There is an opinion that laying laminate can only be done horizontally or vertically. This is a fundamentally wrong approach - there are other installation methods that allow you to add variety to the design of the room and achieve interesting visual effects. One of these methods is diagonal laying of laminate flooring.
Laying laminate diagonally
If you follow the instructions, the laminate is laid strictly vertically or horizontally. This is a standardized approach, which in geometrically complex rooms can even create additional difficulties.
You can add sophistication to the design by laying the laminate diagonally. This method does not in any way affect the service life of the coating or its reliability, but the room acquires a certain style, and in a situation where the room has rounded walls, protrusions and other geometric elements, the diagonal type of installation is much better suited.
Important! With the horizontal/vertical installation method, the coating lies parallel to the wall. Diagonal laying requires an angle of 30-45°. It is determined depending on the wishes of the owner and the geometric specifics of the room.
This installation method allows you to create the effect of increasing space. An interesting solution from a design point of view would be to use lamellas of different shades, which will visually increase the coverage area, focusing attention on the corner parts - for this, lamellas of a darker color are selected in the corners.
Advantages and disadvantages
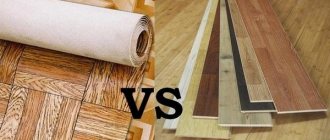
Laminates and parquet boards are a worthy material not only due to their interesting and effective color, as well as texture that imitates a wooden surface, but also due to the ability to give the interior of the room special comfort and coziness. This covering option allows you to influence the overall visual perception of the room. Professional craftsmen note that when laying laminate flooring, it is possible to visually enlarge the room. The material can be laid in a straight line or across the room, which helps visually adjust the volume of space.
We advise you to study - Brick walls in the kitchen interior - decorating rules and creative photo ideas
However, the diagonal laying method is neutral. This arrangement of lamellas allows you to visually add volume to the room. Floors with diagonal laying of laminated boards always look stylish and attractive. Laying laminate flooring correctly diagonally with your own hands is not at all difficult. Before starting work, it is recommended to find out what is good about this installation and where to start laying such finishing material correctly.
Pros and cons of diagonal laminate laying
Laying the laminate diagonally is best suited when the room uses a minimum of furniture. This method allows for the possibility of varying the nature of the drawing, allowing you to create real masterpieces.
The disadvantage of this method is the increased consumption of material, as well as high labor intensity, which leads to increased costs for layers if the process is not carried out independently.
However, the installation process using a diagonal method is not much more difficult than the horizontal one. For this reason, it is quite possible to handle the installation yourself.
The sequence of laying laminate of the indicated varieties
Laminate laying technology.
Laying the laminate begins from the left corner of the room. Before laying, you need to measure the width of the room and calculate how wide the last row will be. This is necessary so that when laying out the last row there is no gap of 2-3 cm along the wall. It will not be possible to cover it with a plinth, and making a thin strip of laminate is very problematic.
Related article: How to clean polyurethane foam from linoleum: tips
The remaining width should be at least 5 cm. To do this, the panels of the first row are cut to length. A gap of 1 cm is left between the walls and the laminate for thermal expansion. Then it is covered with a plinth. In this way, the first row of panels is assembled from left to right. The right edge panel should always be trimmed, taking into account the gaps. They begin to collect another row from the remaining segment. This results in the required seam spacing, which is recommended to be 30 cm.
Having made the first row, wedges are inserted between the wall and the laminate to ensure the required gap.
The main thing is to ensure that the row is straight. Sometimes the straight position of a row can be disrupted due to the fact that the wedges tend to fall out when the panels of subsequent rows are hammered. You can fix the first row with self-tapping screws and washers on a wooden base, or dowel-nails (on concrete). They are screwed into the corners and at the joints of the panels of the first row. After completing the installation process, the screws are dismantled.
When laying laminate with Lock type locks using the gluing method, each subsequent element is joined first along the long sides, and then along the short ones.
Laying interlocking laminate.
When using a laminate with a lock like Click, first make up a complete row of panels and then insert it into the previous one. If the width of the room is large, it is better to take a partner to help, since this procedure is inconvenient to perform alone.
It is convenient to carry out installation by tapping laminate dies with special devices. If they are not there, the laminate is tamped through a segment (10-15 cm) of the panel, orienting it into the groove with a tenon. By mounting the right elements of the row at the edge and the last row, it can be pressed from the wall surface with a small nail puller. This should be done carefully, using pads, so as not to harm the walls and laminate.
Upon completion of assembly, the baseboards are installed. They should be attached not to the floor, but to the wall.
When choosing the direction of installation, the first thing to consider is that the pattern and structure of the material are combined with both the geometry of the room and its illumination. You can choose from several assembly options: direct laying along the light line, across the light line, diagonal laying. If this is provided for by the design of the material locks (which should be indicated on the packaging), the laminate can be laid out in squares, herringbone, or any other pattern.
Related article: Creative decor: Roman blinds combined with tulle
Return to contents
The main advantages and disadvantages of laying laminate flooring diagonally
Pros:
- Suitable for rooms with complex geometry;
- Allows you to visually increase the space;
- A winning option with minimal furnishings;
- Becomes a decoration of the interior of the room;
- Suitable for continuous floor finishing with lamellas, without joints or thresholds.
Interesting: modern designers use this type of installation to zone a room. This can be achieved by combining different textures and colors of slats in a given room.
Minuses
- Increase in consumables. This method requires an average increase in material consumption of 15%, compared to horizontal or vertical laying of lamellas.
- If specialists are hired for installation, they will demand a large payment for such work.
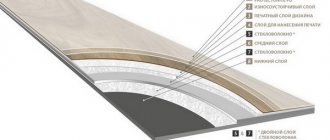
Laying the underlay
Underlay for laminated floors.
Its thickness should be no more than 4 mm. There is no need to make the backing thicker, as this will again affect the wear resistance of the locks. Nowadays there are plenty of materials to choose from for the substrate. The cheapest are substrates made of polyethylene (penofol, isolon, etc.).
Cork bases are the most environmentally friendly, but they are also the most expensive. Extruded polystyrene foam is also used, which is rectangular sheets with a corrugated side.
The choice of substrates is rich and is constantly updated with new types of materials. The service life of such a substrate (from any specified material) is significantly longer than that of a laminate. You can choose any variety based on its cost.
When laying the laminate on a concrete base, a waterproofing layer is placed under the substrate. To do this, use ordinary polyethylene with a thickness of 0.2 mm or a similar film.
The laminate must be left for at least 48 hours before use in order to adapt to the room conditions. It is better to carry out installation based on where the light falls in the room. If laid crosswise, the joints begin to cast a shadow and become even more noticeable, distorting the integrity of perception.
Article on the topic: False panel for the kitchen photo: how to attach, installation, video
Methods for laying laminate flooring require different options for attaching the dies.
Return to contents
Laying laminate diagonally with your own hands
You can install laminate flooring yourself using this method. The technique is practically no different from the usual laying of laminate, but requires compliance with certain features. By following them, you can save money by doing all the work yourself.
Material stock
Before you begin preparation and installation, you need to make sure there is a sufficient amount of laminate. The principle of laying using the diagonal method is similar to the horizontal one, but the outer panels will be trimmed on both sides of the row, and the cuts will be triangular.
Due to geometric features, the diagonal laying method requires increased laminate consumption. The required amount is calculated in a fairly simple way - take the area of the room for standard installation and add 15% additional material.
For those new to styling, it is recommended to use this surcharge, although for experienced professionals it can be as little as 5%.
If you plan to use an angle of less than 45°, then there will be even more waste, which means increased material consumption. For this reason, 45° is the optimal laying angle.
Surface preparation
The preparation process for laying laminate diagonally is normal. The most important thing is a perfectly leveled floor. It is mandatory to use a substrate under the laminate, which performs many important functions, including smoothing out height differences, sound and heat insulation.
Important! The substrate allows you to smooth out mini-differences. Its presence does not mean refusal to level the floor and fill the screed.
The surface must be thoroughly cleaned of debris and moisture is not allowed. Otherwise, there is a high chance that the laminate will deform in the very near future.
Laying from the corner
This is the most commonly used installation method. It is best to place the long side of the lamella in the direction of the sun's rays falling through the window. In this case, the joints become less noticeable. The cuts behind the walls are covered with plinths.
The initial rows will consist of a trimmed trapezoidal board, the upper side of which is equal to the side of the trapezoid of the previous lamella in the row.
There are a number of tricks to keep in mind when using this method:
- To create a uniform cutting angle, you should make a single template according to which the lamellas will be cut;
- If there is more than one lamella in a row, it is necessary to cut off a small triangle at the first lamella on the left;
- Assembly is carried out along the short ends, after which the row is connected to the already laid laminate;
- During the installation process, you need to tap on the short ends to compact it, but this must be done carefully - they are much more fragile than the long side;
- The last row with this type of installation is formed by cutting the lamella to the format of a small triangle.
The rest of the installation process is standard.
Technology
Before starting work, you need to prepare the necessary tools:
- Hacksaw or jigsaw;
- Hammer or mallet;
- Square;
- Roulette;
- Pencil or marker;
- Scotch;
- Stationery knife.
It is also best that before starting work, a plan drawing of the diagonal layout is drawn up, which will clearly indicate how many boards are needed and how to lay them correctly. This diagram will help both when purchasing the material and when installing it, placing the drawing in front of you.
We advise you to study - Laying laminate flooring with your own hands: step-by-step instructions
First you need to thoroughly clean and make the floor smooth and clean. After this, the underlay is laid over the entire surface of the floor. Joints and seams are sealed with tape. Excess pieces are removed with a knife.
You need to decide whether the room will be without thresholds or with thresholds. If there are thresholds, you need to calculate the gap from the material to the wall and make a workpiece to maintain this gap.
We start laying from the corner of the room. You should always take into account and cut holes for pipes in advance.
You need to lay the parts diagonally with your own hands in the same way as when laying bricks. It is necessary to make offsets of 25-35 cm so that the coating is stronger and does not deform at the joints.
Parts must be trimmed at the same angle. You can use a pre-prepared template, and for a 45 degree angle you can use a regular square.
When a row consists of more than one floorboard, they will first need to be assembled into a row. Only after this can a whole series of parts be laid out at once. You can immediately assemble a trapezoid with corners, but there is an option to assemble only the long parts, and measure and saw off the corners separately. To compact the parts perfectly, you can use a hammer or rubber mallet.
Using this technology, row after row goes until the opposite corner. There is a small corner left at the end. It is necessary to mark it correctly and carefully insert it into the right place.
For waterproofing, the joints of the elements are coated in advance with a hydrophobic compound or silicone.