Well waterproofing work
The well requires mandatory waterproofing, no matter how paradoxical it may sound. There are a number of reasons for this.
- The water in the well should always be clean. Dirty groundwater should not get inside through the walls of the well. Groundwater is located closer to the earth's surface than the water lens from which water flows into the well. In the soil there is enough of all kinds of decomposing organisms, there are fecal matter, pathogenic bacteria, chemicals for agricultural needs, etc. If such liquids are allowed to enter the well, its contamination is inevitable. It is prohibited to use such a well for collecting drinking water.
- Waterproofing is necessary to preserve the structure and strength of the reinforced concrete walls of the well themselves. Concrete, although it seems durable, is destroyed under the influence of salt and acid solutions coming from the soil. The material becomes loose and, losing strength, begins to crumble, which, in turn, allows groundwater to penetrate the well and contaminate drinking water.
Waterproofing work is aimed at creating protection for concrete well rings and sealing the joints between them.
- It is reasonable to carry out waterproofing at the stage of well construction, that is, even before lowering the rings into the shaft. This makes it possible to waterproof the surface of reinforced concrete parts, both internal and external. This will significantly increase the wear resistance of parts and prevent groundwater from flowing through the walls of the well.
- External waterproofing is carried out using the coating method, after which roofing felt is glued in several layers. However, rings with such a coating are very difficult to install. Therefore, it is better to use impregnating waterproofing. The outer surface of the well walls is treated with a specialized compound. Penetrating deeply into the material, it fills the pores of concrete and then crystallizes. This creates high-strength protection that is not afraid of the effects of soil chemical compounds. It’s better not to skimp and prime the walls not once, but twice. Then the waterproofing will last as long as the reinforced concrete rings last.
- To waterproof an old well, you will have to push the soil away from its walls 3-4 top rings down. After drying and cleaning the surface of the well walls from dirt, you can treat them using the coating method, followed by gluing them with roofing felt in several layers. For the first layer it is better to use ground mastic. If you use pure bitumen, it will dry out and crack very quickly - this material does not last long.
To create external insulation, it is necessary to make an external bedding, a clay barrier and a concrete blind area. But it would be reasonable to carry out this work after laying the pipes and carrying out work on insulating the top of the well.
Another important task is to carry out work to seal the joints between the rings. When installing a well shaft, a sealant can be immediately placed between the rings
To do this, you can use “Gyrosolite” or “Barrier”. The seal is elastic, fills joints well, expands in volume when exposed to moisture and thereby prevents the penetration of groundwater. When dealing with an old well, repair of the joints is clearly necessary. Having separated the joints to a depth of 3 cm at an angle, you should take an iron brush and clean them well. Existing leaks are eliminated using a “water plug”. This is AQUAFIX. The product is a cement composition that instantly hardens upon contact with water. Then you can take a repair compound (for example, MEGACRET-40) and seal the resulting cavities. The composition adheres remarkably even to wet surfaces and does not shrink. On the inner surface of the well shaft, all kinds of flaws are repaired in a similar way.
When the repair composition has dried, you can begin to waterproof the inner walls of the well. As noted above, when installing a new well, the rings should be processed in advance before assembling the barrel - then only the joints will remain to be sealed.
AQUAMAT-ELASTIC coating insulation has proven itself well. It is a two-component cement-polymer mixture that is absolutely environmentally friendly and does not affect water quality in any way.
Before coating with coating insulation, the concrete surface must be moistened with water. The mixture is convenient to apply with a wide brush. You can apply waterproofing tape over the first layer of the mixture that has not yet dried at the joints. The second layer is applied after the first has hardened. To re-apply the insulation, the walls no longer need to be wetted with water. After the second layer has dried (about a day), the well is considered reliably protected.
Laying water pipes
How to do piping
The water supply to a home can be based on any source, but the effectiveness of the system depends on how correctly we lay the pipes. For a country house, products made of metal-plastic, polypropylene or polyethylene are usually used, which are connected either using fittings or welding.
Trench with pipes
The general algorithm for laying pipes includes the following operations:
- Installation of the supply pipe. We dig a trench from the house to the pit using the head of a well or a caisson with pumping equipment. The depth of the trench should be from 1.5 to 2 m, which will prevent freezing of the water pipe in winter.
- Registration of entrance to the premises. We make a hole in the foundation or base into which we insert a metal sleeve with a diameter larger than the diameter of the pipe. Through the sleeve, which will provide protection against deformation during building subsidence, we bring the pipe into the room. We carefully insulate the hole.
Drilling a hole in the foundation
- Preparation for installation of water supply. We apply markings on the walls for laying pipes. For open installation, we attach brackets to the load-bearing surfaces on which the pipes will be fixed. If hidden installation is planned, we make grooves in the walls using a wall chaser or a hammer drill with a chisel attachment. We also install brackets for pipes in the grooves.
Photo of groove for hidden gasket
- Water supply connection. At the entrance to the house we install a ball valve, to which we attach a manifold. We connect the pipes of the water supply system to the collector with our own hands, which we divide into several circuits. This installation scheme allows you to optimize the pressure: when one tap is opened, the pressure in other areas will not drop.
Collector wiring diagram
- System assembly. We connect metal-plastic pipes to each other using press fittings. We install polyethylene and polypropylene products by welding, using a special soldering iron for connection. We fix the pipes on brackets (openly or in grooves). We connect shut-off valves, plumbing fixtures, faucets and other points of consumption.
Installation diagram using press fittings
Scheme for soldering polypropylene pipes
Before sealing the grooves and performing finishing work, it is advisable to test the system. During the test run, we check the quality of the pipe connections, the operation of the control automation and the functioning of the pump pumping water from the well or borehole.
How to provide hot water supply
To ensure the proper level of comfort, you should think about installing a hot water supply system.
So that we can wash ourselves, wash dishes and take a shower with hot water, we can use a variety of devices:
- Water heating boilers - gas or solid fuel. They can be either single-circuit (for heating water only) or double-circuit (hot water supply + heating). To use the system, a separate pipe with cold water is removed from the collector, connected to the boiler, and a separate hot wiring is carried out from the boiler.
Heating and hot water supply system based on a solid fuel boiler
- Storage water heaters. Such a heater is a container from 50 to 100+ liters, inside of which there is a heating element. Water enters the tank, is heated to the required temperature, after which the heating element is turned on only to maintain the desired degree of heating. The reservoir is replenished as you use it.
Storage water heater installation diagram
- Instantaneous water heaters. They are used either in the smallest country houses without a shower, or in large cottages in separate sections of pipe distribution. The flow-through heater is mounted on a cold water pipe directly in front of the point of consumption. Heating occurs when liquid passes through the body of a device with an electric or induction element.
Flow heater
As a rule, a water heating boiler is installed in a house that is used throughout the year. Storage and flow devices are suitable for summer houses, as well as for buildings in which hot water supply was installed after the heating system was installed.
Small installation tricks
Before starting work, a diagram or design of the water supply system is drawn up. The diagram must include all elements of the system with a calculation of the diameter of the pipes used and the number of auxiliary parts (couplings, fittings, volume of insulating material). It is better to prepare a trench for the pipeline in dry and warm weather.
Step-by-step installation instructions:
- Project preparation.
- Preparing the trench.
- Preparing the pump and hydraulic system, checking the configuration.
- Insulation and installation of pipes in the trench.
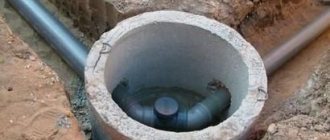
- Installation of water intake elements in the well (you must remember that you will have to drill concrete rings in the well to install the water intake element, so you must have an impact drill or other powerful tool).
- Connection of all installed elements to each other.
- If the wiring in the house is installed in advance, the system is immediately checked for leaks. If the water supply is uninterrupted, then the trench is subject to further insulation and covering with soil, if necessary.
The tightness of the water supply structure at the joints is ensured using a special silicone-based sealant.
The submersible device is lowered into the water. During water intake, the device should not be interfered with by the filtration elements used at the bottom of the well pit.
Installation
Depending on the complexity of the project, installation can be simplified or complicated. But the basic steps still remain the same:
- Creating a trench from the water source to the pipe entering the house. The depth depends on the season.
- Communications on the site are installed and insulated.
- Installation of a shut-off valve at the entry point into the house.
- Pump connection.
- Checking the correct operation of the system section outside the house.
- Wiring is carried out indoors. At the same time, filters are installed.
- The area inside the house and outside the house are connected to each other.
- The last check of the system as a whole.
There are several ways to insulate pipes. For example, you can use materials such as:
- Expanded clay.
- Foam chips.
- Foamed polyethylene and others.
If there are no problems with electricity, then winter water supply can be installed together with a heating cable. This is the most effective way of protection.
The difference between a summer water supply system and a winter one
If you visit your dacha exclusively in the summer, during the holiday period, then the summer system will be the best option. Winter is suitable for those who constantly live in the country or often travel outside the city, regardless of the season.
The collapsible water supply design consists of lightweight plastic pipes, flexible hoses and connecting elements that can be quickly unscrewed or removed
Features of summer water supply relate to its performance and installation conditions.
Here are a few nuances that you need to know:
- with the lightweight summer version, the pipes are buried to a depth of 0.5 m to 0.8 m, that is, the freezing horizon is not taken into account (for comparison, the winter pipeline is laid in deep trenches, from 1.5 m and deeper, depending on the region);
- pipes for temporary use do not require additional insulation (permanently used communications require additional thermal insulation or electrical heating with a special cable);
- installation of the pump does not require large investments - it is enough to put on a casing or install a canopy (a constantly working mechanism is usually installed in a specially designated enclosed room or in a caisson);
- a stationary water supply system needs a drainage device, just like the winter capital version, however, for dismountable systems this nuance is not relevant, because the drainage occurs during the dismantling process;
- for lightweight installation, wiring with a serial connection is used, for permanent installation, with a collector connection;
- The operation of a seasonal system is often ensured by a submersible or surface pump; the functioning of a permanent network occurs thanks to a pumping station, and, if necessary, with a storage tank and a water heater.
It is clear that the installation of a winter version is a more serious undertaking that requires sufficient material investments. The status of a summer water supply largely depends on its type: you can choose either a permanent permanent structure or a collapsible “temporary structure” for 2-3 months.
Water supply by surface pump
Surface pumps are installed outside the well; these are inexpensive, reliable devices, but are more suitable for use in the summer.
Pros: Easy to set up, repair, maintain.
It is installed next to the well into which the hose is lowered. The pump is connected to the electrical network.
A significant disadvantage is the loud noise and water supply from a depth of less than 8 meters and only with an ejector.
To optimize work, you need to automate the entire system, which is also necessary for security. If the water stops flowing, the pump will turn off and will not burn out.
To make an independent water supply to the house you will need:
- Surface pump.
- Hydraulic tank.
- Pressure switch.
- Additional mounting elements.
If you have a tank, you can store water and the system itself will not run idle, which will significantly extend the operation of the pump. If there is no pressure gauge in the hydraulic tank, install it separately.
Hydraulic tank or barrel tank
Instead of a hydraulic accumulator with a surface pump, you can use a regular plastic tank-barrel. Install it on a stand, as high as possible from the ground, so that there is good pressure in the house.
To make the system automatic, a float sensor is mounted in the storage tank; it shows the water level and, if it has dropped significantly, sends a signal to the switch. Then the pump starts working until the tank is filled.
Where is it installed? Tank installation requirements:
- Close to the water.
- The surface pump is placed in a shelter. For summer use it is enough to make a cap (roof), but for year-round use you will need to build a warm, heated room.
- The place where the pump is located must be well ventilated, with a low level of humidity, so that the metal does not corrode.
- The room is removed from the house and from neighbors, the surface pump is noisy and even in the basement you cannot do without soundproofing.
With any option, the following conditions must be met: proximity to the well, sound insulation and protection from frost.
For year-round use of a surface pump, it is better to build a mini-boiler room next to the well.
How to connect
There is less hassle with a surface design than with a submersible one, but a number of conditions will need to be met for the work to be effective.
List of required materials and tools: ·
- Pipes going from the pump to the tank.
- Fitting (connects the hose and pump).
- 2nd input adapter.
- Hoses: intake and irrigation.
- Check valve and filter.
- Various fasteners.
If the system is equipped with a hydraulic tank, buy a pressure gauge and pressure switch. A float sensor is needed when installing a storage tank.
Tools you will need:
- a set of wrenches and wrenches;
- roulette;
- insulating materials;
- building level;
- device for soldering plastic pipes, etc.
Base installation
The entire installation with the pump is mounted on a strong, stable base to eliminate the slightest tilt or vibration. The base can be a shelf made of solid wood, mounted on a brick or concrete wall using metal brackets.
To secure, use anchor bolts, and it is better to place a rubber gasket under the body. It acts as a shock absorber and dampens vibration.
Supply hose
A check valve and filter are attached to it on one (lower) side using a coupling with an external thread. You can buy a ready-made design with a coarse filter.
The upper end of the 32 mm hose or pipe is attached to the pump using a fitting. The finished hose is lowered into the well, the check valve should be immersed in water by 30-50 cm.
Installation to water supply
When the wiring around the house is done, the pump with the hydraulic barrel is installed, you need to remember that the horizontal part of the hose is installed with a slight slope. All connections made on the threads are sealed using FUM tape.
Pipes from the pump to the house can be made surface or laid in the ground with mandatory insulation.
The principle of laying a pipeline with a submersible pump
In order to ensure that there is constant water in the dacha, we select water supply for a private house from a well using a submersible pump. It is better to immediately buy good polypropylene pipes (or polyethylene pipes with a wall width of 3 mm) for cold water supply, rather than laying a regular hose that will last 1-3 seasons.
If a water heater is installed in the house, then pipes for hot water supply, more durable with a layer of aluminum foil or fiberglass, are diverted from it.
The diameter of the pipes is optimally 32 mm, they are laid in the ground at an angle, and every 15-20 cm they raise it slightly when looking in the direction from the building to the well.
What you need to buy:
- Submersible pump.
- Cable (suspended) with a diameter of 3 mm.
- Relay (type RDM-5), which operates dry. Fittings, ball valves.
- Filters for purifying coarse and fine impurities.
- Pressure gauge to monitor the functioning of the pump.
Source requirements
When drawing up a water supply scheme, be it water supply in a country house or installation of a system in a private house, we must not forget about SNiP. Here are a few technical specifications to follow:
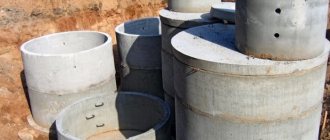
- The mine must be deep. At least four to five reinforced concrete rings.
- The material from which the well is assembled must be reliable and durable. A reinforced concrete ring with a diameter of 1.5–2.0 meters, with a groove assembly system, is best suited. Instead, you can use reinforced concrete pipes with a diameter of at least 800 cm, installed vertically with the socket up.
- An optional requirement is external sealing of the rings with a HDPE sheet. The new advanced technology will be a barrier to silt and clay, which in any case will penetrate inside. Here you should remember that you still have to make holes in the ring, otherwise the source will simply dry out.
- When installing a source, be sure to pour 20–30 cm of sand and gravel mixture at its very bottom, and it is best to sift with coarse stones.
- After installing the well, it is completely filled with screenings or ASG. Since water must penetrate into the shaft, it cannot be made too airtight.
- The final requirement would be an absolute ban on the use of metal. Over time, it will begin to oxidize and rust, and no filter will help here.
Advice: when using the source year-round, its upper part should be insulated, especially the head.
Types and methods of water supply to a private home
From the perspective of the dependence of the water supply source on external factors, two fundamentally different types of water delivery to the user can be distinguished:
Centralized water supply at home
In essence, the same autonomous, but within the region. In this case, the user does not need to worry about arranging a source of water. All you need to do is connect (cut into) the central water main.
Connecting the house to the central water supply
All actions come down to the step-by-step implementation of a number of requirements, including:
contacting the regional utility organization MPUVKH KP "Vodokanal" (Municipal Enterprise "Water Supply and Sewerage Management"), which controls the central main;
obtaining technical characteristics of the insert. The document contains data on the location of connection of the user's pipe system to the main line and its depth. In addition, the diameter of the main pipes is indicated there and, accordingly, instructions for choosing home pipe distribution. The water pressure indicator (guaranteed water pressure) is also indicated here;
receive an estimate for connection, which is developed by a utility or contractor;
control the execution of work. Which are also usually performed by UPKH;
perform system testing.
Advantages of central water supply: convenience, simplicity.
Disadvantages: fluctuations in water pressure, questionable quality of incoming water, dependence on central supplies, high cost of water.
Autonomous water supply at home
You can independently provide water supply to your dacha, private or country house using an autonomous water supply. In essence, this is an integrated approach that includes measures for installing a water supply system, starting with providing a source of water supply, ending with its discharge into the sewer system.
An autonomous water supply system can be presented in the form of two component subsystems:
water delivery: imported, groundwater, from an open source;
supply to points of consumption: gravity, using a pump, with the installation of a pumping station.
Therefore, in a generalized form, two water supply schemes can be distinguished: gravity (storage container with water) and automatic water supply.
Using a container (water tank)
The essence of the autonomous water supply scheme for a house is that water is supplied to the tank using a pump or poured manually.
Water flows to the user by gravity. After all the water in the tank has been used, it is filled again to the maximum possible level.
Gravity water supply system - water supply scheme from a storage tank
This method is supported by its simplicity; it is suitable if water is needed from time to time. For example, in a country house that is not visited often or in a utility room.
This water supply arrangement, despite its simplicity and low cost, is too primitive, inconvenient and, moreover, creates a significant weight on the interfloor (attic) floor. As a result, the system has not found widespread use and is more suitable as a temporary option.
Using an automatic water supply system
Scheme of automatic water supply for a private house
This diagram demonstrates the functioning of a fully autonomous water supply system for a private home. Water is supplied to the system and to the user using a system of components.
This is what we will talk about in more detail.
You can implement a completely autonomous water supply for a private home on your own by implementing one of the schemes. There are several device options to choose from:
Water from open sources
Important! Water from most open sources is not suitable for consumption. It can only be used for irrigation or other technical needs. Obtaining water from an open source requires the creation of sanitary protection of places of water intake and is regulated by the provisions of SanPiN 2.1.4.027-9 “Zones of sanitary protection of water supply sources and drinking water supply pipelines”
Obtaining water from an open source requires the creation of sanitary protection of water intake sites and is regulated by the provisions of SanPiN 2.1.4.027-9 “Zones of sanitary protection of water supply sources and drinking water pipelines.”
Storage tank or “Hydraulic tank”
This is a necessary element in the water supply scheme for a private house from a well, regardless of the type of pump. Sensors and an automatic system that controls the operation of the pump are mounted on it.
The capacity of the “hydraulic tank” is from 24 to 150 liters. It is not used as the main water tank. It contains 1/2 liquid (water), which is necessary to maintain the entire system in a normal, operating state. And at 1/2 - compressed air under a pressure of 1.5 A minimizes the likelihood of water hammer, the number of idle on-off switches and provides a small supply of water in case of a power outage.
When choosing a model, take into account the volume of daily water consumed, the area of the house, and the room itself where the accumulator is installed.
Pump selection
A pump for supplying water to a private house from a well is the main element, and the consistency of the water delivery system depends on its correct choice. Pumps are :
- Superficial . The pump itself remains on the surface, and a special suction pipe is lowered into the water.
- Submersible . They are completely immersed in water to a depth, not reaching the bottom by about 1 meter, otherwise it will suck in sand, which will “kill” any, most modern equipment.
The first option ( surface pumps ) is convenient only in the spring and autumn, at summer cottages. The pumps are easy to install, raise water to a height of no more than 8-9 meters, are cheaper and have low efficiency. But they work well only at temperatures not lower than + 4C.
For wells with a depth of more than 9 meters, a submersible pump is best suited. If the water level changes, it is better to buy a pump model with a signal float. If the water level drops to a critical level, the pump automatically turns off.
Performance is an important selection criterion. It is calculated based on water consumption needs at all open water points.
But it’s not worth buying the most powerful pump if the water consumption is average. Running it “idling, dry” will increase the likelihood of a quick breakdown.
What types of pumps are there:
- Vibrating . Budget, not complicated, noisy. Not suitable for automatic water supply systems. They work poorly in dirty water, the pressure is good, low productivity, short-lived and burns well. Suitable for temporary, summer water supply options (Malysh-M BV 0.12-40 10m (240 W).
- Centrifugal . The best option, meets most of the characteristics required for wells. They work at great depths, have good performance, and are not noisy. Expensive and complicated.
- Vortex . They have high performance qualities, are simpler in design, cheaper than centrifugal ones, survive the ingress of air, but cannot tolerate even the slightest impurities in the water.