Today there are a huge number of technological possibilities for arranging a concrete floor in an apartment or private house. You can use a variety of insulating, insulating, and flooring materials, apply “warm floor” technology, and level the concrete surface with self-leveling solutions.
If a moisture-proofing membrane is spread on the floor, then the logs are laid on it without a gap.
However, such an option as laying on a concrete floor does not lose its relevance. This option of flooring over a concrete floor is especially in demand in the construction of private houses, where the ceiling height allows it. In addition, laying on a concrete floor makes it quite easy to use inexpensive types of insulation materials.
Joists in the floor system
The floor frame consists of several levels, starting from the foundation with a grillage and ending with a base on which the finishing coating in the form of tiles, laminate, parquet, linoleum, etc. is laid. The material for the base is usually a concrete screed. It is less commonly used in wooden houses, but, for example, city apartments and private brick cottages cannot do without such a platform. The screed can serve as both the final layer of the frame and the load-bearing layer in relation to the upper part of the base. The logs form a kind of superstructure over this structure. They are not laid on a concrete floor in a continuous manner, but with indentations similar to a lathing. The methods of fastening may be different, but the basic quality of the structure will be determined by the characteristics of the tree itself. The joists must be well dried, free from minor flaws and, if necessary, treated with special impregnations. These can be fire-resistant agents to prevent fires, or ordinary drying oil, which extends the service life of the material.
Preparing the base before laying joists
Most residential buildings have concrete floors. To lay the logs, they only need to be properly prepared. Of course, such work is quite labor-intensive, but for the long life of the wooden floor it is certainly worth the effort.
Return to contents
Pouring the foundation for joists in a country house
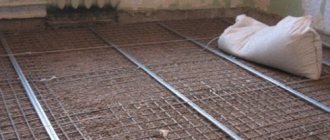
Those who build houses in suburban areas can be advised not to lay logs on the ground, but to install them on concrete, because even compacted soil does not have the same strength as a concrete floor. The easiest way to pour a concrete base is around the perimeter of the strip foundation.
Concrete is poured onto a compacted and horizontally leveled bedding made of sand, crushed stone or AGS, the surface of which must be carefully smoothed to prevent breakthroughs of the waterproofing film laid on it. The ceiling must be reinforced. To do this, reinforcement or rods are placed on top of the waterproofing. There must be a gap between the reinforcing lattice and the bedding so that after pouring the concrete, the reinforcement will be thicker. After the concrete has completely hardened, which lasts about a month, a leveling screed is poured.
Return to contents
Apartment floor repair
Those who are going to lay joists in apartments where concrete floors were installed during the construction of houses should not “relax” either. More often than not, it turns out that foundation repairs are inevitable. True, in some cases it is possible to lay joists on a concrete floor without precisely leveling it (one of the sections will be devoted to this method), but it is imperative to bring the ceiling into proper shape.
The first priority in the preparatory activities is to remove the old flooring. After this, the old screed is removed. Often it ends up in a dilapidated state. To remove it you will need:
- perforator;
- construction hammer;
- shovel.
Using a hammer drill or crowbar, the old screed is removed down to the solid base. Noticeable protrusions also chip off it. After removing construction debris, cracks and depressions in the ceiling are sealed with mortar. After this, the base should be thoroughly dried. In the future, all operations both in apartments and in houses under construction are performed in the same way.
Return to contents
Preparing the base for leveling
An antiseptic composition and primer are applied to the dried base. After this, the overlap is treated with bitumen mastic in 2 layers. The mastic is also applied to the walls to a height equal to the thickness of the future screed. Please note that the smoother you make the screed, the easier it will be for you to install the logs, which all you have to do is lay them on an ideal horizontal surface. Therefore, create a plane before filling it. This operation is simple, but requires patience and precision in marking. To do this you need:
- painting cord;
- hydraulic level;
- dowel-nails;
- roulette;
- synthetic threads;
- gypsum;
- beacon profiles.
Make a chalk mark on one of the walls (near the corner). Apply it at any height. Using a level, place a point at the opposite end of the wall. Stretch a cord rubbed with chalk between the marks and, pulling it back, beat off a horizontal line on the wall. Make lines on the other walls in the same way. Using a tape measure, determine the point on the floor furthest from the chalk line. Place a mark opposite this point on the wall, move up 2-3 cm from it and place another mark. This will be the level of the future screed.
Measure the distance between it and the chalk line and place marks along it near the corners of the walls. Pulling the cord between them, beat off horizontal lines. Along them, drive 3-4 dowel nails into each wall. Pull the thread between the opposite surfaces.
The screed plane is ready. Now you can place beacons under it. They head from the far wall towards the entrance. The extreme profiles are located 15 cm from the walls. The distance between the beacons should be 20 cm less than the length of the rule. The profiles are attached to the base with gypsum cones, the pitch of which is 30 cm. After the gypsum has hardened, the solution is poured and leveled with the rule.
Return to contents
What tools and materials will be required for the work?
Large-format logs will be difficult to process at home, so it is better to calculate and order elements with the required parameters in advance. If this was not possible, then pre-processing the lags will require the use of a jigsaw, a circular hand saw and a grinder. Already in the process of attaching the joists to the concrete floor, you will need an electric screwdriver or an electric drill with bit-type attachments. It is advisable to prepare a more powerful tool - at least with a 1500 W drive. As fasteners you will need metal fastening fittings - anchor elements, bolts, angles, screws, etc. The choice of one or another group of hardware depends on the installation technique.
As for auxiliary consumables, there will be few of them. At a minimum, you will need pads for the joists. In this capacity, you can use plywood sheets or bars of the appropriate format. Also, do not forget about the possibility of installing insulating coatings. The classic design of the floor on joists makes it possible to install both thin vapor and waterproofing insulators and thick insulation in the form of mineral wool slabs.
How to lay joists
First of all, it is necessary to select the highest quality materials. Coniferous trees are perfect for this task. It is necessary to ensure that its humidity is no more than 18%. After purchasing, you should give the beams a little rest, leaving them lying in the room where you plan to lay the floor.
After making sure the wood is ready, you need to prepare the floor. It is cleared of debris and dust, all cracks are sealed, irregularities and protrusions are knocked down. Then you need to take care of waterproofing to protect the wood. Special mastic, rolled materials, and even regular thick film are suitable.
Substrates must be placed under the joists. You can make them yourself from thin pieces of wood, plywood or plastic, or you can buy ready-made materials at a hardware store. Make sure that these elements do not sag or become deformed, as this can cause gaps that are harmful to the wood.
When laying, you need to make sure that the logs stand perpendicular to the sunlight falling from the window. This installation will allow for uniform heating of each beam, which will reduce the likelihood of bending the material.
If fairly strong and thick sheets are chosen as the black coating, then the beams can be laid in fairly large increments. We must assume that the average width of the space between the joists is about half a meter, and the outer beams are placed at a distance of a couple of centimeters from the walls.
Distance between floor joists depending on the thickness of the floor board
After assembly, the sheathing must be positioned horizontally. If desired, you can level the floor using a cement-sand screed, but the design of the joists allows them to be laid on the floor without additional leveling. Instead of a screed, it is enough to place pre-prepared substrates in the right places.
Each support at the bottom must be supplemented with a pad made of a piece of rigid material that is not subject to deformation (for example, linoleum). Soft materials will “sink” over time and lead to squeaks and noises.
Lag fastening diagram
Among the necessary tools:
- Hammer drill (or drill with a special mode);
- Fastening elements;
- Tools for preparing timber and other elements.
Types of floor joists
The most common format of floor joists is a beam with a rectangular or square cross-section, having length and thickness parameters suitable for specific application conditions. Especially for worm flooring, it is recommended to use rectangular joists as the optimal design option. A beam with such a cross-section takes up less space in the underground niche, but at the same time provides sufficient coverage in segments along the width of the installation. Accordingly, attaching the joists to the concrete floor is simplified, since shorter and stronger hardware is required to fix the element.
There is also a division according to the method of manufacturing beams. Planed logs undergo special treatment in order to reduce hygroscopicity. This material is more resistant to moisture, so it can be used in the construction of baths and saunas. An alternative to planed beams is sawn timber. This is a rough material with less attractive technical and operational qualities, but it costs less and can well justify itself as the first level of the floor frame connecting the foundation grillage with the finishing layer of lag.
Calculation of material by size
The ability to cope with loads depends on the correct calculation of design parameters. These indicators, in turn, are determined by the size of the room, layout and configuration of the premises as a whole. For a basic calculation, you can use the span of the room, correlating it with the dimensions of the beam. For example, a 2-meter span must be framed with timber with a cross-section of at least 110 x 60 mm. For 4 m, you will need a beam of 180 x 100 mm format, and for 6 m, a standard size of 220 x 180 mm. In turn, the section will determine the distance between the elements. How to attach joists to a concrete floor so that a balance is maintained between structural strength and an acceptable load on the load-bearing foundation under the beams? After all, placement of timber close to solid can cause excessive pressure on the same grillage. With a board thickness of about 20 mm, experts recommend maintaining indentations of up to 300 mm. At 300 mm, the same parameter will already be 500 mm, and 50 mm elements are located at a distance of 1000 mm from each other.
Preparing for work
During preparation, the greatest attention is paid to the condition of the concrete surface. As already noted, the load from the beams can be critical, so the load-bearing base should be brought into proper condition. To ensure that the fastening of the joists to the concrete floor is reliable and durable, the screed is strengthened with mortars, putties and primers. In case of significant damage, the cover should be renewed with a sand-cement fill of an acceptable thickness - 4-5 cm. If we are talking about local small defects, then we can limit ourselves to the spot application of priming and puttying agents designed specifically for concrete. As a cosmetic leveling solution, it is worth using a thin leveling fill with tile adhesive or a self-leveling polymer composition.
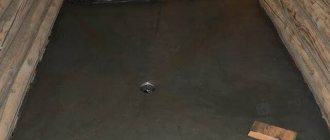
Leveling the concrete base
There are several ways to level a concrete floor.
Classic screed
A universal method used in residential and non-residential premises. It consists of installing a leveling layer of cement-sand mortar . To increase the load, reinforcement of the screed or an additional heat or sound insulating layer can be provided.
Advantages of the method : high strength and long service life, use for all types of coating, reliability.
Disadvantages: high labor intensity, need for waterproofing due to possible leaks, long drying time.
Semi-dry screed
Very similar to the regular classic one. The method is used to avoid unwanted leaks, especially in old houses. This type of screed is used for any type of coating and differs from the classic one in the composition of the mixture and some installation features.
Self-leveling screed
The method is also called self-leveling floors. It differs from traditional screeds in that it is less labor intensive. This is due to the special composition of the mixture, which is sufficiently evenly applied to the base. The horizontality of the coating is ensured by gravity.
Installation of sand concrete floors
Concrete floors must meet several requirements:
- strength and durability;
- chemical resistance;
- tightness;
- environmental Safety.
To ensure these conditions, high-quality materials should be used to install the floor and work technology should be followed. Main stages:
- Preparing the base.
- Installation of concrete screed.
- Finishing device.
- Cutting and sealing seams.
The use of a self-leveling concrete base screed can significantly simplify the construction of a concrete floor.
We recommend reading: Proper pouring of concrete floors in a private house
Basic methods of attaching joists to a concrete floor
The most common installation methods involve fixing the beams using self-tapping screws and anchor connections. A rigid clamping fit is ensured, which ensures that the structure remains motionless even under dynamic loads. How are joists secured to a concrete floor with anchors? To do this, holes are drilled at the designated points of the beam, after which the hardware is integrated according to the standard scheme. The optimal diameter of the anchor bolt is 10 mm, and the length is up to 200 mm. 3-4 fasteners will be enough for one segment.
Floor screed using beacons
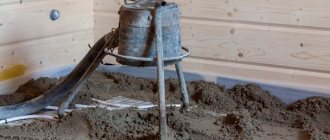
- Along the perimeter of the room, mark zero points on the walls using a water level - marks along which screed level beacons will be placed.
- Before installing the beacons, you need to repair the floor . Fill potholes, chips, cracks, remove debris, remove dust.
- Cover the cleaned surface with a layer of primer.
- Find a point on the surface, the distance from which to the zero mark on the wall is maximum - the first beacon profile will be installed here.
- The distance between the beacons should be 10 cm less than the length of the rule that we use when pouring. We install the beacons strictly parallel.
- In the corner, drill a hole up to 10 mm deep in the floor, insert a plug or tighten a self-tapping screw, the surface level of which will coincide with the zero level. On the opposite side, do the same so that both screws are strictly at the same level. Pull a thread between the screws to orient the beacons.
- When installing beacons, you need to use a mortar, placing it under the beacon profile and ensuring the required height. The installation of beacons along the thread and their level with each other should be checked with a water or other building level. Filling can begin after the mortar under the beacons has set.
- Prepare the filling mixture according to the instructions. Pour the mixture between the two beacons and, moving along them as if on rails, distribute the screed in both directions along the level of the beacon profile. Similarly, place the mixture between other beacons.
We recommend: How to choose and fill a self-leveling floor with your own hands? Screed floor calculator
Angle fastening technique
Another common way to fix lags is using corners. Its advantages include a higher degree of reliability, since the lags are secured to each other. At a basic level, parallel joists are screwed to a concrete base. But as an addition, small-format timber is installed perpendicularly. Connecting corners are installed at the joints with the beams. As a result, a double fixation system is implemented. It is also possible to attach the joists to the concrete floor with corners without the use of intermediate bars. In this case, instead of direct anchor connections, the technique of lateral fixation of beams through the corner to the screed is used. Direct fastening is carried out with screws of a suitable size.
When is floor screed using tile adhesive used?
For screeds no more than 3 cm thick, you can use tile adhesive. It is often used in rooms with low ceilings to install screeds of minimal thickness.
Glue screeds are ideal for quickly leveling surfaces with small level differences. The glue screed is strong, smooth, suitable for any coating.
Sequence of work:
- Fill cracks, chips, and potholes with special compounds.
- Remove dirt and dust, apply primer in two layers.
- Prepare the glue solution according to the manufacturer's instructions.
- Using a spatula, apply the solution to the areas where a thick layer of screed is needed.
- The rule is to stretch the mixture, filling the depressions in the surface.
- After 4-5 hours, if necessary, apply an additional leveling layer.
Features of fastening without drilling
Refusal to interfere with the structure of beams provides many advantages, increasing the durability of the entire structure. But how to achieve reliable position of the lags without the use of hardware? Fasteners will be used, but in relation to auxiliary elements. These are the same consumables in the form of small bars and plywood sheets that should be fixed to the concrete as load-bearing contours of the substrate. The lags will be attached to their platform without drilling. Support strips are initially installed on the concrete floor, after which the beams are laid. Rigid force fixation will be provided using groove connections. They can be provided either in a “lining-logs” combination, or through auxiliary bars running across them, which will be guided along the entire length of the room. This design is complex and requires careful preliminary calculations.
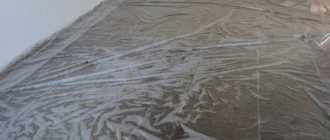
Isolation measures
A layer of waterproofing can be laid before installing the logs, which will facilitate subsequent insulation measures. But experts still recommend starting such work after completing the installation of the beams, since operations with fasteners can damage the laid material. As for the insulation, it is laid in the niches formed between the bars. If the optimized laying of the joists on the concrete floor was carried out only along parallel lines, then there should be gaps between the mineral wool slabs. They are additionally treated with silicone or other sealants, which, in principle, are combined with mineral wool. Pieces of insulation are cut in accordance with the parameters of the empty niches, and then laid on the waterproofing material. As a rule, forceful fixation of mineral wool is not performed - after installation it is enough to cover the material with another layer of hydro- or vapor barrier. In the future, a new layer of wooden planks will be made for the finishing flooring.
Plywood floor
When laying plywood floors, you don’t have to use joists fixed to the base, but install it using adjustable bolts. To do this, threaded bushings are inserted into the plywood. Bolts are then screwed into these bushings. The whole structure looks like a table mounted on legs. Using bolts, it is very easy to set the desired level for leveling the floor with plywood.
Universal instructions for forming wooden flooring in an apartment are available here. Read more about working with plywood here.
The choice of the optimal technology for leveling a wooden floor with plywood determines the condition of the floors and the degree of deviation of the surface “relief” from the norm specified by construction requirements:
- with a difference in height levels of 2 mm, found on an area of 1 m2, even for laying linoleum, which is extremely sensitive to deviations, leveling is not required. Treatment with acrylic sealant or puttying with a homemade mixture of moistened sawdust and PVA glue would be quite sufficient;
- with uniform deformation of correctly laid floorboards with a difference in height levels of 5 mm, leveling the floor with plywood can be done by attaching the sheets directly to the plank floor;
- height differences of more than 1 cm, but not more than 8 cm require the creation of point or strip supports. Essentially, the process consists of constructing a sheathing from timber or from slabs replacing solid logs, for the manufacture of which thick plywood or boards are used.
Correct laying means that the builders alternated boards with different directions of the pattern of annual rings of wood in accordance with technological requirements. This means that bulges-humps or concavities-boats on the floor appeared through one or two boards.
If it is not possible to level a wooden floor without problems with your own hands due to too large fluctuations in height, the structure must be disassembled and built from new lumber. Such serious deviations probably have no less serious reasons.
It is important to note that plywood can be used for dry leveling only if there are no complaints about the technical characteristics of the floor.
A laser device is an excellent thing, but a two-meter level gauge would be more effective as a measuring tool in this case. With its help it is more convenient to study the surface. It is necessary to mark the points in the corners of the room being repaired, find and mark the centers of the lines where the floor and walls meet, and the center of the room.
Regardless of the scope of the work to be done, inspection and repair of the foundation must be carried out. It is necessary to eliminate the creaking, update the fasteners, replace damaged elements, and check the functionality of the “underground” communications.
Before laying plywood, it is necessary to provide the opportunity to “get used to” the conditions of the upcoming service. Material intended for arranging a regularly heated room needs to stand on the edge for a couple of days where it will be laid. In a room that is not spoiled by constant heating, sheets moistened with warm water should stand for at least a day.
All wood floor elements and dry screed materials based on wood veneer or fibers are pre-treated with an antiseptic.
The easiest way to level a floor with plywood is the method without installing joists. Installation of a support beam is not required, since its function will be adequately performed by the evenly distributed tubercles of curved floorboards. In addition to plywood, DSP or GVL boards are suitable for such leveling.
There is no point in leveling a wavy, deformed fiberboard floor. The material will sag during use and repeat all the grooves with tubercles of the rough base.
For a plank floor with floorboards up to 20 cm wide, each of which “swells” evenly, we will buy plywood 8-10 mm thick. If a board more than 20 cm wide was used for flooring, and also if not every floorboard rests with a convex “hump” on a plywood sheet, sheet material will be required with a thickness of 18-20 mm.
The sequence of actions for leveling the subfloor using plywood:
- We will place bosses along the perimeter of the repaired floor to form a mandatory two-centimeter distance from the walls.
- We lay plywood sheets with a gap of 3-8 mm between them to absorb movements caused by moisture fluctuations. When laying several rows, we imitate brickwork. That is, we place the slabs of the next row offset to the slabs of the previous one. There should not be a cross-shaped intersection of four butt seams at one point. The minimum offset size is a quarter of a sheet, the maximum is half.
- We attach them to the “ridges” of the boardwalk at the points with the maximum height established during the preliminary examination. We try to distribute the attachment points evenly, focusing on the distances between the convexes identified as a result of measurements.
It is recommended to drill holes for fasteners in advance in two steps. First you need to use a drill whose size is equal to the diameter of the screw. Then you need to make a hole with the diameter of the cap so that it can be completely recessed in the plywood sheet. The dowels along the perimeter of the plywood sheet should be at least 2 cm away from the edge.
Sheets of plywood with one-sided roughness, intended for subsequent laying of the final coating, are recommended to be laid with the unsanded side up to improve the adhesion of the coating to the leveling layer. It is better to turn the sanded side if you plan to simply mask the screw heads with acrylic sealant and open the plywood with varnish on top.
The technology consists of constructing a sheathing of longitudinal joists and crossbars aligned in one horizontal plane. The perimeter logs are placed at a distance of 3 cm from the walls. The laying step of the longitudinal components of the frame system being constructed determines the size of the plywood sheet. Usually its values vary from 40 cm to half a meter.
Example - if the side is 152.5 cm, then the optimal distance between the axes of both the joist and the crossbars will be 48 - 50 cm. If the side is 122.0 cm, it is recommended to leave 37 - 40 cm between the axes of the support beam.
- Let's start with fitting. Let's lay out the plywood without fastening, adhering to the standard brickwork pattern and ensuring gaps. Let's outline the outline of the slabs; these lines will become guides for future marking of the location of the logs. Don't forget to number the sample sheets.
- Using the markings made on the floor, we first install the joists along the walls. The optimal material for installing strip sheathing under plywood is considered to be a square beam with a side of 40 to 60 cm, variations are allowed. If it is undesirable and not necessary to raise the floor too much, joists can be made by cutting plywood into strips, or using second-grade boards.
- We install transverse jumpers with a step calculated according to the dimensions of the sheet. They are attached to the joists with self-tapping screws, preferably using metal corners.
- We align the logs and transverse elements vertically in a single plane according to the readings of the level gauge. Those wishing to find out how to properly level the surface of an old wooden floor should adhere to the requirements specified in SNiP number 3.04.01-87. According to this collection of standards, it is prohibited to drive wedges made from leftover lumber under the joists. Leveling is done by adding sand, in case of minor deviations by laying roofing material or roofing felt. Most often, a single plane of the joists is achieved by placing wooden spacers under them, such as point supports.
- After leveling, the joist system is attached to the base with galvanized metal corners; dowels, the length of which is three times the thickness of the joist, can be used to fix the sheathing.
- We complete the leveling by laying and fastening the plywood.
The space between the joists can be filled with additional insulation or a homemade screed made from wet sawdust mixed in half with PVA glue.
Apply the mixture, the consistency of thick sour cream, in two or three layers and wait for it to completely harden for two days. In such cases, you can buy thinner plywood for leveling.
It is used to level floors with a slope and with significant differences in heights of up to 8 cm. It consists of installing slats and wooden pads in order to create a unified support system for plywood. Without accurate engineering calculations, it will be extremely difficult for the contractor to cope with a very difficult task.
First you need to try it on, and then carefully calculate the size of each supporting element using the lines marked on the floor. It is necessary to calculate the height and select dimensions very carefully, since all elements of the supporting structure will be different.
The point method consists of installing individual support blocks, cut from boards, OSB boards or the same plywood. The thickness of the block is selected in accordance with the difference between the created flat surface and the actual level. Ultimately, the support system should form a kind of mesh that replaces the strip sheathing.
Since it is inferior to the tape type in terms of reliability and stability, slab linings are installed with smaller increments. You should get some kind of cells with an imaginary square size of 30 cm for sheet material up to 14 mm thick, 45 cm for thick plywood.
And don’t forget about providing underground ventilation! After removing and installing the baseboard, you need to drill ventilation holes in it at pre-existing points. Cover the holes with a ventilation grill.
Have you figured out the best way to level your wood floor with plywood? There's little to do, all that remains is to prepare morally and technically and begin implementing plans. Surely everything will work out great, because the repair procedure does not present any particular difficulties.
Installation of adjustable joists
The most functional design that allows you to adjust the height of the floor to suit your specific needs. For example, it will be possible to adjust the level of the base specifically to the thickness of the insulating material. But how to fix the joists to the concrete floor so that they are adjustable? The fixation system is quite simple and requires the use of only two elements - a rectangular mounting stand with fastening hardware and a threaded stud. The load-bearing function will be performed by a system of stands securely fixed at the points of fixation of the beams using dowels. A pin is installed in the central part of each stand, onto which the timber is subsequently screwed. This is done using a screw and nut, which will allow you to adjust the height of the floor in the future. That is, you will initially need to make holes in the joists with a thickness corresponding to the diameter of the studs.