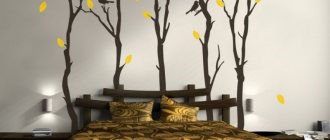
History of drawings on windows
Window art is not a new invention.
In ancient times, people believed in the existence of evil spirits and were afraid that they would enter the home and ruin the life of its abodes. To prevent this from happening, the Celts decorated windows, window sills and shutters with spruce branches. On the other side of the earth, the Chinese decorated their windows with bells for the same purpose. Their melodious ringing was supposed to scare away demons. The Slavs scared away evil spirits differently. Therefore, the tradition of painting windows appeared in Russia only under Peter the Great. The reformer Tsar observed this, like many other things, in Europe. Under the first Russian emperor, people were ordered to put up a festive tree at home and decorate their homes for Christmas. Of course, for a long time this was only available to wealthy people.
In the Soviet Union, houses were decorated throughout the winter holidays. They glued paper snowflakes to the windows and painted them with paints and toothpaste. To this day, Russians are faithful to this cheerful New Year's tradition. Its technology has remained virtually unchanged over the years.
What does the artist paint?
What can you draw on windows? If your imagination is not very developed, then this question will baffle you. Therefore, you can start with a traditional New Year theme:
- Ded Moroz and Snegurochka;
- snowman;
- snowflakes;
- stars;
- present;
- sleigh with reindeer;
- Garlands;
- spruce branches with needles;
- Christmas decorations.
After celebrating the New Year, you can quickly wash the windows and get ready for Christmas. To do this, the symbols of this religious holiday are depicted on the glass:
- biblical scenes;
- angels;
- candles;
- Star of Bethlehem.
New Year and Christmas themes can be diluted with neutral designs:
- funny faces;
- dancing men;
- animals: bears, hares, deer, seals, etc.
- houses;
- candies;
- birds;
- watch.
In fact, what is shown on the window is not so important. The main thing is that the images look light and airy. White drawings are more reminiscent of the “work” of frost on the windows, while colored ones look more colorful and festive.
Second option
For work you will need the following tools and materials:
- Candlestick made of glass;
- Acrylic paints;
- Acrylic outline;
- Paint that gives glass a matte appearance;
- Set of brushes;
- Ordinary alcohol;
- Double-sided tape;
- Foam sponge;
- Cotton buds;
- A set of toothpicks;
- Cotton pads.
Step-by-step description of the work.
First of all, it is necessary to prepare the glass surface for applying paint. To do this, wipe it with alcohol. We decide what will be depicted on the candlestick. You can also use a ready-made stencil or draw a picture yourself. We glue the finished picture using tape to the outside of the candlestick.
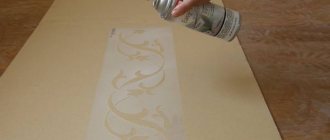
To give the glass a matte look, we use special paint. You can choose any color, for example, golden.
It should be applied with a regular sponge. We distribute it evenly and quickly, as it tends to dry quickly. We wait until the paint is completely dry. Then we remove the previously pasted sketch. After removing the template, empty spaces appeared on the glass that were not filled with paint. In this case, the drawing used was a maple leaf. We outline these places with a contour.
We are waiting for it to dry completely. Then we apply yellow paint. We suggest you do one little trick. Use two types of shades of yellow. Take a lighter tone in the middle, and apply a darker one along the edges. Such a smooth transition of colors will look very harmonious on the product. We remove all unevenness and sloppiness with cotton swabs. Let the paint dry completely.
The final step is to outline the leaves in the form of veins. Remove until completely dry. Then we safely take it and use it for its intended purpose.
Related article: How to make a folding chair yourself?
Tips for beginners:
- If an error was made when drawing the outline and it did not turn out uniform, then in this case you can use a blade and carefully scrape off all the errors, and then continue working.
- When pouring paint, you accidentally went out and stained another element, then in this case you need to immediately remove the paint with cotton swabs and cotton pads before it completely dries.
- Each paint color should have its own brush. To do this, it is better to buy brushes in a set.
We bring to your attention a selection of thematic photos of acrylic painting. Also in the article you can watch several entertaining video tutorials that will help you learn the correct technique for applying acrylic paints.
Vases and glasses:
Paintings:
Candlesticks:
How to make stencils
Stencils are an ideal option for those who do not know how to draw, but really want to decorate their windows with New Year and Christmas scenes. Using a paper template on glass, you can create a real masterpiece with your own hands. Today, stencils can be found in a stationery store or at fairs that take place in many cities on the eve of the holiday.
Attention! Stencils can be purchased complete with special paints in the desired colors or separately.
But if the required picture is not among the ready-made templates, you can prepare a stencil yourself. To do this you will need a small creative kit:
- thick paper;
- scissors (regular + manicure scissors for small parts);
- transparent tracing paper or carbon paper;
- a simple pencil;
- eraser;
- ruler.
Making a stencil is not difficult at all:
- Find a sample drawing in a book, magazine, or postcard.
- Translate the drawing using a simple pencil, applying tracing paper or placing carbon paper under the drawing.
- Carefully cut out the translated drawing along the contour so that its parts remain hollow, but the contour remains intact.
You can also find a stencil on the Internet, print it, or draw it yourself. Then you don’t have to translate it, but immediately cut it out and apply it to the glass.
Painting on glass
To learn how to use stained glass paints and understand how to do it correctly, you should carefully read the recommendations on the technique of performing the work. You can find various master classes on this topic on the Internet. The following steps must be followed sequentially:
- Before you start painting, you must thoroughly degrease the surface with alcohol solutions.
- Draw the contour lines of the drawing using a contour of a suitable color. After drying (this may take half an hour), blots and small smudges are removed with a soft cloth or cleaned with a sharp knife blade.
- Next, use a brush to paint the resulting picture. It should be clarified that you need to carefully apply the composition with a brush so that you do not get an untidy drawing.
- Upon completion, the finished product must be sent for 2 or 3 days to dry.
- Next you need to fix the applied stained glass paint by firing or varnish it. Amateur artists advise, after drying, to place the finished glass product in a hot oven, and then coat it with varnish. After such final processing, the finished painting will delight you for a long time with its bright colored patterns and create a festive mood.
Stained glass windows are easy to care for; it is enough to wipe them with a damp cloth; designs made with amos paints do not wear off and retain their attractiveness for a long time.
Once the technique of painting with stained glass paints has been mastered, there will never be any problems with gifts for loved ones and friends. Receiving an original beautiful thing covered with painting as a gift will be everyone’s dream. This technique also produces excellent vintage paintings that can give you a good mood.
Learning to use stained glass paints correctly (2 videos)
Stained glass paintings in the interior (35 photos)
Preparing the painting
When the stencil is ready, prepare the paints and brushes. You can paint on windows with gouache; watercolor washes off much worse. If the pattern should be white, it is better to use toothpaste. It applies easily and washes off quickly. In addition, an unobtrusive smell of mint will appear in the house.
Now you need to take care of the tools that will be used to apply the paint or paste.
- brushes of different thicknesses and shapes;
- toothpicks;
- foam sponges;
- old toothbrush.
Don't forget about a jar of clean water, where you can rinse your brushes or moisten a sponge to erase the unsuccessful element.
Before painting, the window is washed well and wiped dry.
Drawing technique using a stencil
- Place the stencil on clean glass.
- Using a brush, toothpaste or paints, apply the design to the glass.
- Wait until the drawing dries, only then can the stencil be removed. It's better to do this with toothpicks. If you remove the stencil from a wet design, it will most likely smudge.
- Using a thin brush, add small elements and correct any errors.
- Use a toothbrush to create a splashing effect.
- Use a moistened sponge to correct the drawing.
- Finally dry the drawing with a hairdryer, setting it to the weakest setting with cold air.
Attention! If a child draws on the windows, he needs to explain the safety rules. You cannot climb onto the windowsill, lean on the glass, open the window and draw from the outside.
Decorating your home on New Year's Eve is always fun. Such magical moments bring the family closer together. They are especially joyful for children. Drawing on windows can develop a sense of beauty and a love of creativity in little artists. If parents allow their child to depict something on their own, they may be pleasantly surprised by the child’s ingenuity and imagination.
Stained glass painting, materials and everything you need
Hello, dear pikabushniks!
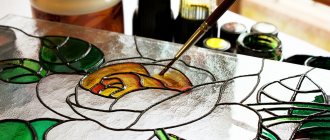
This post, long promised by me, is dedicated to stained glass painting and all the materials and tools necessary for this. And so that it’s not completely boring, I’ll demonstrate some of my works that I haven’t posted yet, and at the same time I’ll tell you how I painted this vase in the Tiffany style:
Let me remind you that stained glass painting is an imitation of classic stained glass using special paints. Also, this type of creativity is sometimes called stained glass, and on an industrial scale there are even special machines for making contours and pouring paint. But we will, of course, consider the manual option.
So, to practice stained glass painting, you need two types of paints: glass contours and stained glass paints directly. All of them, in turn, are water-based (require firing) and solvent-based (do not require firing). The former are non-toxic and allow you to quickly dry the product in the oven - these are definitely advantages. The latter dry out on their own, although they take longer, and do not require any hassle with the oven. But such stained glass paints are toxic and have a rather pungent odor of solvent, so it is advisable to work with them in a respirator and in a well-ventilated area. I use solvent-based paints, it’s more convenient and familiar to me.
Let's take a closer look at the contours.
Contours on glass
- These are thick paints in tubes with thin noses. As the name implies, they are necessary to create contours that imitate the soldering of individual pieces of glass in a classic stained glass window, and are necessary to separate paints of different colors. They are placed on the glass in a voluminous sausage. Also, contours on glass are ideal for dot painting, which I also wrote about earlier.
Many novice craftsmen wonder which company’s materials they should choose. I admit, this choice was not easy for me either, since all masters have their own preferences and what one likes, I may not like. But in the end, I tried several options and chose the optimal contours for myself. I’ll tell you about the characteristics of contours from such companies: Decola, Tair, Pebeo, Lefranc&Bourgeois, Hobby Line.
Decola and Tair are domestically produced contours, but they are very different in their properties. The decolov ones are quite liquid, they spread a little on the glass and settle when dry, which makes the contour not very convex. In addition, it is almost impossible to obtain ideal lines, because air bubbles constantly appear in these contours, as can be seen in the photo (topmost green line). That’s why I don’t use them specifically for stained glass painting, but very often for dot painting. For example, I painted these glasses with Decolov contours:
Secrets of glass painting techniques for beginning artists
Glass painting attracts attention, but for many this technique seems difficult. In fact, mastering this type of painting is easier than learning to paint with a brush.
Nowadays, you won’t surprise everyone with a hand-painted bottle or coffee can. And once upon a time, the art of painting began with huge stained glass windows, striking in their magnificence, in temple buildings, in Gothic cathedrals, and Catholic churches. To a greater extent, it looked like a mosaic made of individual colored glasses, and not like a painting in the literal sense of the word. The modern glass painting technique is somewhat different from ancient technologies; it is quite possible to master it on your own and without significant expenses.
- Development of glass painting technology
- Apparent simplicity and real difficulties
- Preparatory stage of glass work
- How to draw a picture
- Ideas for creativity
- Opportunities for organizing a business
Development of stained glass painting techniques
It is difficult to name the historical homeland of stained glass painting. Although, according to historians and archaeologists, this art originated in ancient times: they could decorate glass products with oil paints even under Alexander the Great. But since glass is a porous material, such drawings did not last long and lost their original appearance. Therefore, the originals have not reached us.
Glass was also painted with oil paints in Rus' in the 16th and 17th centuries. In large strokes, in some places dense, in others with gaps, bright patterns and stylized plant ornaments were laid on pots and jars, as well as on glassware. And in Germany they used the technique of scraping paint from the surface of glass.
Much later, thanks to the efforts of artists and craftsmen, technologies were found that made it possible to carry out drawings by applying paints that preserved transparency and brightness. With the advent of aniline dyes, artists have much more opportunities. No wonder they were immediately appreciated by masters of folk arts and crafts.
Apparent simplicity and real difficulties
Glass painting, on the one hand, is simple and accessible enough to do at home. On the other hand, some skills are required. A steady hand and accuracy in work will help create a beautiful and unique drawing.
If you are ready to tinker with paints, contours, wait patiently for layers to dry before applying the next ones, if you like to turn ordinary household objects into works of art, glass painting will expand your capabilities as a creator. Working with glass instills accuracy and makes you feel like a Renaissance artist.
This technology can be recommended to mothers who are involved in the development of their children in order to develop drawing skills on various surfaces. Under the strict guidance of elders, the child takes his first steps into the world of amazing art.
And starting from the age of 9-11, you can study on your own. For this purpose, there are many offers in art supply stores: sets of stained glass paints, individual tools. Just start and you'll love it.
Preparatory stage of glass work
The list of what you need for glass painting is not very long. The work will require special paints. They are sold labeled as stained glass or paints for glass and ceramic surfaces. Also stencils and special contours. It is with their help that the drawing and its boundaries are applied. You will need brushes of various sizes and shapes, rags to remove excess paint, sponges or swabs to fill large surfaces with an even layer.
Stencil
Before work, the glass must be completely cleaned. This applies to labels if bottles or jars are used for painting. Then be sure to degrease the surface on which the design will be applied. This can be done easily and simply by washing with soapy water and rinsing with plenty of clean water. Allow to dry without wiping, otherwise lint from the towel may remain on the glass.
How to draw a picture
You can study the features of glass painting techniques for a long time, but it is better to try to create your first picture. It is important to choose the image size according to the dimensions of the future masterpiece.
- Pre-print the drawing or draw it on plain paper.
- Place the design on the back of the glass, securing it with tape.
- On the outer surface, apply a drawing outline along the glass.
- Let it dry.
- Using special acrylic paints intended for glass, fill in the patterns using a brush. The process will take time, since it will be necessary to dry individual fragments in order to proceed to the next ones. You can apply the paint in several thin layers to achieve the desired effect.
It is important to allow time for drying, this way you will preserve your work for a long time. Also, for safety, the painting must be coated with transparent acrylic varnish.
Drawing
Creating an outline
Filling out the sketch
Finished work
Fix the finished glass with the pattern into the frame. When exposed to light, you will get a very beautiful image. The sun's rays, passing through the paint, will delight and amuse.
Painting bottles and cans is a little different in that the work has to be interrupted more often so that small areas have time to dry before turning and painting the other side of the product. But the principles are the same. Cleaning glass, contouring, filling with paint and varnishing.
Ideas for creativity
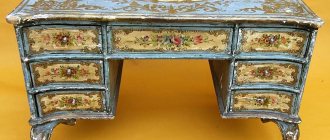
You can paint not only glass blanks that can be turned into a painting. These can be vases, plates, jars for spices and coffee, tea utensils. At the peak of popularity are original wedding glasses, decorated with exclusive patterns. It’s easy to turn an inexpensive candlestick and lampshade into a masterpiece, or make a stylish box from an ordinary jar.
Specialized stores sell blanks for painting in the form of dishes, souvenirs, accessories and watches. If desired, using this technique it is easy to make your own decoration.
All this can be given to friends, relatives and colleagues for anniversaries and holidays, adding a memorable date or a hint of the occasion to the celebration.
Opportunities for organizing a business
Many craftsmen, engaged in this fascinating type of creativity, receive, in addition to pleasure, additional income from their hobby. If the drawing is original, neat, and has an uncluttered plot, then the demand for such a product will be increased.
Despite the fact that the materials for the work are expensive, like everything related to arts and crafts, the cost of the completed product allows you to make a decent markup. It’s good if the jar or bottle has a lid. Then this item can be used for its intended purpose, not only as an interior decoration. Such original items are accepted for sale in the handicraft departments. Online stores offer additional opportunities; today they are available to everyone.
Trying to make something unique with your own hands is a pleasure that has every opportunity to develop into a home business. But don’t rush to think about money, first enjoy the process and master the skill to perfection.
Author: Olga Sedova, especially for the online magazine “Women’s Hobbies”.
DIY glass painting with acrylic paints
Once you want to do something with your own hands, it becomes very difficult to stop at the goal achieved. In addition to creating paintings with my own hands, I became interested in painting on glass with acrylic paints. The originality of things decorated in this way can fit into any interior, especially if it is simple and cozy, like the Provence style. Since I have already mastered this technique and even decorated several glasses on my kitchen set, I dare to share with you my knowledge about the paints with which you can paint.
Painting on glass with acrylic paints
What to paint with?
Glass painting is a fascinating activity. There are several types of paints that differ in their composition, scope, and end result. For example, the first thing people pay attention to is whether the paint is transparent or covering.
To create a beautiful contour that will not allow the colors to mix, there are special contours. If you plan to create a stained glass window, you need paints based on a solvent. This type of paint is characterized by a pronounced smell, but the result is a wonderful stained glass window that can transmit light.
Paint selection
In any store, the seller will advise you which paints are best to use for painting on glass. But before that, he will definitely ask how you will use the paint. There are several options due to which the type of paint will differ:
- Perhaps you are looking for paints for decoration or professional painting
- Maybe you want to give a master class or, on the contrary, practice
- There is also the option of painting with children
Acrylic paints
Acrylic paint contains natural or synthetic pigments, binders and water. Both acrylic and stained glass paints are used for painting on glass. Let's look at the advantages of topcoat paints:
- Are opaque
- They tend to adhere well and are lightfast
- They have a wide palette of shades, while the colors are bright and you can add sparkles to them
- Have good abrasion resistance
- Do not slide off the glass when painting
- Professional paint has no odor
- Can be packaged in tubes, jars or cans
-yourself glass painting
In addition, I want to share my knowledge about stained glass paints, since I managed to use this type:
- Are transparent
- The most common paints and varnishes dry in about 24 hours.
- In order to firmly fix them, they must be heated to a certain temperature. That's why they are called baked
- The pastes are applied using stencils onto the film and when dry they are transferred to the glass.
- Stained glass paints for painting on glass are slightly more expensive than acrylic mixtures
Fixing the applied pattern
When the drawings on the glass are finished, they should be fixed, and I will now tell you how this can be done. It is best to fix a glass masterpiece using acrylic varnish, as it has several features:
- It is non-flammable and has no pungent odor. That is why it is very easy to work with such varnishes indoors.
- Application is quite easy, so even a beginner will not have any problems with this process.
- Has the property of drying quickly, and the material can be diluted with water
- Does not affect the original color of the paint used
- Due to its low cost and efficiency, one can will last you for a long time
Self-painting on glass with acrylic paints
The pricing policy for acrylic varnish is quite good; in specialized stores you can purchase the product at a price of about 150 rubles per 50 ml.
Application
Stained glass paints have their own application technology. First you need to purchase:
- a set of stained glass paints;
- contours for drawing on a glass surface;
- ready-made stencils, which you can make yourself if you wish;
- ethanol;
- brushes;
- cotton buds;
- toothpicks or needle.
Before you paint with stained glass paints, you should choose a pattern. You can take freely available templates and stencils for copying. Further, all work is carried out in stages and in a certain sequence.
Before painting glass, it is degreased with alcohol. If the artist has the talent and skills, then the pattern is applied with a marker. Otherwise, you can fix it on the back side of the product or transfer it to the front side from the stencil using carbon paper.
Each detail must be carefully outlined, avoiding breaks. Then you should wait for it to dry completely, the time indicated in the instructions.
Stained glass paints are applied in a dropwise manner, and then distributed with a brush from the center to the periphery in an even thick layer. Errors should be corrected immediately with cotton swabs, without allowing the coating to dry.
Having painted all the details of the same color, you need to thoroughly rinse the brush, wipe it dry and start working with a different shade. Stained glass paints form air bubbles in their thickness, which can be removed with the tip of a needle or a toothpick. To speed up the drying process of the finished pattern, you can use a hairdryer.
Application of acrylic coating
Painting on glass with acrylic paints also begins with degreasing the working surface and applying the design yourself or using a stencil.
While do-it-yourself stained glass paints are applied only to the contoured drawing, this is not necessary for their acrylic counterparts.
If you make an outline, the image will resemble a stained glass window. And without its use, the pattern will be stylized as a work of painting.
After drying, kitchen set items should be coated with heat-resistant varnish to increase their service life and preserve the colorful designs.
It is worth considering the fact that decorative, heat-resistant water-based acrylic paints dry very quickly, but require baking in the oven for durability.
Use of balloon covers
Aerosol paints are most often used for painting large glass items, although professional artists also use them to decorate small parts. This can be done without extensive drawing experience by using stencils or construction tape.
The following types of aerosol formulations can be purchased in specialized stores:
- oil;
- heat resistant;
- acrylic;
- latex and others.
Most often, aerosol paints for stained glass and other glass products have an acrylic base.
The production of heat-resistant aerosol material for processing certain types of dishes has also been launched.
The advantages of aerosol materials include:
- quick readiness for use;
- ability to penetrate hard-to-reach places;
- good adhesive properties;
- long shelf life without changing quality characteristics;
- no tools required for application;
- resistance to abrasion and fading;
- rich color palette;
- high drying speed.
Despite the abundance of advantages, aerosol paints also have some disadvantages:
- inability to dilute paint with solvent;
- complex application technique;
- mandatory use of stencils for drawing small details - this increases the consumption of expensive paint;
- aerosol materials of different colors cannot be mixed;
- use personal protective equipment such as goggles, a mask or a respirator while spraying.
When using aerosol acrylic paints, you should strictly follow the instructions to avoid the formation of drips and other defects.
When decorating glass surfaces outdoors, you need to choose windless, cool weather.
You can fix the applied pattern using transparent acrylic varnish.
Tips for Newbies
If you are new to painting, then before you paint on glass you should remember a few tips. They will simplify the process of drawing a picture on glass with your own hands.
Painting on glass with acrylic paints
To begin with, choose transparent dishes if you are not drawing on window glass or fittings. You can choose snow-white ceramics as a background - this way nothing will distract you from applying the design. In addition, try to first draw a sketch on a sheet of paper - in the future, your hand will remember similar outlines and drawing will become much easier.
With the help of samples on a sheet of paper, you will get a feel for your hand and complex outlines or patterns will become easy for you to execute. In the moments of the first compositions, it is very difficult to immediately switch from a thick line to a thin one and vice versa, but for beautiful painting such moments are very important. Therefore, do not neglect the opportunity to practice beforehand.
Don't forget to learn to draw flowers. Try with simple ones, and then start more complex petals. At this point, you can try to combine colors yourself and “wedge” any flower into an existing design.
Don’t forget that acrylic paints applied to glass dry within one day, so don’t rush to test your work for durability.
Choosing brushes
You can paint on glass with painting brushes; they are small in size and you can easily create complex patterns. If you decide to decorate a large area, then you should also stock up on construction brushes. Drawings are applied using brushes with a rounded end, but a flat brush should be used to secure your artwork.
Brushes for painting on glass
The choice of brush material is up to you. You can use both natural and synthetic ones. However, it should be remembered that natural bristles are used for water-based paints and varnishes. Don't forget about buying a palette knife. This is the name given to a special metal spatula that is used to mix different colors of paint.
In addition to all of the above, you can view a huge number of master classes that will help you decide on the technique of painting and even drawings. Experienced craftsmen will tell you how to properly hold a brush and apply a pattern to glass. In a professional store, sales consultants will help you choose the necessary paints and brushes - all you need is a desire to create and create interesting patterns with your own hands. Experience does not come immediately, so after the first failure you should not give up what you started. Continue to try painting with acrylic paints and involve your family in this process, because only such moments spent together are remembered for a lifetime.
Let's start simple
There are ordinary glass glasses in any home. Let's give them an unusual look. In this case, we will use ordinary acrylic paints and use a little imagination.
For work you will need the following tools and materials:
- Glasses for painting;
- Acrylic paints;
- Acrylic contour;
- Plain paper;
- Black simple pencil;
- Paper scissors;
- Set of brushes;
- Regular alcohol;
- Cotton pads.
A step-by-step description of the technique of acrylic painting on glass.
Before you start painting, you need to prepare the surface for applying paint. To do this, take a cotton pad, soak it in alcohol and wipe the glasses.
Then we take a white blank piece of paper and begin to draw a picture on it the same as it will be on the glass. You can use ready-made stencils or print the picture you like and use it. The main thing is that the size of the picture matches the size of the walls of the glass itself.
We cut out the drawn sketch and carefully insert it into the inside of the glass so that the drawing faces you.
We outline the sketch. As you can see, the design was also imprinted on the glass.
Do not forget that the contour must be closed, otherwise all the beauty will be ruined.
Leave the glasses until the outline is completely dry. After the outline has completely dried, we proceed to applying paint. Only large areas are filled first. We are waiting for them to dry. Then we move on to smaller details. You can also use small beads as decoration, so the cups will look even more original.
Article on the topic: Crochet openwork sweater for beginners: diagrams with description and video
That's all, and the master class has come to an end. You can paint glasses in exactly the same way, but use, for example, the dot technique. This material can be used as an example, but you can show your imagination and create much more interesting and original ones. The most important thing is not to be afraid to experiment, to practice your skills, then everything will work out.