Ways to create paper furniture with your own hands, diagrams and important nuances
Paper furniture is in demand in interior decoration; you can make simple shapes with your own hands. Another area of application for these items is toys for children. Every child will want to have a dollhouse with beautiful paper furniture made with their own hands. To make such products, you do not need additional origami skills, you just need to follow the instructions provided.
DIY room design using paper
You can find a lot of ideas for decorating a room with paper decor. Each room in the house has its own interior.
The kitchen is a place where the whole family gathers around a cozy table. Using paper napkins will be perfect for decorating household appliances, such as a refrigerator or microwave oven. To do this, you need to choose the color or design of the napkin.
You can also use wall painting in the kitchen (the lack of talent is compensated by the ability to use a stencil). It is also beautiful to place a picture with kitchen paraphernalia on an empty wall.
The whole family usually participates in transforming the living room. There are several ways to decorate this space. The first method is large and voluminous words or letters made of paper. This can be either a surname or any other figure. The second way is crafts from bottles, homemade vases, soft pillows.
The bedroom is a comfort zone and a place for relaxation, so the space needs to be used quite wisely. A garland of paper hearts or a photo collage designed using scrapbooking technique is suitable for this.
Required tools and materials
Origami furniture is an interesting trend that requires special attention. Making such figures does not take much time, and the resulting result pleases adults and children with its appearance. The main feature of the products is their maximum similarity to real furniture items: sofas, tables, cabinets, armchairs and chests of drawers.
It is unlikely that you will be able to use such furniture in real life, but the items will be a good option for creating a model of a future room or designing a dollhouse. To achieve similarity with real furniture, textured paper is used during construction to imitate various surfaces: stone, leather, fabric, wood and metal. When creating objects, it is better to use paint that does not completely saturate the material, but only gives it color.
The following materials are used for production:
- Material for the base – matchboxes, some corrugated cardboard, colored thick paper;
- Pieces of fabric, decorative film and textured paper for finishing finished items;
- Scissors;
- Black pencil or pen;
- PVA glue or any other for working with paper.
You can work with paper yourself, or you can involve loved ones in the process. Then the resulting products will be diverse, but together they will form a single ensemble.
Auxiliary materials
DIY furniture for Barbie dolls from scrap materials is often made from cardboard or unnecessary old boxes. But many parents forget that there are also auxiliary products that will help decorate the surface of finished products and give them an attractive appearance.
Wire: how to make forged furniture
The technology of working with wire has been known for a long time (for example, in the Middle Ages, wonderful jewelry for women was made from flattened copper thread). This idea can be used in making furniture for dolls. Several variants:
- garden swing for Barbie - made using a long piece of wire and pliers;
- chairs made of wire and beer bottle caps - look great in a princess's house;
- bed - a frame for a sleeping place is made from wire;
- decorative flower stands for the house.
Working with wire is easy: you can use it to create several dozen beautiful hangers in half an hour, just using pliers.
Popsicle sticks
Not only cardboard furniture is in demand among children, but also wooden furniture. If you don't have sheets of plywood in your house, popsicle sticks work well. Shelves, tables, chairs, bunk beds, and garden furniture can be made from this material. All models look natural and stylish, and to improve the aesthetics, the sticks can be painted in different colors. A good idea would be to build a staircase for the dolls.
Plastic jars and lids
A common option for creativity are jars and their lids. Plastic products have a round shape, so it is convenient to build a toilet bowl for baby dolls from them:
- To work, you will need cardboard, a jar of yogurt, and a box of toothpaste.
- A toilet seat is cut out of cardboard.
- The pasta box is cut in half - this will be an imitation of the tank.
- A yogurt jar will serve as a toilet.
You can leave the finished product white or continue your creativity and glue on the “seat”, making it from a soft material.
Wallpaper and newspapers
Ideal for decorating house rooms or furniture itself. Colorful and bright motifs will please your child. Having leftover wallpaper in your house after renovation, you can completely recreate your child’s room in a dollhouse. With the help of newspapers it is easy to create a modern interior style and cover some pieces of furniture with them.
How to do the following options
You can make anything from paper. You just need to show imagination and perseverance. Let's consider master classes on making popular types of furniture. Based on detailed instructions, you can make other types of interior items. The most popular are:
To find out how to properly construct paper furniture, you need to consider each option separately.
Sofa
A paper sofa will look great both in a dollhouse and in a miniature copy of a real interior. Before you start, pay attention to the paper sizes:
- For miniature options, you should choose colored paper 10x10 cm;
- For execution in medium sizes, you need to give preference to a workpiece of 20x20 cm;
- To create a large-sized sofa, the dimensions of the material increase proportionally.
The color of the paper can be chosen as desired, but it is better that it fits into the future interior or imitates real furniture. Having selected the materials, you can begin manufacturing:
- The square sheet is folded in half, after which it is opened and folded perpendicular to the first one;
- The next step will be an additional hem. The bottom edge is folded to the middle fold line, then folded again. The output is 3 fold lines, not counting the central one;
- The lower thin strip is folded onto the first fold, after which two identical triangles are laid by folding the side parts diagonally;
- The accordion is folded to the end, and the upper part of the workpiece is bent to the middle. The workpiece is turned over;
- The lower corners are folded up in turn, and the upper corners are bent down diagonally;
- The workpiece is turned over again, bending one corner inward. This is how the back is formed.
After turning the product over, you need to form the legs of the sofa and it will be ready. Such a beautiful and original item will become a real decoration for a toy living room or an original art object.
Dresser
The most optimal and profitable way to create a paper chest of drawers is to use matchboxes. They slide out conveniently, so making the item will not be difficult. If you want to make a chest of drawers out of paper, then you should use paper blanks. This chest of drawers is convenient for storing small, lightweight items. This will perfectly include beads, beads, clasps, clips and other little things for creativity and handicrafts. The top of the chest of drawers can be painted with colored markers, giving it an original look.
How to make great furniture for dolls with your own hands: a selection of ideas with step-by-step instructions
Making toy furniture from cardboard is a quick process, but sometimes it can be labor-intensive. In order not to burden yourself with lengthy attempts to create magnificent furniture from store-bought materials, you should use the means at hand - working with them is easy, safe and fast.
Universal matchbox chest of drawers: a simple master class
If you have previously had no experience in creating models of various crafts, then you can start your creative activity with your child with a matchbox. To make a universal-type chest of drawers, you will need 4 match containers, glue, and finishing materials. Process step by step:
- The boxes are freed from matches and cleaned of excess dust.
- Next, you need to properly glue the blanks: they are stacked on top of each other in a row or 2 boxes in a line.
- When the product is glued, it is left to dry.
- A dried chest of drawers for dolls is decorated: colored paper or remnants of wallpaper are glued to the surface.
To make the model as realistic as possible, you can put small dots on the “boxes”. Painting each element a different color will create a fun and vibrant piece of furniture.
Fireplace from a box
Children love to repeat many things after adults, so they will probably want to install a fireplace in Barbie’s cozy home. To recreate the design of the product, you can view photos of real devices, and then get to work. For the pattern you will need a cardboard box, as well as foam tiles, glue and paints. The step-by-step process looks like this:
- Draw a window for the fireplace on the box and cut it out with a stationery knife.
- A home fireplace for dolls can be corner or rectangular - it all depends on your imagination, so you need to think through the design in advance.
- “Bricks” must be cut out of gypsum ceiling tiles to display the actual masonry. The cutting can take place with the child.
- The resulting rectangles are glued onto the surface of the fireplace.
- The final stage will be painting the product in the desired color.
To secure the paint layer, the fireplace can be varnished - odorless acrylic varnish is suitable for this.
Cardboard cabinet: how to make it yourself
The simplest option for creating a cabinet is to use a ready-made box, where parts of it will serve as doors. But this option is too light and inconspicuous, so you can make a doll cabinet from cardboard with your own hands. The creation process step by step:
- To begin with, it’s tedious to calculate the size of the model and figure out what will be stored in it. To do this, just estimate the amount of clothes the doll has.
- Use a printer to print a layout of the cabinet body, cut it out and glue it together.
- Using scissors, cut the doors for the product, as well as the shelves inside, to size.
- Attach doors and shelves with tape.
- You can decorate the cabinet with a wood look using wallpaper.
Decoration
A separate stage is the decoration of finished products. Do-it-yourself furniture, diagrams of which can be found in this material, is decorated as follows.
| Material | Peculiarities | What is it suitable for? |
| Self-adhesive paper for furniture | This material can be used in the manufacture of any type of furniture. This film is ideal for beginning craftsmen, because it is easy to cut, and the adhesive layer allows you to decorate the surface without any problems. | For tabletops, seats of chairs, sofas and armchairs, for decorating cabinet doors and chest of drawers. |
| Using paints | Paints allow you to show creativity and move away from standards. Using paint you can paint any pattern and design. When choosing a product, make sure that it does not damage the paper base. Acrylic or water-based compositions are preferred. | For all types of crafts, especially for decorating the front parts of products. |
| Application of fabric | The fabric allows you to imitate the structure of furniture as much as possible. | Suitable for sofas, armchairs and chairs. |
If gouache is used for decoration, you need to mix it with PVA glue (1:1). After drying, the paint will not imprint on your hands, and the product will receive additional rigidity.
Do-it-yourself paper furniture will be an excellent option for a dollhouse or designing models of a future interior. Creating miniature objects is a fun activity that you can involve all family members in.
Source
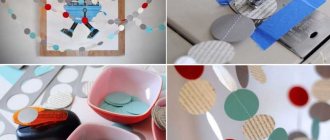
Paper in decoration
Sometimes, in order to diversify the design, a couple of decorated little things are enough, and you can do them yourself.
How to make paper decor? In order to make jewelry from paper, you need to take:
- several types of paper (white Whatman paper, colored paper for decoration, corrugated paper, tissue paper, scrapbooking paper, velvet paper, quilling paper)
- adhesive (PVA, silicone glue, titanium)
- tools (paper scissors, scissors with curly edges, brushes)
- additional materials for decoration (threads, buttons, sparkles, paints, yarn, etc.)
You can always get ideas for decorations from photos of paper decor.
The advantage of ready-made templates for projects
The software offers a selection of ready-made buildings that will be useful to residents of standard houses - Khrushchev, Brezhnev, Stalin and others. The position and area of the rooms, the placement of windows, doors, bathrooms and gas stoves have already been specified. To open the catalog, just click the “Standard layouts”
at the start of the program.
You can also access these templates through the "File"
.
Use templates from the program catalog to instantly create a project
The DIY interior design program offers ready-made layouts with one, two, three and four rooms. Find the one you need and in a few seconds you will receive a design of your apartment, verified down to the centimeter. All that remains is the most pleasant part - choosing the finish and arranging the furniture.
Using the template as a basis, you can design both the entire apartment and a separate room by simply removing the “extra” rooms.
Design a room in a couple of clicks
If you haven’t found a suitable option among the standard layouts, don’t worry. Designing a room from scratch in the Interior Design 3D program is just as easy and quick. The menu is in Russian, a clear and user-friendly interface will make working in the program easy and enjoyable.
Below are detailed instructions on how to design a room with your own hands on a computer. Follow the recommendations and the result will please you.
Step #1. Create a room drawing
To take the first steps in developing a project, you need to download Interior Design 3D for free from the website and install it on your computer. To launch, simply double-click on the shortcut. After opening you will see the start window.
Select the mode for creating a room project from scratch
Create a new project and in the main editor window select the tool for creating walls (the “Draw a room”
).
Use it to build rooms of the desired shape and size. You can use rooms from templates by clicking the Add Room
. In the selection you will find rooms in square, rectangular, L-shaped, U-shaped and T-shaped.
Use ready-made room templates
Complete the basic layout by adding windows and doors. In the catalog you will find regular windows and balcony blocks, double doors and options with an arch.
Install window and door openings in the room
Step #2. Choose interior decoration for the room
Maximum accuracy and realism of the layouts in the program is achieved through a huge selection of materials. A variety of paint colors, numerous wallpapers, dozens of types of flooring from parquet to tiles, different textures of ceilings - you will find everything you need to realize your idea.
Customize finishes for each surface in the room
To change the type of wallpaper, type of flooring and ceiling, select a room and go to the “Properties”
. Switch between surfaces, selecting the desired material from a large built-in catalog in each tab.
When choosing finishing materials, remember that light colors visually expand the room and give a feeling of free space. If your apartment has small, cramped rooms and low ceilings, white wallpaper can visually correct an unpleasant situation.
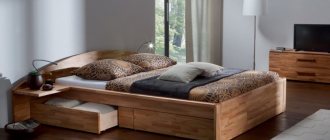
Step #3. Arrange the furniture
The selection of furniture and decorative items is perhaps the most important thing in how to create the interior of a room, because they are the ones responsible for comfort! Click "Add Furniture"
, select the necessary interior items and place them in the rooms. Experiment to find the most interesting solution!
Select furniture from the program catalog and arrange objects around the room
If you see that the selected chest of drawers is facing the wall, do not be alarmed. All objects can be easily rotated, moved, enlarged or reduced. Settings are made through the “Properties” tab.
Pay attention to the dimensions and finishing of the furniture to recreate the interior in the smallest detail. If you want a wenge or white oak cabinet, no problem! Your ideal sofa should be soft lilac - good for your health! Change the base colors and materials of any interior items through the “Properties”
.
Select suitable finishing materials for the furniture in the room
If among the wide range of proposed finishing materials there is no suitable one, do not be upset! You can add your own version to the catalog. Find a texture on the Internet or take a photo of the design styles you like, and then click the “Add your materials”
.
Step #4. Save the room project
When you get the completed apartment interior design with your own hands, take a virtual walk around the room. You can do this by enabling “Virtual Visit”
. The camera can be rotated to zoom in or out.
Evaluate the room design project with a virtual visit
When creating an interior design with your own hands in the program, do not forget to save the project! This reminder may seem unnecessary, but imagine how frustrating it would be if you were lovingly arranging the marital bedroom or children's room, and then the computer turned off due to a power outage. Nobody wants to start work from scratch, so we recommend saving projects often.
Click on the floppy disk button located at the top of the window and select “Save Project”
. Now at any time you can open the designer again to bring your design to perfection. In addition, you will have the opportunity to save the finished layout as an image or PDF document.
By the way, if you add a project to the standard database, in the future you can create something new based on it. For example, if in ten years you decide to renovate again.
The program also offers a convenient layout printing function. Click the button with the printer image and select what type you would like to print. You can leave only the floor plan, the 3D version, or both options on one sheet. Now it will be very easy to compare projects with each other!
Set up the display of 2D and 3D diagrams on the page and save the design project
Do-it-yourself interior design in the program is practically the answer to the question “How to become a designer.” You are given the opportunity to achieve perfection even in the smallest details. If you turn to professionals, they can only take into account your wishes, but no one except you truly knows how to create the home of your dreams. So download the software, use your imagination to the fullest and go on an amazing journey through the world of design!
Other DIY furniture ideas for dolls
Despite the large list of proposed furniture options, there are several more interesting and easy-to-implement ideas:
- microwave. The possibility of constructing a cardboard box immediately comes to mind, but everything is simple here - a regular children's sharpener will do for a microwave. A third-grade child will have an object in his pencil case that just needs to be refined externally;
- fridge. It’s simple to do: cut a blank out of cardboard or paper and fill it with cardboard shelves. You can hang plastic pockets for food on the door;
- washing machine. To work, you need a box of cookies and a glass of yogurt. A round slot is made in the box, a glass is inserted - this is the drum of the machine. All that remains is to decorate and draw the buttons: such equipment can be placed in the bathroom of a toy house;
- dressing table. The simplest product for evening wear can be made from matchboxes. Several parts are glued together in height, then a mirror is arranged. A piece of foil enclosed in cardboard is suitable for it. You can put an imitation of a box on the table, and also make carved elements on the sides from paper;
- bath. Setting up a restroom or bathroom is easy. Previously, we told you how to make a toilet for a doll, and a bathroom is made even faster. No stencils or diagrams are needed here. It is enough to take an old oblong container for food - it will serve as a bathroom. You can use diamond-shaped plastic beads as legs.
To make the atmosphere of a dollhouse real, it is advisable to place flowers in the rooms, hang pictures, and make rugs from fabric.
Cardboard furniture is an excellent solution for children whose imagination knows no bounds. Original, compact and bright furnishings will allow you to create handy home remedies. The combination of several materials will make the furniture functional and reliable.
Source