History of fabric panels
The history of the appearance of the first decorative paintings dates back to the Middle Ages. Unlike paintings that were created on canvas, all kinds of materials were widely used to make panels: scraps, paper, wood or various types of fabrics. Moreover, by combining several seemingly completely incompatible materials, skilled craftsmen managed to create canvases of extraordinary beauty.
Since ancient times, in order to properly highlight the decoration of a house and emphasize the unique image of the interior, various types of panels have been used. Therefore, decorating surfaces with drawings and voluminous fabrics was considered the best way to decorate a room or facade.
Nothing beats a job done with your own hands. A fabric panel will be an excellent decoration for your interior.
Having passed through the centuries, the art of creating tapestries and paintings from fabric has not lost any of its appeal.
Therefore, nowadays, thanks to the painstaking work of craftswomen, it will not be difficult to do it yourself or mass-produce a real masterpiece. And an excellent result is guaranteed if a person has a wonderful imagination and is sincerely interested in this decorative needlework.
Ideas for homemade fabric paintings - master classes
Let's consider the features of some variants of such paintings.
The most basic idea is to choose a fabric with an interesting structure and pattern, and frame it, or stretch it onto a frame. The investment of time and money is minimal, and the result can be a bright color accent in the right place, or a whole composition of such simple and textured solutions in the style of minimalism.
We will need a whole piece of material, a stretcher (frame), scissors, a regular furniture stapler, a hammer and small nails.
The most important thing is to properly prepare the fabric, decide on its size (it should be a few centimeters larger on all sides of the stretcher). It needs to be smoothed out well so that there are no “bubbles” or wrinkled fabric in the picture. The fabric is laid right side out on a hard surface. We apply a wooden stretcher on the wrong side, leaving an equal amount of fabric outside it. Then the material is tucked in (to avoid shedding) and placed behind the bar, after which it is fixed with a stapler. The same operation is performed on the opposite side. First of all, the fabric is attached in the corners and center of the frame slats, and then evenly stretched along the entire perimeter. Our painting is finished and can take its place prepared for it.
A more interesting option is patchwork
Based on the previous version, you can create a painting using this technique. Only on the already finished base on the frame will it be necessary to sew patches connected to each other manually or by machine. The pieces are selected according to the compatibility of textures and colors, and squares, rectangles, and strips are cut out of them. Drawings in traditional English patchwork are distinguished by their geometric shapes, which makes it possible to assemble a mosaic panel from scraps of fabric based on various patterns, or to create a whole picture of geometric shapes based on the color scheme of the source material. It is also possible to combine fragments not with a needle and thread, but by tying them together with a crochet hook and yarn.
Stages of work:
- We are thinking over the composition of the future painting.
- We select fabric for the base and scraps that match the color scheme of our idea and are similar in texture.
- We smooth the base well and stretch it onto the frame, fixing it tightly with a stapler on all sides, making sure that there is no sagging or distortion, and adjusting the tension of the canvas.
- We outline the contours of the future picture with chalk on the base.
- Using scissors, cut pieces of suitable size from pieces of fabric. We put them together and sew them to each other with threads in a way convenient for you. You can crochet them together. We cut off the excess fabric.
- We iron the finished parts of the composition well with an iron and carefully sew them to the base.
- We admire the results of our labors.
The Japanese version of creating a painting from fabric is called kinusaig
It is similar to the previous type of paintings in question, but to bring the idea to life you will not need needles and threads, and the wooden frame should be replaced with a foam base.
We will need: a sketch of a drawing, a flat piece of foam plastic (this can be a ceiling tile without a picture), a stationery knife, a simple pencil, sewing scissors, glue, sewing pins, a photo frame.
Stages of work:
- The cardboard base is pulled out from the photo frame. The foam is cut according to its dimensions using a stationery knife, and the two components are glued together like a sandwich with glue. Then the future workpiece is placed under a press for two hours to better fix the layers.
- Then you need to take the selected design and glue it to the foam coated with glue. Let dry.
- The contours of the design are carefully cut with a stationery knife deep into the foam. The depth of the resulting recesses should be about half a centimeter.
- Pieces of fabric are selected according to the size of the image details and cut out with a margin of about two millimeters.
- Starting from the middle of the picture, the image is filled with pieces of fabric, the edges of which are carefully pushed inside the contour cut into the foam. This can be done with a nail file or a thin, non-sharp object.
- A painting completely filled with fabric is framed and can be hung on the wall.
Let's add volume and life to the picture by completing it using the quilting technique
This type of applied art is akin to patchwork, but, unlike it, it has elements of multi-layering, which allows you to give the picture volume and liveliness. In the process of creating such a work, three or more layers of fabric are sewn together (by hand or on a machine). Soft fillers, such as padding polyester, can be placed under the parts to give more volume, so the picture will be more impressive and visually expressed. Details (quilts) are sewn separately and alternately sewn into the overall picture. This is a fairly old patchwork technique, and it was very widely used in village life.
Stages of work:
- Similar to the first option. That is, the fabric is taken and stretched onto a stretcher.
- A second layer is attached, which serves as the basis for a three-dimensional image (batting or padding polyester);
- The top layer is decorative and consists of quilts. They are combined with various decorative elements, be it embroidery or fabric appliqué, and are sewn together in different ways.
- All layers must be stitched together.
- The finished painting can be framed.
Your works can depict flowers, geometric shapes, abstraction, or be a simplified copy of handwritten paintings, but in any case they will decorate your home, creating coziness in it, a good mood for its inhabitants and showing guests your creative abilities and skillful hands.
Anyone can feel like a real master and creator, because your inspiration is an inexhaustible source for cool ideas that can be drawn from any source, be it nature, life stories, or your fantasy and imagination. Fabric paintings can become not only decorative elements for your home, but also an interesting and exciting hobby that develops a sense of beauty and is an excellent stress therapy. This hobby is also interesting as a source of additional income, because handmade things are highly valued and in demand. Choose for yourself the best option for one or more techniques and develop in this direction, because there is no limit to perfection.
How to make a New Year's panel from fabric correctly
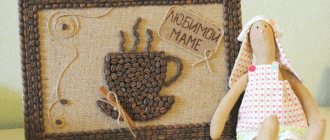
New Year is a special holiday when everyone congratulates each other and gives gifts. Therefore, on this day, a self-made New Year's panel will be a great surprise.
For example, an unforgettable gift would be Santa Claus depicted on the canvas carrying a Christmas tree.
To make such a panel you need:
- Special frame with dimensions 12x17 cm.
- Blue chintz fabric.
- Skin of different colors. For clothes and Santa Claus's hat - red, and for the face - pink. In addition, you will need white, green and golden fabrics.
- Regular cardboard 12x17 cm.
You need to cover the cardboard with chintz fabric. After this, you need to make a three-dimensional silhouette of the future Santa Claus out of cardboard.
A New Year's panel made of fabric is an ideal option for decorating your room for the New Year.
Using red fabric, the clothes and hat are cut out. For mustaches, beards, and “fur”, white material is used. By the way, the “fur” should be cut to create a fringe. Silver fabric is used to make sleighs. And the Christmas tree should consist of separate parts and have several shades.
To give volume to individual parts of the figurine, it is recommended to hold them briefly over a candle fire.
Having taken care of the blanks, you can start gluing all the details of the future panel. To make a high-quality canvas, the master needs to show imagination and try to express all his feelings on the fabric. A properly made New Year's applique will be an excellent gift that will not leave anyone indifferent.
Holiday panel idea
There are a lot of bright and cheerful holidays in the world, which most people celebrate with a large circle of family and friends. A panel made in a festive style will be a worthy decoration for any feast, infecting the atmosphere with a festive mood! It can also serve as a wonderful gift for:
- New Year;
- Wedding anniversary;
- Birthday;
- International Women's Day, etc.
You can make it from any available means. For example, a New Year's panel can be decorated with paper snowflakes, cotton wool snow, sparkles and beads, and in the middle of the composition there can be a luxurious multi-layered spruce cut out of fabric. The main thing is to use your imagination and creativity!
How to make a fabric panel on the wall
A decorative panel made of voluminous or regular-sized fabric will become an interesting piece of furniture. Moreover, thanks to the existence of a huge selection of such paintings, everyone will be able to choose the best option.
Some craftswomen prefer to create wall panels themselves. Moreover, the entire process of making such a product is quite simple, and people who have never done handicrafts manage to create beautiful products.
An old frame is suitable for making a decorative panel; you can also use a sheet of thick cardboard or chipboard.
Woven fabric can be made in several ways:
A fabric panel does not require large material costs and is easier to make than you think
- The prepared fabric is stretched over the base, after which it must be wrapped on the reverse side and secured well with glue. All that remains is to attach the resulting base to the frame.
- You need to make a frame from wooden slats. Next, the selected fabric is cut taking into account the allowance and stretched onto a wooden blank. It is important to secure the material well on the reverse side with a stapler or nails.
- To make panels from fabric, you can do without a frame; instead, you will need plywood. Foam rubber or padding polyester should be attached to the front side. The resulting base is covered with prepared fabric and fixed well on the reverse side.
To decorate the resulting canvas, you can use different materials. Some people trim the product with colored beads or buttons. In addition, you can make beautiful and colorful flowers from scraps; the panel will look good and become the highlight of the room.
To make a children's wall panel, craftswomen specially create pictures or drawings taking into account the child's preferences. A similar decorative detail in a nursery will make the room bright and colorful.
Foam option
For manufacturing you will need the following tools and materials:
- Textile;
- Styrofoam;
- Cutter's scissors;
- Satin ribbon;
- Loop for attaching a picture;
- Glue;
- Pins.
Using the finished polystyrene foam, we cut out the fabric. We glue the fabric onto it.
Article on the topic: Application from plasticine on the theme “Golden Autumn”: presentation with photos
The side parts also need to be made to match the picture. To do this, take a satin ribbon of the required size and glue it to the sides, as shown in the photo:
In order for the completed picture to be attached to the wall, we attach a loop for fastening to the back of the foam.
Using this manufacturing technique, you can make several paintings for one composition.
The painting can be of any size and shape. Imagine and experiment.
One option is to create a modular picture. As an example, such a picture is shown in the photo below.
A panel with fabric flowers is an unusual room decoration
Before making a more complex panel, you should familiarize yourself with the technology of its creation. Today there are many master classes with step-by-step instructions that allow even a beginner to surprise others with a real masterpiece.
For a canvas with flowers, it is important to prepare in advance all the materials necessary for the work and make a blank. Thanks to the use of a special scheme, the result of painstaking work will be a high-quality product.
Making a panel with flowers from fabric will take you 1.5-2 hours of your time, but the result will exceed all your expectations
To make beautiful flowers for the panel you will need pieces of bright fabrics. You should cut out circles of different sizes; here, pre-prepared templates will help. After this, you need to collect all the resulting circles together (the smallest piece will be the last one on top), and then sew them together. A bead is attached to the center - this will be the final stage of creating a flower.
To make the edges of the product have a wavy shape, you can burn them a little with a candle flame.
A good solution for decorating a future canvas with flowers would be a spring theme. Using a sewing machine, you can separately make bright green blades of grass that will have different sizes.
Upon completion of the manufacture of all parts of the planned canvas, all that remains is to correctly attach them to the base. For very thin parts, it is recommended to use glue, and flowers and blades of grass are sewn on.
The flower does not have to be round. After all, its creation completely depends on the imagination of the author.
Making panels from scraps of fabric with your own hands
For lovers of abstraction, you can independently prepare an unusual wall decoration from scraps. Such a unique picture will help to favorably emphasize the interior of the room and will become the pride of the hostess-craftswoman.
To work, you will need a frame with equal sides and several types of contrasting material. To avoid confusion in the future, it is better to draw a diagram of the future product in advance and number all the stripes.
Why throw away leftover fabric when you can make a fabric panel with your own hands, which will become an original decoration or gift
The shreds are cut into the required quantity and attached to the base, strictly following the specified order. To make the composition interesting and bright, it is important to alternate colors correctly and take care of reliable fastening of parts. For this, it is recommended to use special hot melt adhesive.
A picture made from scraps will look very good on the wall. Therefore, upon completion of the work, it is necessary to secure the resulting product in a frame.
When choosing fabric for a panel, you need to take into account its color, as well as its structure. Silk material will stand out perfectly and expensively on the wall. And the fabric, which has a dense structure, is very convenient for work.
To avoid sagging of thin shreds, it is recommended to insert cardboard into them. In addition to this purpose, such tabs will help prevent the material from showing through.
If you need to make an abstract spiral from scraps, it is better to make the template in the opposite direction. And then lay out all the stripes strictly according to the scheme.