Perimeter lighting soaring ceiling
Modern ceiling lighting with LED strip
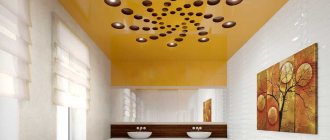
Soaring ceilings are now in trend. The term “floating ceiling” refers to a structure where LED lighting is installed around the perimeter.
This allows you to achieve an amazing effect. The ceiling is optically separated from the walls and begins to “float”.
Until recently, soaring ceilings were installed only in five-star hotels and elite restaurants.
Video:
Those who never visit such places could only admire the photos of unusual interiors decorated with soaring ceiling structures.
Today this technology has become available to most people. You can make a floating ceiling in your apartment or house.
To do this, you just need to purchase a special profile with a gap around the perimeter for the LED strip.
For floating ceilings, you can use fabric of any quality and color - it doesn’t matter whether it’s matte or glossy. It's more difficult to choose the backlight color
The classic option is white LEDs, moreover, they give more light than multi-colored ones
When choosing an LED strip, you need to pay attention to the warmth of the light
For residential premises, it is better to use LED lighting with warm light.
A two-level soaring ceiling, like the one in the photo in magazines, looks luxurious in any interior.
To make such a design, you will have to assemble an additional level on a separate frame and provide for the possibility of installing one of the LED backlight levels around the perimeter.
Photo:
Two-level ceilings are a huge field for experimentation. In such designs, you can use translucent and perforated fabrics, as well as their combinations, plasterboard niches and boxes, multi-colored coatings, mirrors, appliqués, and photo printing.
Such a variety of possibilities carries with it some dangers. Elements may turn out to be incompatible, and as a result of experiments, the interior will suffer.
Therefore, when developing a ceiling design with lighting and other decorative elements, it is better to trust a professional designer.
The specialist will be able to pre-model on the monitor screen what this or that “masterpiece” will look like in reality.
Types of lamps
The following types of lamps can be used to illuminate a suspended ceiling:
- Spot
. Inexpensive products that help organize lighting and zone rooms. - LED
. Budget models that provide diffused glow. They have a long service life. - Classic
. These are traditional pendant chandeliers, which are not very often used to illuminate suspended ceilings. - Daylight
. Economical models, which are mainly used to decorate non-residential premises. Their installation is quite simple, but it is necessary to take into account the increased requirements of these devices for the quality of the supplied electricity. In case of voltage fluctuations in the network, they can quickly fail. - Fiber optic
. Using lamps of this type you can create unusual effects. The cost of fiber optic devices is quite high, and their installation requires experience. In addition, they take away the height of the room.
Before making a suspended ceiling with lighting, you must consider the following recommendations:
- Zonal illumination has proven itself well when several low-power light sources are used. It looks much more beautiful than using one bright lamp.
- The layout of the lamps is thought out in advance. This takes into account exactly which places need to be illuminated and how brightly.
- The organization of lighting in the kitchen area provides for separate illumination of work surfaces and the general area.
- In the bedroom, the main interior objects - a bed, a table, a wardrobe - need separate lighting.
- Hallway zoning is also often used in modern design. The choice of lamps depends on the area of the corridor and the type of decoration.
- By correctly approaching the organization of lighting, you can effectively implement unusual design ideas - “starry sky”, “northern lights”, etc.
- Each lighting zone must be provided with a separate switch.
- When starting to implement the instrument installation scheme, a detailed list of works is drawn up. It must indicate the model, parameters and locations of lighting fixtures and switches.
Lighting accents
Ceiling in the kitchen-living room 55 photos combined studio, modern style
Lighting fixtures allow you to focus attention on different interior items. For example, an LED strip will help highlight the geometry and contours of the living room
It is attached to special cornices or to vinyl sheeting using double-sided tape. The diodes glow brightly and are also economical.
When creating lighting for suspended ceilings, the lamps are either placed on top or recessed into the canvas
The glow of built-in ceiling fixtures is diffused and soft, which is important for bedrooms and individual areas in rooms.
Spots and pendant lamps can be adjusted and thereby correct the direction of the light flow. They are used to highlight indoor work areas or interior items.
What type and method of lighting should I choose?
One of the main tasks when developing a stretch ceiling design is to decide on a functional lighting option for the room.
After all, the comfort of the room and the harmonious emphasis of the created interior depend on this. It is best to use combined lighting sources, which include: ✔
various chandeliers
✔
LED strips
✔
spotlights
✔
light lines
The combination of such diverse light sources allows you to adjust and visually highlight certain areas for a particular room. Using the controller, you can increase or decrease the lighting power, as well as selectively turn on the light source separately or together, each time adding variety to your mood.
Kinds
Perimeter ceiling lighting options
There are several types of ceiling lighting.
- Today, overhead linear ceiling lighting is very popular. Lamps with similar designs present simple continuous lines. They can be used both as main and additional lighting. With the help of such details you can create a very interesting composition, since linear lighting fixtures can intersect each other at any angle. Light compositions that move from the ceiling to the wall look especially interesting.
- For a multi-level ceiling, it is necessary to correctly select beautiful lighting. For example, for a stylish two-level ceiling, you can purchase a chandelier that matches the style, spotlights, special directional lighting bulbs, as well as economical LED or neon strips. A two-level ceiling covering with large lamps will look organic only in spacious rooms.
- Ceiling spotlights can be used for interior lighting. Such lighting devices are more powerful. Most often they can be found in museums, at exhibitions, in gyms, shopping centers, etc. The most popular are LED specimens. They are distinguished by their efficiency and bright light.
- Today, one of the most common are recessed spotlights. As a rule, they are compact in size. They can be installed in both hard and suspended ceilings. The main advantages of such lighting are its affordable cost and discreet design. Such specimens are used to decorate any room, be it a cozy living room or a small bathroom ceiling.
- Suspended ceiling chandeliers look harmonious in many interiors. They can have a variety of shapes and sizes. The choice of these lighting fixtures largely depends on the layout of the room and the height of the ceiling. For example, for a room with low ceilings, you should not choose a chandelier that is too bulky. Visually, it will reduce the already modest space. A luxurious large chandelier can be hung in a spacious room. With the help of such a detail you can complete the interior.
- The most flexible ones are flexible lamps. These include bright neon tubes of different lengths, duralight cords and LED strips. Such elements can be installed under a suspended ceiling, between different levels of the ceiling and plasterboard structures, as well as along ceiling plinths. You can install these lighting fixtures yourself. This will not take much effort and time. It is worth noting the durability of flexible systems. They do not consume a lot of electricity and do not require maintenance.
- Not so long ago, track lighting structures began to be used to decorate home interiors. Initially, they were complemented by shopping centers and office spaces, but today they are often found in home settings. Such structures consist of a system of lamps attached to a busbar - a rail no more than 3 m long. The rails are fastened into a certain combination using various connecting parts of different shapes.
- The most popular are L-shaped, straight, cross-shaped and rectangular designs. They are attached directly to the ceiling and are lowered down using special cables. Several different lighting fixtures can be located on one base.
- Track lamps on rods have a modern design. Such options are used to decorate any room: from the kitchen to the bedroom. They come in different shapes and sizes. Most often, these options are made of metal and are ceiling holders of various sizes with lampshades attached to them. Such lighting looks organic in modern interiors. Classic ensembles should not be supplemented with such lamps.
What does the price of single-level stretch ceilings consist of?
- In total, two main parameters can be distinguished: the area of the room and the type of canvas. The cost will also be affected by the presence of a seal and the need for additional work.
- Use the calculator on the website to create your own budget.
- Our specialists will tell you in more detail. So, you can submit an application for a free visit of a designer-measurement to your site. He will not only make all the calculations, but will also show you a catalog with photos of our work, help you choose a suitable single-level stretch ceiling and conclude an agreement for its installation. Also, examples of structures erected by our craftsmen are presented on the website.
- If you have any questions, call (Moscow) or (Moscow region).
What is LED strip lighting?
Even modern neon and halogen lamps are inferior to LED lighting, since such lighting devices have a budget price, are durable, energy-saving, shine brightly, are suitable for any ceiling (they can also be installed on tension structures), and are also available in a variety of colors. In addition, do-it-yourself LED ceiling lighting is available to anyone, since its installation does not require any special skills or knowledge.
The use of LED strips in the design of suspended ceilings allows you to achieve different lighting and decorative effects that are difficult to achieve when using standard lighting: smooth changes in lighting color, glow brightness, contrast, etc.
There is a backlight, which is a flexible tape. It contains LEDs, conductive tracks and resistors. At first glance, it looks very much like a thick dropper with wires at the end. With them, this lighting device is connected to the power supply. On one side of the tape there is an adhesive tape with which the backlight is attached to the desired place. There is also a recessed diode lamp, but working with a strip is much easier, since any adult can install it with their own hands. Both the first and second options can be combined.
Strip diode lighting is also convenient because with the help of a dimmer and an RGB controller you can control the brightness and colors with your own hands and, thanks to this, you can even create a “floating ceiling” with such lighting or create a “starry sky” effect with the same lighting. Due to the elasticity of the LED backlight, you can make configurations of any complexity, since it easily bends at different angles, without losing its strength. It is also often used for stretch ceilings. If such a lighting device is dropped from a great height, it cannot be broken, which makes it unique compared to other similar devices.
When starting to install the lighting, you should decide what it will be like. If it is built into the ceiling, then you will immediately need to make a hole for the lamps.
LED lighting in the form of a strip is used not only on plasterboard ceilings. With its help you can make an advertising illuminated sign, decorate your landscape with your own hands, illuminate the façade of any building with illumination, and it is also suitable for a stretch ceiling. In a word, such lighting makes any designer’s fantasy come true. Various figures look very beautiful on a plasterboard ceiling, which, provided that the tape is installed correctly, seem to float in the air. This is truly an amazing sight. So, since plasterboard structures are the most popular, many will have a question about how to properly install diode lighting on such a suspended ceiling with your own hands and what will be needed for this?
In order to install LED lighting on a suspended ceiling, you first need to prepare a niche for it. To do this, the main ceiling is covered with sheets of plasterboard. Next, you install the niche yourself. This will be discussed in more detail below.
It is important to note that since drywall itself is not such a strong material to support an additional hanging tier, the frame for it must be attached directly to the upper level rails. So, how to make a niche to decorate the interior of the room with LED lighting?
Plasterboard ceiling with lighting
Work on the creation of suspended structures is quite complex. In the absence of proper experience, it is better to invite professionals for this. A pre-drawn drawing will help you realize your original idea and purchase the required amount of consumables.
Work begins with the construction of the first tier:
- Make a line on the walls along the perimeter of the room, stepping back down from the base floor by 100 mm.
- Attach the starting profiles at the mark using dowels and screws.
- Set the main profile. The installation of jumpers occurs exactly according to the drawing.
- Sheathe the finished gypsum board frame with slabs using self-tapping screws.
- Putty the first tier using dry gypsum mixture or ready-made acrylic solution. After the putty has dried, the surface is rubbed and painted.
Installing and connecting lighting devices requires certain skills. Suspended ceiling lighting can be general, fragmented and decorative. General lighting is organized through central lamps. It is convenient to equip a fragmentary space with spotlights. Decorative lighting helps create the right mood in a room - work, intimate, festive.
Plasterboard ceiling with built-in lighting
A plasterboard ceiling with built-in lighting is a very popular design solution. This is a practical, functional and stylish way of finishing.
Here you can successfully combine different types of lamps, and by adjusting the color content and lighting power it is easy to change the visual-spatial perception of the room.
The structure must have the following properties:
- Durability, strength and reliability;
- Absolute safety and reliability of the mounted lighting;
- Aesthetics and originality of design;
- Getting a flat ceiling;
- Under the suspended ceiling it is convenient to discreetly place various communications (wires, ducts, etc.);
- If desired, the design of a plasterboard ceiling can be made completely consistent with the design concept of the room as a whole.
Wear resistance and strength of the structure will be ensured by the use of a rigid metal profile and thin ceiling plasterboard. A bright LED strip of the desired color is perfect for illumination. or combinations thereof.
Why is it recommended to use thin drywall rather than thick sheets almost a centimeter thick?
This was done for a reason. Due to the lightweight material, the weight of the ceiling structure is significantly reduced, as is the total load on the fastening elements.
By and large, gypsum plasterboard for a suspended ceiling does not require great thickness and high strength, because its cladding is not subject to significant mechanical stress. A little more than 0.5 mm is the most suitable thickness of this material for a ceiling structure.
The metal profile has similar advantages.
Such structures, with their low weight, have excellent strength when compared with a wooden slatted lattice.
LED lighting for plasterboard ceilings
What are the benefits of LED backlighting? Why do consumers prefer non-halogen lamps, and this type of spot lighting? After all, quite recently there was no worthy alternative to halogen products.
The advantages of LEDs are obvious:
- With excellent brightness, such a lamp consumes significantly less energy compared to any other source;
- It actually does not heat up even after burning for a long time. In other words, the possibility of its overheating, which could cause a fire in the structure, is completely eliminated;
- Such an element is much more compact than other lighting devices, and therefore it can be used in design as conveniently as possible. Indeed, due to its size, it can be easily disguised even by minor decorative elements;
- Has an impressive service life;
- Affordable price;
- Easy to install.
There are LED strips with a universal glow and monochrome. The latter emit only one color - white, blue, red or green. Unique ones can change their shade. The lighting is controlled from the remote control. the team can change not only the hue, but also the intensity of the glow.
Plasterboard ceiling design: lighting device
Illumination for such a structure can be done in one of two ways - hidden or open. The latter is completely easy to install. A hole is made in the suspended ceiling according to the required dimensions, and a lamp is placed in it. When using this method, the lamp should not weigh more than ten kilograms.
The fact is that the cladding and frame of the ceiling structure do not have high load-bearing capacity.
If hidden lighting is chosen as the design. then the lighting fixtures are located between layers of drywall, in a niche made for this purpose.
With this device, the light beam is directed not downwards, but onto the ceiling itself. Reflecting from its surface, it creates a magnificent effect.
Stretch ceiling
Tension-type systems appeared relatively recently, but quickly gained popularity. They are widely used in both residential and public sectors. This is facilitated by the decorative and operational characteristics of tensile structures. The main elements of such ceilings are fastening baguettes and decorative fabric made of elastic PVC film or fabric. It is cut out according to the size of the room, and then pulled onto the frame.
The effect of a decorative surface can be very diverse: mirror, glossy, matte, iridescent, textile, etc. As a rule, built-in light generators allow you to illuminate a suspended ceiling. The high prevalence of suspended ceilings is explained by the wide range of colors of the material. In addition to a single-color design, you can use a combination of colors or apply beautiful patterns. In addition, fabric canvases allow periodic repainting. Installation of the tension system is carried out very quickly, usually within one day. PVC films have good moisture resistance, so they are often installed in the bathroom.
Strengths of suspended ceilings:
- Versatility
. You can design rooms for various functional purposes. The material is able to withstand high and low temperatures. - Resistance to mechanical stress
. This applies to fabric sheets (PVC films are quite sensitive to any sharp objects). - Flood protection
. Vinyl sheets, when flooded from above, are capable of collecting a large volume of water inside themselves (up to 100 liters per m2). This allows you to protect the property in the room from damage by water. - Antistatic properties
. The use of special impregnation prevents the accumulation of static electricity on the decorative surface, which attracts dust. This makes cleaning much easier, for which you can use a damp sponge. - Visual expansion of the room
. This primarily applies to glossy coatings that reflect and enhance light.
LED strip pattern
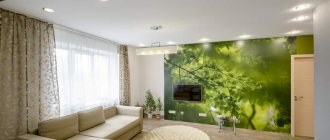
If you attach an LED strip or lamps directly above the canvas, from the “underside” of the ceiling in the form of a geometric pattern, you will get a very effective design in terms of design.
This design looks beautiful and unusual. When turned off, the backlight is completely invisible, and the ceiling looks like a standard, unremarkable tension structure.
But if your soul asks for a holiday or guests come to the house, if you need to celebrate an anniversary, New Year, birthday, or you are just having a party, then just turn on the lighting and an ordinary room will be transformed.
Lighting fixtures are fixed to the tension fabric in the right places. This way you can paint entire pictures from light bulbs of different colors.
In this option, it is possible to connect several modules separately, which allows you to change the color and contours of the backlight.
Photo:
Not every canvas is suitable for patterned lighting. It needs to be able to transmit light rays.
Glossy films do not have this ability, since they are not at all transparent, but a matte film can be used.
In addition to the requirements for the quality of the ceiling covering, there are wishes for the installation of the decor itself.
If the lighting is done using LED lamps, then the distance between them and the canvas should be at least 15 centimeters.
Otherwise, the lamps will stand out as color spots on the surface of the ceiling. Because LED lights will take away some of the height from the room, the room will appear lower.
An LED strip may again be a way out. It can be pulled just two to three centimeters from the surface of the canvas.
Video:
It is lightweight, fits comfortably, does not heat up and does not damage the fabric. Theoretically, an LED strip can last forever.
Its light just dims over time, with white LEDs dimming faster (after about 10,000 hours). Red, blue, green and yellow LEDs will last three times longer.
One of the options for using LED lighting is the “Starry Sky” ceiling. LED light bulbs are placed pointwise above the suspended ceiling very close to its surface.
When the backlight is turned on, part of the ceiling will remain dark, only the LEDs will shine through the canvas, creating the impression that there is a starry sky above.
And finally, it is worth noting that LED strip is not the only way to decoratively illuminate a stretch ceiling. For the same purpose, you can use flexible neon tubes and duralight cord.
Video:
Starry sky
Stretch ceilings with lighting in the form of a “starry sky” look very interesting in interior design. To create them, use one of the following methods:
- optical cable. In this case, the fibers on the base ceiling are connected to the general power supply, after which they are attached to the suspended ceiling from the inside of the structure. In this case, luminous points are formed that are invisible during daylight hours;
- two-layer “starry sky”. With this method, double-sided canvases are used, in which the upper part does not transmit light. Holes are made in the coating, located in a chaotic manner. At the same time, streams of light enter through these holes onto the second layer, creating unusual celestial patterns.
How to make stretch ceiling Starry sky at home with your own hands.
There are many lighting options for stretch ceilings, so it’s up to you to choose. Consider your financial capabilities, personal preferences and interior style, then you will be able to create a magical and cozy atmosphere.
LEDs
LED ceiling lighting received special recognition as soon as it appeared on the shelves.
LEDs, although they are not yet very cheap, more than pay for their cost with their inherent qualities:
- bright, even light output;
- low power consumption;
- long service life.
LEDs of various colors for ceiling lighting
Increasingly, designers are choosing LED ceiling lighting when, when installing suspended ceilings or multi-tiered panel structures in an apartment, the question arises about choosing light sources. This type of lighting is especially harmonious for suspended ceilings.
In this case, unlimited imagination will allow you to create truly enchanting lighting masterpieces using LED strips.
Stretch ceilings illuminated with LEDs immediately attract everyone's attention with their unusualness. Just imagine that with just one click of a button you can turn an ordinary city apartment into a romantic corner or a bright, sparkling discotheque
To do this, you just need LED lighting.
Glossy stretch ceilings in combination with LED lighting look very beautiful
Installation of LED strips
Having decided to use original light in your interior, you should carefully study how to make LED lighting on the ceiling. Most often, double-sided tape is used to secure LED strips.
If the tape is self-adhesive, then the installation process is simplified:
- thoroughly degrease the mounting surface;
- remove the protective layer from the tape;
- Press the tape firmly to the installation site.
As a rule, LED strip is sold in the form of winding on a reel 5 m long. The cutting frequency of the LED strip for the ceiling, depending on its type and the density of the LEDs on it, ranges from 3 or more.
To decorate one room, three strips are usually enough, since when connecting more components in series, excess current flowing through the first sections of the circuit can cause such lighting to quickly fail.
Instructions for installing LED lighting on the ceiling using a decorative cornice
The tape selected in length and color must be properly secured:
- Typically, the LED ceiling strip is placed between the baseboard and the ceiling (“slit light”) so that the LEDs are not visible from below.
- Careful selection of the distance at which the levels of the ceiling structure are located between each other will ensure that the intended lighting advantageously emphasizes its individual parts or the entire upper tier.
When installing a strip with LEDs, simple rules must be followed:
- handle the tape carefully, try not to damage it;
- if it is necessary to create curved sections, remember that the minimum bend of the tape can be a radius of at least 2 cm;
- observe polarity when connecting;
- First connect the controller to the power source and only then the tape itself.
Multi-tiered suspended ceiling with LED lighting
The combined lighting of a multi-tiered ceiling will look great if an exclusive chandelier with LED lighting around the perimeter is chosen as the central element.
Not continuous ceiling lighting, but “islands” looks very original. In this case, the strip can be replaced with LED tubes. You can use suspended ceiling lighting with LEDs that are hidden by its canvas.
LED lighting behind a suspended ceiling can look very impressive
Before making LED lighting on the ceiling, you should take into account a lot of nuances. For a harmonious combination of all the components of the style that needs to be created in each specific case, you should pay close attention to every detail. It is necessary to take into account the total area of the room, its configuration, the presence of doors and windows, and the height of the ceiling.
Choosing and installing lamps correctly is a kind of art. And well-organized LED ceiling lighting with your own hands will create comfort and peace in the house, pleasing the owner for a long time and not requiring immediate replacement.
Plasterboard structures
Plasterboard finishing allows you to create various shapes and configurations for decorating the ceiling. Along with classic linear solutions, square, round, oval and multi-level elements are quite common. You can use niches, transitions, protrusions and decorative inserts. The strength of the structure is ensured by reliable fastening of gypsum plaster boards to metal profiles that can withstand heavy loads.
Complex design ideas require more time to create. The cost of such work also increases. To enhance the visual effect, lighting devices are often used. Lamp models can be different - incandescent lamps, LEDs, halogen or energy-saving devices.
Rooms with normal humidity levels are finished with conventional gypsum boards. If air humidity is high, it is recommended to use special moisture-resistant material. This applies to areas such as the laundry room, bathroom or swimming pool. The degree of resistance of products to water may vary (this needs to be clarified with the seller). The difficulty of installing plasterboard boards on the ceiling is primarily due to their dimensions (standard dimensions are 150 by 250 cm). To create a plasterboard suspended ceiling with lighting with your own hands, you will need an assistant.
How to do the installation yourself
LED ceiling lighting has a huge advantage - it is very easy to do it yourself. As a rule, LED strip is produced self-adhesive. If there is no adhesive layer, you can use double-sided tape for this purpose. Before you start making hidden ceiling lighting, the tape should be thoroughly degreased, its surface should be cleaned, after which you need to remove the protective layer and press it to the ceiling surface.
People who are interested in how to make ceiling lighting with their own hands should know that this is not a difficult task at all. Almost every man who has the desire and a little patience can cope with it. In stores, the tape is sold in reels of five meters. It is believed that one room requires 15-20 meters. This length is considered optimal so that the elements do not burn out due to overvoltage. In case more LEDs are required, it is recommended to separate them into different power supplies.
When a suspended plasterboard ceiling with lighting has several levels, the distance between them is selected taking into account the efficiency of the LED strip. If the distance is too small, the light will be uneven and the LED dots, as well as the black spaces between them, will be visible. If the distance is large, then the light will have time to dissipate on its way to the upper level. As a result, the quality of lighting will deteriorate greatly.
In order to visually expand the area of the room, it is recommended to install the tape along the side walls. To visually reduce the area, the tape is installed in a semicircle. It is best to install LEDs in such a way that they are not visible from below, but only diffuse light. This effect can be achieved by placing the tape under the cornice.
LED strips for installation on a plasterboard ceiling with backlighting have markings through three LEDs. For this reason, cut the tape only along the marked lines. If a cut is made in the wrong place, the two outer LEDs will not light up. After this, you need to use a soldering iron to solder the wires to its contacts. To prevent the diodes from overheating, you should use a soldering iron with a power of no more than 25 watts. After this, all that remains is to power the tape. For suspended plasterboard ceilings with backlighting, a voltage of 12V or 24V is required to power the LED strip. To reduce the network voltage from 220V you will need to buy a switching power supply. It should be taken into account that the power of this power supply must be no less than the power of the tape itself. Otherwise, the protection will not allow the power supply to work. It is preferable to use a compact power supply unit to illuminate a ceiling with LED lighting, because a large unit will look too rough and heavy. The turning radius of the tape must not exceed 20 mm.
So, to summarize, we can say that anyone with some home craftsman skills can install such lighting with their own hands. Moreover, LED strips have made this type of design accessible to every person who knows how to do anything with their hands and has artistic taste.
Let's get started
The installation of a multi-level illuminated ceiling should begin with the design and marking of the future structure. The initial frame is installed and sheathed with sheets of plasterboard, they are attached using self-tapping screws.
The most difficult thing about installing a plasterboard ceiling with your own hands is to align the profiles exactly along the same line and screw in the self-tapping screw, so that the level remains level.
For this, a laser level is best suited and it’s good if you have an assistant; it will be quite difficult alone and a lot will depend on the quality of the screws, so you shouldn’t skimp on them.
When the frame is ready, the next step is covering it with sheets of plasterboard. This is how the first level is formed, here you can already install the backlight. After this, the second level is attached.
What materials will you need?
- Guide profiles 28x27
- Ceiling profiles 60x27
- Separator tape
- Sealing tape
- Dowel-nails 6x40
- Anchor wedges 6x40
- Level
- 2.5 m rule
- Drywall 2500x1200x12.5
- Self-tapping screws
- Hammer
- Screwdriver
- Roulette
- Hammer
- Stationery knife
- Direct hangers
- Metal scissors
- Primer
- Spatulas
- Seam tape
To eliminate damage that may have appeared on the material during installation and to hide the joints between the sheets, putty should be used. This can be done both before and after installing the lighting.
Advantages of LEDs
Thanks to LED ceiling lighting, the room becomes both cozy and very stylish. Compared to other types of lighting, LED lamps have many advantages:
- They are suitable for almost any ceiling, although most often they are installed on a suspended ceiling.
- They consume much less electricity. They are fifteen times more economical than conventional incandescent lamps.
- Such lamps have a significant shelf life. Without replacement, they can last up to 120 thousand hours.
- LED lamps shine brightly.
- It is possible to control colors.
- You can make luminous figures of almost any shape.
- They are safe to use.
LEDs can dramatically change the appearance of a room. She can turn a room into a dance hall with bright lighting that flickers to the beat of the music. And, on the contrary, you can make a romantic and mysterious room from a brightly lit room. The only drawback of an LED lamp is its relatively high cost compared to others. But, since it lasts much longer, the savings are quite significant.
Backlight installation
Since neon and fluorescent lamps are used relatively rarely, we will only focus on how to make additional lighting on the ceiling using more modern technologies.
Options for using LED strip
LED strip is used for hidden lighting of both ordinary and suspended ceilings.
- Curtain lighting. This method is considered the simplest and does not require special structures for hidden installation. All you need are polystyrene ceiling cornices wide enough to accommodate the LED strip behind them. The cornices are attached at some distance from the ceiling only to the wall, and the lighting itself and the power supply are installed in the resulting space along the perimeter of the wall.
Behind the eaves lighting
- Illumination in a niche of a suspended ceiling. The most common way to make such lighting is to make ceiling niches. They can be of any shape and size, located along the walls or in the center of the ceiling. The main thing is that their size should be such that the LED strip itself cannot be seen from anywhere in the room.
How to arrange a niche for lighting
Niches can be open or closed.
- Closed niches have a vertical edge along the edge made of gypsum or plastic profile, frosted glass or plasterboard.
- The design of open niches differs only in the absence of such a side. They usually have to be made deeper to hide the light source.
Illumination in an open niche
The choice of niche type is determined by the lighting effect you plan to achieve. If the interior lighting should be a narrow and bright beam of light, then a closed niche is made, and an LED strip is attached to its bottom. If the niche is made open and the light source is placed on its inner vertical wall, then you will get a wide strip of diffused light on the ceiling.
Changing the light strip width depending on the niche design
To make sure that the illuminated ceiling will look the way you intended, experiment before installing the niche frame. You will need an assistant who will hold a fragment of the structure with a switched-on LED flashlight placed in it under the ceiling. You will need to move to the farthest point of the room and make sure that the light falls as intended and its source is not visible.
Pay special attention to the height of the niche. It should be such that, if necessary, you can easily repair or replace the backlight
Connecting LED strip
- Measure the perimeter of the room or area where the illuminated ceiling will be installed. Determine the lighting power you need and divide it by the resulting footage. You will get the power of one meter of LED strip. This indicator will become a guideline for her choice.
- When purchasing a strip, do not forget to buy a power supply of sufficient power, and in the case of using a multi-color LED strip, also a controller that is connected to it in series.
- Without compromising the quality of the glow, no more than three reels of tape with a length of 5 meters can be connected in series. But the service life of the LEDs will be much longer if all strips are connected in parallel.
- For parallel connection to one power source, additional wires are connected immediately after it. If several power supplies are used, they are also connected to the network in parallel.
Parallel connection of two sections of tape
- After installing the entire circuit, the protective paper layer is removed from the LED strip and it is glued to the surface.
In the video you can learn more about the rules for installing LED backlights.
Using conductive panels for lighting
If an LED strip allows you to decorate ceilings with internal lighting, then placing conductive panels on the ceiling is an opportunity to create any fancy patterns and ornaments that glow in the dark.
Such panels can completely cover the ceiling surface or serve as inserts. Small LEDs with metal wires of different lengths are stuck into them. Getting into different layers of the panel, they receive the necessary nutrition.
https://youtube.com/watch?v=xjF7bsmFFzc
As you can see, lighting the ceiling with your own hands is not a difficult task, but it is very interesting and requires a creative approach. And your imagination, coupled with basic construction skills, can transform your home, making it unique and inimitable (see Ceiling lighting: neon, LEDs and fluorescent lamps, designing lighting from a ceiling niche).
The use of spots in the interior
Spots mean a group of spotlights mounted on a movable bracket. Thanks to this design, you can change the direction of the light at will. Spots have many advantages, however, they must be connected correctly.
All spots can be divided into several groups:
- invoices;
- built-in;
- combined type.
In appearance, the spots are very similar to ordinary traditional chandeliers. You can use any light bulbs for such devices - LED, halogen or incandescent lamps, without forgetting, however, about power limitations. Spots are most often installed in the center of the ceiling, filling them around the perimeter with single spotlights or other types of lighting.
Before making lighting on a suspended ceiling using spots, it is important to familiarize yourself with some of the subtleties of their installation:
If several such lighting devices are provided on the ceiling surface at once, the power cable from the distribution box is connected to the lamp closest to it.
All other devices are connected to it in parallel. Before starting installation work on installing a stretch ceiling with lighting, it is important to remove the cables for further connection of the lamps and insulate them. The lighting fixtures themselves will be installed after the canvas has been tensioned.
Holes will be cut in the film for each lamp, which will then be covered with heat-resistant rings. They will protect the material from melting.
Examples for different types of surfaces
Modern technologies make it possible to create modifications of canvases that have different textures. Let's consider the main types of textures that are used for suspended ceilings with lighting.
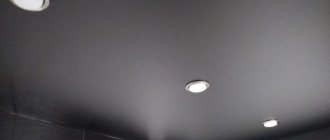
Matte
The option with a matte texture practically does not reflect light and perfectly imitates a traditionally painted ceiling. Spotlights and LED strip look especially advantageous.
Glossy
The surface of a glossy stretch ceiling mirrors objects and glares strongly in the light. Thanks to these qualities, it is a spectacular accent in the room.
Satin
The option with a satin texture combines the characteristics of matte and glossy materials in appearance. The satin ceiling reflects light slightly, so it is suitable for almost any interior.
The photo shows a living room with a purple satin-textured ceiling.
Lighting and interior solutions
The design of lighting fixtures should match the interior of the room.
- The popular and modern loft trend is characterized by laconic and uncomplicated forms. Lamps made in this manner do not have additional decorations or decorative elements. Aged lamps are suitable for such an interior. For loft-style ensembles, you should choose ceiling lighting made of plastic, glass or metal.
- Ceiling lamps in the high-tech and minimalist style should have the most simple and clear lines. They can be made from inexpensive industrial materials and have a discreet appearance. Also in these modern settings, a luminous ceiling can be used as main lighting.
- Today, such an airy style as Provence is at the peak of popularity. In such interiors, ceilings complemented by beams look harmonious. You can complete such settings with beautiful and elegant lamps with light shades of medium size.
- Lighting a room in the Art Nouveau style should have regular shapes and clever, bold and original configurations. In such interiors, devices containing elegant forged metal or custom lampshades will look harmonious.
- Large chandeliers with wrought iron and glass compositions look organic in classical ensembles. They can have elegant and luxurious shapes. However, such lighting fixtures are not suitable for low ceilings.
7 photos