How to fix paintings on different types of walls
You should choose a fastening method based on the type of walls. Not every partition can be nailed, so you should know how to hang pictures on different types of walls.
How to attach a picture to a brick partition
Despite its practicality and strength, brick is a fragile material. Drilling holes, screwing in screws and hammering nails will not harm such a wall if the drilled hole is filled with cement mortar. And only after this will it be possible to insert a screw or hook into the wall. This measure will prevent the formation and spread of cracks in the brick.
You can also use brick brackets, which are attached to the required section of the wall.
How to hang pictures on wooden walls
This material is the most convenient; just hammer a nail in the right place. It won't require much effort on your part.
Article on the topic: Lurex fabric, what is it. Application and care
The canvas is suspended from a nail by a loop, cable, nylon thread or other type of fastening.
How to hang a picture on a concrete wall
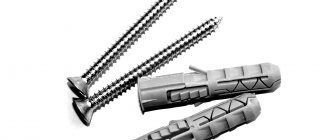
You won't be able to drive a nail into a concrete wall; you'll need a drill or hammer drill. A hole is drilled at the designated point into which plastic dowels are inserted.
You need to screw a hook or screw into the dowel and hang the decoration.
How to hang a picture on a plasterboard wall
Bulk and heavy canvases should not be placed on plasterboard walls. This material does not have high strength and resistance to stress.
To fasten pictures on plasterboard walls, special dowels—“butterflies”—with special spacers are used. This allows the mount to stay securely in the wall.
Modern fastening systems
Today, more modern and functional accessories and tools for repairs and modern design are released almost daily. Progress has also affected fasteners for paintings and photographs.
Velcro for attaching pictures Command
This system can be used to hang a picture if it does not have a mount, without damaging the wall surface. Velcro Command
They are plastic fasteners that are attached to any type of covering.
Such Velcro consists of two parts and can be reused. In order to attach a picture using such fasteners, you should attach one part to the wall, the second to the picture.
Before installing such fasteners, you should prepare the surface and degrease it. Thanks to this, you will further increase adhesion to the wall.
Hook for fastening the Kreps system
This system is intended for paintings, photo frames and other decorative interior items that have special ropes or cables as part of the fittings. This is due to the fact that the design provides for the presence of special hooks on its surface, which do not leave traces after dismantling and make it possible to hang the picture even on a concrete wall.
One such hook can withstand a weight of 1-1.5 kilograms. But if you want to hang a large and heavy item, you can use several hooks at once. The most important thing is to correctly calculate the number and placement of these fasteners. The picture should fit tightly to the wall.
In order to install such a hook, you will not need much time, since this is a fairly easy operation, and even a child can cope with it:
- You need to remove one side from the protective layer and glue it to the wrong side of the hook.
- After this, remove the protection from the other side and attach it to the wall.
- Hold in this position for about 30 seconds, after which you can safely hang decorative elements.
Dismantling is even easier. You just need to pull out the tab, thanks to which the unsticking will occur.
As you can see, there are many methods for hanging a painting, photograph, poster or other decorative elements without drilling huge holes in the wall. We have offered you the most popular and proven methods. Therefore, you can easily complement the design of your room and change it at your discretion at least every day.
Since ancient times, people have sought to decorate their home with a variety of decorative things: panels, photographs, masks, decorative hanging figurines, amulets, paintings.
Pictures have always been hung on walls, and sometimes situations arise when it is not possible to drive a nail or screw into a wall or there is no one to do it.
We will talk further about paintings, or more precisely, about their mounting on walls. Shall we look at ten options? how to hang a picture correctly using different fastenings.
How to mount a painting on the wall
If the canvas is small and light enough, you can do without nails or drilling the surface. There are several ways to hang pictures without using a drill or hammer.
Double sided tape
Mark a line on the wall where the top edge of the painting will be located. Apply tape to the back of the canvas and remove the protective strip from the paper. If you want to secure the picture more securely, attach adhesive tape not only to the top, but also to the bottom edge of the decoration.
To ensure good adhesion of the tape to the surface, press the tape firmly against the wall for 20–30 seconds.
Liquid Nails
With the help of liquid nails, the painting will be securely attached to any type of wall. Apply the adhesive along the perimeter of the canvas, maintaining a distance of 5 cm from one “island” of glue to another. Then press the decoration against the wall and hold it there for a while.
Coat hook or paper clip
If there is wallpaper on the walls, you can use a clothes hook or paper clip. Mark the location of the fastening with a simple pencil, and make a cross-shaped cut at the marked point using a sharp stationery knife.
Related article: Crochet beret for women with description and video tutorials for the summer
Fill the resulting space with glue, secure with a paperclip or hook, and straighten the wallpaper in the place of the cut. You can hang the picture no earlier than after 24 hours.
Needles, buttons and pins
These products are only suitable for fixing small pictures on walls covered with wallpaper. The upper corners of the image are pierced through with a needle or pin and attached to the wall. If necessary, you can secure the decoration in the lower corners.
Photos in the interior - how to hang photos without nails
- Date September 25, 2013
- Author Natalya Kozerskaya
- Categories Interior photography
It’s been a long time since I wrote on the topic of photographs in the interior... And today I want to answer the question that was asked by my readers in the comments to previous articles - how to hang photographs without nails and without harming the wallpaper.
NAIL-FREE FIXING IS REUSABLE AND SAFE FOR WALLPAPER
1.
The most convenient option is Command 3M fastening system
It allows you to easily and reliably attach objects up to 4 kg (depending on the type of fastener), and is removed without leaving marks on the wallpaper. Mostly these fasteners are white, but you can also find black fasteners.
For photographs, two types of Command mounts are available: - Frame holders with loops. Withstands a weight of 2 kg. — Fasteners for frames without loops. The manufacturer guarantees that a set of 4 small fasteners can withstand weights of up to 450g, medium ones - 1 kg, large ones - 2 kg, although the promotional video even talks about 4 kg.
Why is the second mounting option convenient? the second part of the Velcro is attached directly to the frame; it can be re-glued several times if you were unable to hang the photo straight the first time.
The main advantages: - you don’t make a hole in the wall and don’t spoil the wallpaper if a photo or painting needs to be removed - you can easily change photos and frames.
These fastenings may not be suitable: - for very delicate designer wallpaper, - for uneven surfaces, for example, brick walls.
If you are interested, you can watch a video about these holders.
2. There are also several options for lighter photos and posters:
2.1. Scotch 3M Branded Adhesive Removal Strips:
- Adhesive removable clear squares and Scotch strips
- Adhesive, removable colored Scotch figures (come in a variety of colors, can be reused, ideal for fun baby photos, one figure holds 85g weight)
These mounting options are easy to remove without harming either wallpaper or photos, so they're great for hanging a collage of small, frameless photos on your wall, for example. Suitable for wood, glass, tiles, etc.
2.2.
Bantex Tack-All or Scotch 3M
adhesive
This adhesive mass holds a weight of about 450g and is similar to chewing gum - you tear off a piece and stick it to the wall, then press a photo frame or paper poster against it. It is easily removed and can be used again - as with chewing gum, you simply take another piece of tape and press it several times against a piece of tape on the wall/paper, gradually removing the latter from the surface.
The downside is limited use. For reliable fastening, you need a fairly smooth wall with or without non-textured wallpaper, as well as a plastic or paper surface of what you are hanging - a photo frame or a paper poster itself.
Where can you buy Command, Scotch, Bantex mounts: - stationery stores, stationery sections in large hypermarkets - photo stores and photo laboratories We are talking about both regular stores and online stores. There you can also look at similar products from other lesser-known manufacturers - for example, Kores, Unibob, UHU.
FASTENING WITHOUT NAILS, DISPOSABLE
Of the neat fastening options without nails, the following can also be mentioned, but when dismantling they can still damage the wallpaper, the wall or even the photo frame itself: - Double-sided mounting adhesive squares and 3m Scotch foam
(4 squares can withstand weight up to 900 g) -
Just double-sided tape - Liquid nails (sold in building materials stores)
CREATIVE FASTENING WITHOUT NAILS
Also, don’t forget about the various creative options that I wrote about earlier, when you attach not the photographs themselves to the wall, but something on which you can later put or attach them: - Photos on shelves By the way, Ikea has neat narrow shelves for paintings.
— Photos on clothespins, including in a large frame or grid, on tape or rope
— Photos on magnets or a magnetic board
Photos used in this article were taken from the following websites: Bridal Musings, Cathy Mores Photography, Sierra Studios Photography, Photojojo, Ikea.
I hope the article helped you, and now you won’t have any difficulties with how to hang photos without nails and without harming the wallpaper. Don't forget to SHARE the article with your friends You can find other articles on how to post photos in the “Photos in the interior” section.
How to attach a collage of paintings
If you plan to hang several paintings, you can use the methods described, but a composition mounted in a non-standard way will look much better and more original.
Board
In this case, it is better to choose a board that differs in color from the walls and other interior details. This will allow it not to “merge” with surrounding objects, but to immediately attract attention.
Mount the board on the wall and place the images on it in the order you want. The method of attaching pictures to the board can be different: liquid nails, double-sided tape or a small nail.
Plank
Using a wooden plank and nylon threads, you can secure paintings at different heights. Attach the plank to the wall, having first tied thick nylon threads or twine to it. The length of the thread depends on the height at which the painting will hang.
At the other end of the thread there will be a hook or a paper clip (if the canvases are not heavy), on which the images are hung.
Trouser hangers
This method is suitable for paintings that do not have fastenings. You will need hangers with clips like those used for trousers.
Attach hooks or nails to the wall on which hangers with canvases will be located. Insert the image into the clamp and place the pictures on the walls in the chosen order.
How to determine your fame sector?
Each person has his own element of power. Usually it is energy that destroys the element of personality. This very element of power is, as a rule, strong in its sector. For example: - water - in the north; - land - in the northeast, southeast, southwest, northwest; - metal - in the west; - tree - in the east; - fire - in the south. To know where and how to place letters, you need to determine your element of power.
Since this publication was created at the request of one of the readers of articles on this site, his data and his spouse will be given as an example. To understand what question he is asking at the moment, you should familiarize yourself with his request.
Hello! This is Evgeniy again. I express my deep gratitude to you for your articles and advice, they help me a lot, so I want to ask you one more question. I have accumulated several certificates of honor from previous jobs and several medals for sporting achievements, and my wife has the same. Can you tell me in which sector of the living room, on which wall and how best to place them? Thanks in advance.
Two consultations have already been held for this man and his wife. This publication focuses on the data reported in this article. Evgeniy’s personality element is metal. This means that the energy of power for him will be fire. The fire element is active in the south. It turns out that this man can place his certificates on the southern wall in the hall, in the living room, in the office or in the southern sector of the apartment. After the correct placement of certificates, as a rule, positive news regarding career and relationships with superiors, colleagues and clients follows.
The element of personality of Eugene’s wife is fire. This means that the element of power for her will be water. If this woman decides to place her certificates in the north in the hall, in the living room, in her office or in the northern sector of the apartment, then her salary may increase or she will receive a promotion. However, it should be borne in mind that the result of placing diplomas, certificates and awards in the right sector, as a rule, depends on how favorable the energies are to a person at a particular moment. Sometimes the result may simply be improved relationships with superiors and colleagues.
How to make a picture mount
If there is no fastening on the picture, and for some reason it is impossible to hang it on the wall using pins or liquid nails, use one of these methods:
- Using a furniture stapler, attach a thick nylon rope or twine to the frame.
- Drive a nail or screw into the top of the frame, attach copper or aluminum wire to it, wrapping it several times under the head. Bend the other edge of the wire with a hook.
- If the picture is three-dimensional, you can use furniture hinges. Attach the loop to the frame on the back side of the canvas, and secure it to the wall with a screw.
Related article: DIY fabric flower necklace
Any of these mounts will securely hold the decoration on the wall.
How to hang a picture on wallpaper without nails
Fastening apartments without nails: options and ideas
You can install the picture without using nails. Methods:
- A small picture by weight can be attached to a spider hook. It installs quickly and leaves no marks on the wall.
- The lightweight canvas can be installed on the wall using needles. A tailor's needle is perfect; you need to drive it into the wall at an angle, remove the eye with pliers and hang the frame.
- Double-sided tape is perfect for drywall surfaces.
- Special Command Velcro. They are easy to install and securely fasten paintings weighing up to two kilograms. Such. The cathode cannot be used on vinyl wallpaper.
- Liquid nails can withstand heavy paintings. They are applied in small dots to the inside of the canvas and attached to the surface with light pressure.
- Polymer glue. It is applied either to the frame, if the picture is not heavy, or along the entire perimeter, if the weight is large, and pressed against the wall.
- On a fishing line or transparent thread attached to a molding or ceiling plinth.
- You can purchase a special rail with hooks that can be moved. Several canvases are immediately attached to it; they can be swapped at any time. This method looks original.
How to Attach Picture Holders to a Concrete Wall Without Drilling
You can attach the holders to a concrete wall using glue, double-sided tape and adhesive tape.
How to attach a world map without nails without damaging the wallpaper
Lightweight sheets can be attached using ordinary paper clips and needles. They are easy to install, hold securely and leave unnoticeable marks.
- Select a section of the wall and mark the location where the paperclip will be attached.
- Carefully make a cut along the mark and a second one perpendicular to the first, only smaller in size.
- Gently push the edges apart with a blade; as a result, a small empty space will form under the wallpaper.
- Pull the rivet apart to form a hook.
- Glue fills the void under the wallpaper.
- The paper clip is pressed onto the glue and the wallpaper must be returned to its original form.
- Within 24 hours the glue will set and the fastener is ready.
When using double-sided tape, when removing it from the wallpaper, they may come off with it.
But you can try to do this carefully and not damage the wallpaper; you need to remove the tape at an angle of 90 degrees.
How to hang a frame without nails on hooks
To avoid driving nails into the wall, you can use special hooks with a sticky base or regular coat hooks. They are easy to attach and hold the canvas securely. If necessary, you can hang the picture on several hooks.
How to hang a large picture on the wall
If the image with which you want to decorate the room is large and has an impressive mass, you need to take the mounting method seriously. A paper clip or liquid nails will not hold a large picture, so reliable fasteners are necessary.
Four pin hooks
For a voluminous decoration you will need several similar mounts. These hooks are equipped with durable alloy pins and only need to hit the fastener a few times with a hammer to get them firmly seated in the wall.
Special mounts
You can purchase special mounts for paintings. For bulky and heavy fabrics, it is better to choose sets of durable hooks with a reliable adhesive base. In this case, you do not have to worry that the mount will not support the weight of the image.
Cunning spider hook for paintings
In modern hardware stores you can find such an option for attaching a picture as a hook called a spider. It will also allow you to solve the problem of interior design without drilling the wall and damaging the wallpaper. The damage from its use is minimal; if you plan to dismantle the device, small dents may remain in the wall, which can be easily removed with your fingers. The maximum weight for a spider is up to 2 kg.
The installation of this interesting hook is described in detail on its packaging; it itself is very easy to use and will not cause much trouble. After you have removed the device from the packaging, you should decide where to place the picture on the wall.
The spider should be applied so that the nails on its surface are on the front side. An important condition is that the wall must be smooth and solid; crumbling is not allowed. It is necessary that the device fits tightly to the wall.
After the mounting location is marked and the hook is attached, we hammer in the nails with a hammer so that they fit into the wall. The nails should go completely into the wall, and their remaining parts should completely sink into the body of the hook. Once the hook has been fixed to the wall, you can safely hang a picture on it.
Dismantling the hook, called the “spider,” will not cause any trouble; it will be enough to simply remove it from the wall with force, as a result of which the nails will come out of the wall. After removing the device, you can wipe the mounting area with a dry cloth or fingertips to tighten the remaining small holes on the wall.
How to choose a place for a painting
When placing paintings, it is important not only to choose the right mounting system, but also to place the image in the right place. When choosing a section of wall for the canvas, pay attention to the following points:
When creating a composition from several paintings, remember that the main painting should be located in the central part of the collage.
