If you have thick cardboard at home that you cannot find a good use for, then, armed with our idea, you can easily make a small and fairly durable table.
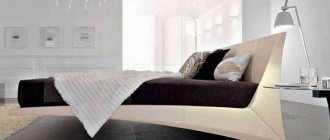
A cardboard table cannot withstand heavy loads, so it is used as a coffee table.
Such a table will be designed for moderate loads, it can be used as a coffee table or under a computer, and it will be able to withstand the weight of the monitor.
Please note that it is best to make a corner table from cardboard with your own hands. In this case, it will receive additional support from the walls and will be more stable and reliable.
You can adapt the general principle of making a table to suit your purposes. To do this, you can decide on its shape and size yourself. This must be done before starting work in order to know in advance with what parameters the parts will be manufactured.
Cardboard furniture is a choice for those who care about the environment
Inexpensive, beautiful and environmentally friendly furniture in your home – is it a dream, a fantasy, or is it really a reality? The answer to your wishes is excellent and original cardboard furniture !
You can’t even imagine what a huge amount of different furniture you can make yourself from this material. And you will learn how to turn your dreams into reality from our article. Today, cardboard furniture is very popular in many countries.
Its advantages are quite clear - lightweight, durable, environmentally friendly, inexpensive and, most importantly, it can be easily made with your own hands.
Stages of making a paper chair with your own hands.
Let's look at creating a paper chair step by step. This option is quite difficult to implement and may not work the first time.
Read and repeat the following steps carefully:
- Take a square piece of paper and fold it diagonally twice.
- At the same time, return the sheet to its original position each time. It is important to make the diagonals visible.
- Next you need to get a horizontal fold line. To do this, we also bend the sheet and immediately return it to its unbent form.
- We take the sides and connect them to each other so that we get a triangle.
- We bend the left edge and direct it to the center. This is a kind of mark at the bottom of the triangle.
- We direct the right tip towards the resulting mark, and then tilt it downwards.
- We bend the lower part twice so that the product is thinner.
- We bend a small corner in half and direct it to the left side.
- Next we straighten it. You need to insert some thin object into the corner.
- Then we straighten the corner and see a part that is very similar in appearance to the leg of the future chair.
- Next you should make another leg.
- In exactly the same way, we get a small but noticeable mark and bend the right side to the center. And we bend the left corner to the right side towards the mark and bend the corner back and down.
- Then the lower part must be bent in half.
- We repeat all the steps for the second leg in the same sequence. As a result of the work done, the chair already has two supports.
- Let's start making the third support.
- We tilt the second part of the right corner to the left.
- We tilt the bottom corner back up to the vertical line.
- We bend the left side towards the right, and point the bottom corner up. We open it, straighten it and get a small triangle-shaped figure.
- We bend it in half and get the third leg of the craft.
- The fourth support can be made using a similar and already proven technology as the previous one.
- Bend the sharp corners of each leg upward.
- We make the back of the product. To do this, bend the top of the workpiece back in the opposite direction.
Small coffee table in nautical style
The marine theme is always successful because it is associated with vacation and relaxation - things about which it is impossible to have negative emotions. Such a set will always lift your spirits, especially if you use souvenirs brought from the south to decorate it: shells, stones, sand, etc.
But first you need a base. The material at hand that can be found in any pantry is suitable for it: an old window frame and a wooden handle.
The frame is first cleaned of dust and dirt, the paint is removed, the surface is treated with sandpaper and sanded, and then re-coated with fresh paint of the desired color. If necessary, new glass is inserted into the frame. The role of the base will also be played by the usual available materials: plywood or furniture board.
The cutting is sawn into four equal parts - these will be the table legs. They are carefully cleaned, painted and attached to the base using self-tapping screws.
The table is ready! All that remains is to add decorative details to the empty box, which is a frame: multi-colored sand, pebbles, imitation coral, photos. As an additional decoration, you can use a thick rope that is wrapped around the legs.
Here's another interesting option for a coffee table
The video tag is not supported by your browser. Download the video.
So, you have decided to make a coffee table from cardboard, now you need to understand the technology of its manufacture.
Initially, you should design a tabletop. In order for it to be strong enough to withstand the loads of a monitor or laptop, it is best to design it on two levels.
To do this, using a stationery knife, three elements of cardboard are cut out in a shape reminiscent of the designed tabletop. The first part is the top level, the second and third parts will be used for the bottom level.
Then thin cardboard strips are cut, bent like an accordion and attached with glue to the lower parts of the tabletop. It should be remembered that they are fastened with an edge and the width is of equal size. Therefore, when markings are made, it is better to use a ruler. If, however, the strips turn out to be different in width, this may lead to the appearance of dents. The density of the cardboard strips is also of great importance for the strength of the tabletop.
The next step after laying the cardboard is to attach the second part of the bottom of the tabletop. Next we move on to manufacturing the top level. Strips of cardboard are also glued onto it and after the glue has completely dried, both parts of the tabletop are connected.
To increase the strength of the cardboard strips, it is best to additionally secure them with tape and the corners require special attention.
So, the tabletop is ready, now let's move on to making the base. When making a corner table, you only need two legs. At the same time, to increase functionality, you can also build several shelves.
To make the legs you will need four equal sized pieces of cardboard. Moreover, they can be either rectangular or square. It all depends on the size of the leg. You can also use glue to attach them. It is necessary to make grooves at the junction and secure them with glue.
If you decide to make a solid table leg, then in this case the stiffening ribs can be single-layer, but should be placed quite tightly. It is best to glue strips for shelves and stiffeners 2-3 pieces at a time, which will lead to a more reliable result.
What do you need for work?
The main material for making the table is cardboard. In some cases, you will need sheet cardboard, in others it is enough to take cardboard boxes and scraps.
Corrugated cardboard
Some models of tables are made of paper - plain or newspaper. Also, to make and decorate furniture, you may need additional consumables (pipes, plastic, glass, tape, glue, sandpaper, paint) and simple tools (tape measure, knife, ruler).
Cardboard table - basic option
Boxes from household appliances are perfect for such a product, especially those that are large. To begin with, determine the shape and dimensions of the tabletop: it can be round, rectangular, square.
Advice! In order to be able to place heavy objects on the table (computer, laptop, books), the table top is made of two levels.
Table made of sheet corrugated cardboard
The technology of its manufacture is as follows:
- Using a stationery knife, cut out two identical blanks.
- From the same cardboard, cut many strips about 5 cm wide and bend them like an accordion in any way. All ribbons must be exactly the same in width, so they are first marked on cardboard using a ruler.
- Using glue, securely glue the strips to one of the blanks, placing them edge-on. The tighter they stand, the stronger the finished product will be.
- Allow the glue to dry completely.
- In the second workpiece for the tabletop, holes are made in the corners for the legs.
- The two parts are connected to each other and glued so that the accordions remain inside the tabletop.
- Cut out another strip and paste it over the sides of the future table surface.
- The product can be painted with any paint or decorated with varnish, stickers, ornaments, craft paper, or wrapping paper.
The easiest way to use the legs for such furniture is to use 4 identical pieces of plastic pipe, which are also pre-painted. If the table is corner, you only need 2 legs.
They are glued into the prepared holes and pressed tightly from the inside of the tabletop to its upper part. If desired, a couple of shelves are built at the bottom of the table in the same way, but making them thinner than the tabletop.
Coffee table-pyramid
A cardboard table can also stand on one leg. It will become an original piece of decor, a convenient stand for tea drinking and gatherings with friends. In addition, it will be easy to transport from place to place. The basis for the work is also a large cardboard box from household appliances.
First of all, cut out the pyramid. Its center is a square of any size, with identical triangles extending from each side.
To get the pyramid itself, the triangles are folded inward and all their sides are gradually glued together (using tape and glue). The center of the workpiece remains at the base of the pyramid - a square.
Gluing the pyramid
The table surface is made from a large cardboard box lid or glued together yourself. The edges of the tabletop must have sufficient thickness (at least 5-6 cm).
Important! To strengthen it, a frame in the form of a lattice of light wooden slats is glued inside, otherwise the table may bend under the weight of heavy objects.
Next, the table is finally assembled: the sharp end of the pyramid is inserted into the center of the tabletop, carefully cutting a hole at the top. Glue all the grooves and let the glue dry for 24 hours. Furniture is decorated randomly. For example, they are finished with foil, kraft paper, self-adhesive film or covered with acrylic paint.
Cardboard coffee table
Table made of paper stones and glass
The surface of such a product is made from a finished piece of glass or plastic, and it can have any shape and size. The table leg is unique - it is made of paper stones, which are made from corrugated cardboard.
Flat cardboard is not suitable for this purpose, nor is material with various inscriptions and drawings. The ideal option is to use unnecessary boxes or ready-made sheets of corrugated cardboard.
Table on stones made of cardboard
Furniture legs do this:
- Remove all stickers and tape from the boxes.
- The raw material is torn into pieces, then crushed into fine crumbs in any convenient way.
- The paper crumbs are poured with water in a large container, left for 1-2 days, and the mass is stirred periodically.
- After complete liquefaction, carefully squeeze the water out of the cardboard.
- In another bowl, dilute the PVA glue with a small amount of water so that it becomes a little thinner.
- Add cardboard pulp to the glue and knead the “dough”.
- Stones, columns or other products that could serve as legs for a table are fashioned from the mass.
If the stones are large in size, to save cardboard mass, the inside of each product is stuffed with crumpled cardboard, which was previously wrapped with masking tape. This lump is coated with gruel, compacted and given the desired shape.
The cardboard mixture is applied in layers, with the layer thickness being about 1 cm. After drying, a new layer is applied.
Dry stones only in a dry room, otherwise they may crack. After 14 days, they are sanded smooth with sandpaper or a sander so that the top is flat.
Making cardboard stones
Then the workpieces are coated with wood primer. A finished tabletop made of tempered glass or other material is glued to the top of the stones.
Table made of cardboard boards
Such a table will be incredibly durable, beautiful, and at the same time very cheap. The base material (cardboard boards) is also suitable for making chairs, shelves, racks and other furniture. To work, you will need identical sheets of corrugated cardboard of the required size.
These sheets are glued together with any of the following compositions:
- Wheat paste. Heat 1 part flour and 4 parts water over low heat until a thick mass is obtained. A little bactericidal primer is added to the finished product.
- Glue on wood. This composition can be purchased at any hardware store and diluted 1:1 with water.
- Wallpaper glue. It is also diluted with water according to the instructions.
Place the first piece of cardboard on a flat surface, apply a large amount of glue, and distribute it evenly. Continue to place cardboard and fill it with glue, gradually reducing the consumption of the product.
The finished board is laid to dry in the sun for 2 hours, or indoors for a day. After drying, the blanks are used to form a table top and other table parts, and decorate the product in any convenient way.
Cardboard is a universal and multifunctional material. If you use your imagination, you can make a lot of useful and practical things out of it without spending extra time and money.
DIY coffee table.
You decided to buy a high-quality and inexpensive coffee table, but after shopping, you were probably convinced that high-quality coffee tables made of natural wood cost good money.
There is a solution - to make a coffee table with your own hands. If we knew how to make a magic wand, then everything would be much simpler, but we will have to work a little and you will see that there is nothing complicated.
In this material we will look at making a coffee table from natural wood with our own hands, as they say from “A” to “Z”.
Of course, you still can’t do without financial investments, but they will be several times less than the cost of a coffee table bought in a store.
Coffee table shown in the photo. 1 cost approximately 1000 rubles.
And two days off for the time spent on making the table (including painting and drying).
Photo. 1 DIY coffee table. Prepared for final processing - staining and varnishing.
Table dimensions table top 1000 mm x 600 mm thickness 30 mm shelf (size is selected after attaching the legs) of this table 640 mm x 430 mm, thickness 18 mm.
The height of the coffee table from the floor is 450 mm.
The most difficult part of the table is the tabletop and shelf. We will have to buy them (fortunately, the stores have everything), since, without special equipment and devices, making a high-quality product is quite problematic.
The tools you will need are a jigsaw, a screwdriver or drill, PVA glue or any other glue designed for gluing wood.
The entire process of assembling and making a coffee table with your own hands is shown in detail in the photographs.
Making the legs of a coffee table (photo 2).
Photo. 2 Making coffee table legs.
The legs are cut with a jigsaw from a block of at least 150 mm wide, 430 mm high and 45 mm thick and carefully processed with sandpaper.
For those who are interested in this coffee table design, the stencil form of the legs can be downloaded HERE.
Unfortunately, the height of the table legs is larger than the size of a standard A4 sheet, so the stencil form consists of two halves. Print both and glue them on thicker paper or cardboard. All that remains is to transfer the stencil shape of the legs of the coffee table onto the wood and cut it out with a jigsaw.
We attach the legs to the tabletop (photos 3, 4, 5, 6, 7, 8).
Naturally, we start by marking the place where the legs of the coffee table are attached (see photo 3).
Photo. 3 Marking the location of the coffee table.
We fasten the legs to the table top in a “tenon” using wooden “caps”, and put them on glue (PVA or any other intended for gluing wood), you can additionally strengthen the connection with a metal corner on a self-tapping screw (see photos 4, 5, 6).
Photo. 4 Attaching the legs of a coffee table.
Photo 5. Attaching the legs of a coffee table.
Photo 6. Attaching the legs of a coffee table.
Rice. 7 Attaching the legs of a coffee table.
Rice. 8 Attaching the legs of a coffee table.
Fastening the shelf of a coffee table (photo 9).
Photo. 9 Attaching the shelf to the legs of the coffee table.
We fasten the shelf with self-tapping screws (see photo 9). One caveat - before tightening the self-tapping screw, it is better to pre-drill a hole with a drill of a smaller diameter (to prevent cracking of the wood), otherwise you can ruin the whole job.
The coffee table is ready, and moreover, made with your own hands from natural wood. All that remains is to cover it with stain and varnish. The color depends only on your preferences.
How to make a folding table
A folding table is an incredibly useful thing that I have always wanted to have. I put off the purchase for a long time and suddenly at one of the summer festivals in the park I saw a folding table of a very interesting model. I couldn't resist taking a photo of it in order to reproduce it myself. Later, I also came up with a special convenient carrying bag for this table.
The whole work process turned out to be far from difficult and brought me pleasure. And the result exceeded all my expectations! I decided to share my experience online with those who also want to make a folding table with their own hands.
Here are the materials I used for the job
- 1 PC. a round wooden block 120 centimeters long and 2 centimeters thick;
- 3 pcs. parquet boards, 5x 0.6x20 cm,
- 1 PC. parquet board, 2.5 x 0.6 x 20 cm,
- 4 things. transport bolts,
- 4 things. brass threaded nut inserts,
- Nylon flat cord, 10 x 2.5 cm,
- Staples, 6 millimeters each.
Once you have everything you need for work in your hands, we can get down to business.
Step one. Cutting a round block
Saw the round block into four equal parts. Please note that I do not mean sawing off 4 pieces of 30 centimeters each. I point this out because I haven't seen any 120cm bars on sale lately that actually measure up to their length.
Step two. Preparing planks for the table top
Cut the 5cm planks into pieces of 60cm each. You will only need 10 planks. My experience suggests that it is best to saw off all ten of them at once, and then make sure that they correspond to the required length. At this stage of work, I urge you to be especially attentive and careful. When sawing off the boards, I clamped them in a vice so that they could not move. In addition to these boards, you need to saw off two 2.5-centimeter boards of the same length, 60 cm.
Step three. Processing the edges
Using sandpaper, carefully and carefully sand the edges of all sawn parts.
Step four. We are preparing the nylon braid
Cut two pieces of braid, each 60 cm long. Lightly scorch all edges with the flame of a lighter so that they do not crumble later. This makes it very convenient to work with any nylon fabric.
Step five. We connect all the planks of the tabletop
Now at this stage of the work we need to evenly distribute the planks for the tabletop. You can use any scraps of planks as a separator, the main thing is that they are the same. Lay the tabletop planks with the wrong side up, as this will be the future bottom of the tabletop.
Step six. We fasten the boards together using nylon tape
Before you start doing this, make sure at the very beginning that your staples will not pierce all the way through the boards. My stapler, on the other hand, turned out to be too weak to drive staples into hard wood, and I had to “help” it a little with a hammer.
It is also worth paying close attention to what surface the boards are laid on. In my case, it turned out that I did not pay due attention to it and, as a result, slightly damaged the front side of the tabletop.
Step seven. We continue to fasten the boards together
During the working process, make sure that the spacers can be moved freely, and that the boards are still firmly connected to each other with the same nylon tape. If everything is so, then calmly continue working.
Step eight. Drilling holes
We place 2.5-centimeter strips across the tabletop. After this, mark the location of the center and drill 6 mm holes in that place. These strips are a fixative, they make the tabletop strong and prevent the nylon tape from stretching excessively. After this, make sure that the bolts fit into the holes properly.
Step nine. Installing fixing strips
- Once you've done this, your countertop will look something like this (see photo)
Step ten. Making legs for a table
Prepare a caliper and use it to carefully mark the middle of one of the cuts of the round block. Clamp it in a vice and drill a hole with a 7mm drill bit to a depth of 25mm.
I highly recommend that before you place the block in a vice, be sure to wrap it in cardboard. This will reduce the pressure and prevent the vice from damaging the block.
It is also very important not to hold the block with your hands while drilling: this is very dangerous!
Unfortunately, my holes did not turn out perfectly even in the center, but this did not in any way affect the quality of the finished product as a whole.
Step eleven. Installing threaded nut inserts
As it turned out later, these small brass threaded inserts turn out to be a very delicate thing. They are very difficult to install perfectly straight.
Thus, I simply ruined a couple of holes, but fortunately the internal thread remained intact. This is the only reason I didn't have to make new legs. I suspect that in order to perform this task carefully and delicately, it will be necessary to use a special tool.
Step twelve. Assembling our folding table
Now all you have to do is just screw the legs onto the screws that are inserted into the tabletop. When you don’t need the table and need to disassemble it, you can easily put it in a bag or a special bag.
But what will be the final chord in making your folding table? Everything here is up to your taste and discretion: you can cover its surface with varnish, drying oil, etc. There is a lot of room for creativity and experimentation!
Tell your friends about us!
Source: https://best-sborka.ru/kak-sdelat-skladnoi-stol
Necessary tools and material
In the process of manufacturing cardboard furniture, the main role is played by the main raw material (cardboard) and related materials to create the final product. Regardless of the type and purpose of the creation being invented, the list of tools will remain unchanged:
- a stationery or construction knife with a sharpened edge;
- ordinary or paper tape, double-sided;
- scissors;
- roulette;
- ruler;
- pencil and grater;
- sandpaper for sanding cuts;
- PVA glue, Moment, hot melt glue or construction glue (selected depending on the type of cardboard used);
- kraft paper.
In addition to these positions, it is worth thinking about the decor of future furniture. Fabrics, paper, wallpaper, paints for creating unusual designs, etc. are suitable for this.
As for the choice of the main material - cardboard, you need to take into account the strength parameters that will extend the service life. Furniture made from corrugated cardboard should be preferred because old boxes may not be durable. The more sheets there are in such cardboard, the stronger it will be in the future. The number of layers of paper and cardboard varies from 2 to 7.
Simple origami diagrams of a paper chair
A miniature chair is very easy to make using the origami technique. To do this, you will need a sheet of paper measuring 20x20 cm. Schemes for manufacturing can be found on thematic websites and downloaded from the Internet.
There are also many books on this technique. However, it is quite possible to experiment and create your own scheme. There is a very simple scheme for making a high chair, understandable to both adults and children.
Follow the strict sequence of actions:
- You need to take an ordinary sheet of paper in the shape of a square and fold it horizontally. The larger it is, the larger the chair will be. Accordingly, from a small piece you can make a very tiny product.
- Next, return the sheet to its original state and fold half the paper horizontally.
- Fold the other half of the sheet horizontally in the same way.
- We unfold the sheet and begin to fold it in the opposite direction.
- Carefully cut off one of the sides and bend the remaining part in half.
- We turn one corner so that we get a corner. We do the same with the other side.
- We direct the lower part upward.
- We wrap the side parts on each side. In configuration, they resemble the walls of a chair. The resulting product is already visible.
- We unfold the craft, straighten it and give it the outline of the desired product.
REFERENCE! An ordinary chair can be easily made from a simple origami pattern in 5 minutes.
IMPORTANT! In the origami technique, strictly follow the recommended steps and try to make all folds as accurately as possible with the smallest error.
Advantages of a cardboard table
Before you start making furniture from cardboard, you should initially consider its main advantages, which include:
- stylish and original design. Cardboard will allow you to design and make almost any piece of furniture based on your own taste;
- efficiency. During production there is no need to purchase consumables and pay for delivery and installation. It is necessary to invest only in the necessary tools, which can then be used in the manufacture of other pieces of furniture;
- mobility. Furniture made of cardboard is easy to unfold, which makes it convenient for transportation;
- ergonomics. Cardboard furniture saves you time by eliminating shopping trips, is comfortable and is designed to suit your personal taste;
- safety. Environmentally friendly material will be safe for you throughout its entire service life;
- strength. If you approach the process of manufacturing and processing the material itself (cardboard) correctly, the resulting result will please you for a long period of time.
But as they say, in every barrel of honey there is a fly in the ointment. The main disadvantage of cardboard furniture is that it is negatively affected by humidity and this type of furniture cannot be used outdoors in damp or rainy weather.
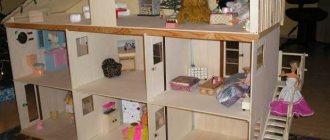
DIY table for dolls - master class. Press!
Girls love to play with dolls, using the entire space of the room and improvised objects as furniture.
buy a whole dollhouse in children's stores not cheap. Making toy furniture with your own hands is a budget alternative to purchased options. Making a table for dolls is quite simple.
What can you make a table for dolls from?
Most often, any available materials are taken doll :
- wood , plywood, bars, laminated panels, etc.;
- plastic (plastic);
- cardboard, paper;
- matchboxes ;
- CDs;
- sticks , plastic bottle, tin can and much more.
DIY cardboard chest of drawers: detailed instructions with photos
There is a creator in each of us. At a certain period of existence, a person, as an individual, needs to do something with his own, not always with golden hands. These impulses are embodied differently for everyone. This directly depends on the degree of skill.
Original handmade products
It has become a fashionable trend to produce handmade products - soap, decorative items, jewelry, paintings, watches, interior items, and much more. A furniture maker with carpentry skills can easily make a chest of drawers, a table or a chair from natural wood with smooth lines and carved details.
What should those who are bursting with creative impulses, but have no special skills, do? The process of designing and gluing furniture from cardboard will help you “express yourself” - a cheap option, it helps to turn unnecessary boxes, pieces of wallpaper or a liter of paint into a full-fledged and worthy piece of furniture for a child’s room or living room.
Mini chest of drawers made of white cardboard
Anyone can make a chest of drawers from cardboard or other available materials. When purchasing household appliances, boxes are left behind. We throw them away, despite the thick walls. By gluing the cardboard in several layers, we get an object with the required strength.
Multi-colored chest of drawers made of cardboard for sewing accessories, covered with fabric
Cardboard furniture: design and construction
Beautiful small chest of drawers made of cardboard using decoupage technique
There are several options for making cardboard furniture. You can make separate patterns for the side walls, top, bottom, and then glue all the parts together. Another option is to insert smaller boxes into a large box from a refrigerator or washing machine. The walls will come out stronger.
If you cover the inner surface of the shelves with bright fabric or colored wallpaper, and the outer surface with plain wallpaper, you will get an original, open shelving unit. The shelves can hold books, photo frames, vases with flowers, and other decorative items.
Chest of drawers made of cardboard
Having subjected the cardboard to external and internal decoration, no one will guess that you made the shelving unit or chest of drawers from cardboard boxes yourself.
White chest of drawers made of cardboard with drawers of different sizes
Features of cardboard and necessary tools
Cardboard is suitable for design and decoration, providing a wide variety of original shapes
When starting to realize your creative ideas, think about the design of the future product and the place where it will be located. Cardboard as a material has advantages and disadvantages.
Advantages and disadvantages
- Strength. A hand-made cardboard chest of drawers can withstand decent loads.
- Low cost. You can do without any investment at all if you have a supply of cardboard in the house or you know where to get extra.
- Environmentally friendly. Easy to dispose of after use. Cardboard is a natural material and is not capable of polluting the environment.
- Flexibility. If desired, the object can be given any shape.
- Shortened service life. Cardboard is not wood; it cannot last 20-30 years. With careful use and high-quality assembly, cardboard will last 5 to 10 years.
- Use in dry rooms. Cardboard is afraid of moisture. You can't put such a thing in the bathroom.