Do you want to please your daughter and give her a doll house? Read how to make a house for Barbie, Monster High with your own hands from cardboard, plywood and MDF.
What girl doesn’t love dolls and doesn’t dream that they have a real house with spacious rooms and furniture? Such a toy will not only entertain the baby, but will also make her director's play more complex and varied. As you know, while playing, children learn and develop, and parents must make an effort to organize the conditions for this development.
Do-it-yourself dollhouse for Barbie: diagram, photo
Of course, there are simpler options for making a doll house for your daughter:
- Buy ready. But they cost exorbitant amounts of money. At the same time, the plastic parts turn out to be fragile, they are poorly attached to each other, and the house constantly falls apart.
- Organize your home in a closet, nightstand or bookcase. Probably, my parents did this themselves in their early childhood. The good thing about this option is that, firstly, there is no need to spend extra money, and secondly, the child will learn to use substitute objects in the game. The downside is that sooner or later the daughter will say that the house is not real, she will want to have something more believable, with wallpaper, windows, etc.
Then mom and dad will have to decide how to make this toy themselves. First of all, decide on the sizes. If the house is intended for a doll like Barbie or Monster High, it will turn out to be oversized. The height of each room will be at least 30 cm, the width, so that you can put a doll bed in the house, 40 cm or more. For baby dolls and toys-figurines, you can make a more compact “housing”.
DIY plywood house for Barbie.
IMPORTANT: In practice, a doll's house takes up space as a full-fledged piece of furniture. Having decided to make one, you need to think about where it will stand in the room.
The next stage is the selection of materials. As a rule, dollhouses are made from:
- Cardboard boxes and cardboard. This is a budget option; you don’t need to spend a lot on purchasing materials. Also, you don’t need to think about what kind of fastenings to assemble the house with; you only need any glue and adhesive tape. The big disadvantage of the house is that it is fragile, hygroscopic, and gets dirty easily. You cannot place heavy furniture on thin shelves. A cardboard doll house is not suitable for small children who do not know how to calculate strength during play.
- Plywood. A more practical and also cheaper option. A sheet of plywood is applied to parts for a toy house with your own hands using an ordinary jigsaw. The toy turns out better. But porous plywood must be painted or glued so that it does not absorb dust and moisture, does not swell, and fungus does not grow in it. Another disadvantage of this material is that thin sheets of plywood are not easy to connect together so that they hold tightly and the house does not fall apart.
- Wood, MDF. The most practical and expensive option. The house will be of very high quality and durable, stable and safe. It will not fall apart, even if a child hangs on it with all his weight. MDF is easy to process, the structural elements are firmly connected to each other with self-tapping screws, and their caps can be recessed into the thickness of the material. MDF gives absolute freedom to house decor ideas.
An interesting dollhouse made of cardboard with lighting.
IMPORTANT: You need to remember that a child will play with the house, and, most likely, this large toy will be in the children's room. Materials for it must be hygienic, environmentally friendly, hypoallergenic, and non-toxic. If after priming or painting the house emits an odor, you need to let it air out.
Beautiful homemade doll house.
Although the house is intended for children from 3 years old, that is, the age at which the director’s play has already been formed, you need to pay attention to the presence of small parts in it that can cause choking. Before you start purchasing materials for a dollhouse and directly move on to assembling it, you need to make a plan or diagram. It will help you calculate how much material you will need to buy. The parts will correspond to each other, they will be firmly connected. A stable and beautiful house for toys will delight the child and will not spoil the interior of the apartment.
Scheme of a doll house with dimensions.
Do-it-yourself dollhouse, doll house master class
For Barbie dolls, Monster High and others like them, stores today have everything from underwear and shoes to castles and yachts. But it’s much more interesting to sew dresses for them and build doll houses with your own hands. And even if the dress is not very big in size, and the housing is not very smooth, durable and even, but you will become the owner of the most exclusive and most expensive items for you.
Two-story house for dolls
Material and tools:
- sheets of MDF or fiberboard, or non-laminated HDF, or regular laminate. Thickness is approximately 5-7 mm. The quantity depends on the size of the home;
- jigsaw;
- “Moment-joiner” glue for walls and roofs, PVA glue or wallpaper glue for paper;
- construction tape;
- any paint on paper (acrylic, gouache, watercolor), colored markers;
- pieces of wallpaper (preferably with a small pattern);
- corrugated cardboard for “slate” on the roof (inner layer);
- wooden rulers for stairs (you need to erase drawings and inscriptions from them with sandpaper in advance);
- pencil, ruler, scissors;
- self-adhesive wood-look floor film.
We will make furniture and accessories later, so I’m not writing materials for them here.
Work order
- Dollhouses start with very precise drawings. Using them we cut out three walls, three ceilings, internal partitions and roof parts. Using a jigsaw, we carefully cut out window and door openings, having previously drilled small holes in the corners.
- We glue the middle of the building together, filling the joints with construction tape.
- Glue the back wall.
- We install internal partitions.
- We install the attic roof. Doll houses do not have to be made with a roof, but in our building they will also live in the attic.
- We install skylights on the roof.
- We cut “tiles” from thin cardboard.
- We glue it (starting from the bottom) or corrugated cardboard onto the roof and paint it.
- Let's paint the walls or cover them with wallpaper. Cover the floor with film.
- We saw the rulers and glue the stairs together.
- We install the stairs. That's it, you can think about how to arrange the furniture and what curtains to hang.
There is not one wall in our house. This was done specifically to freely move housewives and make rearrangements in apartments. You can hang curtains, install a fireplace made of matchboxes, and lay carpets on the floor.
Watch the video: how dad makes a dollhouse out of plywood:
Housing from boxes
Immediately associations arise with homeless shelters, only our doll houses made from boxes will be so beautiful and comfortable that even you yourself will want to live in them. To build such a house for dolls, you will need several shoe boxes of the same size.
Place them all on their sides and on top of each other, as in the photo, and glue them together with PVA. Secure the edges and joints with construction tape. For the sake of structural rigidity, it is better to simply draw and glue the windows in such dollhouses rather than cut them out. For the same reason, it is better to make apartments on one level without stairs.
The good thing about such dollhouses is that they can grow in sections-boxes, both upward and in apartments.
Watch how to make an amazing dollhouse out of a box:
Corrugated cardboard house
Drawing
Such a dollhouse can only be made by thoroughly working on the drawings. Its design does not require the use of glue or tape. However, in order to insure against surprises, it is better to glue the joints and corners with construction tape. Drawings of all parts are made with slots for connecting structural elements.
Assembly
- Connect the three walls of the house. Install ceilings. Make a roof. Cover the roof ridge and all joints with construction tape on both sides.
- Cover the walls with wallpaper and the floor with self-adhesive film.
- Draw windows and arrange furniture.
Mini house
Sometimes dollhouses are not made for dolls at all, but for the sake of sporting interest, such as car models. It’s a whole art to make such a miniature dollhouse that not a single doll will fit into it.
It’s good if you have a very small box lying around on the farm. Cut it along one edge, and also cut off the bottom on three sides. Make furniture from plasticine or polymer clay, draw windows.
To make the house real, make a roof. Fold a small piece of cardboard in half and glue the gables to the sides. Maintain such dimensions that the roof fits on top of the house and keeps the walls from unfolding.
The simplest house
For those who don’t understand at all, having read the previous instructions on how to make a dollhouse, this very simple design will do - a roombox.
To make this “house”, it is enough to glue together a cross-shaped structure, which will represent four rooms. You can cut doors between them and turn them into one apartment.
House for a doll from a closet or suitcase
If you have absolutely no building materials for a small house, then use the shelves of an old cabinet. If they are too long, use cardboard dividers. Cover the walls with pieces of wallpaper, lay down carpets and install doll furniture. A wonderful home for your Barbie that can be closed with closet doors at night.
Master class 2
www.toysew.ru
How to make a dollhouse from a box?
The girl is really asking for a dollhouse, have you decided to urgently and cheaply make it out of cardboard boxes? Well, then you will need:
- the actual boxes (according to the number of rooms, from 2 to 6 pieces)
- thick cardboard
- scissors
- stationery knife
- ruler
- PVA glue or any other for paper
- paints, colored paper, self-adhesive wallpaper, kitchen oilcloth, corrugated paper, ribbons, braid, bows, other available materials for house decor
IMPORTANT: Any boxes will do, as long as they are the right size and thick enough. For dolls the size of Barbie (29 cm or 31 cm, scale 1:6) or Monster High (26 -28 cm), the most common ones to take are drawers from under household appliances.
A beautiful home for toys made from boxes.
- The boxes are stacked on two floors of two rooms. On the second floor you can also arrange one room and a veranda.
- The boxes are fixed with glue and adhesive tape. To ensure that the parts stick well, use a press made of ordinary clothespins.
- The roof of the house can be made from a box, cut in half diagonally, or cut out from sheets of cardboard.
- Windows are measured, drawn and cut out in the side walls with a utility knife.
- The interior decor of the house is being completed. Ceilings, floors and walls are covered with colored paper, remnants of wallpaper, self-adhesive or oilcloth. You can also make cornices, window sills, baseboards, and other surroundings from available materials.
House for a doll from boxes: tools and materials.
House for a doll from boxes: stages of production.
How to make a house out of a cardboard box: master class with photos
How to make a playhouse for children from a cardboard box with your own hands? But not from a shoe box, but from a box, for example, from a washing machine, so that children can climb into it and play inside. We offer you step-by-step instructions, simple to the point of genius, on how to make a house out of a cardboard box.
A large cardboard appliance box is an invaluable resource for play. There are hundreds of ideas for using it: from containers for storing toys to a house made from boxes with your own hands. We have already written about what cool things you can make from cardboard for a nursery. And today - a special master class for especially large boxes. We will learn how to make a house out of boxes with our own hands.
Children will definitely appreciate this play space, which allows them to have privacy even in the middle of a noisy living room. Don't forget to knock on doors if you decide to stop by for a visit.
How to make a house out of boxes with your own hands
To make a game house from a cardboard box, you will need:
- Large cardboard box.
- Stationery knife
- Hot glue gun
- Fast drying acrylic paints.
Open the box and cut the sides of the top cover as shown in the picture. Cut off the bottom parts of the lid completely.
Use scraps of a cardboard box to form a roof for your house, and connect the parts with a glue gun.
First, draw and then cut out the windows and door with a sharp stationery knife.
Lay out the cardboard on the roof of the house to resemble the tiles. Place cardboard trim around windows and doors.
Make a hole in the roof and form an attic window. Secure the window roof using wide tape.
Paint your box house with quick-drying acrylic paints in two or three layers. If the child is very small, it is better to pre-seal the cardboard sections with tape. so that the baby does not get scratched.
If the cardboard is thick enough, a cardboard box house can be equipped with real fittings: door handles, a number plate, etc. Don’t forget about curtains for the windows for an even more cozy atmosphere in the house.
Read also: Making crafts with children: do-it-yourself mini-city
Read also: PHOTOpositive. Children's toys from old boxes
Read also: How to store shoes if there is little space: a do-it-yourself shoe cabinet made of cardboard
Found a mistake? Select the text and press Ctrl+Enter to report this to the editors
www.uaua.info
How to make a doll house with your own hands from cardboard?
Parts for a doll house can be cut out of thick cardboard, perhaps all from the same boxes of household appliances. Here you definitely need a drawing, for example, like this:
Cardboard house diagram for Barbie.
This house will look like this.
You will need:
- cardboard
- scheme
- pencil and ruler
- glue, tape, electrical tape
- stationery knife
- paints, felt-tip pens, old wallpaper, oilcloth, corrugated paper for decorating the interior and exterior of a house
Three-story toy house made of cardboard.
- The drawing is drawn or found on the Internet and printed. The details of the house are cut out.
- Make markings on cardboard. It is better to cut cardboard parts not with scissors, but with a knife, then their edges will be smooth.
- Sections that will not join together can be trimmed with tape or tape.
- The cut out parts of the house are assembled into grooves or glued together.
- Create the interior decoration of the house. If mom and dad are creative, they can paint the house by hand.
A simple cardboard house.
Cardboard house for toys.
Cardboard house.
A house made of cardboard, assembled into grooves.
Cardboard house for small toys with a drawing.
How to make a doll house from a cardboard box with your own hands
Of course, now it’s not a problem to buy a ready-made house for dolls made of plastic. But they are all kind of the same type, glamorous pink and, most importantly, they do not allow the child’s imagination and creativity to develop. It's like a dollhouse made from a cardboard box! I remember in my perestroika childhood, creating a dollhouse with your own hands was such an exciting and creative process! At first I created a house, then I added rooms to it, made doll furniture and dolls themselves from paper and clothes for them. Wonderful memories! If the child is small, you can make a dollhouse with him.
Here is one of the fairly simple models of a doll house:
You will need a corrugated cardboard box. You will need to cut it into the following parts:
We cut out the windows from white cardboard and the tiles from brown. We cut grooves in the parts to connect them together. The design is collapsible and mobile. You can take it with you to the dacha or on a visit. The following construction is a little more complicated:
There are already two floors and a tree.
To connect the parts together, we make slots in them. Windows, the crown and trunk of a tree, interior items and furniture can be cut out of colored paper and glued or painted directly on cardboard. Over time, you can make pieces of furniture from cardboard and add several rooms to the house. This house is suitable for small dolls or paper dolls that you can make yourself.
If you feel strong and have free time, you can make a large two-story house with windows and doors, a spiral staircase, and columns. You can insert plastic glass into the windows and hang curtains, make tiles from matches, for example, or tree bark. You can even make lighting in the house from a small flashlight. In general, there is a huge field for creativity here.
igrushki-handmade.ru
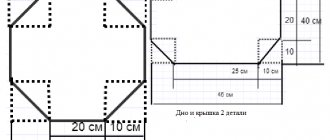
Drawing of a plywood dollhouse with dimensions
Making houses out of plywood is no longer so easy. Most likely, mom can’t cope alone. You need to attract dad, the little princess will definitely thank him for the unique toy with her incomparable happy smile. To make a house for Barbie prepare:
- plywood
- jigsaw
- hammer
- sandpaper
- wood glue or PVA
- masking tape
- nails
- wood primer, paint
- scissors, pencil, ruler
- materials for house interior decoration
Drawing of a dollhouse made of plywood.
Assembly diagram for a plywood dollhouse.
The final version of assembling a dollhouse from plywood.
- The details of the house are very carefully cut out of plywood. They must correspond exactly to the drawing. Window and door openings are also cut out, if provided. Windows can be made rectangular, round or triangular.
- All plywood parts are carefully sanded with sandpaper to prevent the child from driving in a splinter while playing.
- The parts of the house are connected using construction glue, PVA glue or nailed together. It is necessary to make a reservation: a glue gun with silicone will not hold plywood.
- Prime and paint the plywood.
- They think over and create the interior of a dollhouse. The walls in the rooms can be hand-painted, painted in one color, decorated with leftover wallpaper or wrapping paper.
- The floor is also painted, pieces of carpet are laid on it, etc. It is recommended to make a staircase to a two-story house for dolls from wooden rulers cut to size.
- Any furniture for a plywood house will be available - purchased specifically for dolls in toy stores, made with your own hands from cardboard, the same plywood, or improvised means.
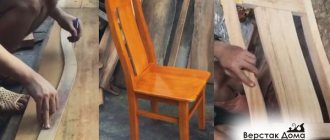
Making a house for Barbie from plywood: stage 1.
Making a house for Barbie from plywood: stage 2.
Making a house for Barbie from plywood: stage 3.
Making a house for Barbie from plywood: the back side.
Making a house for Barbie from plywood: rooms.
Laminate house
How to make a dollhouse with your own hands? We present to your attention a detailed master class on creating a home for toys from laminate. For work we will need:
- • Detailed drawing;
- • Wood glue or construction PVA;
- • Jigsaw or hacksaw;
- • Small pieces of old paper-based wallpaper. You can use acrylic compounds without a pungent odor. After drying, the surface of future walls can be decorated with various images in the form of stickers or drawings.
- • Wide brush;
- • Sponge with a porous base;
- • A simple pencil for marks;
- • Construction meter.
Let's start making a house for Barbie with our own hands. The working stage consists of several points:
On the back side of the laminate we draw the boundaries of the future walls in accordance with the drawing. After this, we carefully cut out all the components with a jigsaw;
Next, we mark the places where the windows and doors will be located;
Using wood glue we fix all the parts together. When carrying out installation work, we take into account the parameters shown in the project drawing;
Now you can move on to decorating the planes. If paper wallpaper was used for work, then they decorate the walls and ceiling. The flooring can be decorated with soft fabric or left wooden. If acrylic paint was chosen, then the work will require the use of a sponge with a porous structure.
Place a small amount of dye on the back of the working tool. With light pressure we decorate all planes. After applying the composition, leave the entire structure until it dries completely. This will require an average of 1 to 3 hours;
Let's start arranging the doll furniture. It can be purchased in children's stores or ordered from professional craftsmen;
Next, we proceed to decorating the interior space. To do this, we use curtains made from several pieces of decorative fabric, soft rugs, and light organza tablecloths.
As decorative accessories, you can use small plastic bubbles, the surface of which is pre-painted with an acrylic composition. Small artificial flowers are ideal for creating floral arrangements. The photo of the dollhouse shows do-it-yourself options.
Do-it-yourself wooden doll house: drawings and dimensions
A girl from 3 to 10-12 years old will play with a dollhouse. This toy, if it is beautiful and of high quality, will stand in the house for many years, constantly delighting the baby and surprising guests. It is definitely worth the effort and investment. Therefore, the best option would be to make it from MDF.
- At the first stage of work, the design of the house is thought out. You need to decide on the size, number of rooms, their shape, and roof configuration. A universal solution is a two-story house with 4 rooms with a pitched roof and an attic.
- For such a house you need the main parts: a back wall, two side walls, two planks for the ceilings of the first and second floors, two vertical lintels between rooms, a plank for the roof slope. It is better to order cutting of these parts from a furniture or carpentry workshop. MDF of the same thickness is used for all of them. Or you can make the back wall and sides, that is, the load-bearing parts of the structure, thicker, and the rest, the auxiliary ones, thinner.
- Window openings are cut in the side walls, and, if desired, in the back walls.
- It is better to order window frames laser cut, then they will turn out perfectly smooth and already trimmed. MDF is a heavy material; glue or ordinary screws will not take it. The parts of the house are connected with self-tapping screws. The caps are sunk into the material and then masked with shavings and glue or polymer clay.
- The attic with a round window looks beautiful on the roof. It is also better to order it laser cut. The plywood attic is attached to the roof of the house using glue.
- To imitate tiles and beautifully decorate the roof, buy thin bamboo roller blinds, cut them to the size of the slope and glue them onto it. The attic is decorated in the same way. If the roller blinds are on one thread, they may fall apart when cut. Then they need to be pre-glued with regular PVA.
- It is convenient to mount the roof of the house on hinges so that it can open. In the “attic” it will then be possible to store the dolls and their dowry.
- Window frames are placed in the openings.
- Next, we move on to decorating the walls. The simplest thing is to prime them and paint them one color. You can also make an imitation of brickwork. The bricks are first marked with a pencil, then cut out with a wood router. MDF is primed and painted in the desired color. After the soil has dried, the recesses between the bricks are marked out using a simple pencil or marker. To make the masonry look natural, the heterogeneity of color is created using crayons.
- “Bricks” of different sizes are cut out of porous egg trays and glued around the windows.
- The exterior decor of the house is completed with artificial small flowers. They are glued at the base of the side walls, on the roof and attic.
- The ceilings and floors of the house are painted in the desired colors.
- The Barbie doll is a conventional model of a person 1 to 6, respectively, and her house. Scraps of old wallpaper or gift paper will look rough in it. A good solution is for everyone to find wallpaper with a design they like on the Internet, reduce it proportionally in a photo editor and print it in a printing house. It is important to choose good paper. A regular Xerox machine will soon be worn out, glue may appear on it, or it will wrinkle during pasting. Photo paper may not adhere well. Wallpaper is glued using PVA.
Blanks for a dollhouse made of MDF.
Window markings.
Assembled house frame.
Laser cut window frames.
Round attic window.
Attic on the roof.
Design of window openings and imitation brick.
Wallpaper 1:6 in a children's doll's room.
House interior decoration.
Finished roof with imitation tiles and flowers.
The girl will play in such a house for hours.
IMPORTANT: The girl will play in the Barbie house for a long time. To make it more comfortable for her, it is better to make it on a leg. The raised design above the floor also makes the toy easier to clean.
Features of making a dollhouse
Any dad can cut plywood into fragments of certain dimensions and configurations and connect them together according to the developed diagram. No step-by-step instructions are required for this process. But there are a number of nuances in working with FC that a home master should know about.
To avoid “production” errors (and errors are inevitable even in measurements), similar parts of the house should be made according to the following scheme. First, one part, and then make sure it matches the required dimensions. And only then, using the workpiece as a template, cut out and process the rest. Otherwise, after assembly, it will turn out (more than likely) that the house will be somewhat skewed, and you will have to redo some things.
It is better to cut plywood with an electric jigsaw. Problems will arise with hand tools - uneven cuts (not along the line, especially if it is figured), “frayed” ends of parts, partial peeling of the veneer in the working area.
Given the relatively small thickness of plywood, the joints practiced for solid wood blanks (saw cuts, tongue and groove) are unacceptable. Therefore, only by gluing with subsequent fixation at individual points with small nails. In terms of safety for the child’s health, it is better to use a casein composition. Such carpentry adhesives are most often used in modeling and making furniture with your own hands, and it is quite simple to buy a dry mixture and prepare the solution yourself. .
Both at the stage of assembling the dollhouse and after its manufacture, it is necessary to carefully process all the edges of the parts. Even if no defects are identified, it’s worth going through the “sandpaper” once again. Microscopic fractions, visually and imperceptible, are potential thorns. Don't forget about the tender hands of children!
Dads should take into account that girls (like all women) have their own secrets. Therefore, in the lower part of the dollhouse or on the side, you should provide drawers or boxes with doors in which you can hide something. Mini-hinges are suitable for fastening the sashes (it’s easy to choose the right sizes in any furniture shopping center).
If the size of the dollhouse is significant, then it is more advisable to first mount a frame from bars of a small cross-section, and then cover it with pieces of plywood.
When drawing up a diagram, it is worth considering that you plan to assemble not just a box for storing toys. Even the smallest house will need some kind of interior filling. What it will be - a mini-table, a crib - is another matter. But already at the design stage, it is necessary to provide for possible options and choose sizes so that the rooms are spacious enough.
Advice. When deciding how to decorate a dollhouse, do not forget that here, when choosing materials, you should take into account their component composition. Certain types of stains, oils, paints, and varnishes contain toxic substances.
If you really get excited about the idea, plan everything carefully and prepare in advance, then you can make a dollhouse with your own hands in just a few hours. Even half a day off is enough for the child to enjoy a home for his toy for a long time.
The stores offer customers a wide range of all kinds of toys, including doll houses. Every girl dreams of getting one of them, while parents can easily make a beautiful and durable house for dolls in just a few days. Moreover, the child will be able to take an active part in the process and express all his wishes regarding size and design. To make a dollhouse with your own hands from plywood, you will need a diagram that you can draw yourself or find a ready-made one on the Internet.
How to make a doll house for monster high with your own hands?
Moms and dads have mixed feelings about Monster High dolls. Some people can’t stand them and consider them crippling to the child’s psyche. Others are inclined to think that stylish monsters stimulate a child’s cognitive interest in myths and legends, and also raise his self-esteem. Be that as it may, girls love monster dolls. And at some point, the daughter may ask her parents to make her a house for them.
House for Monster High from whatnot.
IMPORTANT: The dimensions and design of the Monster High house are different from what is intended for Barbie. But you will have to tinker with the finishing.
- Before you decorate a house for monsters, you should learn more about the Gothic style.
- Monster High likes an interesting color palette: they combine gloomy black with rich pink, fuchsia, neon yellow and green. The same combination of colors should be used in the interior of the doll house.
- You need to think about how to play up the glitter and black lace. There should be gold and silver in the monsters' rooms.
- The interior of the Monster High doll house is also complemented by elements that imitate artistic forging: chandeliers, candelabra, fireplace grates, stair railings.
- Monster High symbols are used in the interior and exterior of the house.
House with Monster High symbols.
Interior in the Monster High house.
House - panorama for Monster High dolls.
How to make light in a dollhouse?
A toy house will look just like a real one if you make light in it. Thanks to master classes on the Internet, you don't need to be an electrician for everything to work.
Lighting in a doll's house.
Typically, lighting for doll rooms is done:
- from Christmas garland
- from flashlights
- from LEDs
The lighting can be powered from a general network or from batteries.
Light bulb in a doll's house.
Wiring in a doll house.
Doll house lighting diagram.