With the development of modern technologies, three-dimensional graphics have entered our lives. “Living” drawings began to appear on the asphalt and walls of city houses. Street artists are increasingly surprising with the skill and realism of their pictures. The new trend is reflected in the interior design. We are talking about 3D wallpaper for the floor, which enlivens the room and gives it uniqueness. How such a drawing is created, what kind of interior it is combined with and how much money is needed for it, we will talk in our article.
With the development of modern technologies, three-dimensional graphics have entered our lives.
Features of creating 3D floors using new technology
Modern materials allow you to realize your wildest fantasies in the interior, including the creation of 3D floors using new technology. High-quality work is not only a beautiful, but also a reliable floor.
To create the effect of a three-dimensional image on the floor, you need to prepare a high-quality high-resolution picture or objects that you want to pour into the floor:
- pebbles
- shells
- colored sand
- dried flowers.
The thicker and better quality the top transparent layer is, the more realistic the volume effect will be. The technology itself requires high-quality preparatory work. It includes:
We also recommend reading:
Event decoration: how a holiday is created. What color should the outside of the house be painted? Beautiful decoration for a beautiful celebration: we decorate the wedding hall with our own hands. In which room should I install a clock and a mirror on the wall?
- Preparation of the base. Usually this is a concrete screed. It is important to ensure that the surface is perfectly flat, without cracks or bumps;
- Ensuring maximum removal of dirt, dust and moisture. If this step is skipped, the bulk polymer material will crack;
- Installation of printed designs or decorative items;
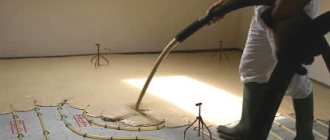
- Pouring a polymer transparent coating. The solution must be mixed with a mixer to obtain the most homogeneous mass;
- Applying final protective varnish.
Required materials and tools
To create a polymer pattern, you can use several systems on different bases - polyurethane, epoxy, methyl methacrylate. The most common choice is epoxy fill. It is easier to install it yourself, it has no smell. The materials for installation will require a wooden or concrete base, a primer layer to increase adhesion, a 3D graphic image, and a transparent layer to add volume. Be sure to use varnish protection against wear. You will also need the following tools for the job:
- Construction mixer;
- Raklya;
- Synthetic padding roller for priming and needle roller for rolling;
- Several spatulas of different widths;
- Container for mixing the mixture;
- Paint shoes for free movement on the surface;
- Hard brush.
Calculation of the required amount of material
At the initial stage, consumables are calculated. The amount of mixtures will depend on the thickness of the future layer, the area of the room and the condition of the subfloor. Each manufacturer indicates the recommended mixing proportions on the packaging of their composition. On average, it takes 4 kg of material to create a layer of 3 mm at the rate of 1 kg per 2 square meters. meters.
Selecting a photo drawing
For a floor with photo printing, you can select and process the picture yourself or use any image from the Internet. The main thing is that the drawing matches the interior as closely as possible and has a high resolution. It could be an interesting abstraction, geometric lines, patterns, stones, flowers, leaves.
If you decide to take the photo yourself, then you should photograph the floor, trying to capture the entire area to be filled into the lens. It is better to take the photo from the side of the doorway. It must be clear, without eclipses or light spots. Then the photo of the room must be transferred to any graphics program and compared with the selected picture. Now we need to remove unnecessary objects, leaving one surface, and align the borders. The resulting pattern now needs to be transferred to the fabric of the required size. This can be done by any outdoor printing company.
Preparing the base
You can only pour the floor mixture onto a perfectly flat surface. Only in this case can you get a beautiful and even picture. There should be no differences exceeding 1 mm on one linear meter. Despite the ability of the mixture to level, it should not be laid on an uneven floor. This procedure will require more filling and additional financial expenses. It will be much cheaper to level the existing base.
First of all, you need to get rid of the old coating and remove the baseboards. Then you should thoroughly clean the entire surface from dirt and dust. If there are deep cracks and potholes in the concrete slab, they are opened with a chisel and hammer, painted with a primer and filled with a cement-sand mixture. In rooms with high humidity, it is imperative to install a layer of waterproofing.
Priming the subfloor
Surface treatment with primer is a mandatory procedure. When carrying out work, it is necessary to take into account some nuances. Floors should be painted no later than two hours after cleaning from dust. Due to the limited period of action of liquid compositions, they must be distributed over the surface as quickly as possible. You need to do it in 40 minutes.
The mixture is mixed in a large container with a construction mixer, alternating reverse and rotary rotation. When the composition becomes homogeneous, it must be left alone for a few minutes for the air bubbles to completely escape. Then the thick mixture is poured onto the floor and leveled with a foam roller. The soil must be placed into the cracks and depressions using a brush.
Filling the Base Layer
Lay the base 5 hours after priming. The background for a three-dimensional image or picture must be made of high-quality materials and have a suitable shade. To make it, polymer mixtures are used, which are mixed with a construction mixer right before pouring, since after 30 minutes the liquid will begin to harden.
The composition is poured onto the primer and the base layer is formed using the rule. After the entire surface has been filled, the floor is left alone for 24 hours until complete polymerization. Then the evenness of the filling is checked. You can start laying out small decor on the 3rd day. The main drawing is placed after a week.
Laying the pattern on the floor
The image of the self-leveling floor can look like a banner or be painted with special paints. The first option is preferable because it is publicly available and easily adheres to the base layer. First, a transparent mixture of polymer and solvent is applied to the surface and left for 24 hours. After the soil has completely dried, a canvas, tile or pattern is applied in another way.
A simplified option for laying out a pattern is to use ready-made self-adhesive film. It is enough to remove the protective film from the back, lay it on the surface and straighten it with a roller.
When laying the banner, it is necessary to carefully remove air bubbles. To do this, carefully roll it over it with a dry roller from the center to the edges.
Filling the finishing layer
At the final stage, a finishing layer is applied, which will help maintain the integrity of the coating and enhance the effect of a three-dimensional image. Like the previous options, it is also applied using a special technology, following the master class. First, a transparent polymer composition is mixed, then the parts are poured onto the picture and distributed with a roller. The thickness of this coating should not exceed 0.3 mm.
Applying varnish
For the finishing layer to dry completely, 30 minutes will be enough. Then it should be coated with colorless varnish several times until a gloss is formed. You can actively use the floor covering within a week. The time interval between application of layers should not exceed 12 hours. Otherwise, the manufacturer cannot guarantee reliable adhesion between them.
Characteristics of types of 3D floors
Self-leveling floors differ in the main component of the mixture being poured. The most popular of them:
- Epoxy
- Polyurethane
- Cement-acrylic
In general, all self-leveling floors can be divided into two large groups: one-component and two-component.
One-component polymer floors
This coating is ideal for technical and utility rooms. In this option, a rich color palette is not needed, but the reliable composition, strength and quality of the filling material is important.
Stage four – installation of 3D images
When the base layer of the self-leveling floor has hardened, you can begin laying the decorative layer:
- dilute the polymer composition with a solvent and apply a thin layer to a dry surface;
- Place a pre-prepared drawing or photo on a vinyl base on the treated surface, align the edges, which should protrude beyond the perimeter of the base and lie on the walls;
- press the image element to the self-leveling floor with a dry roller and, starting from the center of the room, roll it over the surface so that there are no air bubbles left between the base and decorative layers, which will subsequently lead to cracking of the decorative layer;
- when the decorative layer sticks to the base layer, carefully trim off the excess with a sharp wallpaper knife;
- Carefully clean the treated surface from dust and grout residues.
USEFUL INFORMATION: How to make a self-leveling floor with your own hands step by step: pouring technology (video)
Self-leveling floors with the image: fantasy in the interior of rooms
Despite the fact that self-leveling floors with a three-dimensional pattern require significantly more time and financial costs, this technique for decorating rooms wins the hearts of owners of country houses and city apartments. Difficulties in technology and cash injections ultimately pay off with a stunning “wow” effect upon completion of the work.
To choose the right pattern to implement it in the interior, you need to pay attention to such points as:
- Personal preferences and functionality of the room. If you adore seascapes, sea pebbles and the look of waves, you don’t need to fill such a floor in the bedroom; rather, it would be suitable for the bathroom;
- Psychological message of the image. Too aggressive pictures and drawings with a creepy plot will not have a positive effect on your well-being and condition.
- Failure effect. The illusory picture of a hole in the floor (deep cliff or cracks) has an alarming effect on the psyche. A person perceives the earth as something stable, and by violating this feeling, one can end up with the opposite effect.
The process of selecting and installing 3D floors with images must be approached seriously and responsibly. If you are not confident in your abilities, it is better to turn to specialists. The designer's vision and experience in carrying out such work will guarantee the embodiment of fantasy in the interior, which will delight the eye for many years.
What they are made of, overview of characteristics
The self-leveling floor in 3D format is created in stages.
First, the foundation is laid, then a picture should be fixed on it or drawn with your own hands (invite an artist). The image can be made voluminous using a finishing coating. The thicker this layer, the stronger the 3d effect. Any material can be used for the base of self-leveling floors (polymer, mineral compositions). But the top layer must be transparent.
The main properties of such coatings:
- Strength;
- Aesthetic appeal;
- Non-susceptibility to aggressive media (acids, alkalis), but this property is not inherent in all types of compositions for self-leveling floors;
- Versatility (3D coating can be installed on different objects with any interior);
- Heat and moisture resistance.
But if errors are made during manufacturing, the self-leveling floor will lose its properties.
Gallery: 3D floors (53 photos)
How much do 3D floors cost?
Be prepared that the cost of 3D floors differs significantly from other coatings by 5-10 times. The price per 1 sq.m will vary depending on many factors:
- Selection of building mixtures. We have already mentioned that polymer poured floors come in several types and manufacturers. The better and more durable the material, the more it will cost;
- Print the image. The design can be printed on banner fabric or vinyl film, and there is also the option of applying the image directly to the base using acrylic paints;
- Do not forget that installation of a three-dimensional image involves extensive work on major repairs of the base itself , and this also “eats up” a lot of money.
The price is also influenced by factors such as the total area of the floor covering, the technique of applying the pattern, the professionalism and experience of the company. On average, the cost of covering an area of 15 sq.m in Moscow costs $200-$250. In the regions, the price ranges from $8 to $10 per 1 sq.m.
Self-leveling 3D floors with images in the interior
To create 3D floors, you can use almost any image that inspires you, calms you, or makes you smile. But it is important to remember that such a coating is durable, so you should not obey momentary desires or fashion trends. Such drawings will soon become a thing of the past, and you will be admiring the floor for several years to come. Designers recommend choosing neutral, classic motifs: nature, seascape, space themes or the animal world.
Designer 3D floors in the bathroom
For bathrooms, polyurethane poured flooring is best because you end up with a thin, but very durable and beautiful finishing layer. Moreover, in this option you can choose the surface texture, glossy or matte. Experts recommend the optimal coating thickness in the bathroom is 1.5 mm.
The benefits of grouting bathroom floors are obvious. It has no seams, which means no floods are scary for you or your neighbors below. The poured floor is easy to clean, strong and durable. In addition, mold and other bacteria that love moisture do not form on it.
The most common design solution in the design of 3D floors in the bathroom is a marine theme. Pebbles with a rolling wave, cute and friendly dolphins, a bright bottom with colorful fish, starfish and shells.
Designer 3D floors in the bathroom
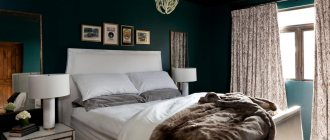
3D floors with images in the bedroom
Using 3D floors in the bedroom allows you to make the room stylish, fashionable and different. You don’t have to limit your imagination, because you can print almost any photo you like in good quality on a plotter. Since a poured floor with a three-dimensional image is already a work of art in itself, make sure that the rest of the interior does not argue with the main motif, but complements it with accessories and a color palette.