Important! We're being manipulated! Original rubber paint LKM USSR is sold only from our websites, according to the contacts indicated on them! Fraud cases detected! Copy the site, name, logo! Please take care of your Health, Time and Money!
Main official website: https://lkmcccp.ru/
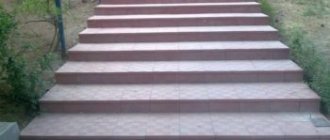
Our client painted the paving stone paths with rubber paint of the USSR especially durable paintwork material in May 2020, the photo shows the previous paths, only the photo is from April 2020. Our rubber paint has not undergone any changes!
Our client is very pleased with the quality of our paint, he washed it under pressure and cleaned the snow, our paint doesn’t care.
We can say with honor: The best rubber paint is LKM USSR.
LKM CCCP rubber paint is the best innovative rubber paint, especially durable, specially developed by our technologists to eliminate the shortcomings of conventional “rubber paints”, including the widely advertised “rubber paints”, which is essentially an ordinary washable facade paint.
Our portfolio https://www.instagram.com/lkmcccp.ru/
Scope of application of rubber coating
Having appeared on the market of paint and varnish products relatively recently, rubber roof paint has already managed to gain a leading position, which is not at all surprising. The fact is that, being a high-quality coloring material, it can be used in a variety of finishing works.
If you need to paint the roof of a building, concrete walls or floors, you won’t find anything better than rubber paint. This coating can be used for painting:
- swimming pools, the walls and bottom of which are made of concrete;
- roofs (slate, black or galvanized metal);
- concrete floors on balconies;
- brick surfaces;
- facades;
- base;
- tennis courts and sports grounds;
- garage entrances;
- wooden, plastered structures and other products.
Due to its composition and technical characteristics, it ensures durability of the treated surface. This becomes possible due to the density and elasticity of the coating, which protects the base from the effects of environmental factors. Actually, this is why rubber paint is more in demand, unlike its analogues.
Rubber pool paint, pool waterproofing
(in the photo the concrete paths and the pool are painted with rubber paint, especially durable LKM USSR)
(noble gray color)
Painting process
The surface must be smooth, clean and dry. It is unacceptable to leave traces of previous paint products on a different base. Before treating cracks with fresh concrete mortar, it is important to remove all remaining dust and dirt. The primer fits better on a base sanded with coarse sandpaper.
Surface preparation
The more thoroughly the concreted area is cleaned, the better the quality of the coating. It is recommended to remove from the surface and small crevices:
- remnants of old paint;
- dust, cement chips;
- sand, soil particles;
- small debris;
- oily or “rainbow” stains from petroleum products.
Treat all cracks by filling with cement mortar. If possible, eliminate all defects and irregularities by leveling with a trowel or spatula. Painting will hide all the flaws and even out the color of the base.
Padding
Sand the dried seams and cover them with a specialized primer for concrete. You can use a universal construction primer mixture.
Attention! Primers are applied to the concrete area with a roller on a long handle. This is much more convenient than working on your knees, painting the floors with a brush.
Coloring
The most important stage is applying wear-resistant rubber paint on concrete for outdoor use with your own hands. The jar must be shaken well before use.
Important! Uniform distribution of the dye is the main condition for high-quality painting. If the latex acrylate is too thick, it is permissible to dilute it a little with water - for ease of use with a painting tool.
Quick-drying paint sets well and does not stick. After a few hours, depending on the ambient temperature, a second layer is applied. It is better to apply the third layer every other day, when everything is dry. After 2-3 days, the base is completely polymerized, and next week the painted floors can be washed.
Liquid rubber for waterproofing
The so-called polymer penetrating “liquid rubber” on a silicate basis owes its name to its external similarity after hardening to this material - although in fact it is a specialized bitumen emulsion with plasticizers. In addition to excellent waterproofing qualities, it also copes well with sound insulation, and high adhesion rates guarantee the absence of any air cavities after application.
The packaging of liquid rubber in stores is different - from a 10-liter bucket to a 200-liter barrel, and many brands allow their application not only with sprayers, but also with ordinary construction rollers or spatulas.
Most often, liquid rubber is used for waterproofing roofs or foundations. Easily applied to reinforced concrete surfaces, cement or asphalt concrete screeds, old mastic roof coverings or roll roofing carpets, as well as wooden surfaces.
Waterproofing the base with liquid rubber
Application to floors
Waterproofing a concrete or wooden floor with a liquid rubber-based composition can be carried out both on the outside and on the inside of the material. However, since the material acquires a not very presentable black color, it is recommended to use some kind of finishing coating on top of such a base - tiles, linoleum, laminate, parquet boards and other types. In addition, before applying impregnation, the base must be thoroughly leveled and cleaned.
Please note the following feature: the density of the liquid rubber emulsion is quite high, and therefore the consumption per square meter of material surface is about 3.5 kg.
Waterproofing a concrete base with liquid rubber
Application to walls
Impregnation of walls is done in almost the same way and can be easily done independently. The thickness of the layer of liquid rubber is usually chosen to be 1-2 mm and the composition consumption will be within the same 3.5 kg per sq.m.
Low sensitivity to temperature conditions (the performance qualities of such rubber are maintained in the range from -50 to +45°C) makes this treatment especially relevant for such types of surfaces as plinths and basement walls.
Pros and cons of liquid waterproofing
The advantages of penetrating insulation in the form of a liquid on any basis include:
- high elasticity of the protective layer;
- complete leveling of the smallest surface defects of the material;
- resistance to all types of mechanical and chemical influences;
- insensitivity to temperature changes and ultraviolet radiation;
- no need for burners and other heating devices during the application process;
- high curing speed;
- long term preservation of the operational properties of the material - up to 30 years.
Among the disadvantages that polymer insulation has, we can only note the rather significant cost of equipment for spraying penetrating waterproofing compounds. However, in any large city you can rent it, which is much more profitable when performing a “one-time” repair.
Waterproofing the bathroom floor
One of the types of repair work is floor insulation in so-called wet rooms. This issue cannot be approached formally. As a rule, insulation work is carried out before the finishing screed. The surface of the base is leveled, dirt and dust are removed, primed and then insulating material is applied to the walls by approximately 20 cm. Then geotextile or spike-shaped (drainage membrane) must be laid on the hardened layer of the membrane to protect against mechanical damage, and only then reinforced with mesh and pour a finishing screed on top of which the tiles are already laid, the result will be reliable protection.
Application technology and main nuances
Before treating the surface, you need to remove old finishing building materials, as they reduce the degree of adhesion. If the concrete has been painted, then there are 3 methods: chemical, thermal and mechanical.
In the first case, special reagents are applied, they soften the old layer. The paint begins to flake off and can be removed with a metal spatula. This method allows you to quickly clean concrete without damaging it, but the liquids contain toxic compounds. If they come in contact with the skin, they cause irritation and also have a pungent odor; you need to wear special clothing when working.
The second method is thermal. A hair dryer is used to remove paint. Heat the surface with it, the coating becomes soft and can be removed with a spatula. The downside is the strong smell from the painted base.
Mechanical - using attachments on a drill, hammer drill or spatula. Cleaning with an electric tool is quick, but creates a lot of dust and noise. After processing, the plane will have to be ground.
Step-by-step instructions for application on the outside of the building:
- Concrete is cleaned of old coatings, dirt, grease and oil stains, and dust.
- Seal large cracks and crevices with plaster mortar and remove protruding parts.
- Leave until completely dry, after which it is treated with a deep penetration primer.
- As soon as the base has dried well, the composition is kneaded to a homogeneous consistency and the first layer begins to be laid. Use a roller, brush or spray gun.
- Wait 2 hours (the exact time is indicated in the manufacturer's instructions on the container), after which the concrete is painted again. After 2-3 hours you can paint it a third time.
If the surface was treated with glossy paints, then they are cleaned to a matte finish and washed with soda. During operation, paintwork materials need to be stirred frequently.
To ensure that you have chosen the right color and consistency, it is best to do a color test. It is used to determine the shade, thickness and drying time.
Painting should be done in dry and windless weather at a temperature not lower than +5°C. The concrete surface to be painted should not be exposed to sunlight. The base is treated in several layers, laid in a small thickness. The interval between their application is at least 1-3 hours. If the surface will often come into contact with water, then in addition to priming, an additional hydrophobic agent will be required.
Before painting wood with rubber acrylic paint, it must be sanded and treated with an antiseptic. Metal structures are cleaned and degreased. Porous building materials are coated with a primer in several layers, since due to their pores they draw in a large amount of liquids.

