From cardboard
Anyone can make such a fake, even a child.
Action plan:
- Cut 2 rectangles, in one of which make a rectangular hole in the center. Its size will be smaller than the photo size.
- Attach the sides and bottom sides of the resulting elements together with glue.
- Cut out a support leg from thick paper and glue it to the back of the photo frame.
- If you plan to hang it on the wall, then you need to secure a loop of rope.
- All that remains is to insert the photo into the upper unglued part of the homemade frame.
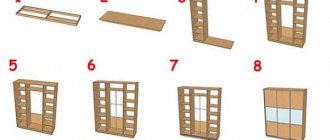
Design options
The manufacture of some models requires special equipment, most often inaccessible to the average craftsman.
From the branches
This is the most budget-friendly way to decorate an old frame with your own hands. The material for its creation can be easily collected by simply leaving the house.
In addition to thin branches you will need:
- cardboard;
- glue;
- varnish;
- decorative elements (flowers, beads, ribbons).
We make a beautiful frame at home using the following procedure:
- Cut out a rectangular base from dark cardboard.
- Clean the twigs, removing excess bark, and cut them to fit the sides of the frame to the same length.
- Secure the branches by intertwining their ends in the corners.
- All that remains is to glue the decor and open the photo frame with decorative varnish.
Unusual photo frames: decor ideas
Did you know that a photo frame made from scrap materials is a multifunctional item? This is not just a stand for a good photo: it can be used as an element of interior decor, and not just a simple one, but an accent one. If the assembled photo frame seems boring and too simple to you, try to refine it and fit it into the surrounding environment. To turn a nondescript item into an exclusive item, anything you can find in your sewing box or storage room will do. Let's see how this can be used?
Eco-style in the decor of cardboard photo frames
Seafood
So that the souvenirs brought from the resorts do not lie dead weight and can fulfill their role as a “reminder” of a wonderful vacation, remove them from their hiding places and use them to frame photographs of the appropriate theme. Small pebbles will be an excellent decoration. The pebbles can be left in their natural form or painted in fun colors.
Small pebbles will be an excellent decoration for a photo frame.
Elements can be laid out, sorted by size, trying to create some kind of ornament, or simply in random order, diluting them with other gifts from the sea coast. In any case, it will turn out non-trivial and nice.
A frame made of shells will remind you of a wonderful vacation
Magic nuts
Remember the lines from “The Tale of Tsar Saltan” about difficult nuts? We will also need gold shells to decorate the photo frame with our own hands, and we will get them using spray paint. Divide the walnuts in half, place the halves on paper and paint them with gold paint. After drying, glue the decor onto the frame. Simple and magical!
Decor of photo frames with golden shells
Eco miniatures
The easiest way to get unusual photo frames. From the gifts of nature you will need:
1. Egg shells.
2. Small shells.
3. Thin branches.
We beat the shell into fragments (not into dust!), and paint the sticks with white paint. Now all that remains is to glue everything onto the base.
This light mixture can also be used to decorate a paper photo frame. The center of such a craft can be not only a photo. Place themed decor there, such as a hodgepodge of large shells and bright autumn leaves.
Decorate a photo frame with eggshells
Aroma frame
A photo frame can not only be beautifully decorated, but also scented to boot. Anise stars and cinnamon sticks emit a rather pleasant smell. The elements are simply glued onto the finished frame. Their number and location are determined arbitrarily.
Materials for decorating aroma frames
Photo in birch bark
A truly unique frame decor option. You can get hold of a piece of unusual finishing material from florists.
Master class photo frame made of birch bark
The birch bark layer is cut into 4-5 strips. Their number depends on the type of fastening of the frame structure. An additional strip of birch bark plays the role of a supporting leg, so it will only be needed to create structures that will be displayed on shelves.
Birch bark strips
We cut out a photo frame blank from cardboard of the required size and paste the selected photo onto its front part. Use colored cardboard, preferably green shades. Glue birch bark strips around the perimeter, decorated with unusually shaped buttons (in the form of leaves or flowers).
Glue birch bark strips around the perimeter
Attach the stand and send the original accessory to its intended place. Black and white photographs will look more impressive in such a natural frame.
Ready-made birch bark photo frame
In fact - braid
Vintage charm
Attractive technology with simplicity. For greater effect, it is better to paint a cardboard photo frame purple. Now you can glue the snow-white lace braid onto it. To complete the composition, add buttons of different diameters and colors at the corners. The exquisite photo stand is ready.
Photo frame in vintage style with lace
Perky spirals
Multi-colored curls of twisted cord and double-sided tape are what you need to transform a boring frame. We release one side of the tape from the protection, attach the tip of the cord and begin to lay it, twisting it in a spiral. When all the curls are ready, fix the strip on a paper photo frame.
Twisted cord frame
Frame in buboes
Very interesting frame design. To work, you will need braid with small dense buboes and transparent glue. A master class on creating a photo frame is not required. All actions are on an intuitive level.
The tape is glued around the perimeter of the product. The frame is laid on the surface. The inside is carefully covered with a protective layer of cling film. The pompoms are straightened out and laid out beautifully, after which they are treated with an adhesive composition. The latter will need to be sprayed from a spray bottle.
Bright photo frame with pompoms
After drying, the braid will become rigid and the buboes will not sag.
Options for decorating photo frames with other available materials
Denim design
Even a child can dress cardboard photo frames in jeans. Cut out pieces of the desired shape from old things and simply glue them to the base. For better adhesion, press the workpiece with something heavy and leave it to dry in this position. Now highlight the inner perimeter with thin twine or orange twisted cord and you can insert a picture into an unusual photo frame.
Photo frame made from old jeans
Wax decor
This postal accessory makes a great decoration for a frame. We collect multi-colored sealing wax and melt it. Using a stamp, we make impressions on the base. The finishing touch will be a bow made from packaging twine.
Decor made of colored sealing wax
From shells
Seashells can be found in every family's arsenal. Now you can find a use for them too, namely to make a beautiful photo frame in a marine style out of them. And if you are looking for a way to decorate an old frame with your own hands, then shells will come in handy.
As a base, you can take a regular frame made of wood or plastic. You need to select whole shells, wash them thoroughly, dry them and stick them in any order. At the end of the work, open the fake with varnish.
Motivation for making your own frame
The main arguments in favor of making such a decision are:
- Framing workshops are not as widespread as it seems to metropolitan residents. They may not be available in a particular locality.
- The price of the order may exceed the financial capabilities of the customer.
- The store may not have a frame of the required size, and most often it is not possible to crop the picture.
- A frame made on your own will reveal the creative potential of the author and demonstrate his aesthetic inclinations.
From yarn
A photo of a homemade yarn frame is best suited for a family or child.
Necessary materials:
- knitting threads of different shades – 80 g;
- 2 cardboard bases;
- decor: beads, buttons, artificial flowers.
Procedure:
- Wrap one and the other base tightly with yarn, make 2 passes each so that there are no voids.
- Cover the photo with two frames and go through the threads again so that the photo does not fall out.
- During the winding process, you can decorate the product by stringing beads and buttons on threads. The finished product can be decorated with artificial flowers.
Painting technology
Paint is sprayed into the cap that closes the container, which is then used to paint the frame with a brush.
The aesthetic appeal of the finished frame is beyond doubt, since the coloring successfully imitates the color and texture of valuable wood.
All of the considered methods for making frames from accessible and inexpensive materials can be done even by novice home craftsmen and do not require professional training.
From the test
A durable and original photo frame can be made from puff pastry.
Materials:
- flour – 1 glass;
- water – 100 ml;
- food coloring;
- sunflower oil – 50 ml.
Procedure:
- Knead the dough from the above ingredients.
- Leave it for 2 hours.
- Make a frame and place it in a preheated oven, bake for 2 hours, turning over from time to time.
- At the end, the product can be cut out with paints after cooling, and at the end it can be opened with varnish.
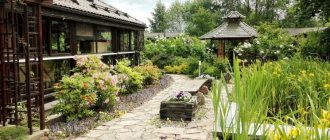
From the window frame
Using a regular old window frame, you can create an original panel in the shabby chic style. Moreover, a frame with old paint and chips will do. They will become the “highlight” of the future masterpiece.
Process of creation:
- Disassemble the frame, install one large picture or several small ones (it all depends on the number of windows).
- Glue the photo onto cardboard in advance. Black and white photos will look best.
- Assemble the finished product and place it on the shelf.
Bonding workpieces
The ends are smeared with glue and glued together on a horizontal surface. The mutual perpendicularity of the frame parts is checked with a square, then the parts are fixed with brackets from the back side.
After gluing, the frame can be fixed in another way - using small nails and cardboard corners, or corners made of plywood (tin, sheet metal).
After the glue has dried, the gluing areas are cleaned with abrasive paper and wiped with a rag. Then the product is covered with one layer of stain.
To avoid uneven coloring, the process must be completed within the drying time. After drying, the product is varnished.
From cereals
In addition to cereals, the frame can be decorated with coffee beans.
Materials:
- thick cardboard;
- colored paper;
- glue;
- paints;
- any cereal.
Procedure:
- Prepare a cardboard base and cover it with colored paper.
- Coat the frame with glue (the layer should be thick) and sprinkle cereal on top.
- In order for the composition to last longer, it must be coated with decorative varnish.
Embroidery frame
For an embroidered picture we make a frame using the following technology:
The embroidery is stretched onto a stretcher or a thick cardboard backing. The source of material can be packaging cardboard boxes.
After stretching, the canvas is secured with threads.
To protect the product from contamination, it can be protected from the outside with glass.
Do-it-yourself bead brooch - 105 photos and video description of how to quickly and easily weave a broochDIY bird feeder - step-by-step master class and ideas for beginners and schoolchildren (155 photos)
Do-it-yourself beads: 120 photos and video description of how to weave beads
Under the glass there is a frame made of passe-partout or ordinary cardboard.
Cardboard is glued on top of the stretcher on the back side, covering the backing.
From clothespins
Using this method, you can get a fun sun frame where the pictures will be arranged in a circle.
Procedure:
- Form a circle from thick paper and cut out the core.
- Secure the clothespins with glue along the entire length of the circle so that the opening side of each of them is directed upward.
- It is best to use clothespins of different shades to make the fake colorful and original.
From children's hairpins
If there are girls in the family, then you probably have collected a considerable amount of decorative hairpins and elastic bands. Most often they are decorated with various flowers, twigs, and berries. You can safely cut them off from the elastic bands and paste them over the entire frame in a circle.
Alternatively, you can attach the decor only to the upper part of the product, leaving the lower part untouched. If the flowers are white, then the part of the frame free from decor can be coated with silver paint.
Primer and painting
After the glue has dried, the frame is painted with water-soluble paint, starting from the back. If an error occurs in choosing a color, the paint can be replaced without significant loss.
Painting must be done until the foam base is no longer noticeable. This painting is a primer, and subsequent painting will require spray paint of the desired color.
The water-soluble paint used to paint the frame as the first layer has an unsightly matte texture and is very unstable. To eliminate these shortcomings, the workpiece is painted with aerosol enamel.
From books and newspapers
To create another masterpiece of handicraft, you need the same base of cardboard or wood, as well as old newspapers, books or glossy magazines. All you need to do is just cover the newspaper into pieces of different sizes and then cover the frame with them. You can make a whole pattern using a large geographical map.
All the ideas presented for what you can make a frame from are simple and budget-friendly. You just need to show a little imagination to get a bright, stylish and original fake that serves not only a decorative role. After all, photographs are a memory of happy days and important events.
Manufacturing instructions
To make the frame, you need to purchase a foam ceiling plinth, which can be found at a hardware store. The range of such products is quite wide.
Measurements of the painting are taken, and then the foam blanks are cut with a hacksaw or knife in accordance with these dimensions. The dimensions and shape of the workpieces are checked with a square and preliminary assembly on the table.
After lubricating the ends of the workpieces with polymer glue, they are pressed against each other with force on a horizontal surface until gluing.