1680
Paving stones are in demand on the market of construction and finishing materials because they have high performance characteristics and a long service life. The material is used for paving paths, sidewalks, squares, and is also used to decorate porches and steps. It must be said that the porch and steps made of tiles look really attractive, because beautiful patterns are created with the help of paving elements, which allows you to add individuality to your home. In this article we will tell you what tiles for outdoor porches and steps are, and we will learn the secrets of laying them.
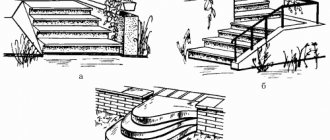
Steps in the park
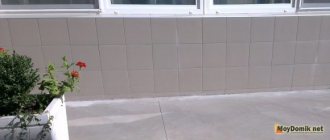
Tiling – the aesthetics of your home
Jellied base - pros and cons
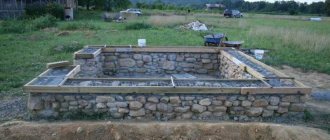
From the name it is clear that the porch is a monolithic base. The advantages of this design are as follows:
- Exceptional strength. Loads that are thicker than concrete are not terrible.
- The most suitable area for ceramic cladding - no multi-layer waterproofing or other materials are required, as if the porch were a wooden frame.
- Durability. If the pouring technology and the preceding stages are followed correctly, the porch will last a long time.
There are also disadvantages:
- A massive concrete porch is not suitable for every façade. Therefore, it is worth considering in advance how it will look - one-story wooden houses are in better harmony with metal and wooden frames.
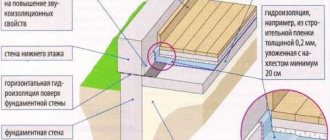
- Exposure of concrete to moisture. Water wears away stones - the saying was not invented in vain. Therefore, you will have to make a canopy for the concrete porch, waterproof the structure itself, and constantly check the object for sources of destruction, even when it is already lined - small cracks can cause major destruction.
- The work itself involves heaviness and proven technologies - attaching concrete to the foundation, formwork, depreciation, reinforcement. The processes themselves are simple, but require strict adherence, otherwise the concrete porch will not receive the proper strength.
To make a high-quality concrete base, expenses will be required - the purchase of a mobile mixer, in fact, the concrete itself - in this regard, metal or wood is much cheaper.
However, poured porch options can be arranged in a variety of shapes - semicircular or round steps, wide platforms. The choice is up to the owner.
Laying tiles on a concrete porch
And so the owners finally decided and made their own porch with a flooded porch. Well, great, the laying will be simple. Before laying paving slabs on the porch, you should purchase the necessary tools and materials:
- Special tile adhesive. You can also reduce the cost of the process by purchasing cement for independent cement production, however, the proportions may be far from the recommended ones, which will naturally affect the quality of the coating.
- Tile cutter. It will definitely be required if the owner’s porch has asymmetrical shapes or circles.
- Plastic crosses. They are designed to separate each element and keep it at the same level. In addition, you should purchase beacons - they will serve as a level and the layer of glue or cement mixture will lie equally and will not affect the distortion of the lined surface.
- Reinforcing mesh. A regular thin chain-link will also work. It is needed so that the surface receives the necessary reinforcement under load.
- Actually, the tile itself. Its variety on sale is simply off the charts. You can use substandard goods - scraps or leftovers. Then you can assemble fancy ornaments from such tiles - the porch will come out unusual.
- Grout. Be sure to be waterproof and keep moisture out of the seams. By choosing a color contrasting with the general background, you can achieve the perfect decor.
- Spatulas with different blades - serrated and smooth. It is convenient for the first to apply glue to the tile or wall surface, and for the second to smooth the grout.
You should definitely take care of the availability of special clothing - gloves and safety glasses if you need to work with an angle grinder. Below are the installation instructions:
Caring for ceramic steps
Tile is an unpretentious material. But since textured surfaces are mandatory for the porch, it can retain moisture, dirt and form ice on itself. It is important to clean the last problem from your porch right away, otherwise there is a risk of slipping and injury.
In other cases, simple cleaning and washing with a stream of water is sufficient. In case of chips and cracks, defective areas must be replaced. There is no point in delaying the work, as moisture will definitely get in and accumulate through problem areas, which is not good for both metal and concrete.
The facade plays a major role in the appearance of the house. Canopies, canopies and porches made of paving slabs with your own hands, made in an individual way, such as cladding, will create an overall appearance that enhances the house externally and protects the structures that are the basis for the decor.
Surface preparation
It doesn’t matter whether the porch was built recently or has expired - cracks, potholes and other defects may also appear on a young structure. You need to get rid of them immediately. For this:
- Clean the concrete from dirt, dust and debris. You can use a vacuum cleaner - it will perfectly pick out small crumbs from the cracks.
- If there are defects in the form of cracks, then they need to be filled with liquid cement mortar and wait until completely dry.
- Next, the site must be primed for subsequent adhesion of the solution or glue to all components of the cladding. To do this, use drying oil or other means intended for a specific purpose.
- Now they are shooting a chain-link mesh onto the porch. This can be done using a special gun and dowel nails or a drill. Beacons are immediately placed in the sectors at a distance of 20 cm from each other.
The foundation can be considered prepared.
Installation
All facade products are equipped with galvanized steel plates for fastening to the sheathing using self-tapping screws. This technology for finishing the external surfaces of a building is called the “dry installation method” and “ventilated facade”.
When installing modules, it is possible to simultaneously carry out measures to insulate the facade. First, thermal insulation is installed, and then the facade modules are installed. The design features allow you to hide the fastening of the previous one under each subsequent product and get a beautiful monolithic surface. Flat and corner facade modules are sold on the construction market specifically for the installation of window and door openings.
It is also worth learning more about how facades are faced with brick.
Video installation of facade tiles with metal fasteners:
Installation of the façade tile structure follows the principle of installation of ventilated facades:
- Before starting work, the base must be well prepared: clean the old plaster, dust and dirt. In this case, it is recommended to use a grinder.
- It is necessary to carry out work to insulate the facade. A popular membrane film, which is secured with a construction stapler, is suitable. This insulation will perfectly protect the walls from getting wet and becoming damaged by mold.
- Wooden beams measuring 5x5 cm are treated with an antiseptic composition. To level the first row of tiles, steel corners are laid in the lower part of the facade and along the perimeter.
- The frame is made by fastening it with profiles vertically and horizontally with brackets that are attached to the wall surface with anchors. Using self-tapping screws and rivets, a horizontal profile is installed. A vertical profile is attached to the top.
- Work begins on the left side, securing the first corner with two screws. Corner elements are used to adjust tiles in corners and near openings. If necessary, the material is trimmed with a circular saw on the right side to preserve the design.
- To saw off the fastening plate, you need to drill a hole for the screw directly into the tile.
- Installation of facade panels is done simply, without tedious rubbing of seams. The result is a monolithic surface without flaws, since the tiles placed one on top of the other hide the fasteners underneath. The result is an excellent imitation of a brick surface or natural stone of any color.
Preparing the tiles
If the area allows you to lay entire elements, then this is ideal, however, as already written above, semicircular and asymmetrical steps require the same forms of ceramics. You should lay the tiles on the porch dry in advance and carefully mark the stones. Further:
- Dry tiles are difficult to cut, so before starting work they are soaked in a container of water. The same as before installation.
- When the elements are cut, it is better to number them on the reverse side - then there will be no confusion and the pattern will be repeated in accordance with the plan.
- Having prepared the material, you can begin installation.
Finishing
When making such a finish, it is necessary to fit all its elements closely together in order to avoid rainwater from penetrating into the openings of the structure. It is the possibility that liquid will get inside the slabs that is the main disadvantage of this installation method.
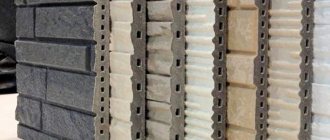
Options for facade tiles with metal fasteners.
Facade tiles with a metal frame are fixed only after the most thorough sanding of the building walls has been completed, as well as the installation of lathing on the facade. The sheathing itself is installed vertically, the distance between its guides cannot exceed half a meter.
Laying
Correct laying of paving slabs on a porch with your own hands should start from the bottom and go up. First, the elements are laid on the steps, and then the risers are installed. So:
- Apply a thin layer of prepared glue using a notched trowel. The dry mass should be diluted in strict accordance with the recommendations on the packaging. The mixture should be applied to a large area of the surface, leveled according to the beacons and allowed to stand for 5-7 minutes.
- They begin to lay the tiles. On the steps it should hang 1-2 cm above the edge, taking into account a 1 cm layer of future glue.
- You should carefully monitor the accuracy of matching of adjacent elements. Plastic crosses have been invented to help with this.
- There should be no gaps between the ceramic stones - all gaps are filled with glue. The grout will only help protect the seams and the decorative component.
It is very important to monitor the level of the laid tiles - if the owners are not satisfied with at least 5 mm of bevel or slope, then there is always a chance to correct everything while the solution is plastic.
Laying risers
Actually, this work is no different from laying wide spaces, with the only difference being that a thick layer of mortar or glue is required. The reinforcing mesh is also applied to the surface and the process can begin. It is important to properly design the ends of the steps. To do this, use a plaster float, acting as a limiter.
You can make a special stencil from plywood and temporarily fix it in appropriate places, and remove it after work. This method is suitable for beginner tilers - the stencil will prevent the mortar from getting out beyond the concrete pour and will help create neat, even edges.
Grout
Grouting is carried out only after the surface has completely set. Plastic mass, rubbed along the seams between the tiles. It is important to immediately remove sloppy masks from the ceramic surface so as not to scrub off the stuck material later.
The grout is selected taking into account the characteristics of the area - frost, high humidity and other weather surprises - the raw material must withstand all the negativity and not crumble into dust. Acrylic options are not suitable, since under load and compression they crack and come out of the seams.
Laying tiles on a metal frame
The process is simple and has few steps, unlike the first option. However, the main feature is the required strength and thickness of the ceramic tiles. It should be at least 5-6 cm. This will make the construction of the porch somewhat more expensive, but you still cannot buy cheap thin options. Further:
- Since the steps of the frame mainly consist of metal corners that form the frame, the installation of tiles does not raise any questions. No special reinforcement is required.
- First, a pattern is made, and the tiles are laid on it on a dry area, simultaneously marking the cut points. It is relatively difficult to shape thick ceramics and for this purpose they use a grinder with diamond discs.
- Next, the prepared tiles are soaked in water, and mortar or glue is applied to the corner shelves. There is no need to feel sorry for the composition - let it fill all the voids and gaps.
- Now you can lay the ceramic elements, and once they have set, rub them in with the selected paste. The grout should also be frost-resistant and not interact with moisture.
An important condition is that there should be no empty gaps between the tiles and the metal corner, without cement or glue. This will prevent the metal base from corrosion. For reliability, before installation, frame corners are primed with special compounds.
Installation principles
Any slab with zinc-clad steel plates should be mounted on a pre-attached sheathing, using self-tapping screws and a screwdriver. It is not at all easy to tear off material secured in this way from the wall, because to do this you will have to apply enormous force, the same as lifting 200 kg. That is why facade tiles are considered the strongest material for cladding.
But if you look at the situation differently, such a tile with metal fasteners can be quickly unscrewed and screwed back just as quickly. If for some reason fastening the sheathing does not seem feasible, then the cladding should be done with a cement solution. For this purpose, the fastening plates must be bent 90° in relation to the tile and lowered into the cement mortar. This will create strong connections between the walls and will also serve to increase the strength of the masonry.
Tiles with fastenings, held on by self-tapping screws, do not require additional care and maintenance during their service. It does not lose its properties under the influence of the sun, is very fire resistant, will not be destroyed by salt stains and mold, and does not require cleaning, washing or painting.
When fixing such cladding, you can provide additional insulation to the house. Manufacturers usually place insulation along with the tiles. The tile itself comes in a wide range of colors. This will allow your home to play with any colors you like. Having the ability to choose color is one of its most important advantages.