Painting stone with a brush
To paint stone with a brush, you will need a bucket, warm water, brushes (narrow and wide) and iron oxide pigments. In our city, pigments are sold in kilogram jars and I found only 5 colors:
- Brown;
- Black;
- Red;
- Yellow;
- Orange.
In order to get a different color, they need to be mixed. I wanted to get beige, I mixed yellow and brown, but it didn’t work out. It turned out to be a completely incomprehensible color. Perhaps I mixed it incorrectly.
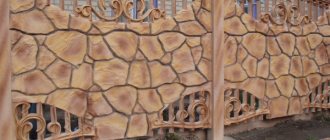
So, first we need to dilute the pigments. I took black and brown, diluted them with warm water in different containers. Then I took about 15 grams of orange and dissolved it in a bucket. After 10 minutes the pigment dissolved. I took a narrow brush and made several stripes of brown and black. Next, I dipped the tile in a bucket of orange pigment several times. The number of dips depends on what color you want to get; the more dips, the brighter the color. I dipped the tile 3 times, then took a wide brush and brushed it all over the surface. It turned out like in the photo below.
I used an arrow to highlight the area that was not painted over; this is due to the plaster deposit that forms on polyurethane molds.
Here's another photo in other colors.
Pros:
- This method is available to everyone;
- Beautiful aging effect.
Minus: painting takes a lot of time.
conclusions
Studying photos is a harmless activity where you will begin to realize your idea of creating a colored rock garden in your garden. The material is very flexible, sometimes heavy, of course. Therefore, we advise you to prepare it first and the more, the better (see also the article “Paint for concrete: which one to choose”).
Research what kind of material you have and carry out some systematization by size and shape; this stage will already be able to clarify a lot with the result. The paints themselves, oddly enough, will not cause problems. They, of course, are the “chiefs” of the entire process, but “they will appear at the last moment.”
Until then, you will have enough time to watch our additional video in this article more than once.
How to paint stones - conditions, principles, actions
If you, having completed all the work around the house and on the site, found a place for a gazebo and installed it, are looking for something else to do, and a spark of creativity burns in you, then we advise you to pay attention to the so popular rock gardens. Try hiding one of the Japanese-style stones in the garden, try making a stone path or an Ai-Petri mountain range. Everything is at the mercy of your imagination, and coloring the stone will only contribute to its growth.
Paints and brushes
Here, however, you need to understand that the paints from the children's school set are not suitable at all. After all, the conditions for the existence of the results of your creativity will be quite difficult and this must be taken into account.
The paint you will apply:
- should be as resistant as possible to precipitation from heavy rains, like from a bucket, to hail the size of a chicken egg;
- must be resistant to constant exposure to sunlight, and preferably not fade;
- must be resistant to both high and low temperatures, and especially to large differences;
- if you are making a colored path, then of course it must be resistant to mechanical stress and abrasion, first of all;
- Well, and, of course, it should be simply bright, beautiful and not lose its attractiveness over time. What we have
Read also Cherry uyfehertoi furtosh description of the variety photo reviews
Considering such serious requirements for such a seemingly toy activity, we do not have such a large set of paints at our disposal, although it can be completely trusted:
As a rule, you will have at your disposal water-dispersed paints that:
- diluted with water;
- very easy to use;
- have a very wide range of colors;
- when applied to the surface, they dry and polymerization occurs, they are extremely resistant to external influences.
2. But, secondly, pay attention to the same acrylics, but for a special purpose - fluorescent, luminous, so-called invisible. These paints allow you to create very unexpected effects. Having used glow only once, you will no longer be able to refuse it in many other situations.
3. Thirdly, silicate paints, which are also highly resistant. Their feature is increased resistance to ultraviolet radiation.
4. Fourthly, silicone paints are all from the same category of reliable and worthy of respect for painted surfaces in difficult conditions. Silicone is highly elastic. If the application technology is followed correctly, the surface painted with such paints will never crack.
Mixing colors
When you work with paints, especially on stone, it is impossible to escape the desire to experiment and not rush into mixing the original colors to obtain some unusual shade. Of course, throw yourself into this whirlpool of creativity, but don’t forget about the bicycle, which, it turns out, was invented a long time ago.
Here are the most typical color combinations - one with the other and what we get as a result:
- if you need lemon, then mix yellow and white;
- if you don’t have real orange on hand, then get it from yellow and red, which even kindergarten children know;
- yellow, in general, is the most popular color for mixtures; its combination with blue will give green;
- but to get bright spring greens, you will have to dilute the greens themselves again with yellow;
- You can get a seductive cherry color by adding brown to yellow;
- It’s not clear why, but many people strive so much for this brown color, no matter how it is, to do this, mix blue and red, but here you will have to experiment with the proportions to get rid of the “dirt”;
- in fact, if you are not satisfied with this combination to get brown, then you can try mixing red and green;
- the same brown, when strongly diluted with white, helps create those seductive shades that beige colors protect our taste;
- Well, and, in the end, by mixing the three primary colors of the RGB palette (R-red, G-green, B-blue), you can enjoy all shades of purple.
Useful advice Painting stone is a matter of soul and creativity, which is accessible to everyone. But we advise you to first accumulate a database of ideas. Look at what the designers offer, what has already been implemented, coordinate all possible options with your conditions.
Under no circumstances should you start work without an idea and a plan for its implementation. Sometimes for work you will need to secure some fragments with concrete, etc.
Work progress
When it comes to creativity, a term such as “work progress” is out of place. However, you can't do it without the usual craft techniques.
Let's start small and create a regular path of stones, which we will then paint:
- First, let's create a path plan;
- let's mark it
- we will clear the entire path to the ground,
- compact the earth;
- pour a layer of sand on top, which we also compact thoroughly;
- then we proceed to laying stones, preferably pre-prepared pebbles of about the same size as two matchboxes - try to follow your idea, although be prepared to change your plan;
- Please note, given that we will paint the stones next, they must first be cleaned of contaminants;
- before painting, it is customary to prime any surface; you cannot skip this operation on stones either - it is best to use a special primer for the paints used, or you can limit yourself to water-dispersed latex paint, which also works very well as a primer;
- there is not much need to talk about further work and solving this problem, how to paint stones with your own hands, when all that remains is to pick up brushes; I can give only one piece of advice - if you have problems with imagination, invite your children to help, or try to plunge back into those years when you were 10 and you still really enjoyed life.
There are other situations when you might want to work with these construction antagonists—stone and paint:
- you made a border, and somehow paint for the border stone suggests itself;
- you have a small free corner on your site, you just watched a program about the Land of the Rising Sun, this calm hard worker of Japan, and you wanted to create something similar for yourself;
- you just have stones and paint left over from construction that have nowhere to go.
Studying photos is a harmless activity that will help you begin to realize your idea of creating a colorful rock garden in your garden. The material is very flexible, sometimes heavy, of course. Therefore, we advise you to prepare it first and the more, the better.
Research what kind of material you have and carry out some systematization by size and shape; this stage will already be able to clarify a lot with the result. The paints themselves, oddly enough, will not cause problems. They, of course, are the “chiefs” of the entire process, but “they will appear at the last moment.”
rock garden photo, stone paths photo
Painting in bulk
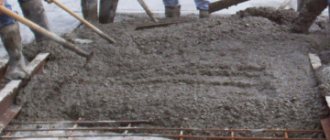
There is nothing easier than painting artificial stone using this method. We take the pigment, dissolve it in water, then add plaster and make a solution. Then pour it into the molds.
Pros:
- Fast painting method;
- All tiles are painted (inside and outside);
- No fading.
Cons: You can only get 1 color.
After drying the stone, the color will fade, so only testing can determine the final color of the stone. I mixed 1 kg of gypsum and added different amounts of pigment: 3, 6, 10, 15 grams. The main thing is to write everything down so that you don’t forget later how much pigment you added to which stone.
Decoration
There are several ways to interestingly paint the surface of decorative gypsum stone, with which you can achieve an unusual look for the product:
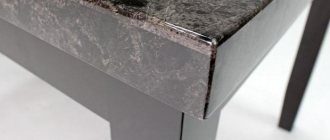
- Under old marble , a stone made with your own hands is dried, and a store-bought one is placed in a warm, dry place and kept for two days. After this, use a flute brush to impregnate the surface in two layers with heated drying oil. After some time, you will get a coating with an aging effect, reminiscent of marble.
- For terracotta - the technology is similar to creating an ancient marble coating, only it is not drying oil that is used, but rosin and varnish - they are diluted in industrial alcohol.
- With a bronze tint - gypsum stones are thoroughly impregnated with drying oil and dried for 8-10 hours. Then two layers of bronze powder diluted in varnish are applied to the material, and the stone is dried. Take 10 g of silver nitrate, 100 g of vinegar, 300 g of pure water, and prepare a special solution from these components. The product is re-coated with bronze powder and treated with the prepared solution. At the end of the procedure, the decorative stone is wiped with a piece of velvet cloth.
- Application of stain - the composition is slightly heated, gypsum elements are immersed in it for literally 5-10 seconds and sent to dry.
Thanks to these tips, preparation for painting decorative gypsum stone will be productive, and the result of the work will be high-quality and long-lasting.
One method of painting decorative gypsum stone is presented in the following video.
Applying pigment to molds
The essence of this method is that you need to dilute the pigment so that it is not too liquid. Apply it with a brush to some areas of the mold and pour in the gypsum solution. The disadvantage of this method is that the molds will need to be washed if you want to make other colors; they say 1-2 pours of cement will remove the pigment completely. I also didn’t like the fact that when pouring plaster, the paint (pigments) can spread.
Instead of pigment, you can use regular grout for ceramic tiles, which you can see in the video below. Grout is much cheaper than pigments, so it turns out very profitable.
Coloring gypsum mortar
One of the options for coloring plaster is to add color to it. However, here it is necessary to take into account that the solution is very thick, and making the color uniform will not be so easy. Well, if we are not talking about a ready-made solution, but about a powder that we will dilute over and over again, then this method does not work at all, since in this case the shades will always be different, and you will simply ruin the wall. Finally, when diluting colors in such a thick environment, it is difficult to decide how much paint to add, so you can easily overdo it. If you do paint the solution, then you need to understand that when it dries it will become a little paler, so it’s better to make the color more saturated.
How to paint plaster?
It doesn’t matter whether we are talking about bas-relief or gypsum tiles - the material itself has excellent adhesion. In other words, it absorbs water very well, and therefore paint and varnish coatings. We list the main ways to paint a plaster surface:
- Acrylic, water-dispersion or water-based paint;
- Varnish for plaster. A great way to highlight the natural color of the plaster coating;
- Pigments including gold and silver. The latter, as well as specialized paint for plaster products, can be purchased at an art store. Moreover, the choice of shades there will be incredibly wide.
Advice! In order for the painted layer to adhere better, it is best to apply a clear varnish on top. Since paint on plaster dries very quickly, you can start varnishing almost immediately.
Work progress
When it comes to creativity, somehow such a term as “work progress” seems out of place. However, you can't do it without the usual craft techniques.
What we do
Let's start small and create a regular path of stones, which we will then paint:
- First, let's create a path plan;
- let's mark it
- we will clear the entire path to the ground,
- we will compact the earth;
- pour a layer of sand on top, which we also compact thoroughly;
- then we proceed to laying stones, preferably pre-prepared pebbles about the size of two matchboxes - try to follow your idea, although be prepared to change your plan;
- Please note, given that we will paint the stones next, they must first be cleaned of contaminants;
Small pebbles seem to be made for paint - it’s like drawing with colored dots on paper
- before painting, it is customary to prime any surface; you cannot skip this operation on stones either - it is best to use a special primer for the paints used, or you can limit yourself to water-dispersed latex paint, which also works very well as a primer;
- there is not much need to talk about further work and solving this problem, how to paint stones with your own hands, when all that remains is to pick up brushes; I can give only one piece of advice - if you have problems with imagination, invite your children to help, or try to plunge back into those years when you were 10 and you still really enjoyed life.
There are other situations when you will want to work with these construction antagonists - stone and paint:
- you made a border, and somehow paint for the border stone suggests itself;
- you have a small free corner on your site, you just watched a program about the Land of the Rising Sun, this calm hard worker of Japan, and you wanted to create something similar for yourself;
- you just have stones and paint left over from construction that have nowhere to go.
Gold paint on stone is always very attractive in itself, now the main thing is just to find the right place for these “treasures”
The process of painting a plaster wall
- Over time, plaster loses its ability to absorb paint well, so it is better not to delay the painting process. If you nevertheless see that gypsum has lost its ability to adhere, then it is best to try to influence it with drying oil. By the way, with its help you can achieve other effects, but more on that below;
- Since the adhesive properties of gypsum are great, painting it can take quite a large amount of paint. To reduce this indicator, it is best to prime the product. In addition to the fact that this will give the surface strength, it is also about the possibility of obtaining a more uniform application of color;
- Acrylic paint is applied to the plaster in at least three layers.
How to paint bas-relief and stucco molding from plaster
Wall decorations such as stucco and bas-relief are painted with acrylic, water-dispersion or water-based paint. The last two types of paint, by the way, will not only provide the plaster with color, but also protect it from external influences.
In addition, various pigments are widely used to help imitate metal surfaces or natural stone. By the way, the plaster can not be painted, but covered with gold foil on top, which will imitate the surface of this metal as realistically as possible. In this case, the foil is applied to the glue, and the top is coated with varnish.
A variety of tools are used, ranging from a spray gun to small brushes and cotton swabs to treat protruding and smallest parts. Depending on the technique used, it is possible to paint under the old surface and achieve other effects.
Features of the construction of stone supports
Since a fence with stone pillars is quite heavy, it is necessary to lay a foundation under it. The most suitable would be a reinforced strip base with a burial depth of 0.8-1.2 m. The optimal span width is 2-2.5 m. In the places where the supports are installed, so-called concrete cups are installed with metal pipes inside and a vertical reinforcement frame brought out (for greater strength of the structure and adhesion of its elements).
Masonry using formwork
The use of sliding formwork allows you to quickly and conveniently erect pillars from natural stone. It consists of a box made of boards, the internal dimensions of which correspond to the desired dimensions of the pillar.
Step-by-step instructions on how to make pillars using formwork:
- The formwork is stopped so that the steel rod coming out of the foundation is located in its center.
- Corners are welded to the pipe, to which the gates will subsequently be attached, as well as horizontal fence logs.
- The first row of stones is tightly placed in the formwork box, placing them with minimal gaps.
- The first row is poured with concrete so that it fills all the cracks.
- Subsequent layers are formed in a similar way until the box is completely filled.
- When the concrete has hardened, the formwork is removed and the pillar continues to be built in height, moving the formwork to the desired level.
Features of erecting supports without formwork
How to lay stone pillars without using formwork? To do this, it is necessary to cover the metal base of the stand with rock, mounting it on a thick cement mortar. At the same time, the rod provides fastenings for horizontal fence jumpers, which are installed at the level of the third row and in the middle.
The voids formed inside the rack are filled with concrete with the addition of fine crushed stone. Larger minerals are used to line the lower part of the support, and smaller minerals are used to line the upper part.
After opening the seams, caps are installed on the pillars to prevent precipitation from getting inside the support and destroying it.
Stone cladding of supports
If thin flat minerals and artificial tiles are used as raw materials, then they are laid similarly to tiles on pre-constructed brick or concrete pillars.
Facing pillars with stone of natural or artificial origin begins with preparing the surface. Concrete or brick supports are cleaned of dust, dirt, and primed. A reinforcing mesh is attached to them and plastering is carried out. This will level the surface of the racks and further protect them from negative environmental influences.
How to cover a pillar with decorative stone? To do this, apply a small amount of mortar to the tile and then glue it to the plane of the counter, pressing lightly. Finishing begins from the bottom of the support and is carried out while maintaining gaps between the elements of 1-2 cm. If necessary, the tiles are cut to the required size.
Upon completion of the work, the seams are rubbed down, the surface of the supports is cleaned of dirt and glue smudges, and covered with a protective compound. The last thing to do is install the covers on the fence posts.
A heavy-duty, reliable, respectable fence will not only serve to protect the site, but will also emphasize the special status of its owners. A large role in its arrangement is played by self-built stone fence posts, built with one’s own hands. If you show patience and use your imagination, you can build high-quality supports that will support the entire enclosing structure and decorate the area.
We turn plaster into natural stone
- If you want the gypsum product to not expose its snow-white structure when chipped and not ruin the entire impression of imitation stone, then it is better to paint it at the stage of mixing the solution;
- The excellent, but uneven adhesion of the gypsum surface will help you imitate stone. Thanks to this, veins are formed on it, characteristic of the surface of natural stone;
- Use the glazing method - applying different layers using paint of different shades. In this case, even marble can be imitated on a gypsum surface.
Gabion construction
Gabions vary in cell size and geometric shape. Mostly box-shaped structures are used, but there are also cylindrical and flat ones.
Flat gabions, a low structure from 15 to 30 centimeters, are used to strengthen slopes and the bottom of reservoirs.
Cylindrical gabions are used to build foundations under water or where it is necessary to strengthen uneven areas.
The most common box-shaped gabions are used to make various types of fences, retaining walls and even buildings, mainly for commercial purposes. For production, a metal structure of standard dimensions is used: 1 meter high and 2 meter wide. The length can be arbitrary and reach six meters. The mesh varies in size and shape of the cells, usually hexagonal, which is made by the mesh method, or rectangular, made by welding.