Cabinet assembly rules
Experience and practical skills in assembling structures such as a cabinet certainly play an important role. However, even with minimal skills, it is possible to get the job done.
To do this, you need to follow a number of specific aspects on how to properly assemble a cabinet:
- Before starting work, you should carefully read the instructions for assembling the cabinet.
- Prepare the necessary tools and clean the area for installing the cabinet.
- Carefully lay out all the parts on the floor or table and count them. The lack of just one element can disrupt the entire assembly process.
- Carry out the work gradually; haste in this case is not the best help.
- If you encounter any difficulties, you can watch several video tutorials on assembling the cabinet.
All mirrors and glass panels are assembled last, so as not to scratch or break them during the work.
Self-assembly of furniture provides a number of beneficial advantages: you do not need to set aside time to meet with a master, and carry out the work at a time convenient for you.
Assembling a wardrobe with your own hands: step-by-step instructions
The optimal option for assembling cabinets of different models is not just one method, since the difference in design requires different approaches to assembling and disassembling built-in furniture. How to assemble a classic type coupe is indicated in the following instructions.
Preparatory stage.
You need to familiarize yourself with all the details of the product (so as not to confuse anything during the assembly process and not have to start all over again), prepare the tools and the place where the assembly and installation will take place. Any furniture is assembled in a horizontal position.
The first stage is to assemble the podium (base and legs).
On the part that is the bottom of the cabinet, we make markings at right angles (confirmations) so as to ensure optimal emphasis over the entire area. We mount the base with dowels and minifixes, then hammer in the support nails. If there is a baseboard, it will need to be trimmed as the podium needs to fit very tightly against the back wall.
The second stage is to install the side parts of the cabinet (if this model has them).
Initially, it is necessary to trim the sides so that they fit smoothly and tightly against the back wall (it is advisable to even sand the back walls of the ends). To place the side parts perfectly vertically, use a level.
If the coupe model does not have side parts and is designed to be placed between walls, then at this stage you need to make a marking under which the shelves will be attached, also using a level. Using a hammer drill, we make holes in the walls (below the level markings), insert fasteners into them and secure the corners. We place shelves on the corners and also secure them. Next, we install the rear racks at the level of the shelves.
The third stage is the installation of drawers and rods.
We install guides on the drawers, retreating from the edge by 10-15 cm, since in most models of sliding wardrobes the drawers are made with inset facades. We attach the response mechanism to the side panels. We install facades. We fix the bar on which clothes will be hung on hangers until the installation of the drawers is completed.
The fourth stage is installing the door.
We take measurements of the cabinet from the inside and mark the levels of fastening of the guides on the floor (podium) and the top panel. Before fixing the floor guide, we also insert a stopper into the holes of the marks to secure the door when closing.
We start installing the door by fixing the guides - the top one needs to be raised a little and lowered onto the bottom one. We adjust the rollers at the bottom through the end holes. That's it, the door is installed.
The final stage.
Attaching hooks to the outside on the side panels, if this is included in the cabinet design, as well as cleaning the furniture collection area. After this, you can safely place all the necessary clothes in the compartment without fear that something will fall off the furniture or clothing will be damaged - if you followed the instructions, such cases are not expected.
For each wardrobe model, the manufacturer provides an assembly diagram, so if you are not sure that you are performing the assembly steps correctly, check the diagram periodically. In addition, there are many demonstration lessons on how to assemble a wardrobe: videos, audio materials, etc. You can also consult an experienced specialist if you have problems with measurements and the correct choice of placement of the product.
High-quality built-in furniture always fits well into the interior, so before you start collecting, decide on the place in the apartment where it (the furniture) will stand. Take advantage of the knowledge you acquired after reading this article, additional information materials, and the services of specialist consultants and easily assemble or disassemble cabinets of any model with your own hands.
Source: remont.youdo.com
Tools required for work
Before starting work, you need to prepare the tools to assemble the cabinet. To install a classic wooden model you will need the following kit:
- Straight and Phillips screwdrivers.
- Stationery knife.
- Construction pencil for marking.
- Screws and screwdriver.
- Roulette.
- Drill.
- Glue.
- Hammer.
For additional decorative finishing, sandpaper may be needed to smooth the edge surfaces.
What tools will you need to assemble a sliding wardrobe with your own hands?
To assemble/disassemble a wardrobe with your own hands at any time, you need the following set of tools:
- level: regular or laser (to avoid problems with measurements)
- angle - for the correct placement of parts in relation to each other, strictly perpendicular
- hammers: regular (driving dowels into walls) and rubber (to align cabinet parts “standing” next to each other)
- screwdrivers with a flat and Phillips nose for screwing in self-tapping screws
- tape measure, marker and pencil for markings
- hex wrench (for working with confermates)
- sandpaper for sanding
- iron to glue melamine edges to the open surfaces of the ends of the panels
- electric drill with wide functionality
- To screw in screws, you will need different attachments for a “bit” type drill to save time and not screw in screws with screwdrivers
- 35mm Wood Drill Bit and Counterbore
- special drills for working on metal ( 2-10 mm )
- 1 cm pobedit drill for making holes in walls
- jigsaw (preferably powered by electricity, 600 kW , for quickly filing coupe parts)
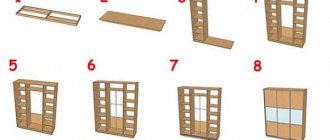
Installation of a classic cabinet model
Assembling the cabinet is a relatively simple task. The master will need a minimum of skills and strict adherence to instructions.
The entire installation process can be divided into several successive stages of cabinet assembly:
- Preliminary stage (preparatory work).
- Marking surfaces and parts.
- Installation of supporting structures.
- Installation of cabinet walls.
- Installation of the top and rear walls.
- Installation of facades and doors.
If each stage is followed correctly, assembly will take minimal time, and the process itself will not cause difficulties for the master.
Note!
Sofa with drawers - TOP-130 photos of sofa options with drawers. Design advantages. Types of transformable sofas. DIY making- Modern sofas: types of designs and frames. Stylistics of modern sofas. Shapes and sizes of sofas. Photo and video reviews
- Wardrobe in the corridor: TOP-160 photos and videos of wardrobes in the corridor. Features of types of cabinets. Nuances of closed and open cabinets for the corridor
Preliminary stage
At this stage, the master faces several important tasks:
- Assessing the quality of parts and counting their quantity.
- Study the assembly instructions.
- Protection of surrounding furniture from dust and splinters that may appear during the assembly process (from drilling surfaces).
- Separately for drilling, you should prepare an old stool or a sheet of chipboard. All work will be carried out on this surface.
- Evaluation of components, fittings and rotating mechanisms (if they are provided in this cabinet model).
The preliminary stage allows you to prepare the basis for assembling the structure, and the master can study the sequence of work.
Manufacturing of parts
All work begins with a section of chipboard sheets. You need to cut the sheets into the required elements. When dimensions are set during design, the width of the saw itself must be taken into account (usually 3 mm). If you ignore this additive, the parts will be smaller.
Related article: How to hang wallpaper beautifully: alternating techniques (photos)
The sheet can be cut, as mentioned above, in a special workshop. The chipboard will be cut very accurately, the edges will be without burrs. It is quite difficult to obtain this quality at home using hand tools. But this is up to your choice and experience.
Edging parts
Edging parts can be done using a regular iron
After cutting the sheet, edging is done. This term refers to ordinary PVC tape (2 mm). A very thin tape, whose thickness is less than 1 mm, is used mainly for finishing invisible ribs; everything visible is covered first.
It is very convenient to glue edges at home with a heavy iron, heating it to the desired temperature. It is selected depending on the material used. This is where the preparatory work ends, all that remains is to assemble the cabinet with your own hands.
Marking parts and surfaces
The markings include both marks in the places of future installation of shelves and cabinet compartments, as well as marking boundaries on the walls.
Modern apartments allow you to install furniture not only along an adjacent wall, but also in a building niche.
Before starting assembly, you should take measurements of the area where the cabinet is supposed to be located. Correlate the obtained parameters with the dimensions of the furniture so that in the future you do not have to move the massive cabinet in its assembled state.
Note!
IKEA cabinets: TOP-170 photos and video reviews of IKEA cabinets. Advantages and disadvantages of the manufacturer. Varieties of shapes and designs of cabinetsSliding wardrobes: pros and cons of sliding wardrobes. Varieties of designs, shapes and sizes. Materials for manufacturing the body and doors (photos and videos)
Black furniture: TOP-160 photos and videos of design ideas with black furniture. Rules for combining colors and shades. Choosing an interior style for black furniture
If the set is placed in a niche, the back wall is not attached to the base, and this stage can be safely excluded from the general progress of work.
Marks are made with a pencil on the inside surface of the cabinet - they mark the installation locations of shelves and axial strips for hangers.
Tricks and nuances
To ensure that your product turns out practical and aesthetically beautiful, adhere to the following recommendations:
- • When designing your cabinet, take existing drawings of finished furniture as an example.
- • The development and implementation of a corner wardrobe project requires greater skill and care than a straight one. An inexperienced master should be well prepared to perform such work.
- • If you doubt your abilities, then it is better to entrust the cutting of parts for a future product to an experienced craftsman - his cuts will come out perfectly smooth and as clear as possible.
- • To ensure that the components do not come out smaller than the required size, it is necessary to take into account the width of the saw cut.
- • Profiles for sliding mechanisms must be positioned strictly parallel. You should also be very careful when marking out the locations of shelves and drawers.
- • Holes for confirmations are made with a drill of the appropriate diameter in a strictly symmetrical order.
- • Installation of a mirror or glass always begins with a seal. The decorative film is glued to the cut edge using a hot iron and cotton fabric.
Installation of support structures
Depending on the type of structure, the legs can be installed in two ways:
- In the first case, the support legs are screwed to the bottom surface of the base. These models provide the ability to adjust the height.
- In another case, the plugs are removed from the support legs, and the parts themselves are inserted into the prepared holes on the lower surface of the base. These models do not provide for height adjustment of the structure.
After fastening, the supports must be adjusted so that the cabinet subsequently stands level. You can use a building level or a guide bar.
Where to start?
To start becoming independent, you need a design for your future closet. You need to prepare drawings for making a cabinet with your own hands. If you can’t, then at least make a sketch.
The main thing is to stake out a place for its installation, otherwise it will be either shorter or longer than the area. Calculate the main dimensions: length, width, height, and then the number of compartments, cabinets, methods of hanging doors and doors.
Next is the choice of material, fittings, paint or varnish, so that the cabinet does not look tacky in a good room interior. If anything is unclear, then turn on our video on how to make a cabinet with your own hands and watch it every time if there is either a misunderstanding or inability.
Installation of cabinet walls
Before installing the side walls, pins are attached to the upper surface of the base. The side walls are mounted on prepared pins.
The next step is to attach the internal walls and shelves in a perpendicular direction. At the same stage, it is necessary to drill holes and then tighten the confirmations.
Note!
Computer desk: TOP-130 photos and videos of types of computer desks. Choice of shape, size and material of manufactureSolid wood table: advantages of the material. Tips on choosing the type of wood and the shape of the countertop. Photo and video instructions for production
Corner sink in the bathroom: TOP-180 photos and videos of options for corner sinks. Pros and cons of small sinks. Types and shapes and materials
It is very important to monitor the force applied, because twisting too tightly can damage the material.
Subtleties of cabinet design
Before you start creating a cabinet, it is important to determine for yourself what purpose it will serve, what functions it will perform and what appearance it should have. This stage is called design and plays a key role in the manufacturing process.
Cabinet dimensions and functions
Designing a cabinet helps you decide on the function and appearance of the furniture. It greatly simplifies the process of selecting the necessary materials. A well-designed wardrobe will serve you for many years with maximum benefit.
The first step is to decide in which room the closet will be located. This could be a hallway, bedroom or living room. Materials and components depend on the room. In addition, it is necessary to determine its approximate location.
Now you can calculate the width, depth and height of the cabinet. At this stage, the number of shelves, rods, hooks and other important components is also calculated.
Then you have to choose the color and design of furniture that suits the interior. And also determine what will be stored in this closet. If you clearly understand the contents of the cabinet, you will be able to accurately determine the desired width. This will help save room space.
It is very important to distinguish between “dry” and “wet” things. “Damp” items include umbrellas and outerwear. It is recommended to store them at the edge of the shelves so that their dampness is not transferred to other things. “Dry” things include all the rest
Choosing the right model
Using the same materials, you can build different cabinet models that will differ in appearance and purpose:
- For books . Such cabinets can be closed or open. Closed ones protect books from external influences, while open ones fit beautifully into the interior. Shelves are often mounted on corners. In order for all magazines and books to fit on the shelves, there are standard cabinet parameters: the height should be 2 meters, the width should be 0.8 meters, and the depth should be 0.4 meters.
- For shoes. Furniture for storing shoes also varies by type. It is possible to build a shoe cabinet as part of a wardrobe or as a separate chest of drawers. In the second case, gloves, keys and hats can be stored here. Shelves are traditionally wooden, but can also be made of metal - they are attractive in appearance and perform several functions. To approximate the depth of your closet, measure the box of one of the largest pairs of shoes in your house.
- For clothes . This model requires more components - hooks, shelves, a hanger bar. In addition, the clothing furniture is equipped with a mirror and a separate shelf for underwear. Such a cabinet is installed along the wall.
One of the options for making a wardrobe is a metal frame + plasterboard lining. First, a frame is built from metal or wooden profiles. It is securely fixed. After which, the frame is covered with plasterboard. The last step is sanding, puttying and installing doors with shelves.
The cabinet model is selected depending on its location and purpose. Each model has its own specific internal and external features
According to the type of design, the cabinet can be free-standing or built-in . Furniture that is located under the stairs or in a niche is gaining particular popularity. This design is quite compact and harmonious. In addition, it saves space in the room, making it more spacious.
Based on the method of opening doors, there are swing doors and sliding wardrobes . Small hinged cabinets are especially popular. There are a huge number of variations of such furniture. It is used to store dishes, clothes, personal items and any other items. The design of such furniture can consist of drawers, bedside tables and shelves.
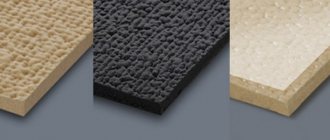
Cabinet material
There are various materials that can be used when constructing a cabinet:
- plywood;
- boards and slabs;
- cardboard;
- solid boards.
Plywood is a durable environmentally friendly material. Its smooth surface does not require any additional processing. You can purchase solid, varnished and already treated plywood, which will greatly save time on assembling the cabinet.
Boards and slabs - this includes MDF, chipboard and laminated chipboard. MDF is often a fibreboard made from small chips. Such plates are fastened quite firmly. Moreover, they are resistant to any changes in humidity and temperature.
Chipboard is a chipboard made by gluing and pressing shavings and sawdust. Such slabs do not withstand exposure to water. However, they can produce a fairly smooth surface.
It is best to use chipboard when assembling wardrobes for clothes or books. They have a lower price than MDF and chipboard. The latter stands for laminated particle boards. They are more popularly known as laminate. It comes in a variety of colors and is extremely resistant to any moisture.
Cardboard. Making furniture from this material has become a full-fledged area of interior design. To the surprise of many, cardboard is practically in no way inferior to traditional materials. However, cardboard is no longer suitable for use in high humidity environments. Parquet varnish gives cardboard the necessary strength.
Solid boards . Wood cabinets have historically been considered durable. They always look great. The most commonly used are spruce and pine. The price of boards often depends on the type of wood, size and dryness.
Selection of fittings and creation of a drawing
An important component of any furniture is fittings - hinges, handles, pull-out mechanisms, thrust bearings, mirrors, legs, fastenings for hangers and shelves. The fittings perform the basic functions of furniture. For this reason, it must be made from high quality materials.
After completing the preparatory stage, you can safely begin sketching the drawing . The drawing should reflect an approximate model of the cabinet. First, a frame is depicted on it. In addition, you must specify all the parameters of the cabinet. Then all the components of the cabinet are drawn.
Carefully and competently draw a drawing, because it will serve as a kind of cheat sheet when building a cabinet. It is necessary to accurately determine the number of hooks, shelves and rods. To obtain a clear drawing, you can use a pencil, ruler and paper
After the drawings have already been drawn, you need to start cutting the parts. This task is difficult to accomplish at home. It is convenient to entrust this matter to professionals by providing a sketch with parameters. For example, many construction and furniture stores provide such a service for quite reasonable money. This solution will contribute to obtaining high-quality parts.
Next, all that remains is to buy fittings, taking into account the individual characteristics of the furniture.
Installation of the top and rear walls
To carry out this work, it is better to hire an assistant who will support and guide the installation of prefabricated panels.
The panels are placed on the prepared frame, fastening is carried out by tightening the screws. For additional fastening, you can use metal corners.
Installation of facades and doors
In modern design, sliding doors with mirrored or figured facades are often used. Installation of such panels is carried out last, so as not to damage the decorative coating.
Instructions for assembling the facade:
- The protective coating is removed from the doors.
- The wheels and sliding slots are examined for compliance and absence of defects.
- If necessary, you can adjust the wheels or slots to match their size and shape.
- The master or his assistant lifts the door and arranges it alternately in the upper and lower groove.
- Lastly, the bumpers are installed and the stoppers are adjusted. This moment is necessary for the doors to fit tightly to the frame.
If the selected model includes decorative coverings on the facades, it’s time to attach them to the front doors of the cabinet.
Beginning craftsmen will be helped by photo reports of cabinet assembly, presented in magazines and practical design web resources.