Any owner of a plot of land wants to give it a pleasant appearance, that is, to improve it. The main role in the design of the land is played by the fence, since this is where the site begins.
The main function of the fence is considered to be the protection of the site, but its decor also plays a far from secondary role. With the help of decorative fences, you can hide your garden plot from prying eyes, divide it into zones, as well as arrange beds and fence off shrubs and trees.
In this article we will figure out whether it is possible to build a decorative fence with your own hands.
Functions and uses of a decorative fence
An abundance of flowers, well-groomed lawns, smooth paths, a decorative pond - it seems that everything is already there. But over time, you always want to change something, add something. In this case, with the help of decorative fences, the area can be divided into several zones. Indeed, in city apartments, each room is decorated in its own way, for each family member. The same principle can be used in the garden. Zoning can be done using various types of decorative fences. Bright and colorful picket fences will separate the children's area, wattle fences will outline the area in a rustic style, strict ones made of log components will indicate the men's territory or the guest area.
Gallery of fences with different purposes
A fence made of willow twigs will decorate any area
Multicolored
A pencil fence will decorate the children's area
A fence separates the recreation area
A decorative fence will first of all give a finished look to the flower bed and emphasize the beauty of the flowers. In addition to the aesthetic function, it also has a number of practical ones:
- Flowers will grow only within the boundaries specified for them and will not grow throughout the entire area.
- The fence will protect the plants from strong winds and accidental damage - the flowers will not be trampled and there will be no broken branches.
- Caring for flowers will be greatly simplified and the problem of accidentally mowed plants will disappear.
- If there are quite a lot of different types of flowers on the site, then thanks to the installed fences and mini-fences, the problem of searching “where which flower was sitting” in early spring will disappear. It is enough to look at the photographs taken last summer, and everything becomes clear. This is especially true for perennials that bloom by mid-summer.
- Thanks to zoning, it will be possible to plant flowers separately that require a certain type of soil and a certain degree of moisture.
- For each type of flower, you can choose a fence of a certain height.
Advantages of installing decorative fencing yourself
The first advantage of erecting a fence is the originality of the idea, which can be realized using one of the inexpensive materials - wooden slats or branches. In addition, the advantages are:
- delimitation of space - the entire site will be divided into separate functional zones;
- safety of vegetation - the first shoots grown with such love can be damaged by carelessness of pets or guests, and the fence, even if low, will save your seedlings;
- grooming - especially for summer residents whose main hobby is flower beds and flower beds;
- unity of style - decorative fences that are the same for all zones will emphasize the concept of landscape design.
Types of fences
Today you can purchase fences of a wide variety of types and sizes, made of plastic, wood, and metal. But I wouldn’t want to see the same one at my neighbor’s. There should be individuality in everything. Therefore, it is more interesting and easier to design and make a fence yourself, using improvised means. It doesn’t have to be large - sometimes one or two spans are enough to give a plot or flowerbed a certain charm.
Gallery of products made from scrap materials
A woven corina fence and at the same time a flower bed for different types of plants
Fence made of tall plastic bottles
Fence-flower bed made of car tires
Traditional Ukrainian wattle fence
You can combine different types of fences on one site
To make a fence, you can use a variety of materials: wire, stone, plastic or glass bottles, PVC pipe, old tires, reeds. Various elements made of wood are also suitable: vine branches, hazel branches, willow twigs, picket fences, wood cuts, wooden logs, etc. Almost everything that is on the farm.
You can increasingly see wicker fences. These are traditional wattle fences that can be easily made from pre-cut and prepared willow twigs, vine branches, hazel, raspberry, cherry branches, and reeds. Easy to make, they go well with almost any plant. With certain skills, you can build a basket fence for a flower bed. Weaving can be horizontal or vertical. For beginners, it is better to start with vertical weaving to understand how it works. If the wattle fence is made in the spring from unprocessed willow branches, it will turn out to be a hedge, since the willow takes root well and quickly.
Types of fences made of different materials in the photo
Slab fence
Simple fence for zoning
Wattle goes well with hedges
You can decorate a flowerbed with such a fence
Original fence made of glass bottles
Willow hedge
Vertical wattle can be very dense
Original fence made of willow twigs
Stone fence for decorating a flower bed with low-growing flowers
Gabion - a fence made of mesh filled with stone
From scrap materials
Pletnya
In every household there is a large number of different materials, which at first glance seem unnecessary. These include plastic bottles, wooden pallets, old tires and more. They can come in handy when building a fence. The fence will look unusual and individual, as if a professional designer worked on it.
Pallet fence
Pallet fence
You need to start by measuring the pallets, this will help determine which area can be fenced. After this, marking is carried out.
In the places where the supports are installed, you need to prepare holes. Install pillars in them, fill them with concrete or compact the soil very tightly so that they stand level and do not wobble. Strengthening can be done using broken bricks or crushed stone. These components will strengthen the compacted earth.
The pallets are attached to the supporting structure, as well as to each other, with screws.
The final stage will be decoration. The fence can be painted. Or place flowers on it, organizing a vertical flower garden.
Pallets consist of wooden boards. This means, like any tree, it is susceptible to rotting and damage by insects. To avoid this, they are treated with an antiseptic.
Fence made of plastic bottles
Fence made of plastic bottles
Bottles open up a huge field of imagination. They can be used whole or cut into pieces.
PROS:
- Durability , they last for about 180 years
- Affordable price - every day, when you buy water, vegetable oil, or dairy products in the store, you are left with a huge amount of plastic containers
- Water resistance - their direct purpose is to store liquids, so they do not allow moisture to pass through
- Elasticity – bottles are easy to cut
MINUSES:
- Fragility - the fence can easily be broken under mechanical stress
- It will not provide protection from hooligans and thieves
Step-by-step instructions for assembling a picket fence:
- The container must be washed, labels and traces of glue removed
- Trim the bottom
- Place the bottles one on top of the other. Drill holes through which to pass the reinforcement or wire. At the joining points, put on previously cut bottoms
- The assembled spans are attached to pre-installed support pillars
- You can use bottles to make a fence like a brick one. To make it heavier, sand is poured inside. They are connected with a cement mixture.
- Another option is wattle fence. For it you need to cut bottles and weave spans. Attach to supports.
- This type of fencing is not recommended for use as a main fence. They are suitable for zoning a personal plot.
From the various types of fences, everyone can choose which one to install to fence their home or cottage. The main condition for successful construction will be the skills of the master. Beginners in this business need to choose an easier option or enlist the help of more experienced comrades.
Preparing for construction: determining the type, location, size
Before you begin construction, carefully plan where the fence will be installed. Make a preliminary sketch according to which you will work. Take the time to draw in detail what types of plants will be planted and the color of the future fence. It is better if there are several sketches linked to existing buildings. This way you can choose a more interesting option. For example, if the main fence around the site is made of stone, it is good to combine it with various types of wooden fences - wattle fence, picket fence, wooden posts.
Marking for the future fence
The fence is installed before the plants are planted, so in the sketch take into account the approximate height of the flowers - the data is indicated on the seed packages. It is important to pay attention to the direction of the world. If you plan to plant shade-loving plants, the fence should be installed so as to create maximum shade during the day and be high enough. For sun-loving plants, the fence should be of minimum height and not shade the plants.
Decorative fence made of driftwood does not reach the ground
The fence is installed close to the soil
A decorative fence can be installed by going deep into the ground if you plan to plant plants that reproduce by root shoots, and by raising it a short distance above the ground if the plants are tall or curling. As a rule, the fence has a height of 40 cm and above.
Decorative fences in the design of a personal plot
The edging of flower beds should be not only decorative, but also practical. It is important that the fence prevents the growth of climbing perennials, decorative flowers with a branched root system, and sharp thorns. Therefore, it is necessary to pay attention to functional options for fencing.
Plastic fence for a small flower bed in the landscape Source blagodatmir.ru
A simple fence made of metal sections Source lachat.ru
Material selection, selection tips
Since the fence is a decorative element, it means that we are not making it for “the rest of our lives.” It should serve us for at least 5–7 years, and then we will still want to change something, because new design ideas or new flowers will appear. You need to choose the material with which you will be comfortable working. Let's look at the most common ones.
Wood is the most environmentally friendly and affordable material. Fairly easy to use. With proper preparatory treatment it can last up to 10 years.
Plastic and glass bottles are the easiest materials to work with. The downside is that plastic is not an environmentally friendly material and can release toxins into the soil. Glass bottles are easy to break and can cause injury in the future.
Options for building materials in the photo
Original fence made of thin PVC pipes
Colored plastic bottles make a fun fence
Glass bottles are not only for storing alcohol
The easiest picket fence to use
Fence-fortress made of tires
Car tires last a long time, but like plastic, they emit toxins. They look pretty rough.
PVC pipe will last a long time. If you have a special soldering iron, you can simply make an original fence from it.
Brick fence
Brick fence
Before you start laying a brick wall, you need to prepare all the necessary tools and materials:
- Large container for mixing concrete mixture or concrete mixer
- Rope for marking the territory
- Bulgarian
- Armature
- Hammer
- Roulette
- Level
- Master OK
- Buckets
- Crushed stone
- Bricks
- Cement
- Sand
- Water
You need to calculate the number of brick blocks in advance. It depends on the size and thickness of the masonry. The thinnest is half a brick, and the thickest is two. With an average masonry of 1 brick per square meter, you will need 100 pieces.
The height of the fence is selected individually. The recommended maximum is up to 3.5 meters.
A drawing will help you make accurate calculations. Guided by it, it will also be more convenient to carry out masonry.
Brick fence
Construction instructions:
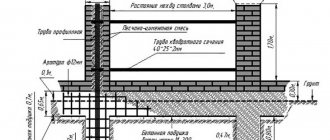
- You need to start work with markings, stakes are driven into the corners, and a rope is pulled over them. The angles must be strictly 90 degrees. A square will help with this
- Next, a trench for the foundation is prepared. She breaks out along the markings. Width 50-70 centimeters, depth from 70 to 100 centimeters
- Sand is placed on the bottom; the layer should be at least 10 centimeters. It performs 2 functions: shock absorption and drainage
- It's time to make the formwork. The boards should be positioned so that the poured concrete has a flat surface
- Reinforcement is carried out according to size, for this purpose tied reinforcement is used
- The preparatory work has been completed and the foundation can be poured. You can prepare the concrete mixture yourself, or buy ready-made ones. Here the choice depends on the available funds. The proportion for preparation should be 4 parts cement, 2 parts sand and 2 parts water. The surface is leveled so that air does not accumulate inside, punctures are made along the entire perimeter with reinforcement. It takes 3-4 weeks to harden. After 10 days, the formwork can be removed. To prevent cracking, the foundation should be watered, especially on hot days.
- Before starting laying, a layer of roofing material or polyethylene film folded several times is laid on the foundation
- Before laying the bricks, they are placed in water for a minute. It will nourish the pores and prevent moisture from being drawn out of the adhesion solution.
- First, the support pillars are erected. To strengthen them, reinforcement is installed inside the cavity and filled with concrete mixture. Only after this does the raising of the walls begin
- The first layer is laid with a cement mixture; it should be thick to compensate for possible unevenness of the foundation. Subsequent ones need to be applied thinner
Next, the bricks are laid out. So, alternating layers, the entire fence is built. In order for it to be durable, the masonry must be carried out along the entire perimeter, row by row.
Reinforcement must be done every 3 rows.
After construction is completed, drainage systems are installed. So that natural precipitation does not damage the fence over time. If desired, you can plaster and whitewash the brickwork.
Calculations
If the fence is installed along the entire perimeter of the site, you must first determine its corner points, drive pegs into them and pull the cord. Once you have established the exact perimeter of the fence, you can move on to planning the spans. To do this, you need to divide the length of the fence by the span. As a rule, for high decorative fences this is 1–1.5 m. Low fences can be made with smaller spans, this will make them more stable.
For example, our plot has dimensions of 4x5.5 m. We plan to make a span of 1 m. The 2 widths of the plot will consist of 8 spans. When dividing the length, 5.5 m does not give a whole number. In this case, you need to increase the length of each span by 10 cm. We get 10 spans of 1.1 m each. The increase is insignificant, but we will avoid two fragments of 0.5 m each, which will disrupt the completed appearance of the fence.
If the fence will be installed in a small fragment (for example, one span of fence), draw its exact dimensions and think over the installation method. It should have a stronger mount, since there is no connection to other parts. It will be secured only by the main pegs and will be more susceptible to the influence of strong wind and rain.
Having calculated the required number of spans, you can begin to calculate the material. Draw a span on paper, count the required number of pickets (posts, branches, planks, etc.), and then multiply by the number of spans. This way you can quite accurately calculate the required amount of material.
Why are fencing needed?
DIY borders for flower beds
The main purpose of the fence is to complete the design of the flower garden. It is this element that “ideally” divides the space into two important parts (the flower garden and the surrounding garden).
But besides this function, the fence has several additional ones:
- Dividing a garden or vegetable garden into zones. In some cases, this is very important, since different areas of the garden may have different aesthetic meanings (for example, for playing, relaxing, etc.). Zoning also helps to separate incompatible plants from each other and avoid overgrowth of some crops
- Restrictions on the spread of plants both within the flower garden and outside. This function is to some extent protective in nature, preventing overly active plants from interfering with the growth of others. In addition, in some cases, the fence is an insurmountable obstacle to the spread of diseases and pests
- Protecting the flower garden from other external influences: for example, dogs or cats
- Paths in the garden can actually act as a fence. Thus, this element performs a dual function. It is not only aesthetically pleasing, but also practical.
- Depending on the height and structure of the fence, it can also provide (at least partially) protection from weather conditions - wind, sun or water flows
Do-it-yourself flowerbeds in the country
In general, the height of the fence depends on what plants grow in the flowerbed . For low-growing or groundcover plants, there is no need for fences or fences that are too high - it is enough to make a structure of low height, for example, from stone or brick.
High plantings (for example, dahlias or perennial chrysanthemums) will require appropriate fencing: picket fences, wrought iron trellises, etc.
Making your own wattle fence
Materials and tools required for work:
- Posts for side supports - 2 pcs. for each span
- Cross bars - 3 pcs. for each span
- Weaving rods - blanks of the same height
- Garden secateurs
- Axe
- Nails
- Building level
- Shovel
- Hand protection gloves
Wattle is the easiest type of fence to make. It can be made from either thin branches or thicker poles.
Fence with vertical weaving
Using a shovel and a building level, we install the side pegs. We deepen them to a third of the height. It is better to first treat the part that will be in the ground with resin or seal it with fire so that it does not rot so quickly.
Using a screwdriver and self-tapping screws or a hammer and nails at equal distances, we attach the crossbars to the posts.
Crossbars and posts must be connected either with self-tapping screws or with nails
We prepare branches of the same length. For this we use a sharp knife or pruning shears. To do this, use a template - a thicker branch of the required length. The wattle fence is usually not made higher than 1.7 m.
You need to prepare a lot of branches
We start weaving from the side that will be less visible. The branches go around the crossbars in alternation: if the first one is braided from the outside, then the next one is braided from the inside. We press the branches tightly against each other.
We weave branches, alternately bending around the crossbars
Alternate weaving of rods
We continue weaving until it is completely filled with twigs. At the end of the weaving, use pruning shears to trim the sharp corners of the rods, if any.
Wooden fence
Wooden fence
Any construction begins with the choice of material. For a wooden fence, you need to choose high quality wood, then it will last a long time.
Suitable boards will be from:
- Duba
- Aspens
- Ash
- Alders
- Mulberries
- larches
Of the listed types of wood, it is preferable to use Siberian larch. This is due to its high quality. By the way, she is not afraid of moisture. It makes her stronger.
An important condition for quality will be reliable supports. The best material must be selected for them. If changing a board in the span is not difficult, then changing the support pillar will be difficult.
Birch is not suitable for fencing. The material made from it is short-lived and costs poorly.
Beautiful wooden fence
The fence can be made vertical and horizontal. The technology is similar, with the exception of laying the boards. Let's look at the example of a vertical fence
Installation instructions:
- The boards are cut to the required length or purchased ready-made in the required size. Typically, the height of a wooden fence is made from 150 to 250 centimeters
- Next, sanding is carried out on both sides. This is done to remove nicks and make the surface smooth.
- Treatment with an antiseptic is mandatory. It will protect the tree from rotting and damage by harmful insects and fungal organisms
- After the material is prepared, it’s time to make markings around the perimeter of the site. For this, pegs with a pointed end are prepared. Height 60 centimeters. Driven into the ground
- A rope is stretched between the stakes. Its tension should be maximum
- You need to dig holes in the place where the supports will stand. Their depth should be between 50 and 80 centimeters. The distance between them should be approximately 2 meters
- The supports are made of timber with a cross-section of 7.5x7.5 or 10x10 centimeters. The lower part is generously impregnated with antiseptic and treated with resin. This measure will protect against rotting. To increase the degree of protection, you can wrap it with plastic film
- The timber is installed in the prepared pits and filled with concrete mixture. If the fence is planned to be light, compact the soil tightly enough
- Nails are driven into the top of the supports. And pull them with a rope. This will tighten them, which will allow you to make the skin exactly at right angles to the soil surface
- Horizontal crossbars are attached to the supports using nails. A step of 20-30 centimeters is maintained between them
- Vertical boards are nailed to the crossbars. They can be closely adjacent to each other or located at an equal distance. It depends on which fence model is chosen. To ensure they are level, you need to measure along the top rope
- After the sheathing is completed, the ropes and pegs are removed
- The last stage is painting work. The shade is chosen according to personal preference. Having artistic skills, you can put a design or ornament on it
You will get an original fence if you use non-standard fastening methods. These include a fence assembled according to the principle of blinds. The boards are laid vertically with a slope towards the outside. Such a fence will reliably protect the area from prying eyes, while increasing resistance to strong winds.
The length of the fastenings should be several millimeters greater than the thickness of the boards being fastened. The tip that comes out from the reverse side is bent with a hammer. Thus, the fastening will be reliable and of high quality.
Sectional small fence made of wooden pickets
Even a woman can make such a fence from the simplest pieces left over from construction work. The work is quite simple and easy, and you will be pleased with the result.
Materials and tools needed for work
Cross bars - 2 pcs. for each span
Side posts - 2 pcs. for each span
Pattern for maintaining the distance between the pickets - 1 pc.
Pattern for maintaining the distance between the slats - 1 pc.
Pickets pre-treated with sandpaper - 9 pieces per span
Screwdriver
Self-tapping screws
Sandpaper
The peculiarity of installing such a fence is that if the side posts are made with pointed lower ends, it will be easy to install by pressing it into the ground. You don't need to use a shovel. The corners are easy to connect with self-tapping screws or nails.
A simple picket fence is very easy to make
We lay transverse planks on the ground. Between them we place a special pattern (a piece of picket fence), which will determine the distance between the crossbars.
We assemble a simple picket fence using templates
We attach the first plank to the beginning of each of the crossbars using a screwdriver and self-tapping screws. We lay an additional pattern and the next plank close to it. We also secure it with self-tapping screws. We attach side posts along the edges.
Between the pickets we place a pattern equal to the gap between the pickets
When the first section of the fence is ready, we begin assembling the next one in a similar way.
We lay the pickets closely and attach them with a screwdriver and self-tapping screws
We prepare several sections in this way, paint or varnish them. Our fence is ready for installation.
We prepare several sections at the same time
Plastic fence
Polycarbonate fence
Plastic has become widespread and is replacing more conventional materials. Its main advantage is high wear resistance. This material is not afraid of corrosion, rotting and harmful insects.
PVC fencing is easy to install. Installation is accessible to a person without experience.
Step-by-step instruction:
- Marking the site and installing beacons
- Installation of load-bearing supports. They must stand strictly level, checked using a level
- Fastening crossbars in purlins
- The structure is secured using railings
- The last step will be the installation of plastic panels
- Special caps are attached to the tops of the pillars to prevent water and dust from entering.
- The assembled structure must be washed to remove any dirt generated during installation.
The construction of such a fence will take a little time. At the same time, it will look stylish and neat.
Decorative metal fence
Metal fences remain the most popular for decorating summer cottages and areas of country houses. Forged products come in a variety of shapes, sizes and design options. A metal fence can act as either a limiter for garden paths or a full-fledged fence for the area.
Decorative metal fence
Decorative metal fences can be purchased in specialized stores or ordered according to an individual sketch. These products are strong and durable.
Installation
You can make a decorative wrought iron fence yourself. To do this, you will need metal corners for the frame, fittings and forged decoration elements.
However, it will not be possible to assemble such a fence without special equipment and certain skills. In order to make a decorative wrought iron fence, you need to have a welding machine.
If you have neither the skills nor a welding machine, and buying a turnkey fence is expensive for you, you can purchase separate sections that are installed independently. The installation method directly depends on the chosen design. Sections can be attached to metal pipes or between concrete decorative pillars.
Care
Iron decorative fences do not need to be dismantled for the winter, but they do require annual painting. The coating will protect the metal from corrosion and extend the life of the fence. With proper care, such fences can easily last 20 years or more.
Forged products look best against the background of stone or brick paths, alpine slides and decorative fountains. Iron decorative fences are most often installed permanently. To do this, the fence posts are concreted so that the fence does not deform in the future. In this case, the main frame should be at a height of 2 cm above the ground. To install a high metal fence, it is necessary to build a foundation.
Decorative concrete fences
Decorative concrete fence
You can often find a massive gray concrete fence that can hardly be called decorative. However, thanks to innovative technologies, a concrete fence can be of a variety of colors and shades, and there may be a pattern on the front part. You can make such a design with your own hands; you just need to purchase or make special molds. The work process is quite simple. Concrete is poured into the matrix for a day. After drying, the section is removed and installed. Everything is simple and consistent. Follow these tips:
- Each matrix must be lubricated with vegetable oil before pouring concrete.
- Recommended brand of cement is M250.
- To prevent the product from turning out dark, there should be less sand in the total mass, and vice versa.
- Before painting the finished product, it is recommended to treat the surface with a deep penetration primer.
Fence made of twigs and branches
Do not rush to throw away cut trees. Their branches will serve as a good decoration for flower beds. To make fences for them, follow the instructions:
- Prepare the required amount of material. The branches should be of different thicknesses. The massive ones are used to create support posts for the fence.
- Thinner branches are suitable for weaving. First separate all excess sprouts from them.
- Install wooden posts (thick cuttings of branches) into the ground in increments of 40-50 cm. Sometimes you need to maintain a shorter distance if the weaving rods are short.
- Check the strength of the installed supports. Start weaving. Place a thin branch first in front of the post, then behind it.
- Secure the intersection of posts and rods with copper wire. Start constructing the fence from the bottom up.
- The second row of weaving is carried out as follows: first, the rod is pulled behind the post, then in front of it.
The remaining free edge can be nailed to the support with a thin nail or secured with wire. To make the fence elegant and unique, each twig can be peeled and varnished. This is very painstaking work and takes a lot of time.
Metal sectional fence with butterflies Source sveklon.ru
Metal fencing for a country flower garden Source stroikairemont.com
Forged fence for a flower garden or rose garden Source budsanteh.com
Decorative brick fence
The most popular material for arranging flower beds, lawns, and lawns is brick. It has extremely positive properties. In most cases, it is laid in a diamond shape, resulting in a jagged fence. But this is not the only installation method. You can lay out fences in the shape of an oval or circle.
Brick border
The second row is laid so that the seams do not match. Each level of brick is secured with cement mortar to ensure the structure is strong. This way you can create a beautiful decorative fence with your own hands.
Other options
When wondering how to decorate your site with decorative fencing, you just need to show a little ingenuity and imagination. Often every summer resident has materials for non-standard and interesting fencing. If you think about it a little, you can build a decorative fence from the most common available materials. For example, a birch fence is made from birch branches. It can be attached using the classic method, to stakes horizontally. And create fancy patterns from branches.
A decorative wicker fence made from ordinary branches can be decorated with clay jugs, or you can weave it according to your own design. As a result, you can create unique compositions that will decorate your yard and will not require any special expenses. Decorative wicker fences can be made in any shape and size.
Weaving from branches
A decorative fence made of branches can be made in the form of snags fastened together. This type of fence is perfect for fencing your garden and vegetable garden from domestic animals. The branches for such a fence should be chosen bent and fancy. They are attached to the main pillars located at a distance of 1-1.5 m.
A decorative fence made of rods can be created very simply by having 2 pieces of steel wire on hand. The wire is stretched over the stakes, and rods are inserted vertically between it. A decorative slab fence or a decorative log fence also looks great on the site.