Assembly steps
After all the details are prepared, you can proceed to the most important step - assembling the wardrobe. At this stage you will need:
- level;
- rubber and regular hammer;
- corner;
- screwdrivers;
- roulette;
- pencil;
- screwdriver;
- drills for wood and metal.
In order to get started, you need to decide on the assembly steps. Most of the cabinets are assembled according to the standard scheme:
- base;
- frame;
- rear wall installation;
- installation of shelves and guides;
- hanging doors.
The final step will be to install additional internal components: pull-out baskets, drawers, etc.
Box
A homemade box must be assembled from the bottom. Step-by-step instruction:
- we mark the place where the base will be installed (legs are often used instead of base strips, but they also require markings);
- we make holes for fasteners, attach the bottom using self-tapping screws and corners;
- We assemble the transverse supports of the plinth.
Adjustable legs are easier to install: the plastic plugs are cut off with a knife and the supports are screwed into prepared holes of the required diameter.
To mount the housing:
- Build the box in a vertical position. If you put it down, the structure may become distorted. It is important to leave at least 100 mm for installing the roof.
- Make holes in the bottom for anchors and install them - this is where the strips will be fixed.
- Mount the panels (you will need an assistant at this stage). First of all, the side part is installed on the left side, it should be held, after which the right side wall is secured.
- Install the middle part (if any), and then the roof, which should be placed on the corners or confirmations.
How to choose components for a wardrobe, useful tips
A step-by-step algorithm is also provided for mounting the rear wall:
- Install the panel on the back of the product.
- Carefully holding the shield, secure it with self-tapping screws. They are tightened with a screwdriver or screwdriver at a distance of approximately 10–20 cm.
If the cabinet has several back walls, the elements should be fastened end-to-end. In this case, it is necessary to use special fasteners that will tighten the parts, and then screw self-tapping screws onto the back plate.
Storage system installation
After checking the stability of the case, you can equip the storage system. To install, you should follow this algorithm:
- The shelves will be fixed using corners and self-tapping screws, so first of all, holes are drilled on the parts.
- Mark the location of the shelves, and then attach them to the side and middle racks.
- The rod is inserted using a special flange that comes with the part. It is attached to the walls with self-tapping screws. If necessary, the rod can be shortened using a hacksaw.
The last step is to secure the drawer and basket guides, after which they can be inserted.
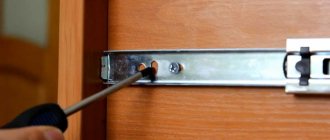
Installation of a sliding system and hanging facades
First you need to fix the guides, do this using self-tapping screws. It is important to install them strictly in a straight line, otherwise there will be problems with sliding doors. Correct assembly of the cabinet assumes that the upper rails are fixed level with the front end of the sidewalls, while the lower rails should deviate from them by 8–15 cm.
The facades are hung last. In this case, the sash is first secured, which will move along the rear rail. Then other doors are installed. To install them, it is necessary that the rollers on the panels fit into the grooves on the guides. After installation, it is important to check the movement of the doors and the tightness of their fit to the side parts of the body. The completion will be the fixation of stoppers, which will prevent the sash from jumping out of the system.
Door installation
First place the door on the internal rails. The second door is installed on the outer path. If there are three sliding fences, then two of them are placed on rollers on the internal tracks, and the third door is placed on the external rails. You can do the opposite, but in the first version the facade of the sliding wardrobe will look more beautiful.
Installation is carried out in the following order:
- the door is rolled with horizontal rollers into the opening of the upper guide rail
- press the support rollers with your hands, bending the springs,
- the rollers are installed on the lower guide bar,
- If there are violations of the correct movement of the sliding system, the mechanisms are adjusted.
Construction of a drawing
When an approximate diagram of the internal filling of the cabinet has been drawn up, drawings can be made on its basis with an exact indication of the dimensions of each section, height, width and depth of the shelves. For ease of access to the shelves, they should not be wider than the door leaf, and if drawers are made, you need to make sure that the door does not interfere with pulling them out. When determining the depth of the shelves, you need to take into account the thickness of the edge with which the front ends are sealed; it can reach 2 mm. To accurately calculate the height of the door leaf, you need to take into account the thickness of the upper and lower baffles, as well as the gaps recommended for a particular suspension (indicated in the specification).
To create a preliminary design and drawings, you can use a special computer program. For example, the “Basis-Furniture Maker” program has several modules that allow you to create specifications for parts and accessories, a cutting map, and determine the optimal locations for fastenings.
What beginners should remember
The most important principle of work in carpentry is care and accurate calculations. Therefore, if you doubt whether you will do the work correctly, just draw drawings for yourself and calculate all the dimensions several times. Don’t forget about such nuances as profile thickness, because when installing the frame it should be taken into account.
If you do not have a corner, or you are not sure of its correctness, the door corners can be checked in a simple but nevertheless reliable way. Firstly, you can simply measure the diagonals; if they are the same length, then the angles are even. Secondly, you can use the Pythagorean theorem, but do not be afraid that you will have to calculate distances and angles. It’s enough just to measure 30 centimeters from the corner on one side and 40 centimeters from the other, and put marks. The distance between these points should be exactly 50 centimeters if the angle is even.
Carefully consider how to make a cabinet on the balcony with your own hands, so as not to make mistakes during the process. And if you make a mistake, you may simply ruin the material, resulting in additional costs or other problems in your work. Therefore, the planning stage is very important, especially for beginners who are just starting to work in this direction.
The door leaf, regardless of whether you make it from lining or from sheet material, it is important that the material completely fills the frame and is cut exactly to size. Otherwise, it may simply begin to wobble over time. The frame itself, also as a result of mechanical loads, may simply warp, and this will entail such negative consequences as increased wear of mechanisms and jamming of doors. That is why the filler must completely and tightly fill the door frame. In addition, to avoid distortion, you can use middle crossbars; they will strengthen the frame and resist its deformation.
Closet doors with louvered type
Regardless of which mechanism you choose, bottom roller or hinged, try to follow the installation instructions in everything. If the instructions seem complicated to you, then try to understand them thoroughly, since both the quality and durability of your work directly depend on this.
Of course, making sliding doors yourself is quite difficult, but don’t be afraid. All masters started out at some point, and most of them learned everything along the way. After all, if you ask most craftsmen for documents on the education of a carpenter, they will not be able to show them to you, since they simply learned through practice. Therefore, you also have a chance to become a master if you try a little and be patient.
How to start making homemade wardrobes
Most novice carpenters do not start with a cabinet with their own hands in the apartment, but make a rough version of the furniture. After all, even making a simple built-in wardrobe for a loggia yourself is quite difficult. Therefore, if you start with a simple cabinet on a loggia, balcony or cottage, you have an excellent opportunity to gain experience. In addition, such a piece of furniture will be very useful as an additional place to store things that are not afraid of the cold, and if the loggia is insulated, then you can easily store items.
It is much more difficult to make a cabinet on a balcony or loggia, since its design is different. But if you succeed, then after that you can safely begin improving your apartment. After all, making a cabinet with your own hands will be a simple task for you. Therefore, all beginners are advised to start by making cabinets for the balcony, as they may have some flaws, but they will not be noticeable.
In addition, you can build a door in the country if you do not want to spoil the interior of your balcony, since a small storage room with sliding doors will always be of minimal use to you to store garden tools.
Don't expect to do everything perfectly the first time. Making even a simple stool so that it looks beautiful is not as easy as it seems at first glance. Firstly, you need to have experience in carpentry, and secondly, you need to try so that everything works out for you. And for a do-it-yourself cabinet, you will also have to show a lot of ingenuity, since the door mechanism is quite unique, and installing it is a rather labor-intensive task.