What does coffered ceiling mean?
This is a finishing method in which the surface is divided into cells by protruding beams. The result is niches of different shapes, often square. The name comes from the French word “caisson”, which means “box”.
Stone and wooden coffered ceilings appeared in antiquity. This arrangement was dictated by necessity: the beams served as part of the supporting structure. Now the design plays a decorative role.
Advantages of caissons:
- mask the unevenness of the rough floor;
- hide wires and other communications;
- reduce noise levels;
- reduce heat loss (especially with an additional insulating layer);
- give the room a noble look;
- combined with different styles of decoration.
Disadvantages of coffered ceilings:
- complex installation;
- high price;
- reducing the height of the room (recommended for rooms from 2.8 meters).
Coffered wooden ceilings: fastening finished slabs
A coffered ceiling with lighting looks very original. When you start working with ready-made slabs, so that your patterns are as even as possible, the first structure is attached in the center, from which it will be easier for you to build on and follow the pattern. It is more reliable and easier to glue them using assembly adhesive. You need to work quickly and carefully, without staining the wallpaper or wood walls.
The structure of a coffered ceiling made of wood. The slabs can be secured to each other using brackets, and the joints can be secured with special plug-in tenons. Insert spikes alone may not be enough. To make the composition look as beautiful and complete as possible, it is necessary to use decorative slats that can be inserted into the cracks created during the installation process.
Dining room combined with a living room, with a coffered plasterboard ceiling. Living room in gray tones in the art deco style. The thickness of the slats should be such that they can cover all the imperfections and possible indentations. This will help make the appearance of the ceiling as complete as possible, allowing you to find the necessary atmosphere. If you want to complement the composition with plaster elements, it is best to attach them using self-tapping screws, but for cardboard elements, construction adhesive is suitable.
Home / Types of ceilings / Wooden / Solution from the past - wooden coffered ceilings Despite the apparent modernity of the name, coffered ceilings have a fairly rich history. They can be found in ancient estates and houses, in the most exquisite interiors.
Translated from French, the word “caisson” literally means “box.” It is precisely because of the shape of its constituent elements that this type of ceiling got its name. In ancient architecture, this detail had a purely practical significance. Such ceilings were not created for the sake of beauty - the caissons were formed by intersecting load-bearing beams on which the ceilings were supported.
[custom_ads_shortcode1]
What can caissons be made from?
Materials differ in properties and processing features. Installation is also a little different.
Drywall
GCR is a relatively inexpensive and at the same time environmentally friendly material. It is easy to create structures of different sizes and install lamps from it. Difficulties arise when joining drywall. And the caissons should be as even as possible, only then will the impression of a solid structure be created.
Ceiling installation takes place in several stages. First, a frame is built from aluminum guides. It is sheathed with cut plasterboard sheets. Then the joints are puttied, primed and painted. Coffered plasterboard ceilings can be decorated with stucco.
Peculiarities! Sometimes only imitation beams are made from gypsum plasterboard. Plasters of gypsum or polyurethane are installed between them.
Tree
This is a traditional material that gives the interior respectability and luxury. Wooden coffered ceilings can be used in bedrooms and children's rooms. Disadvantages include high price and weight.
For finishing, noble species are chosen: oak, walnut, ash, beech, cherry, mahogany, etc. Wooden blocks are used to create the frame. They are sheathed with boards and fill the bottom of the ceiling niches. Sometimes natural wood is combined with MDF, chipboard or plywood. For decoration, thin carved slats are added (along the perimeter of the ceiling and along the beams).
MDF
The material looks like natural wood, but is lighter and cheaper. Therefore, the ceiling is easier to install, and this type of finish is more affordable. As a rule, ready-made panels and strips are used.
The ceiling is mounted in two ways:
- on profiles (the design allows the installation of recessed lamps);
- directly onto the rough base (the surface must be flat).
Advice! When combining materials, it is better to choose those that are as close in shade as possible or, conversely, use contrasting colors.
Gypsum
Available in the form of finished panels covered with carvings and stucco. Various design options are available. Classical, Baroque, Empire, Gothic, etc. styles are used. Floral, geometric and even heraldic motifs are found in the design. Disadvantages include heavy weight and fragility.
The boards are used alone or in combination with plasterboard (on high ceilings). Before installation, the back surface is wetted and glue (PVA or specialized for plaster) is applied. The caisson is pressed to the ceiling and additionally secured with self-tapping screws, since gypsum boards are too heavy to be fixed only with glue. The holes for them are drilled in advance, and the caps are covered with putty after installation.
Read more: Plaster stucco on the ceiling
Products made of polyurethane
Caissons look like plaster ones, but are much lighter. The material does not absorb water and does not burn, is strong and durable. Coffered polyurethane ceilings are suitable for damp rooms and unheated houses. The surface can be painted. Tinting like gold or patina looks interesting.
Polyurethane boards are used alone or in combination with plasterboard. They are glued to the ceiling, so the surface must be flat.
Attention! Caissons for ceilings made of foam plastic, at first glance, look like polyurethane ones. But the material is fragile and short-lived. During installation, it is difficult to achieve even joints, and grains are often visible on the surface of the foam. As a result, the finish looks cheaper and collects dust.
What types of coffered ceilings are there?
Zoning the ceiling using a coffered structure
Types of ceilings can be made from a wide variety of materials. Wood, of course, looks the most noble. Execution options:
- Classical. The most pleasant and stylish ceiling design is made of wood. To achieve the most harmonious combination of such a ceiling with the interior of your room, you need to think in advance about the harmony of color and shape when making it. After creating the layout, the master will install the ceiling, which will be entirely made of wood.
Cozy living room with classic coffered ceiling
- A combination of wood and MDF. This technique is as similar as possible to the classic one, the only difference is that not the entire ceiling will be made of wood; it also uses MDF board. With high-quality manufacturing, even an experienced craftsman will not always be able to determine what type of work it is. Visually, this type is no different from the classic version.
- Caissons made of plasterboard and moldings. This option is certainly the most budget-friendly, but it is not suitable for self-assembly. This work is quite difficult to perform, and only a professional can handle it.
Caissons made of plasterboard in the interior of a studio apartment
An interesting combination of coffers and stained glass in the ceiling design
Caisson shapes
Most often they make square cells. Also found:
- rectangular (look good in elongated rooms);
- in the form of rhombuses (formed by beams crossing the room diagonally, visually adding space);
- in the shape of honeycombs (hexagons; this option is a little more difficult to install).
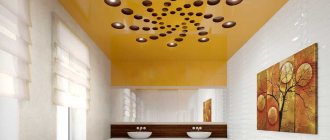
Sometimes the central caisson is made larger in size. It can be round, square, rectangular or oval. Often a chandelier is hung in the “main” element.
Types of caisson-type floors
A coffered ceiling is a ribbed structure with reinforced ribs perpendicular to each other. The cross section of the ribs is determined based on the technological features of the construction of floors. The height of the rib is determined in two sections. The first is determined in the middle of the most loaded edge. The second section is where the ribs meet the vertical support. In this section, the height of the continuous monolithic section is determined by transverse force.
The formula for calculating the caisson floor is determined based on the loads (constant, short-term or long-term) and their design combinations.
According to manufacturing technology, the caisson floor is divided into:
- Prefabricated monolithic coffered floors, the basis of which are prefabricated hollow blocks of different sizes. Their installation is carried out in the form of a closed geometric figure. They remain in the concrete body (serve as permanent formwork). At the junction with the columns, the structure is presented in the form of a solid slab. Above the blocks, the structure is reinforced with reinforcing mesh, and in the over-support areas the concrete blocks are covered with reinforcing bars.
- Monolithic coffered reinforced concrete floors. They are characterized by optimal distribution of the concrete mixture. The ribbed structure is formed due to the absence of excess concrete mixture, which significantly makes the structure lighter. Single-span reinforced concrete slabs with a continuous section are most advantageous with a span length of up to 4.5 meters. As a result, materials are saved, and the number of covered spans increases. The formwork consists of elements such as metal lathing, telescopic racks, plastic caisson formers and inventory forms.
Plastic forms are fixed with high precision, the structure of the channels under the ribs is formed by inventory cassettes of void formers. Reinforcing mesh is placed over the forms, then the entire surface is filled with a mixture of concrete.
The result is the formation of a coffered monolithic reinforced concrete structure.
Color solutions
A traditional white ceiling increases the height of the room and adds air to the interior. Thanks to the caissons, the decoration does not look boring.
Brown, including natural wood, looks noble and cozy. Black adds rigor and aristocracy.
Important! Dark colors are only suitable for high ceilings, as they visually make the room lower. In this case, it is better to choose light colors for the floor or walls, otherwise the room will be too gloomy. The lighting is made brighter, since dark tones partially mute it.
Pastel shades add variety to the interior, but do not lower the ceiling. Light blue and soft turquoise are suitable for Scandinavian or Mediterranean style. For Provence, other light colors are also used (lavender, cream, pistachio).
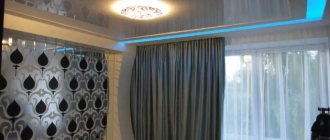
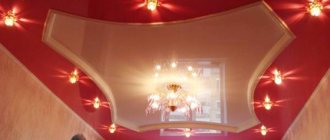
An interesting technique is a combination of contrasting colors for the coffered ceilings. As a rule, beams are highlighted in a dark color, and niches remain light. The overall level does not visually drop, but the ceiling looks original and attracts attention. A more discreet option is white beams and pastel caissons. The difference in height can be emphasized by installing LED lighting behind the beams.
Materials and tools
Although installing a coffered ceiling will take time and certain skills, you can design such a ceiling yourself. Making sure you have the right tools for this project before you start will save time and avoid frustration.
- Wooden beams of the required length and thickness. You can construct false beams with a void inside from flat slats.
- Ceiling plinth for finishing the joints between the caisson and beams, as well as beams and walls.
- One of the materials for finishing the ceiling : paint, wallpaper, plasterboard, panels or ready-made polyurethane coffered slabs.
- Angle cutting machine – there are many joints in this project, the accuracy of which will determine the appearance of the ceiling.
Tools for making a coffered ceiling
- Circular saw - you will have to adjust the boards to the desired length and width, make stepped joints and much more.
- Drill, screwdriver, pneumatic nailer and nails - most of the work will be done at the top, so it will be impossible to hold the board and hammer a nail into it at the same time with a regular hammer.
- A milling machine will be needed if you plan to complicate the shape of the beam structure and make grooves.
- Sander – You can use a hand sander and sandpaper.
- Chalk to indicate the location of ceiling beams and coffers on the ceiling.
- Carpenter's square and tape measure.
- Wood glue - it is better to glue all structural parts first and then secure them with nails.
- A paint roller, brush and water-based paint if you plan to paint the ceiling, or stain for wood beams.
- Goggles and mask to protect against dust and chips.
- Stepladder , high enough to provide access to the ceiling.
- Latex caulk , wood putty and finishing putty.
Table. Use of materials and tools at every step of the installation process.
| Installation Process Stage | Required materials and tools |
| 1. Sketch | 10, paper and pencil |
| 2. Preparation | 3, 5, 6, 14 |
| 3. Marking | 9, 10, 14 |
| 4. Installation of beams | 1, 5, 6, 7, 8, 10, 11,13, 14 |
| 5. Installing the baseboard | 2, 4, 6, 10, 11, 14 |
| 6. Finish | 12, 14, 15 |
How to make a coffered ceiling with your own hands
For each material, the technology is slightly different. Installation of coffered wooden ceilings is considered difficult, since natural wood requires certain skills in operation. Gypsum panels are also not easy to work with - the material is heavy and fragile. It is much easier to make coffered MDF ceilings with your own hands. In addition, this option is more practical: it lasts a long time and is easy to care for.
For installation you will need:
- aluminum U-shaped profiles for drywall;
- pendants;
- crab connectors;
- guide strips;
- panels;
- laminated canvas (to cover the indentations along the edges);
- fillets for decoration;
- fastener
At the first stage, markings are applied to the ceiling and walls. In this case, you need to take into account the width of the profiles. The distance between them depends on the size of the panels (600 x 600 or 900 x 900 mm).
Advice! Markings start from the center, not from the wall. Then the finish is symmetrical.
Leave at least 125 mm between the ceiling and the profiles. The gap will be needed to install the caisson. Then, focusing on the grid, profiles are installed. They are placed with the curved edges down and connected using crabs.
The next step is installing short strips. They are pre-cut to cell size (516 mm for small panels and 816 for large ones). During installation, the part is simply snapped into the profile. The planks are placed in parallel rows in one direction.
After this, the caissons are installed. The plate is inserted into the cell and installed on short guides.
Then long guides are cut. For caissons with a side of 600 mm you will need 2316 mm, and for 900 - 2610. The planks are installed perpendicular to the short ones.
If the distance left at the walls is less than the size of the cells, the gap is covered with laminated cloth. The sheets are trimmed and laid flush with the slats. The final stage is attaching the fillets around the perimeter. This creates a smooth transition to the walls, and the finish takes on a finished look.
Attention! Before installation, you need to consider the lighting system. The devices are located in the center of the cells. Wires are laid in advance and holes are drilled in the caissons. After assembling the ceiling, the lamps are installed and connected.
Stage 5. Installation of ceiling plinth
While the shape of the caisson and its actual depth are created by the height and placement of the beam profile, the boundary and visual depth of the caisson is created by the ceiling plinth.
Ceiling plinth installation diagram
Step 1. Measure the internal dimensions of all sides of one of the caissons. If there is a gap between the ceiling and the beam due to the unevenness of the ceiling, take this height into account in the size of the baseboard.
Step 2. Cut the ceiling plinth to the appropriate length. Using a machine, cut a 45 degree angle on each side of the baseboard.
Step 3. You can install the cut baseboards directly one by one. To do this, apply glue to each part and secure it to the beams.
Step 4. Sometimes it is easier to assemble each box from the baseboard separately, and then install it entirely in the caisson. In this case, use glue to assemble the baseboard box. Make sure it fits well into the coffer and glue the baseboard.
Step 5. Nail the ceiling molding to the joists at each corner of the molding box.
Installation of a coffered ceiling
Coffered ceilings in the interior
This decoration is appropriate in different rooms. The living room with wooden coffers becomes a cozy place to gather the whole family and receive guests. The kitchen gets a more formal and formal look. Here it is better to use polyurethane caissons that are not afraid of moisture. A calm, dim finish is suitable for the bedroom. Natural wood tones, white, and pastel shades are used. The coffered ceiling will add rigor and aristocracy to the office. You can use dark colors or contrasting finishes.
A coffered ceiling is more difficult to install than a regular suspended ceiling. But the result is outstanding.
Creating a frame for the structure
Installation of coffered ceilings can be done with your own hands. For maximum strength and reliability when installing the material, the surface is primed; for rapid absorption and drying, 2 layers must be applied. Then the wallpaper is glued: it is more convenient to do this together for maximum even tension.
Priming the surface for wallpaperingNext, markings should be applied to the wallpaper that needs to dry: finished wood structures will be applied to them. It is best to start from the center, from the central beam. The main part of the entire structure is the support beam, which has a complex box structure. It is attached to the ceiling in the required order, thereby achieving the desired ornament. Having decided on the installation location of the main part, you need to begin creating the box beam. To do this, cut a strip along the length of the block, on the side of which small boards are neatly packed at equal distances.
Installation of the central beam Next, the assembled frame is attached to the ceiling with nails, strictly following the prepared markings. Next, the strip covering the side of the structure is measured and cut out. Having finished working with the frame, close it at the bottom with a board as tightly as possible. The main thing is to strictly follow the instructions and the intended drawing, and also choose high-quality materials.
The next step is to create box beams and place them parallel to the installed central structure, following the sketch. After fastening all the longitudinal elements, you need to proceed to installing the transverse structures. Everything must be applied strictly according to the marks, especially paying attention to the corners, because it is accuracy that creates the final beautiful result.
Installation of box beams To process narrow gaps, the thinnest slats are used, which help not only to seal the gap, but also to give the structure additional volume. The installed ceiling can be completely painted over with one color or you can try a composition of several shades, creating contrast and volume of the overall ceiling structure.
[custom_ads_shortcode3]
Features of the construction of monolithic coffered ceilings
The structure consists of monolithic frames formed using formwork. The work is carried out strictly according to working drawings and in accordance with construction rules and regulations. Particular attention is paid to the installation of formwork and reinforcement work.
Formwork is used in the following types:
- SKYDOME formwork system (completely self-supporting). Designed for repeated use. It is characterized by simple dismantling, a minimum amount of lumber, as well as voluminous inventory elements. The only negative is the high cost.
- Combined formwork. Inventory elements are placed on plywood or solid plank flooring. Compared to the first option, disassembly takes longer.
- Plywood formwork. The process of manufacturing liners and flooring takes place directly on the construction site. This type is more suitable for a home with a small area.
Reinforcement is carried out using volumetric frames, meshes and individual rods. Longitudinal reinforcement implies the use of periodic reinforcement, transverse reinforcement - smooth. The location of the reinforcement in zone 2 mutually perpendicular planes makes it possible to carry out the installation of frames in two stages.