Removing the Mollusk
Before you create a beautiful interior element or decoration from them, you need to make sure that there are no shellfish fragments left inside.
To do this, you need to boil the shells, remove the remains of the organism, and then keep the shells in cold water with the addition of part of a chlorine tablet or bleach.
If the sinks have a black coating, or remnants of the natural top layer, you can remove them with a brush. Small sharp chips can be sanded with zero-grit sandpaper.
To reveal the design of the shell and give it a shiny surface, use manicure varnish.
Preparing shells for decoration
Before use, any doors or cones (even the cleanest ones at first glance) must be thoroughly rinsed in running water, free of sand and debris. Further, their preparation for use is carried out as follows:
- They should be boiled for 1-1.5 hours to remove any remaining shellfish. Otherwise, an unpleasant odor may occur.
- To enhance the color, coat the surfaces with cosmetic oil (you can use baby oil). But this can only be done if varnishing is not carried out.
- To add shine, you can coat the products with varnish. You can choose a completely transparent composition or a product with a certain shade (yellow, amber reddish).
Sharp edges and broken parts must be carefully filed away. If the owners want to give the products a non-standard color, then after the main boiling they can be boiled in water with powder paint.
Drilling holes
To make many crafts, holes must be made in shells.
- For this, drills from 0.8 to 2 mm in diameter installed in a screwdriver are suitable.
- If you don’t have such a tool, you can use a regular needle or a thin nail.
- The steel needle is harder than the shell, so it can also drill a hole.
- To do this, you need to make an initial puncture and carefully drill it out in a circular motion.
- Sometimes shells crack due to this procedure.
- We must not forget that to drill through a thicker shell, a thicker drill is selected.
- Accordingly, the thread and accessories must also be suitable.
- It is better to secure the shell with adhesive tape and drill through it.
Photo frame with seashells
Materials needed: shells, acrylic paints, glue, varnish, wood frame.
Master Class
- The frame can be coated with acrylic paint for beauty. Choose the color yourself.
- Polished shells are coated with varnish on top for durability.
- We select shells of small sizes and different colors and glue them to the frame
- We wait for the craft to dry, insert the photo and hang it on the wall. The original photo frame is ready!
Cowrie bracelet
The shells of these mollusks are so beautiful that they were once used on the islands of Oceania instead of money. If you have such a shell, try making a fashion accessory.
Accessories are sold in textile departments of markets.
You will need:
- Cowries;
- Cord;
- "Floss";
- Beads or large beads;
- End clamps with loops;
- Clasp;
- Split ring;
- Scissors;
- Pliers.
Operating procedure:
- We make holes in the shell at the ends.
- We measure 2 dm of silk cord.
- We pass it through the hole half the length and tie a knot on the outside of the shell.
- We do the same with the second hole.
- We put together several threads of floss of a suitable color, throw them over the cord next to the cowrie, and tie them with a small piece of cord. It turns out to be a brush. For example, in our photo the purple floss tassel is contrasted by the white cowrie, gold beads and blue cord.
- We collect beads or beads to the right and left of the shell.
- We bend the ends of the cord in half and insert them into the clamps. Using pliers we compress the end switches and cut off the excess.
- We attach a ring to one end, and a carabiner to the other. The bracelet is ready!
Recent Entries
- DIY papier-mâché crafts: history of appearance, creation techniques
- Order in the basics for embroidery: and you can easily handle it!
- Impeccable storage and accounting of floss threads using the example of the Gamma palette
- Notebook “Floss Threads”: what’s inside, how to fill it, what is it for?
- Handmade happiness. Hits and bestsellers on handicrafts from EKSMO Publishing House. Season: autumn-winter 2019-2020
- Basics of dry and wet felting from wool for beginners
- “Golden embroidery collection. Charming miniatures. 60 small masterpieces from Sony Line"
- 401 DIY mice and rats: you will squeal with delight!
- Compositions and bouquets of dried flowers (herbs, flowers, cereals, leaves and fruits)
- Heart with embroidery: decorating a pendant in the Shabby Chic style
Editorial: Echinodorus Nazgul
The music of wind
Small shells can be used to make wind chime crafts. Their chime is pleasant to the ear.
Tools and materials:
- Strong thread;
- Plank or branch;
- Scissors;
- Super glue;
- Drill with drill;
- Small shells.
Step-by-step instruction:
- Tie twine to the branch. Make as many rows of twine as you see fit. Do not forget that to tie shells you need to allow allowances for the length of the cord at the knots.
- If you decide to tie shells, make holes in them in advance. Shells are tied by making a knot around the shell itself, or by making a knot that is larger in size than the hole.
- If you decide to attach the elements with glue, glue the shells to the threads.
- The length of the rows can be even, cut obliquely, longer at the edges, shorter in the middle. You can also alternate the threads along the length, as in our photo.
- When everything is ready, tie a piece of cord to the bar in order to hang the product somewhere.
Mirror design
The original design of mirror surfaces and their frames is quite easy to create using a wooden frame as a base. Its design is carried out using a glue gun. If desired, you can also glue dried stars, mother-of-pearl balls, and other thematic elements. This product is perfect for decorating a bright hallway or stylizing a corridor. Such products can be used for hanging in a bedroom decorated in cream, sand or turquoise tones. A large mirror with an unusual design will fit perfectly into the interior of the bathroom. To highlight the frame, you can paint it with silver or gold compounds. To protect against constant exposure to moisture, the paint composition should be protected with a transparent varnish. Otherwise, the paint will begin to crack and quickly crumble.
Shell frame
Even a child can make this simple design element. Most often this is a photo frame. You can use either the natural color of the shells or bring them all to the same color using spray cans.
Required items:
- Frame;
- Shells of any kind;
- Super glue;
- Decorative elements - beads, buttons, ribbons.
Here you need to follow the rule: first, large shells are attached, then the space is filled with smaller shells.
The combination of shells with driftwood - sea-rounded pieces of wood and sea pebbles - looks stylish, as in this photo.
Seashells in the interior of the apartment
In any room there are places for objects decorated with shells. This natural material not only looks beautiful on things, but is also great for finishing surfaces. Seashells in the interior bring notes of freshness and comfort to the room.
Living room
The room where family celebrations are held and guests are welcomed deserves original and stylish decor. If there is an aquarium in it, shells and pebbles can be picturesquely laid out on the bottom. Large shells brought back from various travels deserve places on open shelves. A group of chunky glass vases filled with sand and colorful shells would look great on a console table.
Nautical theme in the living room.
Bedroom
A mirror at the dressing table, decorated with corals and shellfish, will support the marine theme of the interior. Beads or garlands of stringed shells and starfish will decorate the window in an original way.
An excellent addition to the calm atmosphere of the bedroom would be five or six panels with white aged wooden frames and several shells glued to the canvas.
Unobtrusive bedroom decor.
Children's
Marine style in a children's room will appeal to both boys and girls. Especially if the kids make decorative crafts from shells with their own hands. A magical rustling decor in the form of a “chime of the wind” can be hung by the window.
Small boxes covered with pink shells will decorate a girl’s room in an original way. Large sinks can simply be placed on shelves in a boy’s room.
Kitchen
An original decor for the kitchen will be several pots of different sizes, decorated with shells. To support the marine theme in the room, you can decorate the apron with shells. The work surface should not be completely covered with textured elements - it will be difficult to clean. It is enough to decorate individual areas with shells or lay out the border of the apron with them.
Marine notes in kitchen design.
Bathroom
This room is most suitable for nautical style decor. Most often, mirror frames and accessories (liquid soap dispensers, cups for brushes) are decorated with shells. A great idea is to use natural materials to hang a picture on the wall above the bathroom sink.
Hallway
In the hallway, it is most appropriate to hang photos in frames decorated with marine elements. If you want to decorate the mirror frame with them, it is recommended to paint it silver at the end of the work. At the same time, the original texture of the sinks will be preserved and the mirror will be easier to fit into the decor of the hallway.
Any handmade crafts will help make the interior special and unique. Shells, corals, starfish are excellent materials for creating unique things that remind you of relaxation and pleasant days spent with loved ones.
Romantic candles
Sea shells are almost ready-made candlesticks that can be used to create a romantic mood.
Materials for work:
- Large shells;
- Candles in foil (any kind is possible);
- PVA glue.
Step-by-step instruction:
- Remove the candle from the foil and remove the wick by pulling the base at the bottom of the candle. Return the candles to the foil.
- Glue the wick in the center of the shell.
- Melt the paraffin on the stove until liquid and use pliers or tweezers to pour the contents into the shell.
If you are afraid that the paraffin will harden unevenly, first install the shell firmly. After the paraffin has hardened, the candle is ready.
Unusual decor ideas
The assembled sea and river shutters and reels are very easy to adapt to decorate any room in the apartment. You just need to use popular ideas or choose the most unusual solutions for styling your home. For example, doors of different sizes and shapes are suitable for creating an amazing New Year's wreath. They are an excellent replacement for balls and cones. You just need to brightly paint them in the chosen color scheme. The creation of custom products can be carried out for simple styling of kitchens, living rooms, bedrooms and even verandas or terraces. With the help of beautiful cones and scallops, you can decorate not only your home, but also complement your everyday outfits. Using wire or jewelry accessories, you can create beautiful necklaces, bracelets and small rings. Seafood is also suitable for lining a wooden box in which such original jewelry will be stored.
Three-dimensional paintings, installations and wind chimes
Due to their relief and beautiful shape, the neat “houses” of rapans are excellent for creating three-dimensional paintings. They must stick to the wooden base. In this case, the base can be anything: from rectangles, squares to stars. After laying out and gluing all the design elements, it is worth painting them with black or dark blue paint. To emphasize the volume of the painting, it is recommended to cover individual elements with gold or paint them with silver. Prefabricated installations will look no less good in home decoration. They are a frame made of branches to which thin ropes are attached (vertically and horizontally). Sashes, cones, scallops brought from vacation can be attached to the ropes themselves or placed in the center of each of the resulting squares. But for the garden you can make other hanging products - wind chimes. To do this, you need to make holes in the sashes and tie them to ropes at an equal distance. Secure the ropes themselves to a branch or small stick.
Candles and fireflies
Making original candles yourself is quite simple. To do this, you will need to take several ready-made candles, wicks and large shells. Next you need to work according to the following instructions:
- Melt the candles in a water bath.
- Place the wicks in the combs and smooth flaps.
- Pour melted paraffin over the wicks, holding them gently.
- Wait for the paraffin to harden, fixing the wick in one place with toothpicks or a clothespin.
An easier way to create luminous products is to make “fireflies”. To do this, individual doors and scallops of the same shapes and sizes (with small recesses) need to be glued into one structure. The recesses of the valves should be turned towards each other. A garland and lamps should be placed between the curved elements.
When fixing the wick in a new candle, you need to avoid contact of clothespins and toothpicks with paraffin. Otherwise, the surface of the candle will be uneven.
Interior jars and night lights
A very interesting interior element can be made with assembled cones, scallops and a regular jar. To do this, you just need to place them beautifully in a glass container. To give the finished product a brighter and more attractive look, it is recommended to lay down a layer of sand (regular or colored). Its thickness can be from 2 to 5 cm. The higher the jar used, the larger the sand layer can be. It is recommended to place such products in the kitchen, bathroom, and bedroom. In this case, you can use jars of different sizes for work. Another interesting decorated element can be created with a garland. If you put a garland in a jar and gradually fill it with “skeletons” and doors, you can create the best night light for a child and teenager. Such products can be additionally filled with pearls and glass beads.
Dishes and napkin rings
It is very easy to make an original plate from large and small doors. It is suitable for stylish kitchen decoration. Can be used to serve fruits and sweets. To work, you will need to take a plate with any depth. Then lay out the doors in it, placing them as close to each other as possible. The space between the individual elements can be closed with beads or fragments of other doors. Next, you will need to make a thick paste of putty and water. Place the finished mixture on top of the wings, remove excess with a brush. This product will take about a day to dry. Napkin rings, which can also be decorated with sashes, can also help make kitchen decoration no less interesting. To make the products, you will need to take grosgrain ribbons and glue flaps or twisted cones to them with a glue gun.
Design of furniture, shelves and room decoration
Not only shell rock in housing allows you to create an unusual stylization of housing. Individual doors can be used to decorate walls and furniture. For example, they can be used to cover the frame of a niche. Or you can glue it directly to the wall using putty. A very interesting option is to decorate individual parts of the room with small and large doors. You can use them to make stylized columns, circles and squares. You can also paste over the wall near the head of the bed with large scallops and cones. The doors can be used to decorate shelves. This idea is suitable for changing the style of shelves with volumetric wall supports. They can be completely closed with doors and spiral “skeletons”. Similarly, you can paste over the legs of tables and chairs. This design will give the overall appearance of the room elegance and sophistication.
Futuristic figurines
Creating space or other non-standard room decoration requires the use of the most unusual products. For example, these could be structures with non-standard shapes or colors. The following master class will help you make such futuristic figurines:
- Prepare branches and large flaps or spiral cones. “Skeletons” that have holes in them are perfect. For processing you will need silver paint in a can. For the base - a small container and plaster.
- Glue the prepared design elements to the branch using a glue gun.
- Paint the finished structure with silver paint and let it dry completely. Dilute the gypsum and pour it into a container previously lined with cling film. Place the painted branch in plaster. After the plaster has hardened, remove the finished figurine, remove the cling film, and silver the base.
Children's crafts from shells
Children usually make appliqués or panels out of shells.
- Fish applique - Scallop shells representing fish are glued onto hard cardboard using glue.
- Turtle Applique – A large scallop can be used to make a sea turtle. The paws and head can be made from suitable shaped green fragments of bottles rounded by the sea, or flat sea pebbles.
In addition, you can make many more beautiful things from shells. Your imagination can be limitless here.
Getting started is easy
It is necessary to prepare the power tool and unwind the carrier; nothing should force you to make unnecessary movements. A drill or screwdriver will do the job perfectly.
They will require thin drills; it is important not to go wrong with the long one. To firmly secure a fragile component on the table, you can use stationery tape; the strip should pass through the location of the future hole and stick to the table, then the chances of success will increase significantly.
Having decided what to make from shells, you can start drilling all the parts; the above tips will help you avoid a lot of waste of workpieces due to defects.
If several copies crumble, do not worry; when working with such components, losses cannot be avoided. Using a hammer and a small nail, pointing and hitting the head with a heavy object will also create a hole.
Editorial: Pseudotropheus acei Ngara
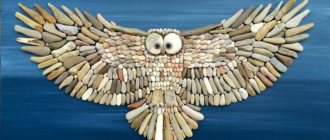
Photos of crafts made from shells
Decorating a vase with shells
Are there a few empty bottles left after the New Year holidays? Which also do not accept glass containers at collection points?