Installation of suspended ceilings does not require specific skills or special devices; only components for suspended ceilings are needed. This work is relatively simple. And it takes relatively little time to install. The most important thing is the preparatory stage:
- read the instructions for installing suspended ceilings;
- decide on the installation method;
- prepare components for suspended ceilings.
Installation of suspended ceilings
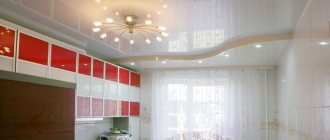
When installing a stretch ceiling, the main structural element is a tightly stretched canvas. It is attached using a baguette - a guide profile. Stretch ceilings can be single-level or multi-level, single-color or two-color. Installation of ceiling structures is carried out using profiles having different configurations.
Note. Lighting fixtures are attached to the tension fabric using a special technology. To bypass pipes (water, heating, gas), special plates with rings are used.
Preparing to install a stretch ceiling
When ordering a ceiling with a harpoon fastening method, you will have to wait at least a week; in other cases, installation of a stretch ceiling is possible the very next day. When installing PVC film, you must initially remove all furniture from the room to avoid damage to it when working with a heat gun. When installing polyester film, this is not required, since installation occurs without heating.
Typical mistakes made with different methods of installing a suspended ceiling
The most common mistake is gaps between the wall and the suspended ceiling. They are formed in two cases:
- Due to the unevenness of the wall, you can check this by applying a level to the wall. In this case, the gaps can be closed with self-adhesive molding.
- due to installation errors: uneven and too strong tension of the web or incorrect step of fastening the profile.
The following errors are quite common:
Be careful when installing a suspended ceiling using any of these methods and do not sign the acceptance certificate until all defects have been eliminated.
Methods for attaching tension fabric
Installation of suspended ceilings can be done using several methods. The choice of installation method depends on the properties of the tension fabric used, because PVC film and textile fabric are attached differently. The most common fastening methods are:
- harpoon – used for mounting PVC film;
- clip - used for mounting fabric panels;
- glazing bead (wedge) - used both when installing fabric panels and when installing low-density panels made from PVC film.
Harpoon method
The harpoon fastening system involves the use of a flexible plastic latch (harpoon), which is factory-fused to the canvas. In this case, the size of the canvas must be strictly maintained. Guides are attached to the ceiling or walls during installation. The prepared canvas is heated to t=55-65C. Then the harpoon is inserted into the groove located in the guide profile until a characteristic locking click occurs. The place where the canvas is attached is hidden with a decorative overlay. The harpoon system allows, if necessary, to dismantle the canvas and then install it.
Harpoon fastening of a stretch ceiling
Clip method
Fabric sheets are attached using the clip method. PVC baguettes and a clip with an elastic clamp are used. This fastening system requires cutting the fabric with a small margin. During the installation process, the edges of the canvas are carefully tucked inside the baguette and secured with a clip. In this case, the tension of the canvas can be adjusted by bending the clip with a staple. Secondary installation of the fabric sheet is not provided, because When the fabric is stretched, its excess part (reserve) is cut off.
Fastening a stretch ceiling with a clip
Bead method
The bead (wedge) method is used much less frequently, since, according to experts, it is not capable of ensuring reliable fastening of the web. With this fastening method, the canvas is inserted into a U-shaped baguette and clamped with a glazing bead. The joint is closed with a decorative plug installed from below. When using the glazing bead method, the fabric is weakly stretched. This method is not suitable for heavy canvases and large rooms. Dismantling this system requires a lot of experience, because... the canvas may be damaged.
Note. When selecting component materials, it should be borne in mind that for each of the given methods of fastening the canvas, different guides are used
Accessories for suspended ceilings
The correct selection of components affects the appearance of the tension fabric and its reliability.
Ceiling molding Separating molding Wall molding Baguette for curved areas
show all
Platform for the lamp Thermal ring Decorative insert T-shaped Decorative insert corner
To install the tension fabric you will need:
- guide profile (baguette);
- fastening material;
- rings and platforms for mounting lamps;
- inserts for pipe bypass;
- special tool.
In order for the components to be correctly selected, you first need to know exactly the size of the room, decide how many levels there will be, where the transitions are located, what type of fabric will be chosen, how many and where the lamps will be located. All this should be shown on the plan.
Sketch of a two-level stretch ceiling
According to this plan, the canvas is ordered. Particular dimensional accuracy is necessary for PVC film - film, because... It will not be possible to change the size once the harpoon has been fused.
Note. When determining the size of the PVC sheet, it is necessary to take into account the size of the guides. When ordering canvas, you should know exactly both the size of the room and the shape of the baguette used. Even a minor error in calculations can change the appearance of the ceiling.
How to dismantle a suspended ceiling with your own hands
Dismantling the finishing material in question may be necessary if the wiring is faulty (remember - we fixed it to the ceiling?) or if liquid accumulates between the material and the ceiling (for example, the neighbors above them flooded it). In any case, the dismantling process can be done with your own hands, without inviting specialists. Step-by-step instruction :
- getting rid of decorative ceiling plinth;
- use a heat gun or a hair dryer to warm up the film;
- carefully pull out the harpoons from the profiles (they directly “press”/fix the canvas) in the corners of the covering;
- We do the same thing around the entire perimeter - remove the harpoons.
During the process of dismantling a PVC stretch ceiling, you will need to constantly warm up the film - this will prevent loss of elasticity and damage to the material.
If you have to carry out the described process with a suspended fabric ceiling, then there is no need to use a heat gun, but certain difficulties may arise when pulling out the fabric tucked into the profile - such material “adheses” tightly to the bead or clip.
After dismantling and fixing the problem, you will have to repeat the procedure for installing the suspended ceiling with your own hands.
The finishing material in question for the ceiling surface is perhaps the most reliable to date. If you operate it correctly and periodically carry out “hygienic procedures” on it, then for a long time you will not need either repair or replacement.
( 84 votes, average: 4.68 out of 5)
Interior glass doors: types and stages of DIY installation
DIY floor waterproofing
Related Posts
Accessories for suspended ceilings: platforms and rings for lamps
Special platforms are used to mount lighting fixtures. The material for them is heat-resistant plastic. The shape of the platform is round, square, or cross-shaped.
Platforms for future lighting fixtures are attached to the base surface in pre-marked places. On the front side of the canvas, thermal rings are glued under the lamps, which serve as a heat sink. Inside each thermal ring, a hole is cut in the canvas into which the lamp is attached and connected.
Thermal ring
Attaching the lamp to a suspended ceiling
Installation of electric lighting devices in a suspended ceiling
Due to the fact that mounting rings for suspended ceilings (thermal rings) and platforms are available in a variety of sizes, they can be matched to various lamps. Universal platforms, which consist of rings of different diameters, allow you to select the required diameter by removing unnecessary ones with a mounting knife.
To hang the chandelier, you must use the hook included with the platforms. First, a hook is attached to the ceiling, a platform is installed, and then the fabric is stretched. The chandelier must be hung on a hook, secured to the platform, and all cracks must be pressed with a decorative glass.
Scheme for installing a chandelier on a suspended ceiling
Technology of stretching stretch ceilings
Marking
Marking
The technology of stretching suspended ceilings requires the most accurate markings possible. The highest quality markings are made using a laser level, as it forms a complete light contour throughout the entire room, eliminating the need to alternately transfer marks from one wall to another. It is enough just to immediately put marks with a pencil wherever necessary and then connect them using a thread treated with colored powder.
Before drawing marking lines, make sure that there is no electrical wiring lying at the profile fastening level, otherwise an accidental screw getting into the wire when installing the profile will cause a short circuit, and the wire at the damaged site will have to be repaired for a long time. This kind of complexity is never included in our plans, especially when the work of stretching a stretch ceiling is carried out independently in order to save a little money.
Attaching profiles
Fixing profile parts
The main set of works for installing a stretch ceiling begins with fixing the profiles to the walls. Let's take into account the following installation nuances:
- the profile is fixed along the entire perimeter of the room directly above the marking line, but not above the level of the lowest point of the room. Installation of lamps requires lowering the profile installation by an amount equal to the height of the lamp plus 1-2 cm for ease of installation;
- You can use a pneumatic gun to fasten the baguette, if it looks like it is justified. Often a hammer drill and a screwdriver are used for these purposes. The frequency of fastening also depends on the material from which the wall is made. For a concrete wall, the normal step for attaching baguettes is 8-10 cm;
- since the profile may not have sufficient length, it needs to be increased by precise cutting. Avoid the appearance of sharp burrs on the edges of the profiles, which could subsequently cause damage to the tension fabric;
- To accurately join the profile in the corners, a pendulum saw is used to help trim the profile to the required angle. You just need to first measure the exact angle, especially if it is more or less than 90°.
Preparation and installation of tension covering
Fabric stretching
Before you start stretching the stretch ceiling, you should warm the air in the room to a temperature of at least 40-50?. Only after this should the packaging be removed from the material. Next, the following actions are performed:
Installation begins from one corner. The canvas is hung on the so-called “crocodile”, gradually moving from one corner to another. The canvas is heated with a heat gun to the temperature specified in the technical documentation attached to the product. If the heating temperature is insufficient, it will be very difficult to perform the work of tensioning the web. Overheating of the coating is also undesirable, as this can affect its external qualities. A glossy coating, for example, may in some places lose its uniformity of texture, losing its shine. When the canvas is ready, an angular blade is inserted inside the harpoon and clicked into place by pushing the harpoon into the groove. Having secured the canvas to a pair of locks in one corner, you can proceed to fastening in the remaining corners, thus ensuring uniformity. After engaging all the corners, the canvas is attached to straight sections of the walls.
When the work of installing the canvas is done alone, the fastening points should divide the canvas into even sections, which are then divided in half again by fastening, and so on until the very end.
Note: After stretching the stretch ceiling is completely completed, it is necessary to carefully check the quality of its fixation in the baguette and the tightness of the fit to it. Lastly, install the top decorative strip, completely hiding the fastening mechanism from view.
Chandelier installation
Installation of lighting fixture
At the final stage of installing a stretch ceiling, lighting fixtures are installed. The chandelier is installed on a special thermal ring made of plastic. Its thickness is 3-4 mm. The size of the ring is selected taking into account the fact that it should not protrude beyond the edges of the chandelier body. A continuous, uniform layer of glue is applied to the ring and after some time it is installed in place. The fabric from the inside of the ring is cut out with a sharp knife and the wires are brought out through this hole. The chandelier is mounted in the usual way and attached to a hook.
Related Posts
- How to remove a suspended ceiling: working with harpoon, cam, wedge fastening, dismantling PVC cloth and seamless fabric covering
- How to make suspended ceilings without heating with your own hands?
- How to make a suspended ceiling with your own hands: installation technology
- How to attach a ceiling cornice to a stretch ceiling and hang a curtain
- How to drain water from a suspended ceiling yourself and the cost of repairs after flooding
- Repair of suspended ceilings after a cut
- Multi-level stretch ceilings for the hall
- Which insert for suspended ceilings is better?
- Do-it-yourself installation of sliding interior doors: video instructions
- How to properly seal a hole in a suspended ceiling
- Ventilation in a suspended ceiling
- How to choose a stretch ceiling depending on the material, texture and manufacturer
- How to attach drywall to a wall: 2 installation methods
- Production, materials and machines for the production of suspended ceilings
- How to quickly wash floors in an apartment
- What to do if the suspended ceiling is flooded
- Caring for matte and glossy stretch ceilings
- The cost of dismantling the Armstrong suspended ceiling and prices in the estimate
- Profiles for suspended ceilings: types, installation methods
- Features and applications of soldered stretch ceilings
- Satin stretch ceilings: pros and cons
- Repairing ceilings in an apartment: finishing features
- The door handle creaks: causes of the problem and solutions
- Why line the roof and ceiling with clapboard and how to do it correctly? nuances of the procedure
- How to glue fiberglass correctly?
Read with this
- How to remove a suspended ceiling: working with harpoon, cam, wedge fastening, dismantling PVC cloth and seamless fabric covering
- How to make suspended ceilings without heating with your own hands?
- How to make a suspended ceiling with your own hands: installation technology
- How to attach a ceiling cornice to a stretch ceiling and hang a curtain
- How to drain water from a suspended ceiling yourself and the cost of repairs after flooding
- Repair of suspended ceilings after a cut
- Multi-level stretch ceilings for the hall
- Which insert for suspended ceilings is better?
- Do-it-yourself installation of sliding interior doors: video instructions
- How to properly seal a hole in a suspended ceiling
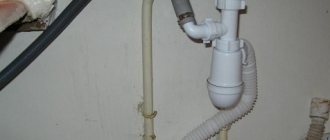
Pipe fittings
If there are pipes in the room, the question invariably arises: “How to bypass the pipe when installing a stretch ceiling?” For a more accurate installation of the tension fabric, bends are used - plates of the required diameter with a cut. The diameter of the plate should be slightly larger than the diameter of the pipe. Before stretching the canvas, the ring should be glued to the canvas from the inside and a hole should be cut inside it. The pipe is inserted into the ring.
Pipe lines
To make the appearance more attractive, sometimes such a plate is installed on the canvas from the outside.
Bypassing pipes, columns and supports