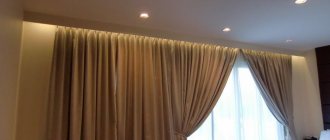
A little about stretch ceilings
Constant attempts to decorate your home, as well as premises intended for receiving people (restaurants, cafes, etc.) leads to the emergence of new finishing materials. This applies to all components of the room, including the ceiling.
Many different materials are used to decorate the ceiling. One of the popular ones now is a suspended ceiling.
It is a thick film, tightly stretched over the entire area of the room.
This allows you to create a perfectly flat flow surface without any transitions or joints. It looks really beautiful.
But the film itself is not placed on the surface of the ceiling; it is fixed to a special frame fixed to the walls of the room, at a short distance from the main ceiling.
In a way, a suspended ceiling can be called a false ceiling that hides the main one.
This ceiling decoration looks aesthetically pleasing and beautiful, but there is a small nuance - the film cannot be load-bearing; trying to attach anything to it will lead to it stretching or tearing. This leads to the need to think in advance about mounting lighting equipment - chandeliers, shades, etc.
A suspended ceiling involves the installation of chandeliers, but this operation has its own characteristics, which we will describe.
So, it was decided to decorate the room with a suspended ceiling. You won’t be able to stretch the film yourself, but you can do the preparatory work to secure the chandelier.
Also read: How to find hidden wiring in the wall.
Basic level of knowledge about PVC ceilings
A stretch ceiling looks like a perfectly flat surface. It is made from PVC film or fabric with special processing. No matter how you plaster a concrete ceiling, you will never get such a flawless look as a stretch ceiling. The fabric or film is stretched over a frame fixed around the perimeter of the room.
It is unlikely that you will be able to cut the fabric to fit the ceiling on your own; to do this, you need to know the degree of its shrinkage and the features of fastening. The cutting and installation should be done by professionals. Not every chandelier can be hung under suspended ceilings. The limitations are dictated by the nature of the material.
It is sensitive to heat and may become deformed if heat is emitted from the lighting fixture. The conclusion is that the chandelier should not heat the ceiling. Energy-saving or LED lamps are used for lighting, and the chandelier itself is placed in such a way as not to deform the thin surface of the film.
Features of choosing a chandelier for a stretch ceiling
First you need to decide on the chandelier itself. When choosing, you need to take into account several parameters to avoid problems in the future:
- You should not select chandeliers with a small height (you need to ensure a sufficient distance between the chandelier lamps and the ceiling film to avoid the possibility of sagging of the film due to the heat generated by the light bulbs);
- It is advisable that all lamps be placed in separate shades (they will additionally protect the captivity from overheating);
- It is better to choose a chandelier that uses several lamps, the more of them, the better (with a large number, even low-power lamps will provide good lighting, and they will not affect the film);
- When choosing, you should pay attention to the protective cap that will cover the wiring, as well as the chandelier fasteners (this cap needs to be large enough. This will primarily facilitate the installation of the chandelier);
- The protective cap should not have sharp edges (to avoid the possibility of cutting the film);
- You need to decide in advance on the fastening method.
The nuances of installing a chandelier on a suspended ceiling
Not every lamp can be used when working with a suspended ceiling, which is due to the technical characteristics of the film. There are a number of factors to consider:
- The film does not tolerate heat well. Short-term heating causes it to soften and sag, while long-term heating causes a violation of the integrity of its structure. Therefore, you should not buy lamps without shades and with a steel base, which heats up from the bulbs;
- the lampshades in the chandelier should be directed downward to prevent stains from appearing on the material;
- When using a glossy film, open lampshades should be abandoned. In this case, the appearance of glare that irritates the eyes is eliminated;
- There should be no sharp edges or casting marks on the base of the lamp that could cut the film coating.
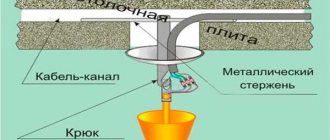
The lighting device is not attached directly to the film, as it is deformed under the load and may tear .
Even LED strips are not glued to it. Therefore, the lamp is fixed to a solid structure placed between the canvas and the supporting plate. In this case, you do not need to lower it much - 4-5 cm is enough.
Methods for attaching a chandelier
The last point mentioned, fastening methods, is the most important for the correct installation of the chandelier on a ceiling covered with film.
Since chandeliers can have several types of fastening, you need to immediately decide on the fastening in order to carry out the preparatory work correctly.
At the moment, three methods of fastening a chandelier are used.
The first - fastening to a mounting hook is the simplest and most common.
It can be used for many lighting devices and can provide both small and fairly large chandeliers.
The second method is fastening to a mounting plate. A small wooden beam is used as a mounting strip, which is attached to the main ceiling, and a chandelier is already attached to it.
Usually used for not very large chandeliers.
The last method is usually used for large chandeliers that have significant weight - mounting on a cross-shaped bar.
Variety of fastened models
According to many, installing chandeliers on a suspended ceiling with your own hands is a very simple matter. The main thing here is to take into account all the nuances and specifics of its fastening. There are currently four known installation options:
- Installation of lighting on a mounting hook is carried out using an ordinary anchor hook, which can be pre-fixed during the construction of the structure. If it is missing, then it can be welded or additional materials can be used to fix it. In your home, this can be done by drilling a through hole in the ceiling;
- The next method is to mount it on a mounting plate. This method is more suitable for standard types of chandeliers, which usually include various screw or nut fasteners;
- A cross-shaped mounting plate may also be included with the chandelier. This method is used exclusively for small models of different shapes;
- I-beams are more often used in large rooms, where massive, heavy chandeliers are often used.
After choosing the type of lighting and the method of fixing it, you can proceed directly to its installation. This is usually done when assembling and installing the frame to stretch the canvas itself.
Preparatory work
Now about the preparatory work itself. They are carried out even before the film is stretched, but already with a frame mounted on the walls for it. You should immediately decide on the location of the chandelier.
If the room was already habitable, and there was a chandelier in it, there is nothing special to invent, unless, of course, a decision was made to move its location.
The selected installation location must have suitable wiring for powering the chandelier.
If it will be installed in place of the previous one, you should estimate the length of the protruding wire - it should be long enough to ensure easy connection of the chandelier.
If the installation location is moved, or the room is new and there is no wiring yet, you should ensure that the wiring is laid to the place where the chandelier is attached.
Moreover, it is not necessary to hide the wire, because it will be hidden by the film. It is only important to secure it to the main ceiling so that it does not sag.
To ensure that the base for installation does not protrude beyond the level of the film, and at the same time is not far enough from it, you need to stretch a fishing line across the entire room so that it passes through the place where the chandelier is attached.
The ends of this fishing line must be secured to the film frame, and the line itself must be taut. This will allow you to determine the position of the film after it has been stretched.
Next, the base for installation is fastened to the main ceiling. It depends on the chosen fastening method.
Is it possible to replace a chandelier installed on a suspended ceiling?
The reason for replacing a chandelier may be a breakdown or simply a desire to change it to a more modern option. You can change a chandelier without special knowledge in the field of electrical engineering. But work should be carried out only with the electricity turned off and carefully so as not to damage the structure of the device. If the size of the cap of the new chandelier is larger, then there will be no problems with replacement. If it is smaller, then it is necessary to make a decorative overlay to cover the gap.
It is easiest to remove a chandelier from a suspended ceiling mounted on a hook. After all, besides it, there are no additional fastenings. To do this, you need to slide the protective screen, insert your hand into the hole and remove the chandelier from the hook, having first disconnected the wires. No outside help is required.
Lamps mounted on a cross, as a rule, have large dimensions and various decorative elements made of glass. Therefore, before removing the chandelier, it is necessary to dismantle the shades and other decorative elements.
After this, remove the cap, secured with a locking screw, under which the fastening system is hidden. To remove the chandelier, simply unscrew the four screws after disconnecting the wires.
As you can see, installing a chandelier in a suspended ceiling, dismantling it and replacing it is not difficult if you do everything in accordance with the instructions. It is important to choose the right mount in accordance with the type of chandelier and its weight.
Installation of the mounting base
Attaching the mounting hook is, in principle, simple. It is enough to make a hole of the required diameter in the main ceiling using a hammer drill, and then screw the mounting hook itself into it.
A stretched line will allow you to correctly select the length of the hook that should protrude. The hook should not reach the fishing line by about 1-2 cm.
Installation of a base made of wooden beams is done a little differently. First you need to decide on the length of the beam itself - it should be the same length or slightly longer than the mounting metal strip that comes with the chandelier.
To secure the beam to the ceiling, a metal construction profile is used.
First, the height at which the beam will be located is measured, and the pieces of the profile required in length are cut off. There must be at least 4 of them to secure the timber.
A stretched line will help determine the level of the film. The lower edge of the beam should not reach the fishing line by 0.5-1.0 cm.
If necessary, the profile can be used as a suspension - this is if the distance from the main ceiling to the film level is significant.
Using dowels, the profile sections are attached to the main ceiling, and the timber is attached to them with self-tapping screws.
Before fixing the beam in the center, you need to make a hole in it for the wiring to come out.
After all installation work, you need to pull the wiring through the hole and secure its ends so that they do not interfere with further work.
If the fastening is using a cross-shaped mounting strip, you will need plywood with a thickness of 10-12 mm.
From it you need to cut a square, identical in size to the cross-shaped bar.
In the center of this square you need to make a hole for the wiring.
Installation of a plywood square is similar to installation of a wooden beam.
First, the position of the square is replaced, all measurements are taken and, using pieces of metal profile, the plywood is fixed to the main ceiling.
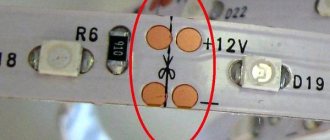
Attaching the chandelier to a hook
The first step is to find the location of the hook. You can press lightly on the film to find the hook.
You need to glue a heat-resistant ring to the place where it is located. Its diameter must be selected depending on the size of the hole that will be needed to access the mounting platform.
During further work, it will not damage the film sheet.
The ring is glued with superglue, and you need to make sure that the glue is on the entire surface of the ring, which will be pressed against the film.
Omissions are unacceptable, as they can lead to tearing of the fabric.
After gluing the ring, you need to check the tightness of its fit. Then, using a construction knife, a hole is cut in the film to access the hook.
The wiring is pulled out through the hole. Afterwards the chandelier is hooked onto the hook and the wiring is connected. The sagging wire is hidden under the film.
All that remains is to lift the protective cap to hide the hole and fasteners of the chandelier.
Installing a chandelier on a mounting plate
Installing a chandelier on a beam is done a little differently. First you need to find the location of the timber, and stick a heat-resistant ring in this place.
In this case, its diameter should be such as to ensure ease of access to the beam, but it should not be larger than the size of the protective cap.
Then the mounting strip of the chandelier is secured to the beam using self-tapping screws. When tightening the screws, it is important not to press them in completely so as not to bend the plate.
Next, the wiring is connected, and then the chandelier itself is attached to the mounting plate.
All that remains is to hide the wiring and cover the hole with a protective cap.
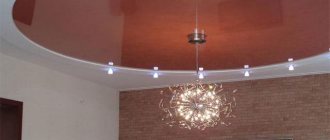
Chandelier for a suspended ceiling - how to choose the right one
Before proceeding directly to installation, you must, of course, buy a chandelier. This is not particularly difficult: every city is full of specialized stores ready to offer the buyer an endless number of variations. Anything will definitely do!
- However, when choosing, you should be guided by some considerations that will help you choose the most suitable option for your premises:
- a large chandelier - for high and spacious rooms: remember this rule, and then you will not have problems with the fact that it will hang very low and draw too much attention to itself;
- the lampshades of the lighting device must be directed to the sides or downwards - in the case when they are directed upwards, there is a risk of noticeable spots appearing on the stretched fabric; such a direction is allowed only if the distance between the lampshades and the ceiling is at least 40 centimeters;
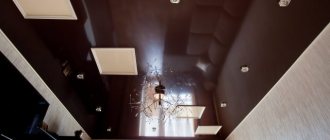
- do not choose a chandelier with a large number of shades if the surface type of your stretched canvas is glossy: a mirror image of objects located in the lower part can provoke their visual doubling, which will create an unpleasant effect on the perception of the room as a whole;
- if the lighting fixture has a wide horizontal surface, then weigh all the pros and cons before purchasing; if you have glossy ceilings, it will be difficult to avoid the constant accumulation of dust on it, but it will be displayed properly.