Weaving a square basket from newspaper tubes: master class, photo
Weaving from newspaper tubes is a very unusual, but very popular handicraft that almost anyone can do. In addition, this handicraft is not expensive, because it does not require purchasing materials. Any product woven in this way is made from the most ordinary newspapers, rolled into a thin tube and fixed with varnish.
What is required for this job:
- Shape - any square-shaped object that allows the product to have a given silhouette: vase, box, jar, drawer, toy, and so on. Choose an item that suits you in size.
- Newspapers – any sheets of newspaper, double sheets preferably.
- Clothespins - regular or stationery, are needed for fixation while weaving a basket.
- Scissors - for work
- Glue – dry or PVA for fixing and twisting tubes.
- Decorative materials - to add design to the finished product.
- A long wooden skewer is necessary for curling a sheet of newspaper.
- Cardboard – necessary to create the bottom of the product
How to weave a basket:
- Flatten the newspaper sheet
- Take a skewer and place it towards the edge of the newspaper sheet.
- Roll up the newspaper sheet and begin rolling, rolling the sheet tightly.
- Newsprint should be coated with glue so that it curls and sticks in place.
- If you used PVA, let the twisted tubes dry a little.
- Cut out the base for the basket, a square: large or small.
- Glue the tubes to the base and secure with clothespins, let dry completely.
- Remove the clothespins and glue a second square (exactly the same), press and secure. Let dry.
- Place the form on top of the bottom and begin weaving, tying each vertical tube with a horizontal one.
- The weaving looks very solid, because you shouldn’t weave several tubes. Each time you glue several tubes into one long strip, which you work with.
- Press the ends of the protruding tubes onto the mold with clothespins
- When weaving, you need to use patterns to create a pattern and carefully weave the edges of the tubes inside.
Detailed master class in photos:
Square basket
LiveInternetLiveInternet
Quote from Marrietta
Read in full In your quotation book or community!
Do you like to weave from newspapers? Then come and visit) Today I want to show you wonderful braids performed by Natalia Korochkova. The author wove baskets specifically for storing onions, and I think that they would also be perfect for needlework - for knitters. In such a basket you can store balls and knit with threads directly from the basket. Very neat and beautiful work) Thanks to the author for the master class and inspiration)
The author wove the bottom for the braids according to the master class from Sovenok for these baskets:
So, let's watch a master class on weaving baskets for food or handicrafts. But, first, I want to share a useful link with you) If you have a car and, like a real Russian, you love driving fast, then you definitely need to purchase a new generation radar detector, which is designed specifically for Russian users. Cobra radar detectors, which have already gained popularity, have customizable options; they not only warn about the signals of existing radars, but also focus on the location of stationary radar systems. Read more on pulsevision.ru.
Below is the author's text. She braided a five-liter bucket. This was the first mistake - I needed a smaller shape, the basket turned out to be too big for me. I wove a round bottom, lately I have been weaving only the way the Owl taught me stranamasterov.ru/node/595525
I glue two 3x3 “crosses” from the tubes with a glue gun. I flatten the tubes at the gluing points.
Using the same gun I glue the “crosses” together. I use a square to keep the angles equal.
I prepare glue, scissors and moistened tubes.
As I work, I will turn the weave to the wrong side, so in order not to confuse you, I will mark the front side of the weave with a blue letter “L”, and the wrong side with a pink letter “I”. Front side. Without gluing the tip, I begin to wrap the cross with one tube.
Front side. I came to the beginning of the first row of winding.
Wrong side - I trim the beginning of the working tube. I glue the working tube to its beginning, but NOT to the cross! I do this so that later I can freely move apart the tubes of the cross.
This is what gluing looks like on the wrong side. I'm starting the second row of winding.
This is what the front side looks like.
The tube is almost finished. I cut off the unevenly colored end of the tube and join it to the new tube.
I wind 3 rows.
Wrong side. 3 full rows wound. I leave the tip sticking out. I'll glue it on later.
Front side. I substitute (do not glue) a new tube for the second layer of winding.
Front side. I finish the first row of the second layer of winding.
On the wrong side, I cut the tip again and glue the working tube to its beginning, but NOT to the cross.
Front side. I have already wound 2 layers of 3 rows. I spread the crosspiece tubes, helping with a thick knitting needle.
I substitute the second working tube for weaving with a rope.
I weave with a rope, pushing apart the remaining tubes of the cross.
The first row of rope is completed.
Three rows of rope are completed. I think everything else is clear.
The glass salad bowl used to weave these baskets. Diameter 22 cm. Height 9 cm.
I added one more to the seven racks. The second mistake is that you need to add additional. racks to half of all racks, then it will be more convenient to get the bow. I wanted to ensure that when you take out the onion, the rest roll out onto the “balcony”.
I wove a rope out of four tubes, while simultaneously raising (or lowering) the racks for the walls.
Then she wove a rope from two tubes, bent the double posts outward, weaving a “balcony.” In the second row, she began to separate the double posts one at a time. First, both outer ones, after 4 rows again the outermost ones, so we gradually spread out all the double posts, thereby expanding the “balcony”. When I was weaving the second house, I decided to open all the double posts in the first row at once, I liked it better this way, it made for a more convenient “balcony” design.
Here you can clearly see how the racks were spread.
I wove only 18 rows. I started to weave a rope from 4 tubes (start not on the balcony), I braided the stands on the “balcony” into a rope. The ends of the racks after trimming are well hidden under a rope of 4 tubes.
I wove a row, moved to the second according to Richard’s MK stranamasterov.ru/node/390898?c=favorite, only we have a string not of three, but of four, so at the 4th stage with the right tube we circle the marked riser and the next TWO and start for the FOURTH riser . And we begin to weave the reverse rope. I finished the second row using the same MK, only I have a reverse rope, so the last turns are not laid on top as in stages 13-18, but are pulled under the first ones, as if we were braiding a braid; from the drawing you can understand where to drag it. I reached the “balcony” and stopped for now.
I placed new racks and wove the rope further on these racks.
I wove a little more chintz and decided to make an inner lip so that the lid would rest on it. I did it like here stranamasterov.ru/node/717067, only at first I bent the racks not inward, but outward, and when lifting them up I carried them under two.
Made a bend stranamasterov.ru/node/201794?c=favorite
I took out the bucket and... was disappointed - my hand somehow fits into the hole, but with the onion it gets completely stuck. I gave up on this case and wove the second one for now - working on the mistakes. Then I took scissors and “expanded” it at the top, making an arch. I disguised the cuts with catfish (I glued it with hot glue, and the handle too). It's a completely different matter!
The cover was woven on the ball, as Ilfat showed stranamasterov.ru/node/620504. Fits perfectly on the inner side
Now I’ll tell you a little about the second house. I braided a three-liter jar, doubled half of the racks, in the second row I separated all the pairs one at a time, and tried to tilt the “balcony” as far forward and down as possible.
I wove 12 shortened rows (you can see how in the photo) so that I didn’t have to cut it out again. Then, in the same way, I framed the racks and 9 more rows with a rope in a circle.
In the corners where there were no tubes glued
I made a fold around the window: behind the next one outwards
under next up
pulled it inside and cut it (smeared a little with PVA glue)
I inserted one more into the racks and made the same bend as on the window. After I pulled the ends of the racks inward, I wove a side on them, on which the lid rests.
How to weave a handle. Master class from Martik
As I already wrote, this braid is very convenient for the handles of all kinds of baskets, since it is voluminous and very dense. To weave it, we take 8 tubes. We distribute them in pairs in this way.
For convenience, I placed the ends of the tubes on PVA glue and secured them with a clothespin
We begin to weave. We weave (alternately) ALWAYS only with the outermost RIGHT and LEFT tubes. Take the rightmost tube (highlighted in red) and bring it UNDER 5 tubes and bring it out BETWEEN the left paired tubes
Then we lay it on top of the second left pair. PSHere and further - we lay ALL the tubes strictly PARALLEL to the adjacent tube
We are done with the right tube (red). This was the first step. Now we do the same with the left tube (blue). We insert the LEFTmost tube UNDER 5 tubes. We output BETWEEN the right paired tubes
We lay it ON TWO tubes. Step two is complete.
The whole braid consists of just two steps. Very easy to do. Repeat the first step again. Far right UNDER 5 tubes
AND ON TOP 2 tubes
Far left UNDER 5 tubes
and 2 tubes
Shall we repeat? ) Far right UNDER 5 tr. and ON 2 tr. Far left UNDER 5 tr. and ON 2 tr. All!
Source stranamasterov.ru/node/754927?c=favorite
Marrietta's inspiration
Weaving a rectangular basket from newspaper tubes: patterns, diagrams, description
You need to weave a rectangular basket from newspaper tubes according to the same principle as a square one. If you wish, you can also weave a lid, which should be only 1 cm in diameter larger than the product itself.
Step-by-step weaving in photos:
Materials for work: Twisting tubes with a skewer
Gluing tubes
Thick tubes are vertical, thin tubes are horizontal
Gluing the cardboard base, fixing with clothespins
Gluing the second cardboard, inner bottom
Fix with clothespins until dry
Establishing the shape and weaving it You can weave using only vertical tubes or weave horizontal ones
You can adjust the height of the product yourself
Secure the product with clothespins at the top for easy operation
Completing the weaving
Wrapping the tubes
The final stage of work
Rolling the tubes inward
Cutting tubes that are too long: the ends can be left or glued
Weaving an Easter basket from newspaper tubes: patterns, diagrams, description
You don’t have to buy a beautiful Easter basket; you can weave it yourself from scrap material – newspaper tubes. These baskets can be filled with Easter treats and given to your loved ones. Depending on how many treats you want to put inside or how much skill you have, there are several designs and ways to make such a product.
IMPORTANT: Weaving is similar to the previous lessons, however, to create such a basket you should not use cardboard for the bottom, but a round shape (a dish or a deep plate), which you will tie.
In order to create a small basket with a handle, you will need about 90-100 tubes, which should be twisted in advance. Let the tubes dry and only then get to work:
- Weave together 8 tubes with a double cross
- Start tying in a circle to make the base.
- Place the base form on top of the knitted small round bottom.
- Tie it, lengthening the tubes and creating patterns (for this you should use weaving patterns).
- To ensure that the product is neat and even, the tubes should be secured vertically, pinching them to the edge of the mold.
- The handle for the basket is knitted separately in the same way as weaving a braid from several tubes at once (see photo).
Step-by-step weaving with photos:
Creating the bottom Tying the base: deep dish
Fixing with clothespins
After tying, remove the form. Tying the edges, rolling the tubes.
Handle weaving: preparation
Weaving into the edges of the warp
Fixing handles with clothespins
The handle weaves at both ends
Tying the ends and tying them with tubes for a neat look
Newspaper basket lid
The lid for the craft is made similar to the bottom, and should be slightly larger than the size of the top of the original.
To make it you need:
- in the side surface of strong and even cardboard you need to make small indentations with a knife;
- thread a piece of paper through the holes on each side;
- wrap around the edges of the product, bending one element after another;
- Finally, hide the free edges under the lid;
- for handles, insert 2 pairs of tubes along the two upper edges;
- stretch them to the middle, bend them and intertwine them with each other;
- coat the edges with glue and fasten with clothespins;
- for a neat appearance, they should be lubricated with PVA again and rewound with paper.
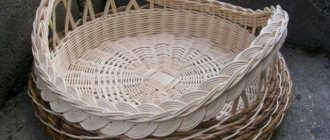
Weaving an oval basket from newspaper tubes: photo, description
An oval basket woven from ordinary newspaper tubes can serve as an excellent piece of furniture and a dish for some food products, for example, sweets, fruit or bread. Making such a product is not difficult, and upon completion of the work you can paint it with any color and even varnish it. This coating will give the basket strength and moisture resistance.
In its principle, weaving an oval basket is similar to other products (square and rectangular, ordinary baskets), however, in this case, special attention should be paid to creating the bottom. You, of course, can use a cardboard base, or you can weave it by hand, which is much more beautiful.
How to weave an oval basket:
In order to make the base, you need to intertwine several tubes together
You can fasten the tubes together by tying them together
After the base is made, start weaving in the usual way.
When you have tied the required diameter of the bottom, wrap and lift the tubes up
Secure the tubes with clothespins and continue weaving
Master class on weaving from newspapers: Oval basket
Author: Lyubov Dikareva
Master's blog
For several days I was haunted by this MK from irpet , but I don’t like it when the cardboard is visible, so I made it a little in my own way... I have a full row of “stitches”, so I get double stands.
This is a view of the bottom from the outside.
Well, now I suggest that anyone interested take a look at my changes in the method. I cut out the cardboard to the shape of the bottom of the bucket, marked the holes and, at first, decided to use a punch, but... the result! (circled with a red curve)))) I made the remaining holes step by step...
I forgot to take a photo on blank cardboard, but the process is absolutely the same... I pierced it with a thin knitting needle, widened it with a thick one, expanded it further with a regular fountain pen, then glued wallpaper, slightly smaller than the cardboard, and again three stages of piercing. By the way, I pierced it faster than I write)))
glued the ceiling wallpaper with a margin on the other side,
I cut out triangles and glued them...
here you can see that there are no holes in the white wallpaper yet
And here we already have it - repeating three stages for the third time))), but it’s fast!
I glued the napkin, wrapping it up and onto the bottom!
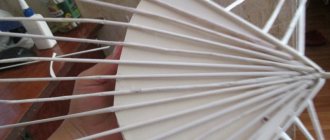
I forgot to take a photo of the insertion of the racks at the beginning, but you can see it here...
I braided the bottom according to the above MK, tied it with threads to the bucket so as not to fidget, by the way, I put the lower layers of napkin between the form and the bottom, so as not to accidentally damage the napkin glued to the wallpaper...
I wove several rows and moved on to a drawing that I had seen on the Internet for a long time, but somehow my hands didn’t get around to it... Everything is standing on a stool upside down, I raised the racks through one, wove five rows of calico weave, returned the racks to their place, put the weaving “on legs"…
wove the rope further...
It was not easy to close, but very easy! I dragged all the racks to the right ones, and since there are two of them, one above the other, it turned out to be a nice openwork edge... You can see the transitions in the back film...
And here is a photo of the pattern that I tried to partially reproduce...
I don’t have a MK for this pattern, so I did it this way when weaving it. There are an even number of racks, but then how to alternate the weaving? Nothing better came to mind... I divided one stand... I wanted to skip it through two, but it turns out to be a terribly long step, it looks even worse... Here you can see the color transitions...
Well, stop looking at the shoals! It’s better to admire the general view, okay? Looks cuter this way, huh?
Bottom inside closer
and outside... The wallpaper is paper, tinted with the stain used to paint the tubes, don't ask the color... An explosive mixture... I matched it to a napkin.
I don’t know if I’ll repeat this bottom again... Still, I like my usual double ones better... And tomorrow the little braided one will go to my friend’s mother as a gift, I have to report on the use of the buckets presented to me...
Weaving a “chicken” basket from newspaper tubes: photo, description
The “chicken” basket is very impressive and is perfect for making surprises for loved ones during the Easter holidays. It can be filled with dyes and Easter cakes and given as a gift to family and friends. Of course, such a product is much more difficult to weave than a regular basket, however, using video lessons and master classes, you can create a basket of incredible beauty.
Prepare a sufficient number of tubes in advance. Do the weaving according to the usual method: first create the bottom, and then put the form down and tie it. Choose a shape that is not very large, since the chicken should not be huge - this product is miniature and decorative.
Beginning of work
Ready product:
Chicken baskets
Weaving a round basket from newspaper tubes: photo, description
A round basket made of newspaper tubes is a beautiful and practical product that can be used as a box to store personal items: jewelry, money, cosmetics, threads and much more. Depending on your preferences, you can make a basket of any diameter, with a lid or handle, and decorate it with different accessories.
Step-by-step creation in photos, master class:
Creating the bottom Weave until the required diameter is reached
The bottom can also be made from a cardboard base
Tie the basket as usual
Round bottom
This version of the bottom is used in various crafts from candy bowls to baskets. Let's look at different ways to weave it.
Option #1
We recommend that beginners get acquainted with paper wicker weaving by watching a useful video in which Olga Lagoda explains how to start weaving a round bottom. You will also learn how to calculate the number of racks for your first product.
Option No. 2
Weaving the bottom based on a cross made of 8 tubes. Take 4 tubes, stick 4 more in the middle at right angles. The result is a cross-shaped base for weaving. To work, you will need additional tubes - working ones. Lubricate the tip of one of them with glue and insert it into the second. Bend the resulting elongated tube in half.
Hug her 4 top bases. Its ends form two working tubes at once. This method of weaving is called “rope in two tubes.”
Popular articles How to make a large, lush, beautiful bow from ribbon, fabric and lace, how to make a simple bow from nylon, satin and grosgrain ribbon?
You can start braiding the base. Place the upper working pipe behind the 4 side bases, and run the lower one over them. To avoid confusion, look at the step-by-step photos.
In this way, braid the remaining warps, making a full circle.
Braid the second circle according to the same pattern, but insert working tubes for every 2 base tubes.
Make three full circles of the bottom.
Continue weaving with a rope, braiding each tube of the base. Weave the bottom until the distance between the base posts reaches 2 cm. Now the round bottom is ready.
If its size is not enough to realize your idea, you need to add additional racks
. If this is neglected, the weaving will become too loose, untidy and will not hold its shape well.
Additional stands are needed when the distance between the base tubes exceeds 2 cm
. Near each base, open a wider hole with an awl. Insert an additional tube into the hole with the sharp end, having previously lubricated it with glue.
Having finished this work, braid a couple more rows of double racks with rope. And only after that they can be pulled apart one at a time and continued, braiding each separately. Thus weave the bottom to the desired size.
Finishing the weaving is very simple: hide the ends of the working tubes in the braid, cut off the protruding ends and glue them.
Option #3
This method also requires 8 tubes. Intertwine them to form a tight cross as shown in the photos.
Take the working tube, bend it in half and wrap it around the four base tubes.
Next, weave with a rope you already know, covering four tubes of the base.
In the second row you need to braid 2 tubes. Thus, you need to complete 2-3 rows.
When the distance between the pairs of posts reaches the cherished 2 cm, they need to be carefully moved apart and continued to be braided one at a time.
Carry out weaving until you obtain the bottom of the desired diameter, do not forget to introduce additional posts if necessary.
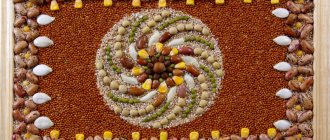
Weaving baskets from newspapers: photos of models
You can get inspired by beautiful products by looking at photos of ready-made and woven baskets. It’s hard to believe, but each of them is connected precisely from unnecessary and old newspapers.
Miniature baskets
Oval Basket Bread Box Square Baskets
Marine style baskets