Stages of creation
- Use a professional marking board or a regular ruler to correctly mark the dimensions of the workpieces. Having decided on the desired size, draw the shapes with a simple pencil on cardboard. Then you need to cut out the blanks with a sharp stationery knife. We will need two parts for each letter, so we need to make them in two copies at once.
- We measure the length of each side of the workpiece around the perimeter. We cut out the sides: the thickness can be any, we will make them 5 cm thick. To do this, we cut out cardboard strips of the required length, 7 cm wide, leaving a centimeter allowance for hemming on each side. Having folded the allowances with your hands, we glue them to one side of the base with double-sided tape, forming the sides.
- We apply the second side of the letter to the side and also glue it with tape.
- We use regular adhesive tape to secure the part in random places for reliability.
- We decorate the resulting blank according to our own taste and desire.
A simple and quick way to design a blank is to attach it to beautiful paper (you can use bright wallpaper for this purpose), trace the shape with a pencil, adding a few centimeters on each side for folds. Cut the paper with scissors and glue it to the cardboard blank with PVA glue. Allow the glue to dry, then additionally decorate the facade with lace, beads, pearls, and artificial flowers.
Common options for words in capital letters for a wedding photo shoot: love, married, wedding, happiness, love, happy, just married, amore, amour. The phrases “I agree”, “Forever”, “Yes, I do”, “Family” also look beautiful in the pictures. Inscriptions with equation signs look elegant, for example, “Masha + Sasha = Love” or the inscriptions “Husband” and “Wife” with arrows facing the heroes of the photo shoot.
Volumetric letters with backlight
Three-dimensional luminous letters will become an original decoration for any holiday.
For illumination, you can use a New Year's garland or make individual light bulbs yourself and connect them using a wire.
Tools and materials
To work you need:
- thick cardboard;
- thin cardboard;
- stationery knife;
- ruler;
- a simple pencil;
- hole puncher;
- glue;
- glue brush;
- spray paint;
- narrow tape;
- box for painting letters;
- electric garland.
Step-by-step instruction
The manufacturing process consists of the following stages:
Stages of creating volumetric letters with backlight
- First of all, you need to select a letter template and calculate the size of the future figure.
- Transfer the template onto a sheet of thick cardboard with a simple pencil and cut out blanks for the future letter with a stationery knife or a sharp scalpel. This will make the edges of the parts smoother.
- Holes for light bulbs should be made along the perimeter of all blanks using a hole punch. Their number should be sufficient to understand which letter glows in the dark.
- Thin cardboard should be cut into strips about 5 cm wide and pasted over the outer surface of the product. This technique will give the figure additional volume.
- The completed letters should be placed in a prepared box and painted on all sides with spray paint of the selected color.
- Using the described method, you need to make several letters necessary to form an inscription or phrase.
- After the paint has completely dried, the produced liters must be laid out on a flat surface according to the inscription and the garland bulbs must be inserted into the holes on the back side. The wire should be secured with narrow tape.
Before installing the garland, you must make sure that it is in full working order.
Having mastered the basics of creating three-dimensional figures, you can make any inscription to decorate the interior or any holiday.
conclusions
As you have seen, you do not need to have rare or expensive equipment for manufacturing. You can make a beautiful three-dimensional letter with your own hands at home; you only need a few stationery supplies and very inexpensive material. If the letter seems too boring, then it’s worth decorating it, how to do it is up to you to decide based on the goals, tastes and purpose of this craft, be it a decorative element for a birthday or an attribute for a wedding photo shoot - anyway, you can always choose a successful and suitable font and a decoupage option. Having mastered this technique, you can easily surprise your friends and loved ones with an original decoration for any holiday, emphasizing the essence of the event.
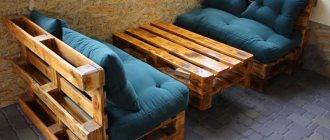
Making three-dimensional letters from wood with your own hands
Wood products are more difficult to make, but such letters will last longer. You can use both wood blocks and plywood. However, in the second case the letters will be flat. To make an inscription, you also need to make a stencil, which is transferred to the workpiece, and then cut out with a jigsaw.
It is very important to subsequently properly process the wood using sandpaper (eliminate irregularities and remove excess material). The letters can be painted, decorated with any material, and additional lighting can be installed in them.
The product must be varnished so that it is not afraid of exposure to moisture.
Decoupage
Decoupage allows you to decorate letters and numbers with a wide variety of designs. Several vintage pictures, images of cities or floral drawings - whatever comes to mind and would be appropriate in the interior.
The execution technique is very simple - the base is primed with acrylic primer or white paint, then the selected pictures are glued to PVA and, after drying, varnished. The result of the work is amazing!
Volumetric letters made of paper
Three-dimensional letters are made from paper simply and easily. Such figures will be an excellent decorative element for wedding celebrations, photo shoots, etc.
Tools and materials
To work you will need:
- letter template of the required size;
- large format thick paper: whatman paper, designer paper or colored paper for creativity;
- scissors;
- stationery knife;
- a simple pencil;
- ballpoint pen with a non-writing refill;
- ruler;
- glue Titan or Moment;
- several books for the press.
Step-by-step instruction
The process of making a three-dimensional letter from paper consists of the following steps:
- First of all, you need to decide on a template, print it on a printer, transfer it with a simple pencil to a sheet of thick paper in two copies and cut it out.
- To form the ribs, you need to prepare several long paper strips with a width of 2 to 8 cm. The thickness of the figure depends on the width.
- On the prepared strips, press the fold lines using a non-writing pen.
- On the paper strips, you need to measure exact segments with a ruler. The corners also need to be drawn with a non-writing rod and bent. At the folds, the corners need to be cut off. On rounded areas, the parts to be glued should be cut on both sides with scissors at intervals of 2–4 mm. An important condition for working is that the ruler is positioned strictly at a right angle.
- Distribute the glue evenly over the entire surface of the rib area to be glued and join the front blank to it.
- The product should be turned over for a few minutes and fixed with your hand so that the glue sets.
- You need to glue the second (wrong) piece to the finished frame and leave the figure under pressure for a couple of hours.
- After the glue has completely dried, all defects and irregularities on the product must be eliminated using scissors or a stationery knife.
The inner part of the blanks should be cut out with a stationery knife and then continued with scissors.
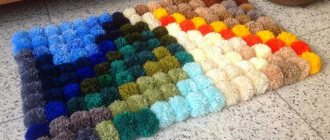
Fabric pillow letters
You will need: red and white cotton fabric, sewing machine, scissors, thread, pins, centimeter, ruler, sheets of paper, pencil, filler - synthetic fluff or holofiber.
Master Class
- Draw letters on sheets of paper.
- Transfer the letters onto red fabric in 2 copies.
- Make patterns, taking into account an allowance of 1 cm.
- Cut strips for the sides 7 cm wide from white fabric (5 cm width of the side, 1 cm allowance on each side).
- Start with a simple letter L: fold the blank right sides together, leaving 5 cm of the sides free, then stitch the bottom of the letter, 1 cm from the edge.
- When the stitching approaches the corner, make notches to make the corner even.
- Sew the side to the part without finishing 4 cm - this will be the opening for turning it inside out.
- Attach the second part of the letter L and make marks with a pencil on the sides opposite the existing corners so that the letter is even.
- Attach the piece, secure with sewing pins and make cuts in the corners so that the fabric does not wrinkle.
- Sew the second piece, leaving 4 cm for turning.
- Fill the letter with filler and sew the hole closed with a blind stitch.
- Start creating the letter O: fold the two parts of the letter and make symmetrical marks with a pencil every 2cm on two blanks on the outer and inner sides of the fabric. Also make marks on the sides of the outer and inner rings.
- Make notches (cuts) along the marked marks.
- Sew the outer ring on one side, matching the marks, leaving 4 cm for turning.
- Sew the inner ring on one side.
- Stitch the edges of the inner ring strip to form a “tube”.
- Sew the free part of the outer ring.
- Turn the workpiece inside out, secure the inner ring with pins and sew it by hand with a blind seam.
- Fill the letter with filler and sew the hole closed with a blind stitch.
- Sew the remaining letters using the same pattern.
Fabric pillow letters are ready! I recommend watching this video!
Master class “How to sew a pillow letter”
Watch this video on YouTube
Changing capital letters to lowercase letters using the Microsoft Word toolbar
Microsoft Word 2003
- Select with your mouse the piece of text you want to modify.
Select with the mouse a piece of text that will need to be changed - On the word processor toolbar, find the Format tab, located between Insert and Tools.
Click on it. Find the “Format” tab, click on it - In the window that opens, select “Register”.
Click on it. In the window that opens, select “Register” and click on it - In the interface that appears, select the phrase “all lowercase.”
Check the box for “all lowercase” - Click OK and the dialog box will close.
Click "OK"
Microsoft Word 2007
- Use your mouse to highlight the word or sentence you want to edit.
Select with the mouse the word or sentence that will need to be edited - On the toolbar, find the “Home” button.
Click on it. Go to the “Home” tab - In the “Font” group, located after the “Clipboard”, left-click on “Register”.
In the “Font” section, click on the “Aa” icon, which is called “Register” - In the dialog box that opens, select the phrase “all lowercase.”
Click on it. Click on “all lowercase”
So the user can choose the following letter spellings:
- “As in sentences” - the first character in the statement will be capitalized, the remaining letters will be small;
Example text with “As in sentences” included - “ALL CAPITAL” - all characters selected by the mouse will become large after pressing the button);
By selecting “ALL CAPITAL” all selected text will be in capital letters - “Start With Capitals”—the first characters of each individual text element selected in the document will be large;
subsequent characters will become small; Example of text with the “Start in Capitals” option enabled - CHANGE CASE - the text will be converted as follows: small letters will become large, large letters, respectively, will be small.
Example of text with the “CHANGE CASE” option enabled
DIY letter pillow
Nowadays you can no longer surprise anyone with an expensive toy or gift. The stores offer us a huge assortment of all kinds of goods for every taste and budget. But you always want more, you want to surprise and leave as a souvenir of yourself a thing in which you can feel the warmth of your hands and care. And only things made with one’s own hands can make a person smile as soon as he picks it up. Such a thing, for example, could be a personalized letter-pillow, which can be given as a gift for a baby’s first birthday or simply as a sign of attention.
To sew a personalized letter-pillow, we will need:
- cardboard;
- a simple pencil;
- scissors;
- ruler;
- fleece in two colors, in this case blue and white;
- needle and thread;
- padding polyester
First we need to make a stencil of the letter. We determine the size of the letter ourselves; in our case, the height of the letter is approximately 30 cm, the width is 25 cm. We take cardboard and use a pencil and a ruler to draw the letter on it.
If you have difficulties at this stage, you can print the letter on a printer using the Word program, the WordArt function. Cut out the letter and trace it on cardboard.
Instead of ordinary cardboard, you can use any available materials, the main thing is that they are thick enough, otherwise the stencil will slip on the fabric. In our case, for example, instead of cardboard, a regular shoe box lid was used.
Next, use scissors to cut out the letter along the contour. You can use nail scissors to cut out the hole in the letter A.
Now we apply the resulting stencil to the fabric and trace it along the contour. We make 2 parts.
Since the letter A is symmetrical, there is no need to ensure that it is positioned correctly on the fabric. But, if you are sewing, say, the letter P or C, then you need to place the stencil on the fabric in a mirror form. That is, you must have two parts that are “mirror” relative to each other.
After the letters have been outlined, we cut them out, but not along the contour, but 1 cm wider.
From white fleece, cut out a strip approximately 15-20 cm wide. The strip should be long enough to cover the side of the letter along the entire perimeter. The perimeter of the letter should not be measured in advance, since the initial result may differ from the final one. It is better to cut the strip longer and then cut off the excess.
Using the same printer, we cut out the letters of the name of the person for whom the pillow is intended. It is not necessary to cut out the internal holes of the letters; they can be made directly on the fabric.
We apply the letters to the fabric and trace along the outline. Remember about “mirror” letters.
Cut out all the letters along the contour. To cut out the holes in the letters, you can again use nail scissors.
Next, take a strip of fabric and one of the letter parts and, starting from a straight line, sew them to each other along the contour line with a “back needle” seam. In this case, the fabric should be positioned right sides to each other, but we sew the parts on the wrong side.
Sew a strip around the entire perimeter.
After this, we sew the ends of the strip to each other. If the fabric is longer, simply cut off the excess part.
Next, we again cut out a strip of white fleece the same width as the previous strip, but much shorter.
Place the fabric right sides together again and sew a strip on the wrong side around the entire circumference of the hole. The ends of the strip are also sewn on. You will get a “pipe” like this.
Now we sew the second part of the letter to the strip in the same way as the first, but carefully ensure that the parts do not twist. Therefore, first we find the corner of the letter (say, the lower right one on the leg of the letter), mark it on both parts and begin connecting the parts from this point. We also sew the second part along almost the entire perimeter, leaving a small hole at the end. The hole should be wide enough for your fist to fit comfortably into it.
Next, turn the letter right side out and thread the “pipe” of the letter’s hole through the hole of the second part.
Now we sew it to the edge of the hole of the second part using a “hidden” seam.
After this, you can evenly fill the letter with padding polyester through the hole left earlier.
Once this stage is completed, close the hole with a “hidden” seam.
Now we place the previously cut out letters of the child’s name on the side and sew them with a “back needle” seam.
The personalized letter pillow is ready.
The author of the master class is Elena Sharygina.
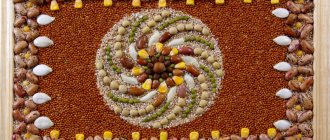
Gypsum
You can use plaster to create interior three-dimensional letters with your own hands. It is better to work with plaster while wearing gloves. To create letters from plaster, you need to prepare a mold into which the prepared solution will be poured. To do this, you need to draw the desired letters on cardboard, and then cut out long strips that are equal to the thickness of the product. These strips need to be glued to the cardboard along the contours of the letters to form a cavity into which the plaster will be poured. It is advisable to tape the inside of the mold - this will make it easier to remove the part after it hardens. To prepare gypsum, strictly follow all recommendations on the packaging. It should generally have a yogurt-like consistency. First, the mold is half filled with solution. Then a layer of burlap is laid on top to strengthen the future product. Then the product is filled to the end, i.e. to the top of the form. Typically, plaster hardens completely after 4-5 hours. After this, you need to use a knife to remove the product from the mold. Then the surface is sanded with sandpaper, the corners are cut off and irregularities are removed. Usually such letters are not decorated, but left white. But it’s not necessary: they can be coated with paint or decorated with some cute little things. To prevent such decorations from getting dirty, they should be sprayed with acrylic spray.
You can also mention creating letters for the interior from salt dough, which you can do with your children.
Some people cast letters from wax to create chic candles. Those who are interested in modeling are quite capable of making letters from clay. There are really many options for creating unique decorative elements.
How to make three-dimensional letters from foam plastic
There are several advantages of letters made from foam plastic: ease of use, cheap material, and the shapes hold their shape for a long time. Making volumetric letters from it is much easier than gluing a cardboard frame.
List of materials:
- foam sheets;
- pen or marker;
- ruler, sharp knife;
- thick paper;
- fine sandpaper;
- PVA-based glue;
- newspaper or thin parchment;
- acrylic paint, brush.
Operating instructions:
Buy polystyrene foam in sheets. You can find it in construction stores. Choose shapes that suit your thickness. If there are none, then you will have to glue several sheets together.
Draw the template first on a piece of paper. This way you can adjust it, which would be difficult to do with foam. Transfer the letter diagram onto the material. For convenience, divide the sheet into several parts according to the size of the workpieces.
Using a utility knife, cut out shapes from foam. Use a metal ruler to help you - move the blade along it. This will prevent the knife from slipping off in the wrong direction.
- The cut line must be sanded. Choose one with fine grains to ensure an even surface. Use a brush to brush away any excess foam scraps.
- To decorate the letters, use newsprint or thin parchment. Tear them into small pieces, apply glue to them and secure them to the foam. Super glue and a glue gun are not suitable for this material.
- After you have covered the entire surface of the figure, leave the glue to dry. Additionally, there is no need to prime the surface, since the glue acts as a primer.
- Now you can apply acrylic paint. If the layer turns out transparent, then paint the letters again. But only do this after the first layer is completely dry.
You can leave the figures in this state or decorate them with ribbons, beads, and artificial flowers.
As you can see, there are a lot of ways to make three-dimensional letters. If you make such decor with your own hands, you can not only decorate the interior or enliven a photo shoot, but also save on the original design.
Wine corks
Another option for making a three-dimensional letter with your own hands is a product made from wine corks. In the modern world, nothing is surprising anymore, but using so-called waste to create interesting things is a great idea. The plugs can be glued together with regular or super glue. You can change the direction of the plugs by gluing them first with edges and then directly. Such products are decorated with paints, appliqué, dried flowers and any other methods.
Volumetric letters made of cardboard
Cardboard is one of the simplest and most affordable materials for creating three-dimensional letters. It is very easy to work with and you can make shapes of different sizes from it.
To make voluminous inscriptions, it is recommended to use thick paper from packaging boxes.
Schemes and templates
Before starting work, you need to select a stencil with a letter and font.
At the next stage of work, the template of the future letter should be transferred to a sheet of ordinary or corrugated cardboard. Further manufacturing technology may differ.
Three-dimensional letters from cardboard can be made in three different ways.
Method No. 1
The simplest and fastest way is to make figures from several layers of cardboard. Such products are distinguished by their heavy weight and reliability in operation.
Tools and materials
To create three-dimensional figures from cardboard using this method you will need:
- regular or corrugated cardboard;
- scissors or stationery knife;
- PVA glue;
- long ruler;
- a simple pencil;
- decoration material: thick threads, colored or wrapping paper, artificial flowers, shells, small stones, beads or beads.
Step-by-step instruction
The workflow consists of the following steps:
- Using the selected stencil, you need to make from 7 to 10 identical cardboard blanks.
- All blanks should be glued together with PVA glue.
- After the glue has completely dried, the finished volumetric letters need to be decorated.
To decorate finished three-dimensional letters, you can use thick threads, which you simply need to wrap around the figure or paste it with colored or wrapping paper, decorate it with flowers, beautiful shells, small stones or beads.
Method No. 2
The second method of making three-dimensional figures is a little more complicated than the first. But with its help you can make classic letters that will become a real decoration for your interior or holiday celebration.
Tools and materials
To work you need:
- ordinary cardboard;
- scissors and stationery knife;
- PVA glue;
- ruler;
- a simple pencil;
- non-writing ballpoint pen;
- several books for the press;
- materials for decoration: white paper, glitter, beads, shells, bows, satin ribbons, etc.
Step-by-step instruction
The workflow consists of the following steps:
- Using pre-selected stencils, you need to cut out two identical parts from cardboard.
- To form the edge of the future figure, you need to cut a strip 3–4 cm wide greater than the thickness of the product.
- Using a non-writing rod, you need to draw fold lines through which the workpieces will be held together into a single whole.
- All parts must be bent along the formed fold lines.
- One of the blanks should be glued to the edge of the product. For greater convenience, in areas of the figure with smooth lines, the fold of the rib should be cut with scissors.
- In a similar way, it is necessary to glue the second blank to the rib.
- The finished letter should be placed under a press for several hours.
- After the glue has completely dried, the three-dimensional letter can be covered with white paper, sprinkled with glitter, decorated with beads, shells, bows, satin ribbons, etc.
To create three-dimensional letters with your own hands from cardboard, the third method is to use the papier-mâché technique.
Tools and materials
For production you will need:
- regular or corrugated cardboard;
- cardboard paper towel rolls;
- white printer paper;
- scissors and stationery knife;
- PVA glue;
- ruler;
- a simple pencil;
- acrylic paint;
- paint brush.
Step-by-step instruction
The creative process consists of the following stages:
- You need to draw two blanks on cardboard using the selected template.
- The paper towel roll should be cut into several identical rings with a width of at least 2 cm. The thickness of the future figure depends on their width. To create one letter you will need at least 7 such rings.
- The prepared paper rings must be glued onto one of the blanks without going beyond it.
- Apply glue to the free edge of the paper rings and glue a second cardboard blank to them.
- White printer paper should be wrinkled and cut into small strips.
- Use prepared paper strips to cover the surface of the letter in several layers and wait for the glue to dry completely.
- The finished figure must be covered with a layer of acrylic paint.
Textile
The most common way to make three-dimensional letters with your own hands is to make them from fabric and filler. For those who are at least somewhat familiar with a sewing machine or even thread and needle, making soft letters will not be much of a problem. They can be small in size, when for decoration they are strung on a thread or fishing line and words are formed, or large in size when they are used as floor pillows. But the most popular size of such products is considered to be medium size, like regular sofa pillows.
To make three-dimensional letters from textiles with your own hands, you need to: - select a fabric that matches the overall style of the room, - make a stencil of the required letters, - transfer the stencil using cardboard to the fabric, - cut out two blanks (note that on one side you should apply the stencil is straight, and on the other - in a mirror image, i.e. upside down), - sew them together in the most primitive way. This can be done by hand or by machine, depending on your sewing skills. As the letter is stitched, the free space in it is filled with scraps of fabric, foam rubber, padding polyester or cotton wool. It is worth choosing fabric and threads that are strong enough so that such a letter does not need to be repaired frequently. You can join the fabric with any type of seams, leaving them outside or inside, turning the letter inside out at the same time. You can decorate such pads in different ways: sew on buttons, lace, glue on various butterflies, pebbles or flowers. For children, you can “revive” these letters by gluing eyes, nose, tongue, hair to them and designating arms and legs using threads. Decorating a finished pillow gives you complete freedom to your imagination.
Decoration of volumetric letters
There are many ways to decorate cardboard letter blanks. They involve the use of a variety of materials. Moreover, the process itself will not be complicated and burdensome.
Corrugated paper
This method is one of the simplest. It will require:
- Crepe paper;
- Scissors;
- Glue.
We follow the instructions:
- We unfold the corrugated paper and cut it into strips 70-100 mm wide.
- We fold the strips like an accordion.
- We cut the resulting accordion along one side. The distance between cuts should not be more than 15 mm.
- We retreat the width of a strip of crepe paper from the edge of the workpiece, glue the cut accordion onto the base with the fringe facing up.
- In this way we glue the entire workpiece, row by row.
Napkins
Paper napkins are an inexpensive and simple material with a soft base. It should be noted that to design three-dimensional figures they will be required in large quantities.
Preparation required:
- Napkins;
- Thread;
- Stapler;
- Scissors;
- Glue.
We carry out the work as follows:
- If possible, divide the napkins into layers.
- Take a few napkins, fold them in half, and fold them again.
- Using a stapler, we fasten the resulting squares in the center.
- We cut the square so that it turns into a circle.
- We lay out the round blanks on the table and lift up all the layers of the napkin with our fingers.
- We attach the resulting volumetric blanks to the cardboard facade using glue.
Textile
To decorate in this way, you need to have patience. All actions must be very careful.
In addition to the cardboard blank, you should prepare:
- Glue;
- Scissors;
- I love any fabric.
We proceed in the following sequence:
- Apply glue to the front part of the workpiece. It is better to use super glue, as it will not create additional volume between the cardboard and the fabric.
- We put the fabric on top and stretch it a little with our hands. There should be no folds on the front surface.
- We press the material and wait for the adhesive to dry.
- Turn the letter over with the side with the fabric already glued down. Carefully and evenly cut off excess material.
- Similarly to the first, we design the second side of the façade of the blank.
- After the glue has completely dried on large parts, glue strips of fabric to the sides.
Letters - alphabet
Letters can be used not only for decorating holidays and celebrations. They will look no less impressive in a children's room. You can always make an alphabet from felt for your beloved baby. This way he can not only play, but also learn letters.
DIY crafts, how to make a clock from scrap materials? Summary of a lesson on applique in the middle group on the theme of mushrooms, stencils, crafts Kanzashi bows for September 1 from satin ribbons for beginners, step by step What you can make with your own hands from a box and a cardboard box, how to decorate an organizer, box, shoe box
To work you will need to prepare:
- Thick threads;
- Multi-colored felt;
- Sintepon;
- Office paper;
- Soap or chalk;
- Scissors;
- A simple pencil.
Making templates for letters is very simple; they do not have to be very large. All necessary blanks can be printed on a printer and cut out, leaving an allowance of 5 mm.
Next we make the alphabet:
We apply the template to the felt and outline the outline using chalk or soap.
- We sew the felt using a thick thread, but not all the way.
- Through the small hole left, fill the letter with padding polyester or other filler. To make it more convenient to push it, you can use a simple pencil.
- Sew up the hole.
To decorate the letters, you can use flowers and figures, also cut out of felt.
.
Three-dimensional letters and numbers can be made in a variety of ways. Moreover, almost anyone can do them. In this way, you can not only make your photo shoot or holiday original, but also save significantly on decor.
In the video below, we invite you to watch a step-by-step master class on making three-dimensional letters from the most affordable material - napkins.
Foam letters
Foam letters with creative inscriptions are a popular accessory for a wedding photo shoot. Lightweight foam words look beautiful in pictures. You can toss them in the air for creative and fun photo ideas. It’s easy to make large foam plastic parts for filming; you just need to acquire the necessary material, imagination and free time.
Necessary materials
- Polystyrene foam (use polystyrene from packaging for household appliances or specially purchase it at a hardware store, where they sell it in various thicknesses, so you can choose the thickness of the material needed for your idea).
- Bright marker.
- Stationery knife (sold at a hardware store in the wallpaper department).
- A piece of fine and coarse sandpaper.
- Various decorating materials: fabric, paper, paints.
Buttons
All the variety of buttons that are now on store shelves may well be useful when decorating letters. The buttons are glued to the most ordinary hot melt adhesive. Delicate and delightful works created using ordinary buttons inspire heroic deeds.
I just want to put aside all the things that have accumulated and also decorate the house with such beauty! Moreover, it’s my daughter’s birthday very soon, and an elegant number decorated with shiny buttons will be very useful. This figure will be irreplaceable at a holiday photo shoot!