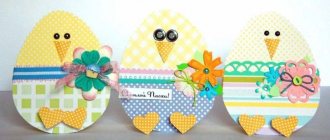
Rice, beans, pasta, millet, buckwheat, seeds can serve as excellent materials for making an original panel. By creating a panel of cereals with your own hands, you will not only decorate your home or office with original paintings, but also have a great time. The process of making such products will be quite exciting for children. Additionally, the child will develop creative thinking, attentiveness, perseverance and the ability to do difficult tasks. Therefore, if you are still wondering how to spend time with your child in an interesting and useful way, go create a panel of cereals with your own hands together.
Materials for creation
To create an original painting, you don’t need hard-to-find materials; everything can be found at home. You can create figures using:
- pasta;
- rice cereal;
- barley;
- beans;
- corn grits;
- buckwheat;
- millet;
- seeds
It will also not be difficult for you to find materials for the base of the picture. It can be:
- cardboard;
- boxes from household appliances;
- boxes of candy.
To decorate the frame, use acrylic paints, baguette sheets, fabric or cardboard.
What cereals can be used for crafts?
Parents can draw the simplest template for crafts from cereals themselves or with the help of the baby himself.
To do this, just find out his preferences and portray his favorite character from a fairy tale or book, cartoon or movie character, which will help to interest children as much as possible.
An excellent option would be to use large children's coloring books, with themes that are interesting to the child and a small amount of detail.
In the creative process, you can use a variety of grains, such as semolina and buckwheat, corn and rice, poppy seeds and millet; to reduce the cost, it is better to choose chaff from these grains.
We create an original picture
To make it you will need:
- frame;
- pencil or printer;
- cereal;
- PVA glue;
- thick cardboard;
- sample.
A master class that describes in detail each stage of creating a panel will help you make sure that this is a fairly simple process.
Technology for making panels from cereals using templates:
- Using a pencil, draw a template or choose the one you need online and simply print it out, then cut it out. Templates can be different: animals, nature, cities, or favorite cartoon characters. It is better to choose templates with large details, and it will be easier for you, and they usually look more beautiful.
- Glue the template onto the cardboard that will be the base of your painting.
- Spread the design with PVA glue and begin filling the parts with grains of a matching color. For example, buckwheat is suitable for a horse’s mane, and a human body can be made from semolina. The main thing is to use your imagination.
- You can decorate the background with rice colored in the color you like.
- Place your item in the frame.
Related article: How to quickly sew a blouse without a pattern: sewing master class
Useful tips
In order for your painting to last as long as possible and turn out to be the brightest and most beautiful, you should follow some recommendations not only when making it, but also about storage and subsequent care.
- Once every six months the painting needs to be re-coated with clear varnish. If you did not initially coat the painting with varnish, you can spray it with super-strong fixation varnish once every six months, then the grains will stick much more reliably;
- If you don’t have a variety of cereals at home or they are all the same color, you can use them and then paint them with paints, but, of course, it won’t look so impressive;
- The finished product should be placed under a press for several hours, so the cereal will better adhere to the glue and will look more neat;
- Excess grains need to be removed from the panel, this is very simple to do: you can just turn the picture over and that’s it. Carefully inspect the product to ensure there are no empty spaces or bald spots.
Related article: How to make a cap with your own hands
A picture made from cereals is perfect for decorating a kitchen or any other room in an apartment, it depends on the subject of the picture, it’s just that such a craft will look most organic in the kitchen. You can also give this product to your family and friends for any occasion, because gifts made with your own hands are much more pleasant to receive.
From cereals and pasta
An original panel that divides cereals into several compartments. To make it you will need:
- cereals;
- pasta;
- thick cardboard;
- frame;
- pencil;
- PVA glue;
- something to mark boundaries: rope, straws, toothpicks, pasta, etc.;
- decorative elements (cinnamon, flowers, bows, beads).
Let's look at the stages of creating a panel of cereals and pasta. On a cardboard base, draw compartments for cereals with a pencil. Choose the size and number of compartments yourself.
Glue toothpicks, tubes or other objects that you prefer onto the drawn partitions using glue. Press them with your hand for a few seconds to help them stick more firmly.
After the borders have completely dried, you can begin filling the cells. To do this, you need to lubricate the selected area with glue and pour the cereal there, then press it down a little with your hand.
Place the picture in a frame or decorate the edges with the same items you used to make the borders, as in the photo:
Cover the panel with varnish.
Use decorative items to decorate your composition.
What do you need for work?
Grains of various crops and plants are needed as materials. For this purpose, grains of peas, coffee, corn and other crops are used. As additional materials, you may need various leaves, you can use beads, pieces of fabric, and so on, that is, everything that can be used to decorate the picture.
The tool kit includes the most common items: tweezers, gouache, which is used for painting grains, PVA glue, pencils, superglue, silt and aerosol varnish. The needle is used to adjust the pattern of the painting if necessary, and the finished canvas is coated with varnish.
Thick cardboard is mainly used as the basis for the future painting; packaging boxes from a hair dryer, TV and any other equipment, as well as other hard materials, are also suitable. To prevent the paintings from losing their shape and getting wet from the glue, they are not made of thin cardboard and paper, the base must be dense.
Beautiful flowers with your own hands for March 8
The finished work will need a frame for framing. It can be made of wood or plastic, or any other material.
From seeds into fruits
When making panels, you can use various seeds: pumpkin seeds, cucumber seeds, corn and dill. Combine materials with each other and complement the seeds with coffee beans, cereals, beads and sequins.
You will need:
- paints;
- cardboard;
- pumpkin seeds;
- brush;
- PVA glue.
Master class on creating a “fruit” panel:
- Draw your favorite fruits on cardboard: apples, oranges, bananas or peaches. To make the task easier, use printed templates.
- Apply glue to the surface of the design.
- Now take the pumpkin seeds and arrange them tightly together in a pattern. Wait until the product dries.
- Grab some paint and a brush and you can start adding color to your fruit. You can paint the seeds in advance if you are worried that you won’t be able to paint them neatly once they are already in the picture.
- Cover the finished composition with varnish and insert it into a frame.
Article on the topic: Magazine “Sabrina” No. 8 2019
Don't forget to supervise your child while creating a panel of cereals and seeds. The younger the baby, the larger the material you choose should be.
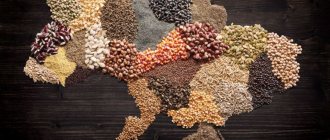
Beautiful panel
In the photo you saw a step-by-step master class on making a picture from various grains. Of course, the general principle of action is clear, but still requires some explanation. So, for work you need to prepare:
- A variety of cereals, beans, pasta. They should all be different colors to make the picture bright and expressive;
- Glue;
- A sheet of thick cardboard or plywood;
- Template of the desired image;
- Paints and brushes.
So let's get started. First you need to paint the background of the painting in the color that you have chosen for your composition. For convenience, the cereals need to be sorted, here you can adhere to various classifications, as you wish (by color, by shape, by size, etc.) Now on the basis you need to draw the selected picture, even if you don’t know how to draw at all, don’t despair, always you can use a stencil.
Now you need to apply glue to one element of the drawing and immediately pour the cereal planned in this place according to the plot onto it. When the glue dries, shake off any excess grains.
It is very important: you need to apply the glue in fragments, because if you smear the entire drawing with glue at once, while you work with one area, the others will already dry and the image will turn out to be of poor quality.
When the painting is ready, for reliability it can be coated with transparent varnish; all that remains is to decorate the frame, and the painting is ready.
Related article: My favorite home flower, Gloxinia