What is wool felting?
This type of needlework is the process of creating a variety of products from unspun wool by interlocking and weaving its fibers using various methods using special hardened steel needles.
This process is also called felting (or felting). This exciting activity helps develop creativity.
Reference! Not all wool is suitable for felting, but only natural fibers. The best choice in this case would be mohair and alpaca wool.
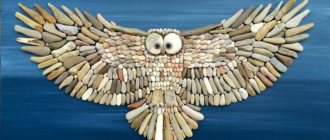
Felting allows you to create original designs on fabric, beautiful toys and various decorative elements (photo). Let's look at how to felt a wool picture with your own hands with step-by-step instructions.
Winter evening
Many needlewomen love to make paintings about autumn and spring. But winter, despite its cold and frost, is also incredibly beautiful.
To work on the painting you will need:
- combed wool ribbons in colors such as: white, blue, dark blue, light blue, turquoise, dark brown, brown, yellow, orange, red;
- non-woven fabric 18 x 24 cm for backing;
- sharp scissors;
- tweezers;
- photo frame;
- glass.
Each stage must be secured, leaving the work under glass. But this is only necessary when working with dry wool.
At the very beginning of the work, it is necessary to pull out all the strands of wool from the tape and cover the surface of the substrate with it. Lay them in different directions, the ends of the threads should extend beyond the non-woven fabric by 1-2 centimeters. Trim off excess by attaching glass.
Article on the topic: Enterlac technique with knitting needles for beginners with description and photo
Pluck the wool to make cotton wool. Create a background in layers, layer from dark to lighter shades. Control the quality of laying the material by applying glass.
Make snowdrifts using white strands laid parallel to the horizon. This technique can be seen when looking at landscapes made of wool.
Pull strands from the dark blue ribbon and twist them a little. This is how tree silhouettes are drawn.
Then add white wool trees.
Collect fluffy wool with your own hands and give it the desired shape for the tree crown.
Use a thin ring of wool to mark the outline of the moon. Fill it with wool fluff, chopped as finely as possible.
Next, cut and lay the wool for the house from dark brown and brown wool. The part on the right should be darker than the left.
Make a roof for the house from dense white strands.
Cover the lower part of the picture with snowdrifts made of white wool.
Cut out the windows, add the finest strands of turquoise and blue to the snow.
Add light with yellow and orange strands. The light should slightly block the house.
Mk for beginners is finished. The product is already ready!
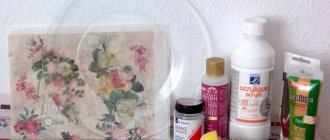
Necessary materials
For this type of needlework you will need the following materials:
- natural wool;
- felting needles with several notches at the bottom (for the dry method);
- tweezers (for laying out small parts when making paintings);
- flannel or non-woven fabric (for the base when making paintings);
- liquid soap or warm soap solution (for the wet method);
- eyes, noses and stuffing material (used in making toys).
If you do not yet have experience in purchasing suitable material for felting, it is advisable to purchase ready-made kits for creating paintings in craft stores.
Such kits may include different volumes of material, needles of different sizes and a special solution for wet felting. Each set comes with detailed instructions, which will be especially convenient for beginners. The undeniable advantage of such sets is that after creating one product, needles and solution will remain, which can be used repeatedly later.
Types of felting
There are two methods of felting - dry and wet. When dry felting, compaction of the material is carried out using special needles with notches. Such notches catch the fibers and push them into the lower layers, resulting in felting. Repeatedly sticking a needle into the same place allows you to give the product the desired shape. This method of felting is most often used to create jewelry, toys and various figurines.
The wet felting method involves the use of warm soapy water and straightened wool strands. The layout of the material is soaked in a soap solution, after which it is rubbed and ironed in different directions, gradually increasing the degree of pressure. This method is in most cases used for the manufacture of flat objects: panels, paintings and decorations for fabric and clothing.
Advice! When making a pattern for a product, it should be taken into account that during wet felting the wool will shrink by about 30-40%.
Dry felting wool to create paintings
Paintings from a similar material are created by alternately laying strands of wool in layers on a base fixed with a frame in glass.
Making a painting this way using a simple master class is a great way to master dry felting. By applying material of different shades in thin strands to each other, a smooth transition of colors from one to another is achieved. The production of such a picture must begin with the creation of a background, which is recommended to be laid out from top to bottom in accordance with the chosen scheme.
The strands should be translucent, light and not particularly large. First, use tweezers to lay out the edges of the background, and then the middle.
Important! After each stage of work, the product should be held under glass to secure it.
After this, you can begin to lay out the main motive of the painting. Schemes for beginners, as a rule, contain large motifs with a minimum number of shades. The first step is to lay out the contours of the main figure and fill them with material of the required shades.
Then, using additional colors, you need to “draw” the contours of the remaining figures with thin, slightly twisted strands. During the process, you need to constantly check the diagram. There is no need to rush. Continuing to “paint” the picture with thin colored strands, you need to lay them out along the lines outlined in this way, if necessary, straightening with tweezers or adjusting with scissors if the strands are too long.
Moving little by little to the foreground of the picture, you need to lay out small fragments of it, twisting and rolling the material. If the main figure turns out to be too voluminous, the wool can be slightly squished.
When the work is completed, the picture must be covered with a transparent stencil and the ends of the strands sticking out at the edges must be cut off. After this, the product can be inserted into the frame.
Master class “Painting from wool”
Wool painting. Master Class
Painting made of wool. Landscape “Native land forever beloved...”
Master class “Painting from wool”
Paintings using the wool watercolor technique are always impressive: texture, softness of lines, relief of the image.
Of course, in order to collect a “palette” of wool fibers, you need to engage in this type of creativity for more than a year. But even with a small set of colors, you can achieve the desired shade by mixing strands of wool, just like paints in watercolors. I often use photographs as a sketch of future work (I take pictures wherever possible, the landscape I like, flowers, animals), but I do not follow the image exactly, I change the drawing, shorten it or add to it. Today I would like to present a master class on creating a picture from wool, which my student Anya S., 12 years old, did with my help. We called the landscape “My native land forever beloved...”. 1. Materials and tools: sketch, felting wool, scissors, tweezers, felting needle, frame with glass, gauze or non-woven fabric. Photo 1.
2. A sheet of white paper with a sketch made in pencil is pasted onto the cardboard. Gauze is glued on top using a glue stick. If you use non-woven fabric, you can sketch directly on it. Photo 2.
3. The fibers are applied in thin strands to the canvas in accordance with the sketch: horizontally or vertically, and depicting clouds, slightly twisted into “curls”. Photos 3 and 4.
4. You need to start from the background, in our case from the forest in the distance. To do this, small strands of wool of several colors are twisted into flagella and cut into short pieces over the canvas. Photos 5, 6, 7. 5. Small parts are applied using tweezers and, so as not to move, they are pressed down with a special needle for felting. Photo 8,9.
6. Moving to the foreground, you need to remember that the details of the landscape should be larger and lighter. By mixing three or four shades of the same color, you can get the volume of the image, the play of shadows, and movement. Photos 10, 11, 12. 7. At the end, when it would seem that the work is already completed, small details are added: reflections on the water, small flowers, twigs, pebbles on the path. In our case, we straightened the forest line a little and added shadows. Photo 13,14,15. 8. The picture must be covered with glass, while trying not to move anything, and insert it into the frame. Ready! The young artist is very pleased! Photo 16, 17.
We recommend watching:
Dry felting from wool on the theme Winter. Master class with step-by-step photos Creating a painting from wool. Master class for beginners Wool watercolor Applique from wool for kindergarten “Snowdrop”. Master class with step-by-step photos
Similar articles:
DIY wool painting “Flowers”
Master Class. DIY wool painting
Painting made of wool. Winter
Picture made of wool Tit. Master Class