From newspaper tubes
Quite a budget option that makes beautiful baskets of any shape and size.
Newspapers can be knitted for free in the mailbox. Or replace them with promotional magazines, which are available in almost every store (where promotions are posted for a month).
Cut newspapers or magazines into strips 15–20 centimeters wide. You can use a whole sheet for the straw. Arm yourself with a knitting needle and glue.
To make paper tubes, it is better to use a long knitting needle No. 3 - 4 (the size is always indicated on each knitting needle).
A hot glue gun is more convenient, although you can use a regular glue stick or PVA.
We wind a lot of tubes as shown in the video. The process itself is simple, after several attempts you will do it automatically. Make sure that the tubes are the same width and length (if possible). Glue the tip.
How to make a tube from newspaper
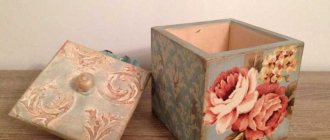
Some needlewomen paint each tube with a special stain. You don’t have to do this (the newspaper drawing itself turns out to be quite original). Or cover an already finished basket with stain of the desired shade. Colors vary.
Any weaving. From standard to more complex. The bottom can be square, rectangular, round. The bottom is woven flat, then the sticks are bent upward and the weaving continues.
How to weave the bottom of a basket
There are several ways. Choose the one you like best:
How to lengthen a tube
When the length of the tube in the weave ends, insert a new tube into it and fasten tightly (you can use glue). That is, a continuous weaving is obtained.
Remember this is paper! Even if you cover the finished basket with a special varnish, the product will still get wet. Therefore, use the basket indoors. For interior or storing things.
Application
Baskets made from paper tubes are widely used in the home and country house. They can be used as:
- Flower pots
- Bread box, candy bowl
- For bath towels
- Like an egg basket
- Like a picnic basket
- For children's toys
- Like a newspaper girl
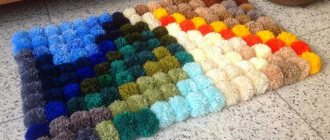
Unusual DIY baskets made from newspaper tubes
You don't have to weave. You can simply fold the tubes in the form of different shapes and fasten them as shown in the photo:
Paper basket
Necessary materials:
- lots of wrapping paper
- glue
- paper clips
- sewing machine.
Fold the sheet of paper several times if it is thin enough. We cut off the remaining part, which can be used for other parts. We form eight stripes 5-7 cm wide.
We sew each strip on both sides.
We weave the bottom of the basket in the shape of a square. As a result, it should look like in the photo.
We fix the corners with glue.
We form the walls of the basket and weave a new strip. We fasten them with paper clips so that the product holds its shape.
When the first circle of strips is closed, fasten the ends with glue. We weave new strips and continue to form the walls.
We bend the strips when the desired height is reached.
Made from Chinese (bamboo) chopsticks
Bamboo sticks, which are used to eat in Asian, Japanese, and Chinese restaurants, are a ready-made building material for making crafts with your own hands. We already have an article on our website: Crafts from Chinese chopsticks (there are a lot of interesting ideas there).
The chopsticks can be washed after use, especially when you like to order sushi at home. It will take some time for the whole package to be collected.
There are quite a few options for making a basket with your own hands from bamboo sticks. You can use glue or simply fasten them with thread, rope, etc.
This example used sticks, hot glue sticks and jute for the sides of the basket.
First we fasten the bottom. We lay out 4 sets of sticks (new, not yet separated) around the perimeter. We glue them together with glue. The hot glue gun dries in a few seconds.
We lay out and glue the sticks in a checkerboard pattern so that the sharp and wide ends go through one another. This results in a square bottom. It can also be made rectangular, without making the perimeter at the beginning, but simply by laying out more sticks in length.
Be sure to cover the work surface with newspapers, bags or oilcloth. The glue gets dirty.
Glue 4 sticks up on both sides as the basis for the frame of the basket.
And we glue the rest of the sticks onto them, making large or small (at your discretion) gaps between them.
You can do the other two sides in the same way - by gluing sticks. Or use jute. Also glue it to sticks - verticals.
This wooden basket can be used for any purpose and purpose: for books, small items, as a flowerpot, etc.
Painting with a bouquet
A paper basket can become the basis for an applique. Such an unusual painting can be given as a gift for any occasion or to decorate your interior. By doing it with your child, you will have an interesting and useful time.
This applique can be used to make cards or decorate a gift.
To create a picture with a flower basket, you can use a diagram with ready-made elements. To do this, cut out the parts and glue them to the base.
For the basket applique you will need:
- cardboard;
- colored paper of 3 colors;
- scissors;
- pencil;
- glue;
- ruler;
- sheet of white paper.
In order to make an applique with a wicker basket, you need to line a rectangle of one color 18 cm long, 10 cm wide into vertical stripes 1 cm wide. For ease of weaving, you need to leave 1 cm to the edge of the strips. Then cut 8 strips 1 cm wide from paper of a different color and 18 cm long.
Related article: Do-it-yourself fabric bow on your head or on a dress with a master class
Then you should weave the strip into the cut rectangle.
The following strips must be woven in a checkerboard pattern.
We weave the sheet to the end. You should end up with a braided rectangle. When working, you should pay attention to the connection of the parts; they should fit tightly to each other.
Now you need to prepare the base for the basket. To do this, you need to draw a template on a sheet of white paper, cut out the part and stick it on the resulting wicker rug.
Cut the rectangle according to the template, leaving 1 cm edges.
Fold the edges over from the wrong side and glue them to the base.
Glue the basket onto the cardboard.
Now you can collect a bouquet by sticking paper flowers or fruits above the basket.
Your child will surely like this applique and give pleasure from creating it. In addition, based on the proposed master class, you can make pictures related to the seasons. So, for an autumn bouquet you can use dried leaves, as well as paper mushrooms, for a summer bouquet you can make dandelions from paper, and for a spring bouquet you can make snowdrops or tulips.
From craft paper or paper bag
The whole world is switching to eco-consumption, so paper bags are now everywhere. It’s not very convenient to use them for garbage, but they come in handy for various crafts.
It is very easy to make a basket from craft bags.
Cut off the handles. Cut the bag into pieces along the seams. And we cut this paper into strips (1.5 - 2 cm).
The weaving technique is the most primitive, the one we were taught in kindergarten.
First we weave the bottom of the required size (one bag will make a fairly large basket). Then we bend the strips and start weaving upwards. When the strip ends, simply glue the next one to it (with glue or a stapler) and continue weaving.
The whole process is on video:
For a denser basket, you can make a double strip of paper. That is, cut them into 4-5 centimeters and fold them in half. Then you will get thin cardboard. It is easier to weave from it, and the basket will be more stable.
This principle applies to any paper. Can be made into a beautiful gift. Or use the same newspapers and magazines.
Making a pattern
The diameter of the bottom of the basket is 30 cm. On the burlap we make a circle with a radius of 15 cm and cut it out with scissors, giving a seam allowance of about one centimeter. The height of the product is also 30 cm. It is necessary to calculate the circumference to obtain the size of the sidewall, which will be 94.25 cm. We cut out a rectangular part measuring 30 cm x 94.25 cm, giving seam allowances of 1 - 1.5 cm on each side .
Scientists use artificial intelligence to identify COVID cures
Incredible sight: a rare solar halo can be seen in Finland (photo)
After a breakup, psychologists advise “disinfecting” social networks
We cut out similar parts from variegated cotton fabric; if there is a pattern on it with a certain step, try to choose it so that the center of the pattern coincides with the center of the bottom. Also cut out the details from auxiliary fabrics, taking into account the allowances. Duplicate fabrics for the bottom are cut without seam allowance.
In order not to waste time on calculations in the future, make paper patterns, so you will have the opportunity to create baskets of the same size at any convenient time. In addition, we will need to cut out the lining, the dimensions of which are almost the same as the outer part of the product.
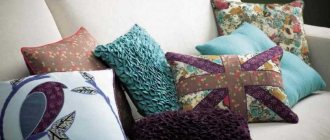
Ribbon basket
If you urgently need to make a basket from scrap materials, then this idea will help you.
You will need:
- Frame: any cardboard box (it can be cut to the desired height)
- Ribbons of two colors (they can be replaced with colored paper, scraps of fabric and other available materials)
- Stapler
- Scissors
- Gift paper. Or any craft paper
DIY making
- Cut off the frame of the basket. In this case, it is a box from household appliances.
2. Wrap the tape around the box from one end to the other, covering the entire bottom. Attach with a stapler on both sides. Do the same with the other side. So that the entire box is covered with blue ribbons.
3. Take a ribbon of a different color and thread it in a checkerboard pattern into the blue one. We fasten the beginning and end of the pink ribbon and tuck the tip under the blue stripe.
4. Cut off a large piece of gift paper. And we distribute it inside so that it is not end-to-end, but freely located. The paper will wrinkle and wrinkle in the corners. It's OK. Secure from the outside with a stapler. Cut off excess paper.
5. We tie a bow to the top to cover the traces of paper clips.
If all the necessary materials are at hand, then making a basket from ribbons will take only 30–40 minutes.
Often in the office, some event or corporate party requires a beautiful box or basket. And there you can find all the necessary materials for this craft.
Making volume
Take a rectangular piece of burlap and secure the dublerin to it using tailor's pins. Iron both parts so that the entire surface of the dublerin is tightly glued to the base. Baste a rectangle of padding polyester to this blank. Carefully align the edges and sew all the parts together using a sewing machine. The product should resemble a pipe. Press the seam with an iron, using just enough pressure to keep the thickness to a minimum.
At this point, there are 2 blanks - the sides and the bottom, now they need to be combined. First of all, you need to make marks on the circle so that creases do not form when stitching to the edge. Both pieces will be sewn on the wrong side. Fold the circle in half, make marks at the folds using tailor's pins, straighten and fold the circle again to mark the opposite sides, this way the quarters of the circle are marked.
Attach the side to the bottom so that the seam of the side is located in place of one of the circle marks, pin the parts together with a pin, and do the same on the opposite side. Connect the side and bottom at at least four points.
In Moscow, more than half of the courtyards and two-thirds of the streets were cleared of snow
Spells on lavender and its magical properties: for sleep and to awaken dreams
Boil, wash, dry: how to reduce the size of a shirt without ruining it
If you are an experienced seamstress, sew the pieces on a machine, otherwise baste the pieces before final stitching. Turn the product right side out and iron the seams.
Basket of thread and PVA glue
A simple way to make a basket involves wrapping a ball with regular yarn and glue.
You will need:
- Balloon
- Yarn of the desired color (not very thin and not very thick), for knitting on knitting needles or hook No. 2-3
- PVA glue
We inflate the ball to the size that we want the future basket to have. We tie it tightly. Spread half the ball with PVA glue. The layer of thread is in a chaotic order: it is not necessary to wind it evenly around the circumference of the ball; uneven bindings will look even more beautiful. Another layer of glue. And we wind the thread again. Make 3 – 5 layers in total (the thinner the yarn, the more layers needed).
Finally, make a handle for the basket. To do this, spread a strip of glue from one side of the future basket to the other. Wrap yarn in several layers.
After drying, deflate the ball and remove any remaining residue. The finished basket can be trimmed with scissors if there are any uneven spots.
Sew the bottom
We cut out a circle from dublerin, the size of which exactly corresponds to 30 cm, i.e. we need a piece without an allowance, and fasten it with pins to the burlap. Be sure to center both pieces. Glue the duplicating material onto the burlap using an iron; iron the parts carefully, avoiding wrinkles and gaps.
To the resulting blank, from the side of the doubler, baste a circle of padding polyester, and then sew the parts on a sewing machine. The main part of the bottom is ready.
Dogs understand the connection between their body and their environment: self-awareness
Astrologers have revealed what the upcoming “Pisces season” promises for the zodiac signs.
Cryptochromes help plants see the world in a different light from us
Crocheted from rope or jute
Even if you don't know how to crochet, it's not as difficult as it seems. Do you like this basket model? It is suitable for any interior: from the most modern to the authentic.
Jute or rope is sold in all construction stores, on the market, in fixed price and many other places. The price will depend on the footage and quality. Jute can be different: in color, in shape, in thickness, in the material used (there is some that is prickly, with inclusions like natural wool; there is smooth).
Manufacturing
First we crochet the bottom. In this case, it is round (but can be made square). Evenly adding loops to increase the diameter; that is, we knit two loops into one loop of the previous row in the same places.
Then we stop adding loops and the knitting automatically goes up to the desired length of the basket.
The bottom diameter and height can be adjusted independently.
DIY knitted baskets
If you don’t know how or don’t want to knit a basket, then rope is still an excellent material for a basket. It can be simply glued together using hot glue. Just choose a thicker one.
Take any pattern as a basis. This could be a bowl, pan, container, etc. It will depend on what kind of basket you want: large, small, round, square, etc. And based on this request, choose a pattern.
And already on it we begin to glue it with rope from the bottom, simply gluing the strips together. Quite fast and beautiful.
Lifehack. Everyone used to have door mats made from jute. In the Soviet Union and the mid-90s, these were the only ones sold. They can also be used as an ornamental material for making baskets. Rows open easily. And they can be glued together in the shape of a basket. Only, of course, the rug will need to be washed thoroughly before doing this.
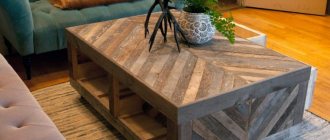
With finished wooden bottom
The wooden bottom can be purchased at arts and crafts stores. Any diameter and shape.
And crochet it as shown in the photo.
This same bottom can be taken as a basis; and glue jute, bamboo sticks, newspaper tubes, etc. onto it.
Master classes on crocheting baskets with step-by-step descriptions:
- Basket made of knitted yarn with a wooden bottom
- Crochet basket made from ribbon yarn
- Crochet basket
Original braid
A small basket will look great in the kitchen, acting as a bowl for sweets or a bread bin.
To work on the product you will need:
- sheets of newspaper;
- PVA glue;
- scissors;
- acrylic paints, brush;
- knitting needle;
- varnish, stain (optional).
The beauty of such a thing is that it can be made from scrap materials.
The whole essence of the originality of the work lies in the preliminary stage - the creation of thin tubes from newspaper. Weaving will be made from these.
To do this, you need to put a newspaper in front of you and determine the location of the paper fibers in it. This can be done by twisting a piece of newspaper lengthwise and crosswise.
Rolling paper along the longitudinal grain is easier and more accurate. It is along the longitudinal lines that you need to cut the newspaper into strips 7 cm wide.
Article on the topic: Openwork crochet scarf with ruffles: diagram and description for beginners
The newspaper fabric is tightly wound onto the prepared knitting needle. In this case, the knitting needle is positioned at an angle, as shown in the photo.
It should be taken into account that when the white newspaper strip is located on the right, the tubes will be white. This nuance will be useful for further painting of workpieces. The free edge of the newspaper strip is fixed with glue.
The required number of tubes is made using a similar method.
To weave a small decorative basket, it is enough to make 30 tubes 50 cm long.
All blanks are painted with acrylic paints in the intended colors, and then left to dry.
You can skip this step and paint the product at the end of the work. True, uniform coloring in the latter case will be more difficult to achieve.
The next step will be weaving from newspaper tubes. The work starts from the bottom of the basket. Ten tubes are arranged crosswise in pairs. In this case, three pairs are placed perpendicular to the remaining two and tucked under each other in a checkerboard pattern.
An additional, separate tube is folded in half and wrapped around the first pair. For convenience, this pair can be marked with a marker. The auxiliary tube crosses and circles the adjacent pair. This weaving principle is repeated in a circle with each pair.
The next circle is performed in a similar way.
Then the paired tubes are separated. In the third and fourth rows, each tube should be braided separately.
The ends of the auxiliary tube are brought upward.
Starting from the ray marked with a marker, the adjacent tube is braided, then the first one is brought up. The second tube repeats the previous action and is also bent perpendicular to the bottom of the product.
This type of work is carried out until all the rays remain at the top.
The last tube must be threaded into the loop of the first beam.
Another auxiliary tube will come in handy, which weaves around the raised rays in a well-known way, one at a time.
You should make four such lines in a circle.
If desired, you can dilute the weaving with beads, which are strung on tubes one at a time.
Article on the topic: Crochet mitts for beginners: diagrams with descriptions and photos
Weaving continues until the required height of the basket.
Three tubes should be left on the sides, the rest should be cut off, having first secured them with PVA glue at the base.
The ends of the tubes are connected to each other to form the handle of the basket. All that remains is to braid it. An additional tube is taken, which is fixed with glue on one side of the handle and tightly wrapped around its entire length.
To increase strength, at the last stage the basket is completely coated with PVA glue.
Advice! If the tubes have not been painted in advance, then the product is subject to final painting and decoration. Alternatively, you can use the decoupage technique.
The country style basket is ready.
Made from polypropylene thread
This thread is now quite popular among needlewomen and lovers of making crafts with their own hands. The thread is durable, not afraid of water, and easy to weave.
You can crochet a basket like this. It’s easy to knit: the bottom follows the granny square pattern , and then up three double crochets without any increases.
Crochet baskets
The bottom and height can be any.
At the end, double crochet a handle, attach it to the opposite side of the basket, and secure the thread.
This basket can be placed in the bathroom for cosmetics. You can even go into the forest with her if you tie her up more. And this one is suitable for a child who loves to collect mushrooms, pine cones and other gifts of nature.
Basket made of clay and polymer clay
If you have the opportunity to buy or dig up real clay, that's great! This material makes an excellent decorative basket. In the store you can also find polymer clay, from which it is quite easy to make any crafts, including baskets.
It is more difficult to sculpt from natural clay; it is better to sculpt a monolithic product and create an imitation of weaving (draw with a spatula or stick). Or make holes, also creating the appearance of a real basket. But it will be an eco-friendly, natural basket.
Polymer has its advantages:
- Easy to sculpt
- You can make tubes, ribbons, etc. from it.
- It's easy for her to weave
- No dirt
It looks a little like plasticine. There are many colors, spatulas for work and master classes on making all kinds of products: from interior items to jewelry. Article on the topic: Modeling from polymer clay: step-by-step instructions with real examples in the photo. Recommendations + master class
You can literally weave a basket from polymer clay, because the material is very malleable.
Materials and tools
Before considering the sequence of actions on how to make a laundry basket, you need to decide on the materials. Expensive components are not required to complete the work. As practice shows, in every home there are several options for what you can make an excellent basket from: fabric scraps, wooden planks, plastic oilcloth and even old newspapers. Typically, additional decoration elements and consumables such as glue and paint are purchased. The beauty of DIY is being able to turn unwanted items into beautiful and functional items for your home.
Before starting work, the basket needs to be designed: determine the dimensions, clarify the shape in order not to adjust the container already during the execution process.
Depending on the execution technique, different materials may be needed:
- for a basket of newspaper tubes you need newspapers, glue, clothespins, scissors, cardboard and a knitting needle;
- for a product on a wooden frame you will need solid slats, plastic and metal tubes for guides, fabric, bolts and nuts for fastening, threads and buttons for working with fabric, scissors, a needle or a sewing machine;
- if the basket is made on a plastic frame, then you need a base - a stationery basket, as well as rope, cord or yarn, a glue gun, fabric, scissors.
From putty, rotband, cement
The results are excellent, durable baskets. They are made quite simply.
You need a dry mixture of one of these building materials. We dilute a small amount in a bucket, gradually adding water and vigorously stirring until the consistency of sour cream.
This mixture turns to stone quite quickly, so keep this in mind when making the basket. In 15 - 20 minutes it will harden in the bucket.
Then we take a pre-prepared template. This can be a plastic bowl or container of the desired size. The template is not required. Many people use a regular plastic bag to give the desired shape.
Coat with the diluted mixture evenly, approximately 2 - 3 centimeters thick. Try to avoid any voids; it is better to use a small spatula or do it with gloved hands.
Don't forget to cover your work surface!
In this example, the basket is made of putty. It is better to use rotband or cement, it is more durable.
If you want to add some elements, do it right away. These can be stripes that imitate weaving. Or leaves (you can attach a real maple or any other leaf, you will get a beautiful imprint; apply it, it is fixed, carefully remove it). And leave the basket until completely dry. The time will depend on the thickness of the walls, air temperature, humidity and other parameters. It usually takes from 3 to 7 days to harden.
After drying, the basket can be painted in any color and coated with a protective varnish.
If you have an old basket, it is perfect for decorating with cement. Just dip it in a mixture diluted with water and let it dry.
From the vine
In Russia, vine is found almost everywhere, so products from it have been made since ancient times. And now they have regained their popularity. Baskets made from wicker are strong, durable, and beautiful.
You'll have to go into the forest to get some twigs. But it's worth it.
How and when to harvest vines
The vine can be cut down or broken off year-round. But before you do this, you need to check the bush. Without breaking off the rod, bend it to the ground. If the rods bend well and do not break or crack, then they can be used for weaving.
Some tips:
- Use straight rods
- Give preference to length. 10 long rods are better than 20 small ones. There will be fewer attachment points during the weaving process.
- Cut rods of the same thickness
Before weaving the basket, the vine is sanded, freed from bark, and dried in the sun.
Handles and lining
For two handles, select 2 pieces of cotton fabric measuring 7.6 x 40.6 cm, also prepare two identical pieces of duplicating material measuring 5.7 x 40.6 cm. Using an iron, glue the dubbing material to the main fabric, placing it strictly in the middle of the cotton details. Sew the fabric along the long edge, turn the resulting strips right side out, and iron.
The lining of the basket is sewn according to the same principle as the main part of the product, with the difference that it does not need to be reinforced with duplicate materials. First, stitch the rectangle along the narrow edge, then, marking the bottom in quarters, baste or pin both parts with tailor’s pins. Sew the lining along the main seams, and if possible, overcast the seams to prevent the fabric from fraying. Leave the lining right side inward and press the seams.
Meteorologists: you shouldn’t wait for spring in Moscow before mid-April
People with Covid-19 and those who have been in contact with others may be prosecuted
Feed is becoming more expensive: chicken meat and eggs may become more expensive in Russian stores
From the twigs
Not only the vine is suitable for weaving baskets, but also other twigs that are in the forest.
They are woven, glued, and connected with thread.
Twigs from raspberries, blackberries and other climbing berries are suitable: they are dense, long, and do not break.
It is better to cut thin trunks in mid-summer; it is easier to weave a basket from them.
From straw and grass
The grass is folded into small long bunches and then woven together with thread. You can do this using a thick thread and a needle, or twine.
It is better to dry the grass in the sun to make hay. Such straw will be more pliable to weave, and the basket made from it will be durable.
Wicker baskets
Willow twigs (vine) are suitable for weaving baskets. Willow is easy to find along the river bank, but it should only be cut in the fall and spring when the branches are flexible. The harvested branches must be soaked in water for two weeks, changing the water daily. Then remove the bark from them and dry them.
The bottom is woven from eight rods, with holes pierced in half of them with an awl to obtain a cross. Encircle four twigs with two branches. This is how two circles are woven. Next, all 16 rods are braided separately. At the very end, another rod is added. Then the racks are bent to form a right angle and continue to weave to the full height. The last row is braided. For the handle, take a thick branch and braid it in a spiral with thin ones. The basket should dry within 2-3 days.
With such crafts, you can go to the forest to pick mushrooms, berries and herbs, and put fruits and vegetables from the garden in them.
If the basket is made oval and larger, then you can even carry a newborn baby in it.
Basket weaving options
These methods are suitable for weaving from any material. You can use thread, glue, or weave tightly, without auxiliary materials.
We showed many options for weaving baskets with your own hands from scrap materials.
Once you start making them, you'll probably wonder if it's worth it, since all kinds of baskets are sold in stores.
Indeed, now the assortment is huge. From simple fixed-price baskets to baskets made of natural materials, wicker, birch bark.
It's up to you to decide, but it's worth trying to make a basket with your own hands, maybe you will find your purpose in this creativity and, perhaps, even build a business on this hobby.
Now all handmade products are highly valued. And it’s always nice to have handmade things in your apartment or dacha; they are definitely more advantageous than store-bought ones.