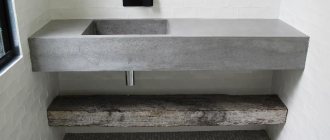
Designers have increasingly begun to use concrete as a material to create lamps and chandeliers. Despite their heavy weight and coldness, such concrete products are suitable for any interior. To do this, it is enough to give the cement a suitable shape, decorate it gracefully, and paint it in the color of gold, silver or copper. If you have some skills and knowledge, you can create cement lamps with your own hands. This will require a minimum of materials and time. Below are a few notable methods.
Lighting fixture made of cement using a package
To create an original lamp you will need:
- milk carton to create formwork;
- plastic bottle for attaching a light bulb;
- dry cement mixture to create a suitable shape.
The size of the cardboard box is not of fundamental importance. It all depends on how big the lamp should be. The main thing is that the package is waterproof, since excess moisture causes concrete to lose its strength characteristics. The folded edges of the box need to be trimmed and a plastic bottle placed in it. The structure should be secured with bolts that are threaded into holes previously made with a nail or screwdriver. To maintain the waterproofness of the bag, the joints should be lubricated with sealant. This is a simple way to prepare a form for pouring concrete.
The dry mixture should be diluted with water according to the instructions on the packaging in which it is sold. It is important here not to pour in excess water. The thickness of the filling should be similar to cookie dough. It is recommended to add water in portions so that every particle of cement gets wet. The finished mixture must be thoroughly mixed twice. When the desired consistency is achieved, the prepared form is filled. When laying concrete, it is important to compact it well so that voids do not form. At the end, you should thoroughly shake the future lamp. These actions will remove residual air.
The utensils and tools used must be immediately cleaned and thoroughly washed to remove concrete. Otherwise, you will have to throw everything away when the mixture hardens. The finished form is left for two days, as the concrete needs to set. Then the packaging is removed and the bolt is unscrewed. To make concrete lamps look original and the light to be more diffused, you can drill several holes in them. A socket with a light bulb is inserted into the prepared form from a plastic bottle, the wires are connected to the switch, and the product itself is hung from the ceiling or on the wall.
Return to contents
Candlesticks
An ordinary cardboard milk box was used (found on chezlarsson).
You can play with the shapes and sizes of the products (found on inmyownstyle).
To create original crafts, absolutely any available materials will be useful - coins, adhesive tape, plastic cups, baking dishes (found on sayyestohoboken, signepling and naver).
Used the bottom of a plastic bottle (found on ellasinspiration).
And then the master found a use for a simple tin can (found on monsterscircus).
A little imagination, and here you have an original little thing (found on nimidesign).
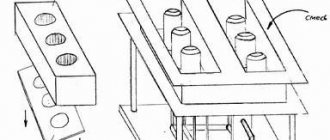
Lamp using a bottle (hanging)
Making a concrete lamp using a bottle.
Other, no less interesting, are suspended concrete lighting fixtures. The products are easy to make with your own hands. To do this, you will need a strong cement-sand mixture with stone or gravel as a filler, a small amount of water, a socket, a cord, a switch, wood screws, two plastic bottles of different sizes, a lamp socket, an auxiliary tool in the form of a knife, drill, tubes with carving
At the first stage, bottles are prepared. The bottom is cut off and holes are drilled for a threaded tube. The cartridge is fixed with nuts and screws on both sides. In this way, a form for a concrete lamp is prepared. After this, you can begin mixing the cement-sand mixture. When the mixture is ready, use a spoon to fill the mold, lightly squeezing from the edges. This is done in order to release unnecessary air and distribute the mixture evenly.
After the concrete has hardened, the plastic is cut off with a knife and the screws are removed. Since the concrete will have a rough shape, it is recommended to sand the surface with 120-grit sandpaper. The last step is to connect the cord through a metal tube to the socket and to the switch. Finally, it is important to check the fastenings thoroughly so that they can support the significant weight of the concrete. Concrete ceiling lamps are made in this way.
Return to contents
DIY conceptual LED lamps made of glass and concrete
Glass, concrete and LEDs are combined in this product to create a modern, original and stylish lighting element that will be a wonderful addition to the interior. Details of the manufacturing process are in the given master class.
Materials
To make an LED lamp with your own hands, prepare:
- LED garland;
- cylindrical glass vase 26.5 cm high;
- PVC pipe;
- concrete mixture;
- miter saw;
- hot glue gun and hot glue sticks;
- cling film;
- electrical tape;
- hacksaw;
- stationery knife;
- drill;
- grinding machine;
- plastic bottle;
- foam adhesive tape;
- nail;
- a piece of plywood or wooden board.
Step 1
. Cut a piece of PVC pipe approximately 13 cm high. This will be the mold for the concrete base of your lamp. Adjust its height yourself. The diameter of the pipe for this project will depend on the diameter of the vase you use. There is no need to process the PVC part; it will become the outer wall of the mold for the concrete base.
Step 2
. The cylindrical base of the lamp with an empty recess inside is to be made from concrete. To make it, you will need a small plastic bottle, which needs to be cut in height approximately 2 - 3 cm lower than the outer part of the mold.
Step 3
. At the top of the concrete lamp base there should be a small rim on which the vase will be placed. To make it, glue foam adhesive tape to the inside of a piece of prepared PVC pipe.
Step 4
. Cover the bottom of the mold with cling film and secure it with electrical tape.
Step 5
. Dilute the concrete mixture with water in the ratio specified by the mixture manufacturer.
Step 6
. Place the prepared part of the pipe on a piece of plywood. Place an upside down, trimmed and empty plastic bottle right in the center of it.
Step 7
. Gradually begin pouring the concrete solution into the mold. Periodically tap the wall of the PVC pipe with a rubber hammer so that parts of the solution settle to the bottom and do not rise up. As the material is poured, the plastic bottle may be pushed upward. Take a nail and lower it to the bottom.
Step 8
. Take a grinder and use it to create vibrations to shrink the concrete solution. During this process, continue to hold the bottle with the nail.
Step 9
. Leave the entire structure to dry completely. This process may take several days.
Step 10
. You need to remove the resulting concrete base for the lamp from the mold. To remove the concrete layer from the bottom side, gently tap it with a hammer.
It will be easy to remove the mold if you have greased it with oil first. If you poured concrete into an unprepared mold, make two small cuts on it with a hacksaw or saw, and remove the PVC part.
Step 11
. Sand the resulting workpiece with sandpaper or a sander using a 60-grit attachment.
Step 12
. Drill a hole in the top to accommodate the wire connected to the plug or other power source. From the bottom, make a small groove for the wire. This will ensure that the base of the lamp is stable on a flat surface.
Step 13
. Thread the wire into the prepared hole and secure it in place using hot glue.
Step 14
. Connect the LED garland to the wire. Carefully place it in the vase. To do this, pre-wind the product on any cylindrical object. Cover the concrete base with a makeshift glass cover.
The lamp is ready.
DIY conceptual LED lamps made of glass and concrete
3.8/5 — Ratings: 75
Similar articles:
- DIY brick and concrete barbecue table
- DIY bench made of concrete and wood
- DIY decorative concrete stones
- DIY concrete night light
Concrete garden lamp
Concrete lighting fixtures for the garden look very good. They not only fulfill their main purpose, but also perfectly decorate the space. You can make them quite easily with your own hands, just follow the instructions below.
The first step is to make the formwork from a 1.2 cm thick plywood sheet. It is important to design the form so that it can be easily disassembled at the end. It is recommended to open the components of the mold with varnish. This will help in the future to separate it from the hardened concrete without damage. If you repeatedly open the formwork with varnish, the finished concrete lanterns will acquire a corresponding shimmering shine.
At the second stage, it is important to carefully consider the wiring method. Two versions are offered:
- Use corrugated plastic pipe as internal formwork.
- Making a wire mold from pieces of foam.
The second method is more acceptable, since the weight of the lantern is reduced and cement is saved. You can connect the foam together with a special glue. After the concrete hardens, the material is easily separated. If pieces remain in hard-to-reach places, there is always the option of using acetone. As a solvent, it easily corrodes foam.
Formwork for a lamp made from a milk carton.
At the third stage, the internal formwork is created. For its manufacture, plywood or cardboard is used. It is important that the wall thickness is more than 2.5 cm. It is recommended to use a trapezoid as a shape. This formwork is easier to remove, especially if you pre-treat the walls with oil. Foam grooves for the wire are laid in the opening.
The cement mixture can be prepared from a ready-made dry mixture, but it is also possible to prepare the composition yourself. For the second method, it is recommended to use M500 cement in a ratio of 1:3 to sand. Gravel or granite chips are used as an additive. One part of this filler is enough. Add water until the mixture is neither too dry nor too wet, with the consistency of cookie dough. This will be the fourth stage.
At the fifth stage, the formwork is filled with the finished mixture. To do this, cement is first placed in hard-to-reach places so that the edges of the lamp are even and smooth. Then the rest of the formwork is filled. To do this, it is recommended to use a vibrating grinder, with which the mixture fits more tightly into the mold.
To prevent water from escaping from the concrete and for it to gain strength, after pouring and compacting it must be covered with plastic film. The future lamp is left in this form for at least three days. However, it is recommended to wait longer for the cement to become sufficiently strong. After the holding time has expired, the formwork is removed, the finished surface is sanded and the light bulb is connected.
Return to contents
Buy GHERY cement lamps in the online store
In the Svetomaniya online store you can buy the following types of devices from the GHERY collection:
- Wall sconce for 2 lamps, 150 mm high and 105 mm wide, with G9 base and 43W power per light source;
- Chandelier with 3 shades on pendants, adjustable within 500-1500 mm, with GU10 base and 50W power per light source;
- A chandelier with 1 suspended shade, also adjustable in height from 500 to 1500 mm, has a GU10 base and a power of 50W.
All lamps are certified and have a manufacturer's warranty. The degree of dust and moisture protection of IP20 devices limits their area of use to dry and dust-free rooms - a concrete chandelier or sconce can be placed in the living room, hall, bedroom, etc. Advanced product design will add special expressiveness to any interior.
To purchase lamps from the GHERY collection or other Mantra products (for example, ceiling lamps), please contact our specialists.
Conclusion
Concrete has long ceased to be a building material used exclusively for the construction of buildings, pouring screeds, and laying out foundations. Today it is used for decorative purposes. Cement is suitable for creating beautiful and original vases, candlesticks, chairs, garden tables and flower pots.
This material is accessible, low cost and easy to use. And most importantly, to create decorative masterpieces, a minimum of materials and quite affordable tools are enough.