Natural wood
The cut of the log is covered with stain or varnish, after which a clock mechanism is installed on it.
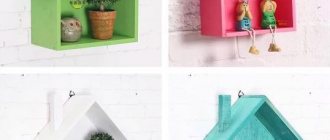
The basis can also be ordinary boards, tightly joined to each other - such a basis is sawed off along the edges to obtain a square, oval or traditionally round shape.
Some craftsmen can make beautiful wall clocks from sheets of ordinary plywood. Arabic and Roman numerals are cut out of it on a machine.
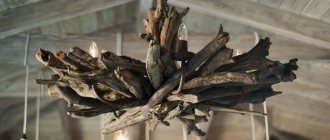
No less interesting are models that have thick branches or pieces of wood at their base. You can make a chronometer that looks like a cuckoo's house from sticks and small branches.
Pocket products
The outdated devices are considered an outdated version; in the past, men hooked them on a chain and carried them in their pockets. Let's try to recreate this intricate look:
- Let's draw double circles.
- We select decoration plates from below and above.
- To the top part we add a fastening mechanism with a rounded rim for the chain, under which there is a wheel for setting the time.
- We place Roman numerals around the perimeter.
- In the center we add two more circles with the usual digital dialing.
- We depict arrows pointed at the tips.
At the final stage, we paint the clock with a pencil, giving it realism with chiaroscuro.
Stopwatch
This attribute, unlike clock mechanisms, only shows rapidly flying seconds. The numbers 60 and 30 are mirrored vertically, and 15 and 45 horizontally. The spaces between them are filled with appropriate divisions, starting with 5.
The only arrow works, and at the top we draw a button that starts the time countdown. Such accessories are especially in demand at sporting events and training, army training, and physical education at school.
Old vinyl records
With the help of beautiful drawings using the decoupage technique it is easy to transform old records. How to properly decorate a wall clock and prepare the surface?
First you need to sand it down with very fine sandpaper to remove any remaining stickers, making the surface as smooth as possible.
Using a jigsaw, the necessary silhouettes are cut out of the plate.
The original “flowing” form can be obtained in a simple way:
- the plate is heated in the oven at 180 degrees for 2 minutes;
- the heated material is placed on a flat wooden surface, then the vinyl is pulled out and bent, giving the desired shape;
- install the clock mechanism in the center.
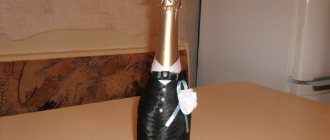
Subtleties of wristwatches. What to do with them?
There is no limit to creativity! You can even make your wristwatch original and exclusive. But in creative stores you are unlikely to find the necessary mechanism. To do this, you will either have to disassemble your old watch or deliberately buy an old one at a flea market.
But to do this job, you need to have special skills and tools. This type of work is more complex and serious, as it is considered a craft.
If in doubt, look on the Internet, look through photographs of sketches of various watches on your wrist, and take a closer look. It is quite possible that you will decide to master this art.
Sea stones, shells
There are often photos of unusual decor of wall clocks made of sea pebbles or shells. To fix such material to the base, use a silicone gun or transparent thick glue.
This product will decorate not only the dining room and kitchen: it looks elegant in a bedroom or living room decorated in a marine style.
Stones and shells are usually glued to the bottom of the base; the edging of the chronometer is made using a thick cord, which can be laid out in waves and decorated with small knots.
We recommend reading:
DIY polymer clay jewelry: review of the best master class with step-by-step instructions for beginners (150 photos of original ideas)- DIY polymer clay flowers (120 photos of the best ideas) - simple instructions with full description + master class and video tutorials
Quilling for beginners (200 photos) - step-by-step instructions with description. The best master class on creating quilling crafts with your own hands
Decoration techniques. What to choose?
In general, it all depends on you, your imagination and your desires. Here are a few basic techniques that you can take a closer look at:
- Decoupage - attaching a pattern or ornament to a base, varnishing;
- Quilling is the process of creating a pattern by twisting strips of paper;
- Elements of scrapbooking - creating collages using photographs or drawings;
- Working with epoxy resin - filling the mold with resin with the addition of various decorations (sparkles, rhinestones, dried flowers);
- Painting with acrylic paints in various styles;
- Using strains to emboss ornaments;
- Embroidery;
- Use of wooden blanks.
Decide what is closer and clearer to you. Perhaps you are already familiar with some technique, or maybe you have long wanted to try yourself in a new style - this is a good opportunity.
Plastic spoons
Original wall clocks are made from plastic spoons - using them, you can easily get the shape of a flower that will frame the chronometer.
Step-by-step instructions for decorating a wall clock will help you quickly assemble such a model:
- a circle with a central part suitable in size for the chronometer is cut out of plywood 5-8 cm wide;
- handles are removed from plastic spoons (at least 250 pieces are needed to work);
- placing the cut tails towards the middle, glue them over a plywood circle (use a silicone glue gun);
- cut out a circle from foam plastic, creating a recess in it for the clock mechanism;
- plastic spoons can be painted with special paint or left white.
Do-it-yourself large decorative clock with a diameter of 1.5 m for New Year's filming in a photo studio
Do-it-yourself large decorative clock with a diameter of 1.5 m for New Year's filming in a photo studio
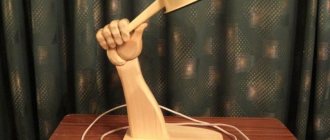
I am a photographer and for the ambiance of the New Year's location this year, I needed a large watch (1.5 meters).
-Part 1 - Idea-
What was needed was a design that was easy to move, but massive in appearance, and at the same time quite durable. I decided on the front part right away; its basis was an advertising banner, onto the surface of which the sketch of the dial I developed was transferred and printed. I prepared the layout of the dial image in the vector editor CorelDRAW. In it I drew the most suitable dial in style. It was decided to make the background under the Roman numerals in the form of cracks in the stone, and by adding “krakens” I “aged” it, making it more stylish. -Part 2 - Frame - With the frame everything turned out to be much more complicated. After going through the possible options, I opted for strips of MDF, 8 mm thick and 70 mm wide, which I had left over from the door work. I had 4 strips, 2000 mm long. According to my calculations, with a bending radius of R=775 mm, the strips should bend easily, without much risk of breaking. According to my plan, I had to create a circle with a diameter of D=1550 mm. Join the ends of the strips - coat them with wood glue, and fasten them with self-tapping screws along the outer diameter, with pieces of the same MDF (in these pieces, holes were pre-drilled in a checkerboard pattern at a distance of 60-70 mm)
This is in theory.
In practice, the following happened: a self-tapping screw entering the strip added tension (the strength of the material is in my hands :)) at the bend. Having made the frame, I left the glue to dry, but when I came to the studio in the morning, instead of a circle, I discovered the shape of a drop - one of the joints, unable to withstand the tension after fastening with self-tapping screws, burst. I had to go a different route. It was decided not to connect the joints with pieces, but to make an overlapping ring, fastening the free ends of the strips with self-tapping screws. At the same time, large inserts were being prepared: a long section was tied together with a rope in the manner of a hunting bow. The created ring and the improvised bow were sprinkled with water from a flower spray bottle and left to dry for two days. Two days later, the rope on the “bow” was untied, while the MDF retained its curved shape. Next, a curved insert was attached to the joints of a large hoop. To prevent the frame from becoming an oval, when installing it vertically, cross-shaped spacers-spokes were installed inside it.
To make them, I used dry timber 25 x 25 mm. The two main spokes were connected by central grooves to each other and formed a cross. The remaining 4 were inserted into the spacer, from the inner corners of the cross-shaped middle - to the inner part of the hoop, then the ends of the knitting needles - were attracted with self-tapping screws from the outside of the hoop. All connections were accompanied by spreading glue on the wood. -Part 3 - Front surface - The finished frame had the shape of a circle, with a diameter of D=1550 mm. and kept its shape perfectly. Having taken the banner with the printed dial design, I laid it on the fabricated frame, placed it strictly in the center, and cut off the excess banner. Taking a stapler in his hands, he began to staple the free edge of the banner to the back of the end of the hoop. In order to evenly tension the banner with a “drum”, fastening is done using the “star” method, when the banner is pulled each time from the opposite side, with an offset, from each subsequent fastening with a stapler (for example, the same principle is used to tighten the crankcase cover, or the cylinder head cover in a car). The remains of the banner, after tensioning, are folded and pressed with a stapler. -Part 4 - Hands - The dial is ready, but the most important thing is missing - the hands. The layout of the hands is done together with the design of the dial, all in the same vector editor CorelDRAW. Then it is printed on a regular laser printer, on several sheets. The sheets are glued together with tape and cut out along the printed outline with scissors to create arrow templates. In “stationery supplies” I bought thick cardboard, 1.4 mm thick. Having attached the paper templates of the arrows and secured them with tape to the cardboard, I traced them with a pencil. Using a scalpel for creative work, I cut out hour and minute hands from cardboard, as well as cardboard washers for laying between the hands, and sanded all the edges with fine sandpaper.
To paint the hands, we chose acrylic interior paint and a black color for it. So that when painting the arrow does not “lead”, painting was carried out alternately on both sides and with the necessary time for the layers of paint to dry. To attach the finished hands to the center of the dial, fittings were purchased - fastening the glass through a hole drilled in the glass. The fastening consists of two parts: a sleeve on one side of which there is a left-hand threaded connection, on the other end there is a hole with a side for fastening to the surface with a screw or bolt, the second part is a bolt with a mating threaded connection and a flat head. I drilled a hole through the banner into the wooden cross of the spokes in the center of the dial and screwed in the threaded fittings sleeve with a self-tapping screw.
I placed the finished hands on the fittings bolt, through a cardboard washer, and screwed them to the bushing installed in the center of the dial. The main part of the fake watch is ready. Now you need to visually brighten up the uneven edges of the banner on the hoop frame. -Part 5 - Finishing aesthetics - Since past years, I have had decorative flexible “vines” of fir branches, with beautiful cones, sprinkled with artificial snow. It was decided to place them around the entire circumference of the clock.
In a hardware store, we bought plastic, loop-shaped cable holders, as well as plastic clamps 3 x 150 mm. Along the entire perimeter, on the outside of the hoop, at a distance equal to 5 minutes of the dial (30 degrees), cable holders were secured with self-tapping screws.
Covering the perimeter of the dial with a spruce “liana”, we attract it with plastic clamps, threading them through the eye of the cable holder.
-Result- The finished clock fully corresponded to the conceived idea and fit perfectly into my location. Materials and fasteners used:
- MDF strips 2000 x 70 x 8 = 4 pcs.
- Beams with a cross section of 1500 x 25 x 25 = 4 pcs.
- Self-tapping screws 4 x 15 = 20 pcs.
- Self-tapping screws 4 x 25 = 60 pcs.
- Accessories for glass = 1 pc.
- Loop cable holders = 15 pcs
- Clamps - plastic ties 3 x 150 = 20 pcs.
- Carpenter's glue - Moment Stolyar express = 1 tube
- Acrylic paint for interior work = about 100 g.
- Color - black = 1 jar
- Stationery cardboard 60 x 40 x 1.4 = 2 sheets
- Fine grit sandpaper
- A stapler with staples, a screwdriver, a scalpel and other tools were available.
Author: Alexey Golubev Source: www.drive2.ru/c/546699722392338562/
Cups and saucers
You can make original products yourself using serving cups and saucers. Bright products will become an accent element of the kitchen or dining room interior.
Making such a model is incredibly simple - the work will take no more than an hour:
- a base circle is cut out of a sheet of plywood, a hole is cut in the center for installing a chronometer;
- the plywood base is painted with paint in a matching color, after it dries, the dial marks are placed;
- using silicone glue, fix it on the saucer marks;
- After waiting for the glue to dry (after 20-30 minutes), glue the cups to the saucers.
Places for gluing cups are pre-treated with fine sandpaper for more reliable fixation. For work it is better to use light cups.
Rules for using wristwatches
There is a stereotype that a wristwatch should only be worn on the left hand, regardless of gender. But in reality this is not so important. You will not offend anyone if you are much more comfortable wearing a watch on your right hand.
For men, the choice of hand mainly depends on the functionality, convenience and safety of the watch. For a woman, combination with other accessories is more important. Therefore, everything depends on you. Creative success!
Textile
Textiles for decoration can have bright colors, interesting patterns or textures. The work involves linen, satin, cotton, jacquard, organza and even burlap. Gluing three-dimensional decorative elements to textiles is easy. Usually these are clay figurines, twigs, dried flowers.
Sometimes the fabric is pre-embroidered with acrylic thread, beads, satin ribbons, sequins, large beads are sewn on, and rhinestones are glued on.
In addition, jute thread, thick cords, weaving and knitting are used in decoration, based on the general style and structure of the fabric. The finished base fabric can be quite dense or delicate, openwork.
We recommend reading:
DIY paper orchid - a review of the best ideas and tips from craftswomen. Step-by-step instructions + master class (photo + video lessons)- DIY paper hyacinth: the best master class for beginners with step-by-step instructions and diagrams from A to Z (130 photos)
- Paper stars - instructions on how to quickly and easily learn how to make beautiful stars with your own hands (100 photos of finished works)
To maintain their shape, it is recommended to starch or coat openwork products with glue. Dry them on a flat surface, fixing them with a press if necessary.
Materials for work
First, a person needs to understand what materials the thing will be made from. The main thing here is not to adhere to standards, you need to use your imagination a little, watch master classes on watches with your own hands. You can use various decoration methods, depending on the style of the room.
For example, the following types of materials are used for the base:
- Baking molds;
- Cutting boards;
- Pan paint;
- Pan;
- Cork-based substrates;
- Plastic boats or forks;
- Discs or records;
- Dishes;
- Tree;
- Metal plates;
- Glass.
If you don’t have enough imagination or don’t have suitable materials at home, you can purchase them in craft stores.
For example, the wall surface itself can be a clock face. It can be decorated at will with various decorative elements and a mechanism can be installed.
In most cases, there will always be old watches at home that are no longer needed and no one will use. Then the mechanism can be removed from them and installed on a new product. It is important to pay attention to the fact that the technical part must fully correspond to the dial.
The following parameters need to be checked for compliance:
- Thread size;
- Base thickness.
The length of the rod must have enough space for the base of the product, as well as for the nut that secures the structure. If there are volumetric elements, you need to check that they do not interfere with the movement of the hands along the dial.
Jute thread and leather
You can make some kind of twigs from jute - after immersing the threads in PVA glue, they are laid out in interesting patterns with ornate weaves. The frozen imitation of branches is decorated with beads and rhinestones.
You can also create an original frame for a chronometer at home using a voluminous cord woven from strips of leather. This design perfectly combines wooden elements and a variety of textiles.
Old newspapers and magazines
Old magazines and newspapers are great for decorating watches.
Individual sheets are rolled into a thin tube in a spiral, fixing the ends with glue - an original artificial vine is obtained, which can be woven into a frame in the form of a square or circle.
Geometric shapes cut out from magazines are glued into abstract patterns to decorate the watch mechanism, the edges are fixed with glue.
Kitchen clock made of cardboard
There are instructions on how to make a watch with your own hands, which will help you create a real masterpiece. For example, the product can be made of cardboard. At first glance, this material seems neither practical nor presentable.
If you look at it carefully, it has many advantages. The work is easy, and technical equipment will not be difficult to replace if a breakdown occurs.
To create a kitchen accessory you will need the following tools:
- Plastic plugs;
- Thick cardboard;
- Mechanism;
- Marker;
- Acrylic based paints.
At the first stage, you need to draw an oval on the cardboard; a compass is used for this. Then the points where the numbers will be located are plotted. Plastic plugs are glued to these places.
The numbers are drawn with a marker and acrylic paints. Using an awl, a hole is made in the center for the mechanism. It is installed together with the arrows.
There are quite a lot of products that are made on the basis of cardboard. If you watch master classes by experienced craftswomen, you can choose the best ideas for watch frames.
Quilling
An original background for decoration is obtained using ready-made paper strips - this greatly simplifies the work. The decor turns out to be voluminous, which must be taken into account when fixing it under the mechanism.
You can place patterns collected from quilling in the places of the numbers. Small paper figures are also placed outside the base.
We recommend reading:
A paper crown is a simple instruction for creating original jewelry with your own hands. Templates, diagrams, master class, exclusive design (110 photos)Weaving from newspaper tubes for beginners: the best free master class, with step-by-step instructions. Photos, diagrams, unusual ideas, videos
Paper rose - how to make it yourself? Step-by-step instructions, original ideas, photos, videos, master class
This way you can create an original watch frame or even a full-fledged painting. These can be images of people, animals, musical instruments.
Alter-scrap, or a new life for the alarm clock
Do you still have an alarm clock in the house? On legs, with a “hat” and bells? You will have to work hard and buy something, but you will not find such a thing in the store. Decorated with floral arrangements and other decorative materials (they are available in scrapbooking stores), an alarm clock placed on the mezzanine will become the most fashionable interior detail in shabby chic and vintage styles.
There are a lot of options for decorating clocks for the interior that will decorate the walls of your home. The base for the dial can be knitted and embroidered, burned on wood, laid out with a mosaic of pebbles, beans, painted with acrylic paints - only your imagination can create something that will delight your friends and decorate your home.
See alsoHow to beautifully decorate a wall with photographs
Butterflies
The idea with butterflies is good for creating a new mechanism. A large butterfly is cut out of a vinyl record, and small insects are glued around the perimeter as a frame.
Several moths flying into the distance look fascinating. The smallest ones can be placed under the chronometer, larger moths can be glued diagonally or vertically above it.
Colored or metallized cardboard is also suitable for making butterflies.
The heart of the watch is the clock mechanism
An integral attribute of any chronometer. Modern mechanisms are distinguished by a variety of design solutions and the quality of materials used in their production. Such devices are divided into two groups:
- mechanical;
- quartz.
You can determine which category a chronometer belongs to visually: just glance at the second hand. If its movement can be described as continuous and silent, then you have a product with mechanical filling. Is the move abrupt and nervous? The watch is quartz.
Photo of watch decor
Did you like the article?
1+