Topiary ball
Homemade topiary balls are preferable to purchased ones: they are simple, convenient, cheap, and most importantly, the required diameter is always at hand. The easiest way is to make a ball from newspapers and any scraps, compress it with wide tape. You can also use a combination of padding polyester and knitting threads. In general, whatever is at hand. Details about balls for the tree of happiness: .
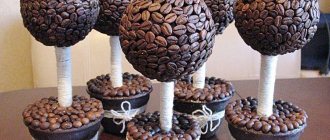
Advice! Always use a ready-made foam ball (you must first paint or wrap the base so that the foam does not melt) if you are planning a coffee topiary: it is convenient to glue the beans onto the foam. In addition, if the goal is to reduce the weight of the product as much as possible, also use a blank.
DIY topiary for beginner needlewomen
The “Seasons” tree of happiness is made very simply and quickly, inexpensive materials are used. The master class involves 3 thematic designs: New Year's, autumn and floral or spring topiary.
New Year
Autumn
✔ Detailed master class - a do-it-yourself tree of happiness for beginners “Seasons” with photos and videos: .
topiary trunk
An elegant topiary in 90% of cases is obtained only with a curved trunk . And again, the easiest way is to prepare the trunk yourself: use a dry branch of corilus (they have characteristic curves), willow, apple tree, walnut or any other tree. First sand the branch with sandpaper.
Advice! Before use, check the strength of the branch to ensure that the trunk does not break. In addition, the branch must be extremely dry: upon contact with gypsum, the damp trunk gives up moisture, dries out and becomes loose!
It is no less convenient to use purchased trunks, called salex, sold in bundles of 10 pieces. These branches are already prepared and come in different colors. The standard length is 30 cm. The thickness of the trunk depends on the weight and size of the crown.
Popular materials
Answering the question - what is a topiary trunk made of - is quite simple. To solve this problem, almost any oblong-shaped object at hand is suitable. As a rule, when making a barrel they use:
- a wooden or metal stick or tube;
- tree branch;
- wire of various thicknesses;
- sushi sticks;
- cutlery (spoons, forks);
- a bunch of pencils (although extremely rare).
Sometimes, when the source material is very thin, two or more components can be connected (for example, you can fasten together a pair of sushi sticks, 3-4 thin wires).
A wire topiary trunk is a point that deserves special attention. Using this material, you can make crafts with either one or two trunks. In addition, these tables can be flat or curved. Often, when using wire, preference is given to curved trunks. Making them is extremely simple: the material bends the way the master himself wants. Topiaries with a curved leg (or legs) look more elegant. As a rule, this type of execution is suitable for creating gift trees of happiness.
However, wire is not the only material that can be used to make a curved barrel. For this, an already bent tree branch or a metal stick (or tube), which was also originally bent, is suitable. On the one hand, choosing alternative materials saves the time required to give the wire the desired look.
Remember! Quite often it takes much longer to find a suitable branch or stick, so the mentioned advantage is dubious.
The barrel made from cutlery deserves special attention. Such items are used only when creating topiaries in the floating cup style. The choice falls on spoons or forks for two reasons:
- they are pliable enough to be bent (when creating the mentioned crafts, this property of the trunk is necessary);
- spoons and forks are strong enough to support the weight of the cup (which means wires are not suitable here).
We have figured out the material from which the topiary trunk is made. Now we need to answer the question - how to secure the trunk in the pot.
Attaching topiary to a pot
Filling with plaster or alabaster is the best choice for securing topiary in a pot. It is convenient to mix the solution directly in the pot, if the size of the container allows it. Pour in plaster (alabaster), add water, knead until it reaches the consistency of thick sour cream, and install the barrel. The fill (gypsum) sets in 2-3 hours and dries completely in 24 hours. Alabaster sets and dries much faster. The time depends on the volume of the pot, the temperature of the water (the warmer, the faster) and the quality of the mixture.
Don’t forget to add pieces of foam plastic, sponges or foil rolled into balls to the pot (especially a ceramic, glass or clay one) so that the plaster does not split the container as it expands. All the secrets for pouring plaster and other methods are in a detailed article:.
If you don’t have time to wait for the plaster to dry (the moisture will finally evaporate only after a day), use an alternative method: we attach the trunk to the bottom of the pot on plasticine, tightly lay pebbles around it (dry chestnuts, crushed stone, shell rock or any material that will not deteriorate upon contact with hot melt glue), sprinkle with small shells or pebbles in layers. We glue each layer generously! The fastening sets very firmly and you can immediately continue work.
Trees of happiness: home topiary
Topiary. What is this?
Topiary is called the tree of happiness. This is a kind of offshoot of landscape design. Even in ancient Rome, there was the gardening art of topiary, which involved cutting trees and shrubs to shape. By the 21st century, connoisseurs of beauty had a desire to contemplate topiaries not only in the garden. This is how home topiary appeared. A stable composition on a solid base, reminiscent of wood. As a rule, topiary is round, but if desired, it can be given any shape. Some craftsmen even make topiary from dry branches so that the crown is not round, but spreading.
@wo_rld_country_
@__topiarii__
Types of topiary
In the manufacture of topiary, not only materials familiar to handicrafts are often used, but also fresh flowers. Therefore, they can be conditionally divided into two main types:
Alive
Living topiaries are rarely made at home, but they are still worth mentioning. The product, although not durable, is still popular. Most often, topiary from fresh flowers is made by florists to order. The basis is a floral sponge or other material on which the flowers will feel good. The composition may contain additional details that do not require special care, but the main content is flowers.
@myatnie_oblaka_flowers
Artificial
Artificial topiary is the most popular among needlewomen. With proper care, they can decorate your apartment for years. Foam or cotton wool is most often used as the basis for such a product, since they are most convenient to work with. After processing, various decorations are attached to the base. This can be any material, from coffee beans to eggshells.
www.diy.ru @home_sweet_home_ukr
Seasonal compositions are often made using appropriate materials. For example, in winter topiary you will definitely find pine needles, cinnamon sticks or Christmas tree decorations.
@lilovii_les
And in the autumn there will be dry leaves, cones or berries.
kuzmenko5835
What elements does topiary consist of?
Even the most complex topiary usually consists of three basic elements:
- crown
- trunk
- the base where you will need to “plant” the topiary
The crown, as we have already said, is a foam ball, which will need to be decorated in the future.
The barrel is made from different materials. Plastic tubes, dry branches, iron rods.
And the base of the tree is any stable surface or some kind of container, for example, an ordinary flower pot.
Now that we have figured out the components, we need to understand how to decorate the product.
What to use?
What the topiary will consist of depends only on the flight of your imagination, but there are several of the most popular materials that are suitable for a beginner.
Coffee beans. One of the most popular topiary details is coffee. It is easy to handle and does not require any processing.
@tulun_nyushen_dolls__
Many needlewomen use buttons, yarn and ribbons in compositions
@lesya_t_
If you know how to handle polymer clay, then it won’t be difficult for you to make a few nice details for your future product before starting work. More often, craftsmen make flowers.
@ol.esia1188
Sometimes topiaries are made from candies and other sweets; this version of homemade topiaries is especially loved by children.
@dagldiyan_olesyadagldiyan_olesya
Common Mistakes
- Crown smaller than pot
If you want to use a large pot for topiary, then the base of the crown should be larger than it so that your tree does not get lost against the general background.
- Overloaded with color
It is important to maintain the same color scheme in topiary and not mix incompatible colors, so the product will turn out stylish and will be pleasing to the eye.
- Overload with details
As a rule, topiaries are made in a specific theme, and a clutter of details will blur the whole picture, depriving the tree of happiness of its individuality.
How to make topiary at home
All topiaries are made according to the same principle, so first you should master the basics of needlework in order to eventually learn how to make complex, multifaceted compositions.
@i.am.osipova
If you want to make topiary yourself, we suggest watching several available master classes on this topic.
DIY crown base
How to make a coffee topiary
DIY summer topiary
Ball of fresh flowers
Tips and tricks: how to make topiary
- The crown always be larger in diameter than the pot. But don’t make the ball too large, everything is good in moderation.
- The trunk must be of adequate length: the ball is not too high, but also does not lie in the pot.
- The top is connected to the bottom: according to the color scheme or the same materials. For example, for a New Year's topiary, the bottom is connected to the top through a composition at the base made of materials from the crown: a sisal ball, cinnamon sticks, smooth berries.
- There may be a compositional center on the crown - the accent of the topiary. For example, for a coffee tree this is a composition with a slice of lemon and cinnamon.
- Gypsum filling also serves as a weighting agent, but there is no point in making the tree too heavy; you can, for example, fill half the container, as for a heart-shaped topiary.
- Dried natural materials - chestnuts, nuts, acorns - are radically transformed if they are painted. The technique was used for autumn topiary.
- Seashells take on new shades when covered with nail polish, here's an example: .
- To protect topiary made from natural material from damage by insects, lightly treat the finished tree with any hairspray. Homemade flowers look no worse than store-bought ones: made from napkins, ceramic plasticine, orange peel, etc.
Satin ribbons
Let's try to make topiary from satin ribbons. If you know how to make flowers from satin ribbons, then it will be very easy for you, but even if this is your first time taking up topiary from ribbons, you will succeed. So, I’ll tell you about the experience of making topiary from satin ribbons with your own hands.
Required:
- about six meters of satin ribbon (no narrower than 5 cm, it’s better to take several colors);
- threads, beads, and ribbon for decoration;
- glue gun or regular superglue;
- a stick or a piece of plastic tube for the barrel;
- pot or bucket;
- material for the middle - a fabric bag, crumpled newspaper or a foil ball;
- earth, pebbles, crushed stone (I used colorful glass for an aquarium).
To make this topiary, a master class on making flowers will also come in handy - look at the video on how to make a simple rose from a satin ribbon.
We make 12-15 roses from satin ribbon. You can use several shades of ribbon (for example, three or four), or you can get by with just one shade - when I made a topiary for my younger sister to decorate the wedding photo booth, I used a beautiful ivory satin ribbon.
We make the middle - for example, we crumple up foil or old newspaper, wrap it with threads to make a dense shape. You can wrap it with ribbon, but there is no need - satin roses turn out quite lush.
The trunk can be made from a branch, a plastic pipe or any suitable stick. In extreme cases, dense wire, folded in several layers and wrapped with tape, is suitable. Wrap your trunk with tape, and then glue the trunk to the crown of the tree on one side and to the pot or bucket on the other.
We string a couple of beads onto a thread and “sew” the beads and a satin rose to the topiary. It should be sewn or glued firmly. When the entire ball is covered with roses, you need to prepare the trunk and pot.
You need to pour a weighting agent into the bucket, straighten all the flowers, and, if necessary, decorate with a decorative ribbon.