It happens that you want to bring something new to your home, add interesting decor, but it is impossible to make repairs either due to lack of time, money or for other reasons. To change the interior a little without resorting to radical measures, you can hang a picture, new curtains, decorate existing nondescript household items and old dishes, for example, using the decoupage technique.
Using this technique, you can modify completely ordinary things by applying appliqué from napkins, rice paper, fabric, printed photographs and pictures. When pasted onto an object, they look like hand-painted paint.
History of decoupage
Translated from French, “decoupage” means “to cut out.” This technique appeared in the east in the 12th century, where they first began to decorate furniture, walls, and household items with decorative pictures. Created by hand and varnished, they created the illusion of artistic painting.
In Europe, this technique gained popularity in the 17th century; society ladies enjoyed decorating their salons with cute little things brought from oriental craftsmen.
We conduct a master class on decoupage of a glass vase
A detailed master class and the video below will help novice decorators become familiar with the main stages of decorating ceramic products.
Interesting and exciting master classes will help you become more familiar with the decoupage technique.
What should be done:
- We select the most convenient place for creativity and arrange the necessary tools in the most rational way.
- Carefully cut out the design you like from rice paper or a multi-layer napkin.
- Using a felt-tip pen, mark on the glass the places where a beautiful pattern will be applied. Marks are necessary to quickly return slipped paper to the selected place.
- Soak the napkin in a bowl of warm water.
- Before applying the image, you need to clean and treat the area with PVA glue.
- Paper is quickly applied to the adhesive base and carefully straightened from the center to the edges with a soft roller or cloth napkins. Care should be taken to ensure that no unsightly folds or air bubbles remain on the surface.
- Another layer of glue is applied on top with smooth movements of the brush.
- We paint the background with multi-colored or plain acrylic paints.
- The dried layer of glue is varnished, and then the finished product must be placed in the oven and heated to 150 degrees.
No putties are used to process glass, because the smooth surfaces of the bottles provide excellent adhesion to the applied design.
Decoupage vase at home
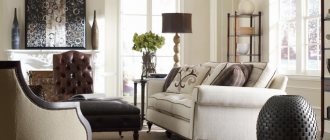
In the modern world, this technique is again popular. It is easy to perform, does not require special skills or expensive materials, and can be done by people who are far from handicrafts.
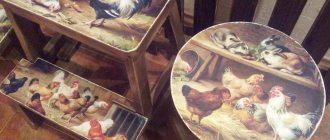
Modern housewives work with any surface: plastic, wood, glass. Boards pasted over with drawings replace paintings, plates made using the decoupage technique decorate kitchen shelves, and vases accentuate attention in the living room.
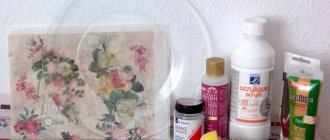
To decorate a glass vase using decoupage technique we will need:
- glass vase
- paint brush
- PVA glue
- napkin for decoupage
- scissors
- varnish based on acrylic or polyurethane;
- sandpaper
- paint-primer.
When decorating a vase, follow the instructions:
- Cover the vase with soil and let it dry, repeat this procedure 2-3 times.
- Cut out the fragments you like from the napkin, or adjust the entire napkin to the size of the vase. Separate the two bottom layers from the patterned layer.
- Lubricate the vessel with glue using a brush and apply a napkin, gently smoothing it with another clean brush.
- Wait until the container dries.
- Apply a layer of varnish, dry and smooth out any imperfections with sandpaper.
- Re-varnish and dry the vase.
There are many ideas for decorating a vase using the decoupage technique. Let's look at some of them.
Decorating small vases
The decoupage technique is used for various objects of human life. It allows you to diversify the interior space with new details. You can decorate both large and small items using this method.
Let's look at the decoupage of a tabletop vase in detail. To do this you will need the following components:
- small vase;
- thick brush;
- napkins with a pattern;
- PVA glue;
- clear nail polish.
The decorating process includes the following points:
- degrease the surface of the vase with alcohol;
- Next we proceed to applying the adhesive composition. Place the brush into the container;
- after this, with smooth movements we distribute the adhesive substance along the entire perimeter of the product;
- carefully place the napkin with the image in the right place;
- when it is completely dry, proceed to the second layer;
- We apply the varnish coating after the glue has dried on the surface of the paper design.
Vase in shabby chic style
In addition to the list of materials outlined above, you will need rice paper and any photographs you like, printed on a printer using waterproof ink.
There are two ways to apply a pattern: direct and reverse. The first method involves applying a picture to the outer surface of the vase, and the reverse - to the inside. With the direct method of decoration, the vessel is covered with rice paper, and only then with photographs.
Classic decoupage method
This type of flower vase decoupage is used for products with a transparent or plain surface. Here the applied pattern allows you to add brightness and highlight individual parts of the dishes.
For decoration you will need the following materials and tools:
- vase;
- special napkins with images;
- thin rice paper;
- adhesive composition for decoupage;
- thick brush.
Vintage style vase
To make a glass vase into a vintage one, you need to artificially age it. First you need to prime the container, wait for the paint to dry and cover it with varnish with a craquelure effect and, without waiting for it to dry, apply a layer of acrylic paint. A thin web of small cracks will cover the vessel and give it a mysterious charm.
Styles
A vase is a common item in every home, and if it doesn’t match the style of the decor, it will have to gather dust in a closet or cupboard. You can stylize a vase using the decoupage technique. We invite you to consider photographs depicting vases prepared to support the styles of different directions.
- Clay jug in country style.
- Vase in Provence style, made in a characteristic lavender color. In decoupage, the technique of surface aging is used, and braid is used.
- Continuation of the Provence theme. The craquelure technique was used when working on the vases.
- Items designed for the shabby chic trend. Made using texture paste and techniques that imitate abrasions.
- Shabby chic vases using woven thread.
- Decoupage of a glass vase (shabby chic) using fragments of tulle and costume jewelry.
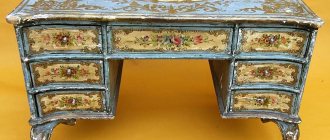
- Rococo style, decorated flower vase.
- Retro direction (seventies).
- Pasting vases with newspapers using the decopatch technique (a type of decoupage) suits the simplicity trend.
- Beautifully decorated vases can create a holiday. Sometimes holiday motifs lie in the design of the product itself: New Year's, Christmas, Easter vase.
- New Year's volumetric decoupage made on a round glass vase.
- Christmas motives.
- Glass Easter vase in country style.
Vase decorated with a napkin, relief patterns and beads
To begin with, the surface of the vase should be degreased by wiping it with alcohol, then apply white paint evenly, and glue a pattern cut out of a napkin along the top or bottom edge. We take white threads, soak them in PVA glue and glue them to the vase, forming an ornate pattern, correcting the unevenness with a toothpick.
We take putty with a syringe and squeeze it out in the form of small volumetric dots, or simply glue white half-beads. The vase is ready, all that remains is to cover it with aerosol varnish and let it dry.
"Antique"
This technique of decoupaging a vase with napkins can turn an absolutely nondescript object into a real masterpiece. A special varnish, which is applied between layers of wet paint, gives such products a vintage look.
After the varnish dries, the surface cracks. The size and number of cracks directly depends on the amount of varnish.
To properly age a vase and achieve the desired effect, we have prepared instructions for beginning needlewomen:
- Degrease and dry the vessel
- Cut out the design and soak in water for a minute
- Lay out the design on the fabric. Apply glue liberally to the back side
- Place the fragment on the vase with the wrong side. Cover the outside with adhesive.
- Dry the workpiece. For a faster effect, you can use a hairdryer.
- Apply the first layer of craquelure varnish, then the second. Dry each layer.
- At this stage, you can fill the cracks with bitumen or bronze powder.
- Cover the vase with varnish and let dry.
Antique style vase
First you need to choose a vessel that is similar in shape to an antique one. Cover it with two layers of primer, choose a napkin with historical images, for example Roman or Egyptian patterns, cut them out and stick them on the vase.
Cover the rest of the space with eggshells using tweezers. Let it dry and coat it with acrylic varnish. The vase can be left white, or it can be lightly coated with pale yellow or beige paint.
Products for problem skinFamily vacation: how to choose a resort for a trip with children?
- Bathroom curtains: review of popular models and new designs
Decoupage is a very simple and quick way to transform objects from ordinary ones into designer ones; if you have the desire, you can turn an ordinary glass vase into a work of art. In addition, this is a pleasant creative pastime that allows you to relax and dissolve in the process.
There are a great many design options using the napkin technique. When decorating a glass vase, let your imagination fly, study photos of vase decoupage taken from the Internet, implement your ideas, and then you will get an original interior decoration or a good gift with your own hands.
Decoration options
Experienced decoupage artists have come up with many ways to decorate a vase with their own hands. Master classes involve step-by-step implementation of work and adherence to the sequence of actions. This is the only way to achieve the desired result and make a truly beautiful product.
A vase for flowers
Most often, an ordinary glass flower vase is used as a decoration item. In most cases, it serves its owners for many years and during this time it has turned from a wonderful product into a standard decorative element. Correctly performed work using the decoupage technique will help return it to its previous state.
You will need the following items:
If you cannot find an item, you can replace it with an appropriate analogue. For example, special glue can be replaced with ordinary PVA, and rice paper with napkins.
Step-by-step decoration of a flower vase:
- Take a cotton pad and soak it properly in alcohol.
- Then, use it to thoroughly wipe the container to be decorated. This simple step will help degrease the surface and simplify the gluing process.
- The rice paper is torn into small pieces.
- After this, the vase is smeared with decoupage glue, and the prepared small parts are attached to it.
- The vessel is set aside to allow the glue to dry completely and the rice paper to be securely attached.
- At the next stage of work, a sponge soaked in acrylic paint is used. With its help, the entire surface of the product is painted. It is important to do this from the bottom up and ensure smooth transitions from light yellow to white.
- While the paint dries, the selected patterns and designs are carefully cut out from the napkins. Then they are glued to the vase in the form of a certain composition.
- After this, a thin layer of acrylic varnish is applied.
- As soon as the surface is dry, small irregularities are rubbed over it. This is done using fine-grained sandpaper.
- The vase is coated with a second layer of varnish.
- After complete drying, the product takes on its final appearance.
All that remains is to buy or pick flowers and put them in an updated vase. This product can also be a good gift for a birthday or any other occasion.
In a similar way, you can decorate kitchen utensils and turn them into an exclusive set. It can be used for a festive feast and any other memorable event. In addition, the vase with a flower in the avatar looks beautiful.
Floor product
Before you make a floor vase with your own hands, you need to find a large glass vessel. The larger it is, the more beautiful the finished product will be. For decoration, you can use not individual pictures, but entire compositions. To do the job efficiently, you will need the following materials and tools:
- large glass container;
- quick-drying glue;
- strong twine;
- cling film;
- bottle;
- decorative elements.
To decorate the product, you can use large buttons, beads or rhinestones. With their help, it is easy to achieve an additional effect that will turn the picture into a three-dimensional composition.
The decorating process is simple and consists of the following steps:
Vintage decoration
This option is ideal for lovers of antique jewelry. You can age a product and turn it into an exclusive item. This effect is achieved thanks to artificially created cracks on the surface of the vessel. They are obtained through the use of a special varnish, which is applied to the vase in several layers and processed in a special way.
Decoupage vase in vintage style
performed using the following items:
The last item includes special glue and varnish. After drying, they tear the top layer of paint and form cracks across the entire surface. Their frequency depends on the amount of material applied. To achieve a greater effect, you can sprinkle the surface with bronze powder.
You can make the product as follows:
- Take red paint and pour it into a convenient container.
- A few drops of green are added to it.
- Then the entire surface or part of it is covered with the resulting material. It is best to apply two coats of paint.
- After complete drying, it is coated with PVA glue.
- Next, the vase is coated with paint of any contrasting color. For these purposes, it is best to use a sponge.
- The product is dried with a hairdryer. The longer this process takes, the more cracks there will be on the vase.
- The lower part of the vase is painted white twice.
- At the next stage of work, an image is formed. To do this, selected pictures are cut out from napkins and carefully glued to the vase.
- After they dry and are securely fastened, the surface is coated with acrylic varnish.
- The product is set aside for a few more hours.
- After their expiration, the vase will be ready for use.
You can age not only a glass product, but also a ceramic one. This is done according to the same principle, only taking into account some of the characteristics of the material.
Original vessel
If you want to decorate a vase in an original way, you can use a special technique
, which involves the use of a balloon. In addition to this, you will need to buy:
- paper and decoupage napkins;
- needle and thread;
- quick-drying glue;
- decoupage varnish.
The whole process is very simple and ideal for beginners. With its help, you can not only decorate a vase, but also learn the basics of this type of creativity.
Manufacturing instructions
original vase:
Decoupage of a glass vase is a rather difficult but interesting activity. With its help, you can not only make an original decorative item, but also give it a look that matches the style of the room. With the right approach to business and following all the recommendations of professionals, you can make a truly beautiful thing that will become an original addition to the interior and transform it beyond recognition.
People learned about the decoupage technique relatively recently. However, she quickly became popular. Now many craft stores sell everything you need for decoupage. Vases, boxes and even pieces of furniture - you can decorate anything.
This decoration option will be interesting for people who love unusualness and originality. An item made by hand is unique and emphasizes the tastes of the owner. Of course, the materials are not sold in single copies, but the ways of combining and using them depend solely on the flight of fancy.
The decoupage master class is not difficult even for beginners. During school craft lessons, many made appliqués cut out of paper. Decoupage is applique, but more elegantly done. There are many items that can be decorated, and in this article we will talk about ideas and tips for decoupaging vases.
We decorate a glass vase with napkins using the decoupage technique
Let's see how you can make a stunning, original gift from an ordinary, transparent vase. We present to your attention a step-by-step master class. Let's arm ourselves with everything we need and go into battle!
Materials you will need:
- Decorated object. Glass flower vase, flask of any size and any shape.
- Napkins. The choice of design depends on the flight of your imagination.
- Scissors. Choose scissors with sharp blades. Napkins are a very thin material; dull scissors can cause ragged edges.
- Acrylic paint.
- Glue for decoupage. You can use regular PVA glue.
- Brushes of different sizes.
Let's look at a step-by-step MK for beginners
- First of all, you need to prepare the vase. Remove dirt and degrease by wiping it with glass washing liquid or simple acetone.
- Cover the vase with white acrylic paint. We pay special attention to the top and bottom of the vase.
- Presumably, where there will be patterns, we cover them with thicker paint.
- Dry (let the paint dry thoroughly, 2-3 hours).
- While the vase is drying, cut out the floral motifs. To make it clearer, pay attention to the photo below.
- The next step is to glue the floral motifs onto the vase itself. We use PVA glue. In order for the pattern to lie flat, it is necessary to make cuts along the perimeter of the pattern. This must be done immediately before gluing.
- After all the steps you should end up with something similar to this photo:
- If desired, you can decorate with additional accessories. For example, as in the photo below, with threads. Or make a set of decoupage on plates for beginners - a wonderful gift for loved ones or decoration for your home!
Agree, it is very simple and beautiful. The most important thing is that it was made with love and with your own hands!
Step-by-step instruction
An independent analysis of a master class on decoupage of a vase can always help you with your work:
- The vase is pre-prepared - dirt is removed, degreasing is carried out using ordinary glass cleaning liquid.
- You can simply use acetone;
- White paint is applied. The greatest attention should be paid to the lower and upper parts of the object;
- In places of the pattern, it is better to thicken the layer of paint;
- Subsequent drying will take two or three hours;
- During this time, you can easily have time to cut out the selected ornament;
- Using PVA, the motif is glued to the vase. Special cuts will be required, which are necessary for even application of the pattern;
- The presence of additional decorations, for example, threads or several similar plates will be appropriate.
Pendant "Heart"
An exquisite compliment in the form of an openwork heart will lift your spirits and create an appropriate atmosphere.
You will need:
- Scissors
- Glue
- Blank “openwork heart”
- Angel decoration
- Acrylic paint - dark brown and white
- Candle
- Sandpaper
- Rubs
- Crumpled ribbon
- Artificial flowers
- Pearl beads
- Jewelry to suit your taste
Step 1
- Paint the “openwork heart” blank well with dark brown acrylic paint.
- When the paint has dried, rub the protruding areas of the workpiece with a candle and shake off excess paraffin.
- Paint the heart with white acrylic paint. After complete drying, create a scuffed effect using sandpaper. The aging should be natural.
Step 2
- Decorate the heart with rubbing. The rubs adhere well to paint and look very impressive on an aged surface.
- Take a set of shabby rubs and cut out matching words or designs. Separate the rubbing backing and place it in the place where you want to place it, with the film facing up. Use a special stick to rub the image until it is completely separated from the film.
Step 3
- Glue a string of twine to the inside of the workpiece.
Step 4
- Prepare a composition of an angel and a key by gluing the key using a thin rope.
- Secure the angel in the center of the workpiece.
- Decorate the heart as you wish and add accents.