Home » Lighting » Light sources » How to hang a chandelier on a concrete ceiling?
The main type of ceilings in modern construction are hollow and monolithic reinforced concrete slabs. Depending on which specific option was implemented in a particular room, there are different ways to install a chandelier on a concrete ceiling. Currently, the most common options for mounting to a ceiling surface are to install the product on a hook or using a longitudinal or cross-shaped mounting strip.
How to install a chandelier on a monolithic concrete ceiling
Regardless of whether a monolithic or hollow slab serves as a ceiling, when installing a chandelier you will have to deal with work associated with drilling concrete. The simplest option in this situation is a hammer drill or electric impact drill, which will be needed to create holes.
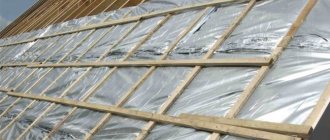
As a rule, wiring for lighting fixtures placed on the ceiling is laid in special channels. Therefore, before we start drilling holes, we need to make sure that we do not damage the power cord.
How to increase the suspension of a chandelier when installing a suspended ceiling
The above article discusses ways to attach a chandelier to the ceiling using a hook or anchor. But more often, suspended ceilings are installed in rooms in which a chandelier is already suspended and there is no question about how to attach it. You just need to increase the length of the suspension. If the chandelier is attached to the ceiling at only one point and the weight of the chandelier is distributed evenly throughout its entire structure, then it is enough to use a chain with a length equal to the distance between the fixed and suspended ceiling.
You can also increase the suspension using a piece of steel wire with a diameter of 3-5 mm, bending one end into a ring, and giving the second the shape of a hook. Metal carabiners from an old backpack or bag can also serve well for extending the suspension.
If the chandelier is suspended on a hammer-in anchor, then it will be enough to replace the threaded rod with a longer one.
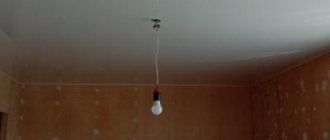
If the weight in the chandelier is not evenly distributed, for example, as in my homemade chandelier for the hallway, then to secure it, you have to install an additional platform-ramp with the ability to adjust the distance to the main ceiling. In the photo, the chandelier is suspended from the main ceiling, before installing the tension ceiling.
The photograph shows a platform installed on the main ceiling before installing the stretch ceiling. Making such a platform with your own hands is not difficult; for this you will need a sheet of plywood or chipboard 10-18 mm thick. The size of the platform should be slightly larger than the size of the chandelier base.
The platform must be installed in such a way that its lower plane is exactly at the level of the suspended ceiling. To ensure this requirement, the platform is attached to the flow using two pairs of corners with holes drilled along their long sides with a pitch of 10 mm. The corners themselves can be made from any metal with a thickness of at least 1 mm. The width of the corners must be at least 20 mm. The diameter of the holes is selected based on the size of the mounting screws or screws.
The corners are secured to each other using two self-tapping screws. I used self-tapping screws to secure the side covers and other components in the computer system unit. If the pitch of the holes does not allow you to accurately set the level of the platform, then you need to use a needle file to saw through the grooves in one of the corners. It is best to drill holes in the corners when the molding for attaching the stretch ceiling is already mounted on the walls. Stretch a thread between the baguette slats fixed on opposite walls of the room, and use it to measure the distance from the fixed ceiling to the tension level.
Each corner is attached to the platform using two self-tapping screws. The length of the screws should be less than the thickness of the platform. If the sharp end of the screw protrudes, it may subsequently pierce the stretch ceiling fabric.
A hole is drilled in the center of the platform for threading electrical wiring and for screwing in a self-tapping screw when hanging the chandelier. The holes should be as close to each other as possible. This will allow you to make a hole in the suspended ceiling for wires and fastenings of a minimum diameter.
The finished platform is secured by the corners to the ceiling in the place where the chandelier is planned to be installed using two self-tapping screws. Holes are drilled in the ceiling and dowels are installed. The issue of drilling holes in walls and ceilings is discussed in detail in the article “Drilling holes in walls”, where, by the way, there is a video of drilling holes in a brick wall.
Usually, the holes in the stretch ceiling for attaching chandeliers and ceiling lights are made by the installers themselves. A plastic ring of the required diameter is selected from the set, lubricated on one side, for example with Super Moment Universal glue, and pressed to a previously designated location. After a few minutes, the glue sets and you can cut a hole inside the ring with a sharp knife.
It is unacceptable to make a hole in the ceiling without gluing the protective ring, since the stretch ceiling film is very stretched and can tear.
After a hole is made in the suspended ceiling, electrical wires are pulled through it and connected to the chandelier using a terminal block, then the chandelier itself is suspended from the platform on the ceiling using a self-tapping screw screwed into the platform.
Installing a chandelier on a hook in a monolithic concrete ceiling
If the design of the ceiling chandelier involves installation on a hook, you need to pay special attention to the fastening element itself. Sometimes, to reduce the cost, manufacturers equip lighting devices with insufficiently high-quality fasteners.
If there is any doubt about the reliability of components, they must be replaced with a quality product. A reliable hook for mounting in a concrete ceiling must meet the following requirements:
- have sufficient strength regardless of the weight of the chandelier;
- its diameter must correspond to the dimensions of the hanging bracket;
- securely fixed in concrete.
To fulfill the last condition, it is best to choose hooks with an anchor system. The designs of such parts have a special sleeve, which is deformed when the central part is screwed in and reliably expands in the hole.
If the chandelier is light in weight and installed on a monolithic concrete ceiling, you can get by with a hook at the end of which has a thread. In this case, an insert made of plastic or wood is placed in a pre-drilled hole, into the body of which the fastener is screwed. It is important to remember that green wood dries and shrinks over time, which can lead to weakening of the entire structure.
On the hook
Before attaching a lighting fixture to a concrete ceiling with a built-in hook, the first step is to check the strength of its installation. To do this, select a weight the size of the selected chandelier, secure it, and then pull it with force. A poorly installed fastener will begin to wobble or fall out completely; in this case, the hook will need to be replaced.
To install the hook, you need to make a hole in the ceiling using a hammer drill and install a collet, followed by mounting the fastening element into it. A pin is placed in the collet and a hook is hung; it is also possible to screw the hook directly into the collet. Before screwing the hook into the thread, you need to lubricate the hole with a thin layer of thick lubricant and screw two copper wires. Next, one hundred grams of gypsum solution is prepared, which in consistency will resemble thick sour cream. After which the hole is filled with a stick, it is important to remember that the gypsum mixture hardens quickly, so the filling of the solution into the thread should be carried out accordingly.
The hook is immediately placed into the solution before it has time to harden and the excess mixture is removed. Wait until the solution cools to room temperature; this will happen after 2 hours or more. After the final setting of the gypsum mixture, they begin to fasten the lighting fixture.
How to install a chandelier on a concrete hollow ceiling
A special feature of installing a chandelier on a concrete ceiling, which has internal cavities, is the impossibility of using anchor fasteners in certain cases. This is due to the fact that when the hole falls into an empty channel, the lower part of the floor slab is not thick enough to securely fix the anchor bolt.
In this situation, fastening elements at one end of which are located so-called have proven themselves to be excellent. "butterfly". These are two or more petals that, when not in use, fit tightly to the body of the bolt. When they get into the cavity, they open under the action of a spring and prevent the hardware from being removed. Rigidity is provided by a lock washer and bolt that remain outside.
In some cases, when installing a chandelier on a concrete ceiling made of hollow slabs, it is not always possible to get exactly into the cavity. This is especially true for situations where a cross-shaped mounting plate is used to mount the lamp. Some of the holes may be on the bridge between the voids. In this case, the best option for fixing the chandelier to a concrete ceiling is a combined mount. That is, use anchors and metal products with drop-down strips.
Preparing for work
Before hanging a chandelier on the ceiling, it is necessary to carry out all preparatory measures correctly. In addition, it is very important to follow safety precautions at all stages of work. This will not only protect the lighting fixture from damage, but will also help maintain health.
Selection of tools and materials. To properly hang a lamp on the ceiling, you need to prepare all the necessary materials and tools in advance. If everything is done correctly, you can significantly simplify the process and get the job done in the shortest possible time.
Among the many tools, only a few will be needed to get the job done.:
- ladder;
- hammer drill or electric drill;
- a screwdriver or an ordinary screwdriver;
- pliers;
- indicator screwdriver.
During the work process, some unforeseen situations may arise. To eliminate them, you may need some other tool that is not on the list. However, if all stages of installation are carried out correctly, the likelihood of their occurrence will be minimal.
The following materials may be needed::
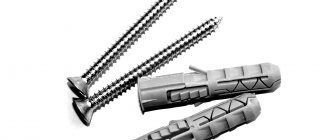
- self-tapping screws with dowels;
- fastening elements;
- terminals or connection blocks;
- insulating tape.
All items used in the work are inexpensive and easily accessible. All this allows for independent installation of the chandelier, even for owners with little financial resources.
Advice from professional craftsmen
In order to properly hang a chandelier from the ceiling, it is necessary not only to choose materials, but also to be able to use them correctly. You can seek advice from professional craftsmen. They will be happy to share their secrets and help you avoid most mistakes.
Among the tips it is worth highlighting the following::
- Before starting work, you need to properly prepare the chandelier itself. To do this, you need to unscrew the light bulbs and remove all decorative elements. This will eliminate the possibility of any parts breaking and will protect the lighting device from losing its attractive appearance.
- After installation, be sure to check the wiring. To do this, it is important to turn on the light not only on the switchboard, but also in the apartment.
- Before installing the hook into a concrete ceiling, you must first calculate the required length. This is done so that the chandelier cap completely covers the mount. If you make a mistake or do not perform the calculations at all, you may encounter a situation where you need to file down a hook that is already hanging. This is a rather complex operation, and it is almost impossible to perform it without proper preparation.
- When installing heavy lighting fixtures, it is best to use anchor fastenings. It will allow you to more securely fasten the chandelier and eliminate the possibility of it falling.
- When installing an anchor hook, it is necessary to correctly select not only its diameter, but also the size of the drilled hole. If everything is done correctly, you can achieve maximum fastening strength.
- When performing any work with electricity, it is best to use not an ordinary screwdriver, but an indicator one. With its help, you can not only tighten the fastening, but also protect yourself from electric shock.
- Very often there are situations when the installed chandelier does not react in any way to the movements of the switch. As a rule, this situation occurs when the phase and grounding are incorrectly connected. To correct this error, it is enough to swap the wires.
Extending electrical wires to connect a chandelier
Usually the wires coming out of the ceiling to connect the chandelier are kept short. A suspended ceiling is always installed at a distance of five or more centimeters relative to the existing ceiling. Therefore, when hanging a chandelier or lamp on a suspended ceiling, the question arises about the need to extend the electrical wires coming out of the ceiling.
If the suspended ceiling can be easily disassembled and access to the connection point of the wires when extended, for example, an Armstrong-type ceiling, then any type of connection can be used. The terminal block will serve perfectly. But if suspended ceilings are installed, then the most stringent requirements for reliability are imposed on the connection of the wires, since if the contact is broken, access to the connection will be practically impossible. You will either have to come to terms with the lack of lighting or decide to dismantle the ceiling.
High reliability of the connection of wires can be ensured only by soldering, and I strongly recommend only this type of connection when extending conductors when installing suspended ceilings. In addition, this is also the cheapest type of connection, since apart from a soldering iron and a little flux with solder, you don’t need to buy anything.
When choosing wires for extension, you need to pay attention to their cross-section. If you don’t make a choice, then the cross-section should be no less than that of the wires coming out of the ceiling. Modern chandeliers consume little current and smaller wires can be used. In this case, you can select the cross-section of the extension conductors according to the table.
After the chandelier is removed from the ceiling, you need to use a soldering iron to tin the wires coming out of the ceiling with solder, wind the ends of additional wires onto them and solder the connection. The length of the extension wires and their number are selected based on the distance to which the ceiling will be lowered and the number of groups of light bulbs in the chandelier. It is better to use stranded wire for extension and with a reserve, since it can always be shortened if necessary.
Please note that the junction of adjacent wires is offset, eliminating short circuit of the conductors. With this connection there is no need to insulate each wire separately. It is enough to apply three layers of insulating tape simultaneously to the entire connection.
After installing the terminal block on the wires, the work of extending the electrical wiring to connect the chandelier on the suspended ceiling can be considered complete.