Factors influencing the service life of linoleum
Linoleum has been used as a floor covering for quite some time, and therefore there are detailed recommendations on how to lay and care for such a covering. What is equally important is a detailed description of how to level the floor under linoleum with your own hands with minimal risks for the further operation of the coating.
The service life and aesthetics of laid linoleum depend on the quality of the work performed. It is impossible to achieve an effective result until the base on which the coating is laid is leveled. Any defects in the subfloor can lead to rapid deformation of the linoleum, which will look very bad in the photo and during visual inspection.
Main types of irregularities:
- visually indistinguishable cracks and crevices;
- height differences between the boards in the flooring and the slabs in the ceiling;
- dents and chips;
- uneven pouring of concrete screed, etc.
Preparation rules
The linoleum pattern can reproduce any materials and coatings (parquet, noble and wild stone, tiles, natural furnishings or metal compositions).
The base on which this roll material is laid should not visually or soundly violate the illusion of the design solution.
Grade
Before starting the installation process, it is necessary to assess the condition of the base under the linoleum and find out whether preliminary preparation of the load-bearing surface is necessary.
An attempt to save on the quality of materials or reduce the required operations can subsequently result in significant rework costs.
Methods for assessing the condition of a wooden floor after long-term use will depend on the experience of the specialist conducting the inspection and diagnosis:
- The express method consists of assessing the condition of the cleaned area of the board and the seams between the wooden elements. The absence of corrosion on the heads of the nails/screws that secure the boards to the joists is a good sign of dry, healthy wood. They walk around the room at a brisk pace so that loose and creaking parts are revealed. If no comments (suspicions of the presence of defects) are identified, then you can continue to use this flooring and move on to the next stage of work.
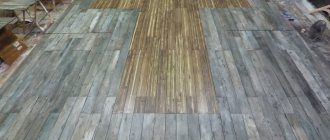
Protruding boards, nail heads - all this can imprint on the soft covering or tear it
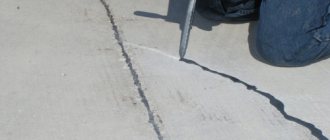
- A complete inspection of the entire structure allows not only to assess its condition, but also to carry out preventive repairs to ensure the reliability of the supporting part of the flooring. To do this, remove the baseboard around the perimeter and lift several boards. The condition of the joists is inspected for tight support on the screed, and for the presence of mold, rot, and fungus damage to the wood. The condition of the concrete screed (cracks, peeling, moisture stains) is assessed. The required amount of repair work is assigned.
- As a precautionary measure of protection, the wooden subfloor is treated with antibacterial impregnations, special agents against insects and wood pests.
- scraping;
- puttying;
- pouring self-leveling compounds;
- covering with sheet materials.
Suspicious stains, grooves, rot, multiple dried cracks are grounds for replacing the wooden element.
Preparation
Before leveling a wooden floor using hand or power tools, you need to set the heads of the nails or screws to a depth greater than the thickness of the layer of wood expected to be removed.
The need to remove old paint depends on the strength of its adhesion to the wood and the technology for leveling the upper surface of the flooring.
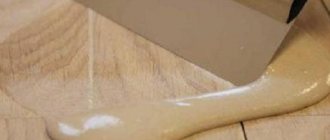
After removing the layer, treat the cracks with putty
Preparatory operations are carried out using one of the selected methods of work:
The first 2 methods are often combined together - after removing each layer with a sanding machine, the cracks and chips are filled with putty.
According to the work plan, the necessary tools and materials are selected.
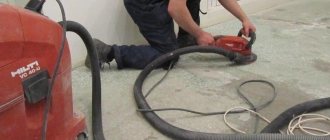
Tools for leveling the base
So, preparing the floor for laying linoleum begins with leveling the surface. To properly level the floor under linoleum with your own hands, you need to have the following set of tools:
- construction level: laser is best, but a liquid level will suffice;
- beacons for pouring screed: metal profiles or straight bars (if, of course, this particular leveling method is used);
- mortar or materials for leveling.
Conclusions about the quality of the base (before and after leveling) should not be made by eye or submitted photos to specialists. Only with the help of a building level or an ordinary long wooden lath (rule) can you assess how flat the surface is.
Methods for arranging a surface under linoleum
Linoleum is available in various modifications with different performance indicators. Despite this, any type of this coating is particularly demanding on the floor level.
Height changes, depressions, loose panels - all this will ultimately lead to damage to the linoleum.
For small differences, up to 1-2 mm per square meter, it is most advisable to use soundproofing and noise-insulating substrates based on polyurethane foam or natural cork. This technology for smoothing out differences is widely used for both wooden and concrete foundations.
The most popular ways to eliminate unevenness and height differences for wooden bases
In case of significant deviations, for wooden floors, the following leveling methods can be distinguished:
- use of putty based on adhesive mass;
- laying plywood or fiberboard;
- pouring self-leveling mixtures;
- surface scraping.
Installing plywood on support beams and pouring self-leveling solutions are the fastest and easiest ways to level. The use of putty is a more labor-intensive, but fairly affordable technology that allows leveling a fairly large base area.
Leveling a concrete floor under linoleum is carried out according to standard technologies and can be done in the following ways:
- pouring concrete mortar;
- use of self-leveling floors;
- laying sheets of plywood or fiberboard.
For concrete bases, it is recommended to use the first two methods, since they provide a more reliable and durable base on which you can lay not only linoleum, but also any other floor covering.
Leveling with concrete screed
Before leveling a concrete floor under linoleum, you need to familiarize yourself in detail with the simplest way to solve this problem. We are talking about pouring a cement-sand screed.
This work is carried out according to the traditional scheme:
- Installation of beacons in increments of no more than 1 meter and the same height, which should be equal to the planned thickness of the screed. To do this, you need to know how to set the floor screed beacons correctly so that you don’t have to redo everything.
- Pouring the prepared solution over the installed beacons while maintaining the thickness of the layer throughout the room.
- Leveling the screed before it hardens using a regular wooden rule, oriented to the height of the beacons.
- Waiting for the screed to dry sufficiently to remove the beacons from the layer and fill the voids with the same solution.
In addition to leveling the floor in an apartment under linoleum, it is necessary to lay a high-quality waterproofing layer under the screed to prevent leaks and, as a result, conflict situations with neighbors.
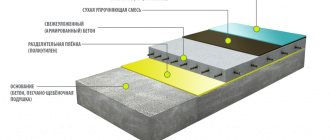
Self-leveling floors for leveling the base
Another option for the best way to level the floor under linoleum if the base is concrete is to pour self-leveling floors. It can only be used if the unevenness of the coating does not exceed 2 millimeters.
This method has a couple of clear advantages:
- minimal time consumption compared to pouring concrete screed;
- ease of work.
Detailed instructions for using mixtures for self-leveling floors are provided by the manufacturer on the packaging. By following the sequence of actions and basic proportions, you can obtain a high-quality, reliable and durable coating, which in some cases will be the final coating without subsequent laying of linoleum.
How to level a floor under linoleum - 5 methods that will interest you
Greetings dear readers. Spring has come - the time for repairs, and therefore I’ll tell you how to level the floor under linoleum. It's no secret that most cosmetic and major repairs require a mandatory replacement of the floor covering. And the most common, due to the ease of installation, is linoleum and similar soft roll-type coverings.
In order not to think about how to level out the waves of linoleum, we carefully prepare the base
The main problem when laying soft roll coverings is the imperfect surface of the rough base. As a result, the relief on the floor surface can become visible through the linoleum over time. To prevent this from happening, you need to carefully level the base before laying linoleum.
Leveling with dry screed
Not many people know how to level a floor under linoleum, and when it comes to creating a screed, they think about pouring mortar. In fact, the screed can consist entirely of dry materials and be a prefabricated multi-layer structure. This leveling method is advisable to use with minimal base defects. It is especially valued in apartment buildings, since the risk of moisture entering the apartments from below is minimized. Read also: “How to properly level the floor - the better way to do it.”
The screed is laid in the following order:
- A waterproofing layer is laid, usually represented by thick polyethylene.
- The joints between floors and walls are taped with a special damper tape.
- Then the beacons are installed to the required height to obtain a certain thickness of the screed.
- Expanded clay is filled in between the beacons.
- From above, the structure is covered with sheet pressed wood materials: plywood, OSB, chipboard, plasterboard.
The last point has its own nuances: drywall is the easiest to install, but is not optimal, but OSB or plywood meet all the requirements. Therefore, quite often they level the floor with plywood under linoleum, which avoids many problems. If drywall is simply fixed with self-tapping screws in increments of 5 centimeters, then plywood is laid without fixation on isolon, which in itself is a more complex type of work.