DIY concrete repair
Often, construction technology requires concrete floors.
This is due to the high technical characteristics of the mixture components. The finished coating is affordable, durable and practical. It stands out perfectly on its own and serves as the basis for subsequent finishing with any floor materials. However, for a number of reasons, the base becomes deformed and becomes unusable - cracks appear and dust formation increases. The resulting defects reduce the strength and reliability of the screed. Therefore, repairs carried out in time will help prevent further destruction. The article will discuss the technology for repairing concrete floors. Content:
Before starting surface restoration work, you must:
- conduct a visual inspection to assess the condition;
- identify the reasons that led to the result obtained.
Based on the data obtained, an elimination technology is selected. For minor damage (potholes, isolated cracks), it will be enough to carry out local repairs. If the area of the area to be repaired is more than 30-35% of the area of the entire premises, then we will talk about capital work.
Causes of concrete floor destruction
There are several known main reasons that have a negative effect on concrete pavement. Conventionally, they are classified into 3 groups: soil influence; external influence; internal factors.
- The first point includes poor soil compaction, winter heaving of the earth and the proximity of groundwater. Such factors lead to formation movements, and as a result, destruction of the concrete floor.
- The second point assumes a negative impact on the base due to the use of low-quality mortar, as well as pouring carried out in violation of technology. Here it is necessary to note such a common reason as shrinkage of the house, which creates some movement.
- The third point includes factors such as: natural wear and tear of the coating, mechanical impact (falling heavy objects) and prolonged exposure to moisture, for example during flooding.
After analyzing this information, you can move on to eliminating the causes. Only after this can we talk about the benefits of repair work, otherwise all the restorations carried out will be useless.
Preparing to repair an old concrete floor
- Work begins with clearing the room of furniture and other interior items. If there is a floor covering on the screed, it is dismantled. All debris and dust are removed. Much attention is paid to damaged areas. This is where a large number of flaking elements accumulate.
- Use a wire brush to remove old layers of primer, rust and other contaminants. Then it is necessary to make notches on the repaired area, which will increase adhesion between the material and the new concrete.
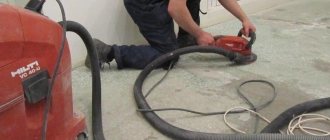
- Chips and dust formed during the process are swept away with a broom. A construction vacuum cleaner will show good cleaning results. The surface must be treated with a degreasing impregnation or primer.
The degree of damage to the coating determines the complexity and type of subsequent work. If financial resources allow, then a major overhaul of the concrete surface can be carried out in order to significantly extend the service life of the floor.
Preparation of working mixture for repairing concrete floors
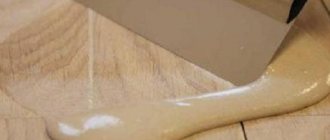
- To eliminate shallow potholes and cracks, you can use a solution containing PVA, prepared at home. First, dilute 1 part glue with 4 parts water. Then diluted PVA is added to the prepared dry cement-sand mixture (1:3) until the optimal consistency is achieved.
- More serious problems are solved by using building mixtures. In such compositions for repairing concrete floors, specially selected components guarantee ultimate strength and high resistance to mechanical damage.
- The mixed powder composition is thoroughly mixed with a mixer. The use of such equipment will allow the process to be performed more efficiently. The finished solution penetrates deeply into the concrete structure and forms a single monolith with the original surface.
Partial renovation
For damaged areas of small areas, local work can be done. The following are undergoing cosmetic repairs:
- recesses;
- cracks of varying depth and width;
- hair gaps (web);
- minor irregularities.
Despite minor defects, work must begin immediately. The smaller their size, the easier it is to tidy up the surface. An increase in existing cracks will lead to their growth, and as a result, to deformation of the floor covering.
Filling Potholes
They usually appear as a result of furniture or bulky equipment being left in one place for a long time. Often the reason for the appearance is a mechanical impact, for example, an object falling from a height.
Elimination technology
- With the help of a tool, the defect expands and deepens. This is done in order to eliminate the possibility of leaving weakened pieces of concrete on the site. The recess is cleaned and primed. Filling is done with an epoxy mixture or adhesive.
- The solution is pierced several times with a metal pin. It is important to remove air voids and distribute the mixture evenly in the resulting recess. Horizontal alignment is performed with a wide trowel or construction rule. After drying, the area is sanded.
- If the depth of the pothole is more than 5 cm, the technology for laying the solution is slightly different. Here the mixture should be poured in several stages to avoid the formation of cavities.
Repairing cracks in concrete floors
These types of defects appear due to shrinkage of the structure or foundation. Temperature changes, incorrect proportions of the concrete composition, and lack of reinforcing elements can lead to deformation.
Elimination technology
- Using a hammer drill or a hammer with a chisel, the gap expands both in width and depth. Carefully inspect the surrounding area for hidden defects, which after some time will lead to repeated repair of the surface.
- The groove clears concrete debris and dust. A polyurethane primer is used for processing. The mixture is poured into the crack and then leveled with a spatula or level.
- If there are large cracks on both sides, use a grinder to make auxiliary grooves. They will serve for laying metal grips, the distance between which should be 25-30 cm. All recesses are filled with mortar.
Closing the cobweb
This kind of deformation cracks can appear during excessively rapid drying of the solution. They are not fraught with danger, but they are quite capable of expanding over time. The web is almost invisible. Its detection is possible by wetting the surface.
Elimination technology
- It is enough to treat the so-called hairline cracks with a primer and seal them with an elastic sealant. If weakened areas are observed along the edges of the crack, it is recommended to clean up the delamination.
- The resulting groove is cleaned of foreign inclusions and treated with primer solutions. For sealing, you can use your own composition or purchase ready-made mixtures of various grain sizes.
Minor unevenness
As a result of pouring, it is not always possible to obtain a perfectly flat floor. This is due to non-compliance with the technology of these works. Defects appear due to neglect of the installation of beacons, incorrectly mixed cement mass (too liquid or thick). Therefore, after drying, “waves” are formed.
Elimination technology
- Wave crests are removed using a grinder with a trowel disc. This is a dusty job, so personal protective equipment must be used. If the area to be treated is large, it makes sense to contact specialized companies. They have equipment in their arsenal that, along with sanding, sucks up dust.
- The depressions are cleaned out and deepened. They are treated with primers or diluted solvent. The recesses are filled with building mixtures; self-leveling solutions can also be used.
Do-it-yourself overhaul of a concrete floor
Major work will be needed if:
- there is extensive damage (over a third of the entire area);
- the “warm floor” system is being installed;
- There is a desire to completely renew the old concrete screed.
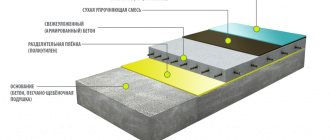
Such work can be carried out using the following technologies:
- laying wet screed using standard cement-sand mortar;
- pouring a self-leveling mixture, which includes plasticizers, stabilizers and fiber fibers;
- installation of a dry screed, including backfill, followed by laying gypsum fiber sheets (GVL).
Solving problems with cracks and cobwebs
Small and shallow cracks are first sawed lengthwise with a grinder, deepening them to 50 millimeters and widening them to 20 millimeters. The length and depth depend, again, on the hardness of the screed. Remove dust using a vacuum cleaner. If the screed is strong, does not emit a lot of dust and is difficult to saw, such a floor can be repaired with a self-prepared mixture.
If the screed is weak and sawed easily and effortlessly, to repair it you will need a good, high-quality primer and a thixotropic mixture. The repair technology is the same as when removing potholes.
Gaping cracks are repaired according to the following scheme:
- the crack is sawed to a depth of 60 mm and widened to 30 mm. The edges of the sides are expanded so that the crack looks like a triangular notch;
- then it is thoroughly cleaned of dust and primed.
- After complete drying, markers are inserted into the cut and held with your fingers while this place is filled with the mixture. And so on throughout the entire length of the crack. The thixotrope for such work must be of high quality;
- after the mixture has hardened, the markers are removed, and a seam of the same width is cut out of the remaining holes from them, where the cord - damper is laid;
- After that, everything is sealed with sealing silicone. You cannot use polyurethane foam or epoxy for this, as they are characterized by very fast and durable hardening.
Any pieces of metal of small thickness are used as markers.
When faced with repairing floor screed cracks, you should pay attention to their number and volume. Small cracks naturally take less time to repair. First, they are inspected, after which the screed next to the crack is removed. This will allow you to avoid chipping on the surface in the future. Even hidden chips will thus be detected and eliminated. The shape of the crack in depth should resemble a cone.
Any debris is removed from the inside, and water is sprinkled to increase humidity.
During the drying process, any prepared mixture will shrink. For this reason, the solution is not poured flush with the floor level, but slightly higher. There is no need to worry, as later you can easily remove the “cap” using a sander.
Improvised means will not help if significant cracks are detected. Cuts are made along the damage with a circular saw. The best option here is to use a diamond blade rather than anything else. The concrete from the cuts is removed with a chisel, as was done before for small defects. All that remains is to pour the prepared cement mortar, which must dry for a specified period of time.
It is worth highlighting as a separate category cracks in a concrete floor that appeared as a result of shrinkage of the poured mortar. Initially, you should “expand” them to a depth of 5 mm. Next, everything is very simple - remove dust and add solution. In this case, it is recommended to use mineral-polymer complexes as additives to the mixture. In this case, concrete shrinkage no longer occurs.
“The Web” requires no less attention. It occurs when the solution dries significantly quickly. Many people have a question about how to seal a concrete floor. To seal cracks, an elastic sealant is most often used over a layer of primer. But it is not always possible to find such places of damage. Their detection is carried out by wetting the surface.
Dust cannot be avoided during the operation of a concrete surface. This affects not only the comfort of being in the room, but also the health of the people in it. Wet cleaning will not help; you will have to repair the floor screed yourself.
The most popular option is painting the floor. Here we use special paint and a protective coating (Ashford Formula impregnation, Maxdur C). This mixture is very easily absorbed into the existing screed and does not allow dust to “climb” out. The pores are filled to a depth of about 5-6 mm. Such repair components create a beautiful surface appearance.
READ MORE: Do-it-yourself linoleum repair with a hole
Repairing concrete floors in this case does not take much time and is a simple and effective means of combating dust formation. Various materials can be selected as a surface coating. The main thing is to decide what final result is needed. If the room does not have significant loads on the base of the floor, then there is no need to even install a thick protective layer, saving money on repairs.
Many residents of Khrushchev-era apartment buildings face the problem of repairing old concrete floors. Over the years, the surface of the screed wears out and becomes covered with cracks.
Typically, the floor covering laid on top does not make it possible to notice the defect in time. This leads to the formation of large cracks and chips. And only by undertaking to dismantle the old coating can hidden problems be discovered.
Therefore, before laying new linoleum or laminate flooring, it is necessary to repair the floor screed.
DIY concrete floor repair
Concrete flooring has irrefutable advantages, which include low cost, durability, and resistance to the effects of the external environment.
Concrete floor repair scheme.
But over time, a concrete floor, just like any other foundation, needs restoration, which can be carried out without the help of others.
To repair a concrete floor with your own hands, you will need the following tools and materials:
- milling machine; rule or rake; perforator; putty knife; brush or roller; grinder with diamond blade; iron markers; sealing cord. epoxy or polyurethane primer; solvent; repair compositions (cement or polymer-modified); primer, varnish.
The reasons for the changes in the initial operational parameters of the foundation may be:
- the appearance of cracks, irregularities and potholes; destruction of structural, insulating and shrinkage seams; increased dust formation.
If similar problems occur, proper repair work must be carried out.
Eliminating unevenness on a concrete surface
To properly repair a concrete floor, you should pay attention to the depressions and potholes that have appeared during the entire period of operation.
As a rule, these defects are formed when the stages of floor installation technology are not followed. To eliminate indentations, you must follow these steps:
- Using a diamond-coated disc, cut out the deformed area (about 2 centimeters deep).
- Use a hammer drill to remove the damaged part.
- Using an industrial vacuum cleaner, clean the surface from dust.
- Apply an epoxy resin primer.
- Putty the surface with a concrete repair compound, use a lath to level it.
- After the repair compound has completely dried and cured, sand the area and level it with the main surface.
- In cases where the depth of the defective area is more than five centimeters, the repair composition must be used several times (layers).
- Such patches should be installed both in damaged areas and in areas where the greatest load will be generated.
Return to content
Elimination of irregularities
Scheme of a concrete floor with linoleum.
As you use the floor, bulges appear from time to time and must be removed. First, the base is milled to a depth of 1 cm, after which it is sanded to completely eliminate irregularities.
Using a construction vacuum cleaner, you need to clean the perfectly sanded area of the floor from dust. After which you can begin impregnation, which will completely strengthen the concrete floor. For this purpose, you can use an epoxy or polyurethane primer, previously diluted with solvent R-646 or solvent in a ratio of 1:10.
A ready-made solution is applied to the area treated with a grinding machine, which must be leveled with a lath or rule. When the solution is completely polymerized, final surface grinding is carried out.
Other types of concrete floor defects ↑
Today, in addition to traditional cracks, there are quite a large number of other concrete floor defects that must be eliminated. Their complexity determines the need to use certain equipment and technologies for restoring concrete floors.
Local detachments on the front surface ↑
If local delaminations from the underlying base occur on the surface of the concrete floor, you can use special compounds.
As a rule, these solutions are based on epoxy resins, characterized by a low degree of viscosity, and are introduced under the facial covering by injection.
In case of large-scale delamination, strengthening the concrete floor by injection is no longer possible; it is necessary to remove the destroyed top layer and pour a new screed
If the peeling is widespread, it is recommended to completely remove the existing coating and lay a new concrete floor. However, all work must be carried out only after careful preparation of the underlying foundation.
Potholes in the concrete floor ↑
Quite often, potholes appear on the surface of a concrete floor. Most often, their appearance is associated with heavy objects falling onto the floor.
Potholes on the surface of a concrete floor are filled with cement
Existing potholes must be thoroughly cleaned of debris, dust and oils, if any. Then priming is carried out, improving the adhesion of concrete and repair composition. As a rule, prepared potholes are filled with a cement composition with the addition of strengthening substances.
It is recommended to pay special attention to the conditions in which the repair composition must harden. Thus, areas of the concrete floor that have undergone repairs must be kept under film in conditions of high humidity. In addition, for 8-10 days the floor surface should be protected from any loads.
Elimination of horizontal irregularities ↑
Horizontal unevenness is the result of poor-quality casting of the concrete floor and violation of appropriate technologies. To eliminate these irregularities, a special machine is used, with which the base of the concrete floor is milled to a depth of 1 cm.
After this, the surface is sanded until the unevenness is completely eliminated. Then it is necessary to remove the concrete dust and saturate the floor with polyurethane primer. An epoxy analogue can serve as an alternative.
The prepared area is filled with a repair compound, and after it hardens, the surface is sanded again.
Loosening the top layer of concrete ↑
Wear on a concrete floor can lead to loosening of its surface. If damage of this nature does not exceed a depth of 3 mm, then in such an area it is enough to remove the top layer of concrete by grinding. This is carried out until a durable surface is obtained, which is thoroughly cleaned of dust.
If the top layer of the concrete floor is slightly damaged, it is simply polished
Then the concrete is treated with special strengthening and dust-removing compounds that have a chemical effect. An alternative can be polymer or polymer-cement compositions.
Thus, by analyzing a number of reasons that lead to the appearance of certain defects on the surface of a concrete floor, the types of these defects and elimination technologies, we can conclude that the process of restoring a concrete floor is quite labor-intensive and responsible.
Repairing Potholes
Potholes that have formed over time also need to be removed. Usually they arise due to a violation of the floor laying technology, because if all the rules are followed, the coating turns out to be quite strong. To eliminate potholes, you need to act in stages:
- using a diamond disc at a depth of approximately 2 cm, you need to cut out the destroyed area on 4 sides; then use a hammer drill to remove the warped part of the floor; the resulting dust must be removed with a construction vacuum cleaner; Next, an epoxy primer should be applied to the cleaned surface; the primed plane is filled with a repair compound using a spatula, which is leveled with a rule or a lath; when the composition dries and becomes quite hard, it must be sanded and done at the same level with the floor.
Concrete floor insulation scheme.
If the depth of damage is more than 5 cm, the repair mixture is applied in several layers.
Such patches need to be inserted not only in warped places, but also in those areas where there is an increased level of technological loads. Ultimately, the possibility of new defects forming on the floor surface will be significantly reduced. An additional advantage of this repair method is that during the work there is no need to stop operating the premises.
What to do if cracks appear in the screed
Some people believe that the appearance of cracks is not such an alarming sign. Sometimes owners do not pay attention to the fact that the floor is crumbling and dusty. However, one should not think so, because it is cracks that lead to the formation of cracks, staining of floors, and filling of cracks with various liquids, dust and dirt. Repair will be easy if the crack is detected as soon as it appears.
It happens that the appearance of a crack goes unnoticed, and later defects from the cracks appear on the finishing surface: most often, it bursts.
Repairing a gap involves preliminary deepening it and expanding its boundaries. It is important to clean the crack from any dirt and dust that has accumulated in it. Next, the repair mixture comes to the rescue. It can be epoxy or polyurethane. Quartz sand is used as a filler for the mixture.
If you notice small cracks in the concrete surface, then you need to carefully sand the surface and fill it with mortar.
How to repair a crack:
- Lay the first layer of repair mixture.
- Filling the same composition with a second layer.
- Wait until the solution hardens.
- Sand the surface thoroughly.
- If there are large cracks, they are repaired using large metal staples.
- After this, the repair composition is filled with reinforcement.
After all the cracks have been eliminated, you should pay attention to whether the surface is even. A poor-quality surface and its unevenness over time can lead to new defects, which will be more difficult to eliminate. You can level the surface using a milling machine.
Sealing cracks
To seal cracks, you can use repair compounds such as polymer-modified concrete, epoxy or cement mixtures with PVA glue. The depth and other properties of cracks affect the technology for sealing them. If the crack is up to 2 mm deep, it can be eliminated as follows:
- using a grinder with a diamond disc, the crack increases to a depth of 1 cm; dust is removed from the resulting seam; a primer is poured into the resulting cavity, previously diluted with a solvent in a ratio of 1:10; The repair compound is placed into the seam. If shrinkage occurs, you need to lay another layer; When complete polymerization occurs, the surface is painstakingly sanded.
When the widest cracks with a collapsing edge appear on the floor, the development of “strip repair” is applied, which is carried out as follows:
Concrete repair scheme.
- A diamond disc is used to make a cut in the crack up to 5 cm; Channels are cut along the crack on both sides and warped areas are removed; After deepening the formed area, all dirt and dust are removed; the cut site is primed with epoxy or polyurethane; the area is filled with a repair mixture in two layers and then painstakingly sanded.
Repair of expansion joints
Expansion joints in a concrete base can also wear out and require repair over time. They can evenly collapse, their density is damaged, and the edges are chipped. For restoration you will need to do the following:
- using a diamond disc, widen the warped seam, while cutting off the uneven edges perpendicular to the base; remove poorly adhering areas, concrete residues, dust, and debris from the seam; Apply an epoxy primer to the inner surface of the embroidered seam and seal it with a special repair compound; then the seams must be marked with special iron markers, which are installed along the entire length of the seam and at the place where they intersect; when complete polymerization of the repair composition occurs, the seams must be sanded to the level of the floor surface; Having removed the markers from the seam, following their traces you need to cut a new expansion seam, vacuum it and fill it with a sealing cord; To perform the final sealing of the seams, a silicone-based sealant is used.
Removing dust
After some time, dust appears on the concrete base. To remove dust and paint a concrete floor, you can apply different coatings to its surface.
If the floor is not subject to the highest level of overload, it is recommended to use thin-layer coatings up to 150 microns wide. To save money, you can apply a primer, concrete impregnation or varnish to a previously painstakingly cleaned surface.
If dust appears under the influence of intense loads, a protective polymer layer 250 microns wide is applied to the concrete floor. But regardless of which method is used, the development of the work contains certain stages:
- to improve the adhesion of the coating material and the base, the floor surface is sanded using a grinding machine; Next, all generated debris is removed with a factory vacuum cleaner; two layers of dust-removing composition are applied to the base using a brush or roller; Finally, a small amount of sifted quartz sand can be added under the coating to give the surface anti-slip characteristics.
Using the above technologies, you can perfectly repair a concrete floor with your own hands and return it to its original performance properties, even significantly increasing some of them. Timely repairs guarantee long-term service of the concrete floor and, as a result, save money.
Subscription
Category: Repair › Floor › Elimination of defects Date: 2012-02-16 10:33:34 The flooring market is developing rapidly, and the consequence of this development has been the emergence of more and more new materials. However, concrete is still a fairly common material. A floor made from it has a number of advantages: it is reliable, its production is relatively inexpensive and installation time is minimal. But concrete pavements are also not without their disadvantages. They mainly relate to the mechanical properties and structure of the material; laying technology and the qualifications of the craftsman who manufactures the flooring also play a big role.
Defects in concrete floors
Some of the most common defects in concrete floors include sinkholes, dusting, swelling, cracks and peeling of the material. Let's look at all these concrete floor defects
and we will see how they can be eliminated. The delamination defect occurs in cases where there are frequent changes in humidity and temperature. You should think about this problem even before starting concrete work: if gas-releasing and pore-forming substances are added to the solution, then such vibrations will not cause damage to your floor covering.
The surface layer may peel off, which is an indicator of either the low strength of the cement or its low content in the solution. This effect is also observed at a high water-cement ratio. Sometimes, due to these reasons, silica dust may appear on the surface. It is possible to get rid of surface peeling: using a mosaic grinder, before using any liquid hardeners, remove weak cement laitance from the top layer of the floor.
One of the most unpleasant defects is the appearance of shells on the surface. Their diameter sometimes reaches 5 cm, and their occurrence is often caused by the incorrect use of active alkaline fillers. Interestingly, such surface damage can take quite a long time to develop. To eliminate them, simple repairs to the concrete floor are sufficient.
Other floor irregularities
Due to excessive grinding and rapid compaction of the laitance with a steel disc, swelling may occur. Why does it appear? At 1-3 mm from the surface, pores begin to form, inside which there is water or air. To eliminate this drawback, you need to dismantle the entire top layer.
One of the most unpleasant moments when working with concrete is cracks. Unfortunately, when they appear, carbon dioxide, salts and other substances enter the material along with water, which lead to corrosion and rupture of concrete. Repairing the flooring will bring little benefit. The main reason for the appearance of this defect is external influences during construction work and violation of the technology for creating the coating. In addition, concrete floors may have other unevenness, and their complexity may vary. These may include minor differences in height, deep holes or chips.
The type of unevenness is the main indicator that affects how to eliminate them. If the unevenness is relatively small, then they can be corrected by sanding, after which it is necessary to apply a finishing layer to the surface. With deep potholes and holes the situation is different. It is necessary to perform jointing work, then putty, make a leveling screed, after which fill the finishing layer.
Common mistakes when creating concrete flooring
Let's look at the defects of a concrete floor
and the mistakes that led to them. When making a concrete floor, care must be taken to ensure that a well-compacted cushion of crushed stone is made. In addition, the coating must have drainage to remove moisture.
If you use fillers of fine fractions and a denser mixture, then shrinkage of the material will be avoided. This factor leads to cracks appearing on its surface during concrete hardening.
If you sprinkle fresh concrete with cement, create a mixture with a high water-cement ratio and perform premature grouting, hairline cracks may appear on the surface of the floor. Although they are not dangerous to the structure of the floor covering, they still have a bad effect on the appearance of the product and, if another material is laid on the floor in the future, they may contribute to the deterioration of its characteristics. Such hairs appear due to the release of fine filler and water to the surface. As a rule, cracks appear during hot weather with strong winds.
Although concrete floors are reliable and affordable, everything needs to be carefully thought out when making them. If the elimination of defects in a wooden floor can almost always be done and, as a last resort, you can simply replace the board, then concrete does not forgive mistakes. There is a high probability that you will have to pay for the repairman’s mistake by completely dismantling the entire floor and making a new coating.
Repairing cracks and potholes in concrete floors
When replacing the floor covering, apartment owners often have to deal with the need to repair the concrete floor, which can be either a concrete screed or the interfloor floor slab itself. Despite the fact that concrete is a durable and reliable material, under the influence of various factors, potholes and cracks can appear on it. To prevent further destruction, timely measures are necessary, because the service life of the finished floor depends on the condition of the concrete base. Let's find out how to repair a concrete floor using special mixtures for repairing concrete floors.
Types of damage and preparation for floor repair
Before deciding whether to start repairing industrial floors or floors in an apartment, you should know what type of damage is and how it should be removed. It’s worth starting repairs if you find cracks or potholes that you can deal with yourself, but you shouldn’t delay it, because the next stage is replacing the floor screed. The violation of the integrity of the seams of the floor covering and an excessive amount of dust make you think, and this is the first signal that the structure of the cement is broken, which can lead to destruction.
If each of the listed troubles is detected in a timely manner and immediate repair of the concrete floor screed begins, it will take a short period of time, and besides, you will not need large investments and the help of specialists, whose services are not cheap. The main thing in this case is to follow the sequence of work and do everything according to our instructions. And it looks like this:
- First of all, you will have to get rid of the old floor covering, and the complexity of the work depends on the type of covering and the degree of its wear.
- Before starting work on restoring the concrete floor, it is necessary to dry the screed for 1-2 days.
- When starting work, remove dirt and dust, for which it is better to use a vacuum cleaner and other means. If you find mold and rust residues, they should be removed using a wire brush. Paint and grease stains should be removed with special means.
- A serious obstacle to repairs can be the reinforcement or reinforcing wire used during concreting; to remove metal pieces, you will need a grinder or tools used for stripping.
After the floor surface is ready for repair, you can begin work, but you must strictly follow the instructions and advice of the “experienced”. The durability of the floor and its coating depends on how correctly you carry out the repair, which is especially important given the high cost of the floor covering. The technology for repairing a concrete floor is not complicated, and you can see this for yourself.
Causes of defects in concrete
Defects on a concrete floor can form for various reasons, which are primarily associated with violations in the process of its arrangement.
Cracks often appear due to the absence, untimely cutting or incorrect calculation of the thickness of joints in concrete floors, designed to prevent stress on the concrete during thermal expansion and shrinkage. A correctly made temperature-shrinkable seam will avoid many problems.
Other reasons for the appearance of cracks include:
- a large amount of water in the solution when pouring a concrete screed or a lack of it;
- poor quality reinforcement;
- lack of waterproofing of the base.
Defects can occur even with quality work done. Any coating is subject to natural wear and tear and is negatively affected by excess moisture. Potholes are caused by physical forces. The influence of external factors on the concrete floor cannot be ruled out. The weak point is the junction of the wall and the floor; cracks often appear there.
It is necessary to determine the type of damage. This will allow you to draw up a work plan and select the right material. The following types are often encountered:
- small depressions, potholes;
- cracks of various sizes;
- the finest cracks and chips.
Repairs should not be delayed for a long time. The size of the defects may gradually increase, the concrete will begin to crumble and come off in pieces, which will complicate the repair of problem areas.
Operational damage
This type of damage is the most common.
Mechanical damage occurs due to a variety of factors and is conventionally divided into internal and external. The latter can be detected on the floor surface independently, but to find the internal ones you will need a special device - a concrete flaw detector. The most common mechanical damage and the causes of their occurrence:
- chips. They are formed as a result of mechanical impact on areas of the floor, under which there are zones of low density. The reason for the appearance of chips may be a violation of the ratio of water and cement in the concrete solution during pouring, the absence of temperature-shrinkage joints, insufficient reinforcement, or movement in the base;
- potholes. Usually caused by shock loads. Potholes can also form as a result of heavy impact, such as where heavy equipment is located;
- peeling of the top layer of concrete. It most often occurs as a result of poor drying of the concrete surface and finishing it until the solution is completely hydrated;
- bloating. They appear when the surface layer of concrete has been compacted until air bubbles have been completely removed from the mortar mass. Blisters also appear after treating an undried concrete surface with impregnations or paints;
- cracks. Over time, they can expand and join together, which can cause large potholes to form.
https://www.youtube.com/watch?v=https:accounts.google.comServiceLogin
As we can see, the appearance of some defects could have been avoided. But chips, potholes and cracks form during the operation of a concrete floor, so they must be periodically repaired.
To minimize the possibility of mechanical damage, it is necessary, first of all, to follow the technology for constructing a concrete floor.
When arranging a concrete floor, the following rules must be observed:
- The class of concrete must correspond to the design loads. Saving on materials can cause the service life of the floor to be reduced significantly and you will have to spend money and effort on repairing it much more often;
- the technology of pouring concrete mortar and its further drying must not be violated. Concrete requires high-quality compaction, and when hydrated it should not lack moisture;
- You should pay attention to the timing. If concrete without special modifier additives was used to pour the screed, then you can begin finishing the surface no earlier than a month after installation work;
- During operation, the concrete floor should be protected from excessively intense impacts. Loads, of course, will be present, but you can reduce the harm from them. For example, simply limiting the speed of traffic on an industrial floor results in much less damage to the coating.
We suggest you read: What you need to consider before building a bathhouse
All the defects listed below arise either as a result of improper use of the concrete floor, or as a result of violations of the technology for its arrangement.
Operational damage includes:
- screed deformation. This defect is expressed by a change in the level of the concrete floor. The coating most often sag in the center and rises at the edges. The reason may be the uneven density of concrete when pouring due to insufficient compaction, as well as insufficient reinforcement thickness and different humidity of the lower and upper layers of concrete;
- cracking of the screed. Cracks can occur both due to mechanical impacts on the floor and during its deformation, which can be caused either by thermal expansion or excessive loads significantly exceeding the design ones;
- peeling. Peeling of small flakes is observed on the concrete surface. It usually begins with the appearance of a network of small cracks. The cause of this defect is too rapid evaporation of moisture from the top layer of concrete;
- dusting of the concrete surface. It is expressed in the appearance of fine cement dust on the floor surface. It may be due to several reasons. This is a lack of cement in the solution, and excess moisture when pouring the floor, and the effect of various abrasives on concrete.
Operational damage is somewhat more difficult to eliminate than mechanical damage.
To minimize the risk of defects occurring during the operation of a concrete floor, the following recommendations must be taken into account:
- the solution should be processed and poured according to all the rules of technology, avoiding its peeling and delamination when drying;
- To prevent cracking of concrete, it is necessary to lay a damper tape around the perimeter of the room to compensate for deformations. On large area screeds, expansion joints with polymer filling must be made;
- it is also necessary to properly prepare the base for the screed: the denser the soil is compacted, the less likely it is for subsidence, deformation and cracking of the concrete structure;
- In order to avoid the appearance of surface damage, a polymer-based strengthening impregnation should be applied to the concrete surface or the concrete should be “ironized”.
We invite you to familiarize yourself with: Gas stove for sauna characteristics
Selecting a mixture for repairing a concrete surface
Before you start repairing the floor in an apartment with your own hands, you need to prepare a mixture for restoring concrete surfaces and structures. They are presented in large quantities in construction stores. In order to choose the right brand of mixture, you need to determine the degree of damage to the concrete surface:
- First degree - there are cavities and shrinkage cracks.
- Second degree – surface peeling, small chips.
- Third degree - cracks within 2 mm with a depth of no more than 40 mm.
- Fourth degree – cracks more than 2 mm, depth up to 10 cm.
- Fifth degree - large potholes and cracks, depth more than 20 cm.
The purpose of the repair mixture must be indicated on the packaging. Such manufacturers of mixtures for restoring concrete surfaces as Emaco, Birss, Ceresit, and Bars deserve attention.
You can use universal repair mixtures, such as Ivsil Render.
Since the price of special thixotropic compositions containing reinforcing microfibers and polymers is quite high, for a small amount of work the mixture can be prepared independently. To do this, take 1 part PVA glue and mix it with 4 parts water. Using this solution, using a construction mixer or a special attachment on a drill, mix the sand-cement mixture in a ratio of 1:3.
Leveling the concrete surface
During its operational life, the concrete surface can change and lose its original evenness. Such uneven coverage must be corrected without fail. Initially, the surface must undergo milling (depth no more than 1 cm), and then it should be sanded to completely eliminate defects.
Rotary milling machine for concrete CNXB-1
Grinding and grinding machine SCHWAMBORN DSM 530SL
Angle grinder with diamond attachment HYUNDAI G 750-125
Using an industrial vacuum cleaner, it is necessary to clean the already sanded floor. For additional strengthening, use impregnation. To do this, you can use a primer based on epoxy resin or polyurethane, which must be diluted with solvent R-646, or for dissolution, use a solvent in a ratio of one to ten.
Want to learn how to make concrete with your own hands? Read about it here.
In this article you will learn about making a concrete fence yourself.
By following the link - https://vse-postroim-sami.ru/building/interior-decoration/608_kak-shtukaturit-gazobeton/ - you will learn about plastering aerated concrete.
Apply a concrete floor leveling solution or mixture to the prepared floor and level it using a control strip. After complete polymerization of the solution, it is necessary to carry out final sanding of the floor.
Return to content
Preparatory work
After choosing the material for repairing concrete floors, you should begin the repair. First comes the preparatory stage:
- All foreign objects are removed from the room.
- Existing debris, concrete chips and dust are swept away. Potholes and cracks are thoroughly cleaned with a vacuum cleaner.
- Any dirt, rust, mold or old soil is removed with a stiff metal brush.
- To remove grease stains, you need to use a special solution.
- The concrete floor is swept with a wet broom, then it needs to be dried.
- If the reinforcement is visible, it should be cleaned with sandpaper and primed with a compound with anti-corrosion properties.
It is better to tap areas of the concrete surface that have lost strength with a hammer and clear them. The rule also applies to the edges of problem areas.
Filling potholes in a concrete floor
Repairing concrete floors begins with widening and deepening the pothole around the perimeter. It is better to use a grinder with a diamond blade for this.
- The cut is made 1 cm deeper than the defect. The pothole widens to the sides by 2–3 cm. If necessary, these figures are increased.
- Using a hammer drill or a hammer with a chisel, a recess is made at the site of the pothole; a rectangular depression should be obtained. If a hammer drill is used, it is better for strangers to move away.
- The recess is thoroughly cleaned with a vacuum cleaner and primed.
- You can fill the pothole after the soil has dried. The mixture is carefully leveled and pierced several times to remove air. You can use a metal pin or trowel. Level the surface using the rule.
The depth of the pothole matters. If it is more than 5–6 cm, then the composition is poured in several layers. The maximum layer thickness is 2 cm.
- After hardening, they proceed to grinding. A building level will help you achieve a level concrete base.
It is recommended to carry out work wearing a respirator, safety glasses and gloves. Windows must be open during renovation. The floor can be coated with concrete paint, which will provide additional protection. It is selected specifically for residential premises. A floor repaired in this way will last a long time.
Description of repair of small potholes
When any weighty objects fall onto the floor, potholes may appear. Their size depends not only on the weight of the object that became their source, but also on the period before the start of work. The sooner everything is eliminated, the fewer manifestations will arise.
After cleaning the surface of the pothole from debris, it is covered with a layer of primer to increase the degree of adhesion. In some cases, substances are added to existing cement compositions to strengthen them. Such mixtures are sold ready-made in stores. Each package of repair composition for concrete floors contains instructions on the conditions under which the solution should dry.
There is another option for getting rid of potholes - making a cut along its perimeter, up to 20 mm deep. The old coating is completely removed. A chisel, hammer drill, or grinder will help with this. Next, all that remains is to clean it of debris, prime it and fill it with solution. Once dry, the surface is sanded.
The presented instructions fully describe the process of minor repairs. The edges of the potholes are processed using a grinder with a diamond wheel, cutting out a rectangular hole with smooth edges. At the same time, its perimeter is expanded along all edges to two centimeters. We also increase the depth by 1-2 cm. This depends on the strength of the screed - the more dusty it gets, the deeper it needs to be cut.
All bulges are removed with a punch or manually. All recesses are knocked out in the form of a rectangle using a hammer drill. If they are shallow, they can be processed using a hammer and chisel, but be very careful so that the pothole does not crack. The dust in the pothole is first blown with a vacuum cleaner and then sucked up.
Treat the excavation from the inside with a layer of priming solution for concrete surfaces. After complete drying, the recess is sealed with a previously prepared cement solution, leveled with a rule and left until completely cured.
Rules for repairing cracks
The process for sealing cracks in a concrete floor varies depending on their size.
- Small cracks expand in depth and width by 2–5 cm. To do this, you can use a chisel or grinder.
- The recess is cleared of pieces of concrete and dust, then treated with a primer.
- To repair cracks in a concrete floor, use a homemade mixture based on PVA. They fill the crack with it and wait for it to shrink.
- A second layer is applied, dried and sanded.
Major repairs of a concrete floor: cost
In case of severe damage to the concrete covering or when installing a “warm floor” system, a major repair will have to be carried out - a complete replacement of the concrete screed. If you contact specialists, this procedure, taking into account materials, will cost the following amount:
- in Moscow – from 420 rubles/m2;
- in St. Petersburg – from 380 rubles/m2.
Dismantling the old concrete screed is not included in this amount; the price depends on the area of work: the larger it is, the cheaper.
(votes: 5 , average rating: 4.00 out of 5)
What causes defects?
In most cases, it is cracks that arise or they are the reasons for the further development of defects in the form of delaminations. The reasons may be the following factors:
- Mechanical damage (excessive load, vibration, water wear, etc.).
- Chemical damage (reaction of alkaline, salts, acids).
- Physical reasons (rain, freezing, erosion).
Penetration of moisture into the reinforcing layer with further corrosion causes peeling
Often the reasons are not particularly significant because the choice of restoration methods is not so extensive. You can carry out repairs to concrete coatings and surfaces yourself.
Types of concrete repairs
It is not so much the reasons that influence the course of events as the ways to eliminate defects. There are three repair methods:
- sealing cracks;
- repair of chips;
- laying a new layer.
The last of the presented methods is an extreme measure, which is resorted to when the concrete surface of the yard is so damaged that local repair work is ineffective.
The process of removing dust from a concrete surface
After concrete has been laid, or after you have repaired a concrete floor with your own hands, dust will appear on it. It is important to rid the surface of it.
In the absence of large mechanical loads on the base, special coatings are used that can be applied in a thin layer (no more than 150 microns). To reduce costs, you can use a primer, impregnation for concrete floors, or a special varnish for treating concrete.
You will read more about dust removal from concrete floors in our next article.
And this article talks about which paint is best to paint a concrete floor.
By clicking on the link - - you will find information about choosing a concrete mixer.
In case of large dust formation, due to the high level of load on the base, it is recommended to apply a polymer coating, which performs the function of protection, the thickness of which is about 250 microns.
Despite this, the general technology of construction work to eliminate dust is observed:
- To improve adhesion, sand the concrete floor.
- Using a construction vacuum cleaner, get rid of all kinds of debris.
- Using a roller or brush, apply a special composition for removing dust from concrete floors. (2 layers).
- If you want the floor to have a non-slip coating, then before the third stage you need to sprinkle the floor with fine-grained quartz sand.
Thus, timely repair work will guarantee long-term operation of the concrete surface, which means that you will save a fair amount of money in your wallet.
Return to content
Repair of defective areas
It is worth dwelling in detail on the most common flaw. Having eliminated the crack, they get rid of other defects. Cracks appear on the concrete surfaces of the yard due to incorrect pouring technology: the movement of the soil during freezing causes uneven stresses in the structure, which cause fractures.
To seal cracks, use special compounds or cement mortar.
To carry out the restoration, the necessary materials are stocked. The set is simple - components of sand-cement mortar (sand, cement, water) and PVA glue.
Preparing the base
To carry out restoration, the first step is to prepare the surface. This is done as follows:
- Determine whether there are chips on the surface. They appear in the area of cracks, which can later turn into pits.
- Expand the cracks. The chisel is inserted into the crack and lightly hammered. This is done along the entire length. Remove peeling areas.
- Make sure that the cracks are deeper than 5 mm. Otherwise, the applied solution will not be able to adhere securely. The crack is deepened with a spatula.
- Cleaning from dust and dirt. They go over it with a metal brush, wash it off with water, and when it dries, remove it with a vacuum cleaner.
Repairing a crack
Seal the prepared area with cement mortar. A solution is prepared in a cement-sand ratio of 3:1. To increase ductility and strength, add a little PVA glue.
- The crack is filled with a solution.
- The surface is leveled with a spatula.
Advice! Use specialized products or silicone sealant as a repair composition.
Sealing technology using a combined method using a thixotropic composition and sealant
Repairing chips
The steps to eliminate chips are identical. First clean the chipped area and apply cement mortar.
Restoration of chips
Often the edges of coatings chip off. To repair such areas, boards are used as formwork. The solution is applied above the level because it shrinks when it dries.
- Remove concrete from the damaged area and get to the reinforcement. Clean the edges of the chip.
- Protect the fittings with an anti-corrosion agent, after cleaning areas with rust.
- Treat the chipped surface with an adhesive compound and fill with the prepared mixture.
It's easy to do it yourself. Actions require precision.
How to restore a concrete floor in the yard, watch the video.
Major renovation
If damage exceeds 30%, the structure is completely replaced. The old screed is removed.
Calculation of screed thickness. The calculation is always carried out from the bottom up, providing for a larger margin.
The traditional design, taking into account thicknesses, looks like this:
- waterproofing (plastic film) – 1 mm;
- thermal insulation (expanded clay bedding, mineral wool slabs, expanded polystyrene) - from 25 mm;
- reinforcing mesh – 6 mm;
- protective layer of concrete - depends on the loads;
- finishing coating.
Markers for screeds
The solution is leveled along rack or pin markers. Both types are fixed with a small amount of cement-sand mortar. The pins are laid in the corners and along the wall structures in increments of 0.5 m. The profiles are parallel to each other, the first with an indentation of 25-30 cm, then in increments of 1-1-.5 m.
Height marks along the pins are made using a tightly stretched cord and a level.
They start working from the corner closest to the doorway - diagonally. A second diagonal is struck along the primary cord. Next, they stretch them around the perimeter and mark them on wall markers.
The procedure for major screed repairs:
- the base is cleaned of sludge and debris, including together with special mixtures for cleaning concrete;
- the surface is treated with a concrete finishing machine and removed dust with an industrial vacuum cleaner. A primer is applied to the entire area; you can use a familiar polyurethane or epoxy primer;
- waterproofing is laid on the dried layer (overlap 15 cm, approach to the walls to a screed height of 2-3 cm). The joints are taped;
- thermal insulation is arranged. Expanded clay is poured in, leveling it with a rolling roller. Either slabs of mineral wool or expanded polystyrene are tightly laid with spaced seams;
- laying reinforcing mesh. The material should depart from the walls by 3-4 cm, the overlap should be 1-2 cells. The mesh is fixed into a single structure with knitting wire;
- Markers are placed on the surface. If pins are used, the heights are checked when the solution hardens;
- prepare a viscous cement-sand mortar in a ratio of 1:3 and pour it between the markers. Each portion is equalized by a rule;
- When the material has hardened, the guides are removed and the recesses are filled with solution.
Materials for major screed repairs:
- thixotropic mixtures, incl. fast-hardening;
- repair liquid mixtures;
- non-shrinkable concrete mixtures.
Depending on the operational loads on the floor, metallized, corundum or quartz hardeners are used. The first option leads in terms of strength and is effectively used on industrial floors. For higher and medium loads, it is advisable to use corundum mixtures. They strengthen the surface of the screed up to two times.
READ MORE: Types of beacons for floor screeds and do-it-yourself installation
This solution is considered optimal for floors under abrasive loads (warehouses, gas stations, places with high pedestrian traffic, etc.). Quartz hardeners work under conditions of light and medium loads. They are more affordable and are characterized by high decorative capabilities due to coloring with colored pigments.
The technology requires an exclusively professional approach. Any mistakes will cause defects and peeling of the hardener. The screed must be reinforced, with a concrete layer thickness of 7 cm and above. Toppings work on concrete M300 and higher.
The readiness of the coating for hardening is determined visually - there should be a slight shoe mark (4-5 mm) on the surface.
The freshly poured structure is well compacted by vibrators. After filling, wait about 7 days.
Then proceed as follows:
- the composition is distributed over the base with dosing trolleys at 2/3 of the total consumption. Spreading begins from the junctions, since this is where the concrete sets the fastest;
- After the topping has been saturated with moisture, which can be seen by its darkening, grouting is carried out using concrete finishing machines. The mixture must be embedded in the concrete structure;
- After the first grouting, immediately add the remainder of the hardener. After it has been impregnated with concrete moisture, grouting is carried out;
- finishing treatment is carried out after the screed has set deeply, when the footprint of the shoe does not go deeper than 1 mm. In practice, 2 hours is enough for this. To do this, blades with a gradual change in the angle of inclination are installed on the grinding machine. The finished surface has a characteristic matte shine.
When all work is completed, you can treat the screed with a special moisture-retaining compound. The floor requires care; for this, it is covered with polyethylene film. After 24-48 hours, expansion joints are made using a seam cutter. After the screed has fully matured, the seams are sealed with polyurethane sealants.
If you think that repairing a floor screed can be done simply by pouring concrete, then this is a mistake. Such a paw will not save the screed from destruction and is unlikely to make the floor smoother.
Old concrete, which has already stood for ten years, differs in strength and chemical composition from fresh mortar. They have completely different structures and such indicators as expansion from heating and shrinkage rate.
If you want to carry out high-quality repairs to a concrete floor, then you need to match the characteristics of the new and old cement screed.
The main characteristics of concrete that are worth paying attention to are rheology and thixotropy.
Thixotropy
This is the property of a medium to reduce its viscosity with constant exposure. Let's take bitumen as an example. If you run your finger over it, you immediately feel the roughness, and then the finger begins to slide freely. By the way, the plates of the earth’s crust move according to the same principle.
Repair compounds for concrete surfaces
Criterias of choice
To seal defective areas, special mixtures are produced or cement mortar is used. When choosing a repair composition for the floor, the operating conditions of the coating are taken into account. There are many factors:
- weather;
- exposure to chemicals;
- temperature regime;
- load intensity.
Attention! Repair compounds from domestic manufacturers are considered the best choice, because they are specially designed for weather conditions in our country.
When choosing, they focus on quality. If the mixture has a high cost, it should have the following properties:
- fast setting;
- high degree of adhesion;
- thixotropy (increase in viscosity).
If the composition is of high quality, then the composition contains polymer fiber or filler from small fractions. This solution structure allows you to make a layer up to 10 cm, reducing consumption to 10%. They are strongly reinforced throughout the structure and do not peel off.
Types of compounds
Repair compounds for concrete surfaces are divided into 2 categories:
- liquid Used for horizontal surfaces.
- thixotropic. Due to their increased viscosity, they are used for vertical surfaces and for finishing ceiling structures.
Non-shrink composition
There is a separate category of compounds that do not shrink and are waterproofed. This property is achieved using special additives that are added during production. If you use this composition for restoration, the new monolithic covering of the yard will last at least 50 years.
In addition to the fact that moisture cannot deteriorate the quality of the coating, elasticity improves, which allows increasing resistance to mechanical loads. There are different types of non-shrinking compounds: some are used to create new monolithic structures, others are used to repair floors and walls.
The non-shrinking composition has a high degree of adhesion and sets quickly. And the repaired section of the floor cannot be distinguished from the entire structure. If you plan to repair an area of more than 5 square meters, then reinforcement is needed. To do this, use a reinforcing mesh attached to dowels.
There are many restoration compounds that you can use to repair your floor yourself. The choice of product is made taking into account the characteristics of surface use and the degree of defect.
Concrete surfaces are sometimes not strong enough or not designed to withstand certain loads. In such cases, strengthening of the fill is required. There are special deep-penetrating strengthening compounds (primers) for this purpose.
Why does floor screed crack?
The floor screed of houses can crack for various reasons. It is the cause of cracking that should be clarified first, because the nature of the restoration work depends on it. After a crack appears, you should find out whether it appeared because the screed was initially performed incorrectly.
The cause of cracks can be the usual installation of beacons and sequential laying of the screed: different mixtures interact, as a result of which over time it cracks throughout its entire depth.
If a lot of water was used during the preparation of the screed solution, this also leads to cracks forming on its surface over time. Excess water significantly affects the quality of the composition and leads to deformation of the floor. A large amount of water makes the composition not strong, but loose. This is what may cause the cement screed to burst.
Quite often, cracks in the floor screed can appear from an excess of water in the cement mortar.
Recommendations for preventing cracking:
- The reinforcement cannot be laid on the screed itself: it must be in concrete.
- Use damper tape.
- Do not use cement mortar to fill a wooden floor.
- When laying semi-dry screed, use polyethylene.
- Choose only high-quality materials.
If cracks appear despite following all the recommendations, you need to start repairing them. To do this, you should choose a high-quality repair composition and perform preliminary dust removal of the surface being repaired. After the composition has hardened, high-quality surface treatment must be carried out, which will help to perfectly level it.