When carrying out major renovations, we usually need to refinish the surfaces. And the quality of the latter will depend on how smooth and prepared the base is. In this material we will talk about whether it is necessary to putty the floor in the case of concrete or wooden floors, and whether this approach will help to create the ideal base for linoleum or other floor covering.
What functions should putty perform on the floor?
- In the case of a wooden surface, the material allows you to hide joints and cracks in the boards, giving the floor a monolithic, presentable appearance. In this case, the use of putty can prevent squeaking, if any;
- Wooden floors can also be protected from moisture using putty if the appropriate composition and primer are used;
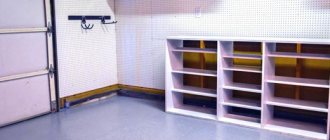
- Regardless of the type of floor (wooden or concrete), the putty performs leveling functions. Linoleum, laminate, parquet and other types of floor coverings must be laid exclusively on a flat floor, which is what the putty composition allows you to achieve.
Conclusion
It is worth noting that the quality of the final result depends on the choice of the optimal composition, so it is worth paying close attention to this issue. The video in this article will help you understand some of the features of this topic even better.
The level of quality of further repairs depends on how correctly the concrete walls are puttyed.
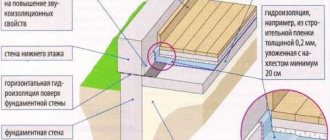
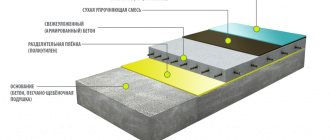
Sectional diagram.
Before puttying concrete walls, it is necessary to prepare them; for this purpose, a primer is used. This will be an excellent way to protect the base from fungus and mold. In addition to antiseptic characteristics, the primer can give the base excellent adhesive properties, which will help finishing materials to firmly adhere to the surface. Priming will eliminate unwanted roughness. If the base has a significant deviation from the vertical plane, then before puttying it is recommended to apply leveling plaster, which is done in 1 layer. Initially, it is recommended to place the beacons using T-shaped metal profiles, after which it is necessary to apply a plaster solution to the treated surface of the walls, leveling it using the rule.
Choosing a composition for a wooden floor
By wood, in this case, we mean the use of both ordinary floor boards and various panels created on the basis of sawdust materials, such as chipboard, fiberboard, and the like. In both cases, it is necessary to select a putty composition for wood. The compositions themselves are selected under the influence of the following factors:
- Level of wear on wooden floors. If we are talking about a fairly heavily worn surface with large potholes and changes in height, then it is better to apply an epoxy compound to it. For small defects, the acrylic option is also quite suitable;
- One-component or two-component mixture. The first is sold in sealed containers, ready for use, and the second consists of two parts - a hardener and a binder base. In the case of a two-component composition, we will have to spend effort on preparing it, mixing it immediately before use.
Varieties
- What putty can be used on concrete?
Putties, like plasters, are classified primarily by the type of binder. The following binders are fully compatible with concrete:
- Portland cement;
- Gypsum;
- Acrylic resins;
- Epoxy resins.
Two-component epoxy putty. There is a hardener in a small jar.
Putty for concrete floors - nuances of choice
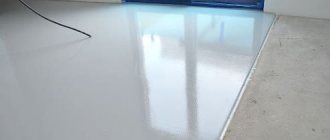
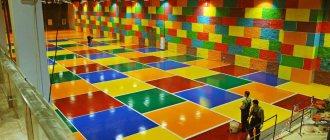
Similar work can be carried out on a concrete floor using a base, finishing or universal putty material. However, the most attractive will be self-leveling compounds, which greatly facilitate the finishing process, since they independently fill in unevenness and form a smooth surface, which can then be used as a basis for further finishing. This material is based on the same concrete, but there are also additives such as polyurethane and polyester. What is their difference:
- Polyurethane. This putty attracts with its environmental friendliness, as well as the highest resistance to various substances: water, organic and synthetic solutions, acids and alkalis, and petroleum products. By the way, it can also be used for wood, as well as for metal surfaces;
- Polyester. The mixture on this basis has the highest strength and adhesion, allowing it to be used in combination with a wide variety of types of surfaces. At the same time, the mixture is very elastic, so cracks do not appear on it. Well, the absence of shrinkage allows you to fill the floors to the required level and achieve a perfectly flat surface.
Important! An alternative would be urethane putty with waterproofing properties. This material is attractive not only because it is resistant to water, but also to various organic substances, as well as physical impact. The material can be used in rooms with a high fire and explosion hazard, as well as where complete environmentally friendly finishing is required.
Cement putties for industrial premises and a budget option for home
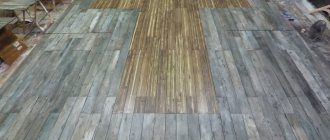
Wooden flooring has always enjoyed wide popularity due to its durability, high resistance to stress, attractive appearance and environmental friendliness. However, over time, the wooden floor loses its original appearance, cracks and crevices appear on the surface, the boards undergo deformation and dry out. Therefore, putty for a wooden floor is a necessary restoration measure to preserve the aesthetic appearance and performance properties of this floor covering.
Putty for a wooden floor is needed not only for installing a new one, but also for cosmetic restoration of the old coating. This material perfectly eliminates existing defects and allows for high-quality preparation for further finishing. The use of a putty mixture provides a significant improvement in the aesthetic and technical characteristics of the floor, increases its resistance to external factors and preserves the beautiful texture of the wood for a long time. Even if you decide to renovate the old floor with simple painting, experts recommend puttingtying it first to eliminate old cracks, unevenness and other defects.
Today, the market offers various options for putties that are suitable for wooden flooring, but you should choose those that meet the following requirements:
- They have a uniform texture without foreign impurities.
- Provide high adhesive properties.
- They dry quickly and apply easily to wood.
- Do not crack after drying.
- Can be sanded.
It is desirable that the putty does not shrink too much, otherwise several layers will have to be applied, which significantly increases the cost of repair work.
Tips for applying putty to a concrete floor
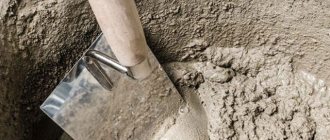
- Unlike walls and ceilings, in such floor finishing, the ability of the mixture to spread, evenly covering the surfaces and filling all the cracks, is important. So the consistency must be made more liquid than that of mixtures for walls and ceilings;
- Stirring the solution by hand is too long and difficult, so the best solution would be to use a drill with a special attachment for this;
- The average “lifetime” of the mixture in a ready-to-use form is 3 hours. Therefore, you need to dilute the amount that you use at this time;
- The floor surface must be thoroughly cleaned of dirt and dust and degreased;
- It is not necessary to apply a primer when the floor is thoroughly cleaned. Only do this if the floor surface may have major adhesion problems;
- You should not pour the material onto the floor in a layer that is too thick, as it may crack when it hardens, not to mention the fact that the hardening itself will take much longer;
- The hardening of the layer will last about a day, but the time here can vary greatly, both from the type of plaster itself and from the temperature and humidity in the room.
How to putty a wood floor
- You need to start by completely cleaning the floor and removing grease stains, which can greatly reduce the adhesion to the finishing material. It is important that when carrying out such work, you should never use water, as it will saturate the wood and also impair adhesion. If water is used, it is necessary to wait until the wooden surface is completely dry before continuing;
- We caulk the joints between the boards, using a large screwdriver or chisel for this, and using these tools, driving the putty inside;
Important! With large cracks, the process of pouring putty becomes pointless, as it simply spills down onto the joists. In such cases, it is best to use twine soaked in wood glue, thus bridging the gaps. If the latter are not very wide, then it is better to fill them with putty with larger particles.
- The composition itself is applied to the boards and joints with a small spatula, making cross-shaped movements and thus leveling the layer;
- After the composition has dried, the floor can be processed with a grinding machine, thus obtaining a mirror surface. But this is relevant if it is necessary to paint or varnish the surface. If you plan to finish with laminate or linoleum, then this stage can be neglected.
Technologies
- How to prepare a concrete surface for priming and puttying?
Instructions - general for floors, ceilings, walls and other surfaces:
- Layers of paint, peeling putty and plaster are removed from the base;
- It removes grease and oil stains;
- The surface is thoroughly dust-free.
Now - a little more detail about each point.
Alkyd, oil and nitro paints are removed with a steel spatula after softening with a universal remover. The remover is applied in small areas 10 minutes before stripping.
Instead of a wash, you can use a construction paint: the surface is heated to 250-300C, after which the softened paint is removed with the same spatula.
Avoid heating one area for too long. Due to temperature changes, concrete can crack.
Water-based paints can only be removed by sanding. For cleaning, you can use a soft
metal brush attachment for a drill or grinder.
Lime and cement plaster are removed with a hard spatula after abundant moistening two to three times. You can wet the base with a wide soft brush or a flower care sprayer.
To degrease concrete, use gasoline, acetone, solvent or white spirit. The oil stain is generously moistened with solvent and wiped off with a rag. If necessary, degreasing is repeated 2-3 times.
You can remove dust from the surface with an industrial vacuum cleaner or, in its absence, with a regular broom brush. In the latter case, dust residues will be glued to the base during priming.
Do not use a household vacuum cleaner for dust removal if you intend to use it in the future for its intended purpose. Concrete dust has excellent abrasive properties: passing through the vacuum cleaner filter and reaching the motor shaft and impeller, it causes accelerated wear.
- How to prime a concrete base
?
Penetrating primer is applied with a long-haired roller or brush. The treatment is repeated twice without a pause for drying: this ensures maximum penetration depth of the primer.
The adhesive primer is applied after thorough mixing throughout the entire package. The tool is the same - a roller or brush. Usually the base is primed in one layer; After the soil has dried, it should be uniformly rough to the touch.
- How to attach reinforcing fiberglass mesh or fiberglass to a wall or ceiling
?
The material is glued with thick PVA glue. It can be applied with a brush directly through the cells of the mesh pressed to the surface. With fiberglass it is a little more complicated: in its case, glue is applied to both the base and the reinforcing material, after which it is pressed to the surface and smoothed out.
The strips of reinforcing material must overlap each other by at least 50 mm.
- How to putty a concrete wall or ceiling with your own hands
?
Minor defects embroidered and treated with penetrating primer are filled with putty using a spatula 10-12 cm wide; then the surface is leveled with a wide spatula (30-35 cm).
It is customary to putty the entire surface with a wide spatula, onto which the construction mixture is applied across its entire width with a narrower (10-12 cm) tool.
The main tool for puttying is a wide spatula.
The putty is applied using sliding movements with moderate pressure. When puttying in several layers, the direction of the strokes in each subsequent layer changes to perpendicular.
It is easier to apply gypsum putty in two or three layers as thin as possible (“scrape off”). Each of them, with a thickness of about 0.5 mm, dries no more than 1.5-2 hours.
It is advisable to carry out all work in bright side lighting. It will highlight the slightest irregularities and grooves from the spatula, allowing you to immediately correct the defect.
It is useful to know a few more subtleties:
- Add the dry mixture to the water not by eye, but using a measuring cup and in accordance with the manufacturer’s recommendations. Putty that is too dry will fall off the wall, and putty that is too liquid will slide down it;
- Cement putty that has set but not completely dried can be rubbed with a wooden or polyurethane float, removing the stripes from the spatula. On plaster finishes they will have to be removed by sanding;
- When mixing cement putty, water and dry mixture can be added to the bowl in any order. When preparing a gypsum-based composition, water is first poured into the container, and only then the dry mixture is added. Otherwise, lumps of gypsum will remain at the bottom, which will be almost impossible to break during mixing;
- Both the mixing container and the spatulas should be washed immediately after the next portion of putty is used up. Lumps of the set mixture, falling under the spatula during puttying, will leave deep grooves in the finish;
- For mixing, it is better to use not a spatula, but a construction mixer or a drill with a whisk clamped into the chuck;
- After mixing, cement putty usually lasts no more than an hour, gypsum putty - from half an hour to 45 minutes. Therefore, the size of a single portion should not exceed 3-4 liters when puttingtying a surface and 1 liter when filling minor defects.
- How to remove putty from a concrete wall during the next renovation
?
Unless the finish is flaking or has major unevenness, it does not need to be stripped completely. It is enough to clean areas with cracks and potholes.
If the thickness of the putty layer does not exceed 3-5 millimeters, it is removed after soaking with water. I have already described the technology above: the surface is generously wetted 2-3 times and cleaned with a hard spatula.
An aqueous solution of starch softens cement putty more effectively. It is applied with a brush or spray.
What to do if a durable putty is laid in a layer of such great thickness that it is impossible to soak it throughout the entire volume?
Arm yourself with a chisel and hammer or hammer drill and take drastic measures. The chisel is installed at an angle of 45 degrees to the surface plane; the putty is chipped off in strips, after which the remaining irregularities are smoothed out using the method described above - with a spatula after soaking.
Making your own putty for wood
You don’t have to go shopping and spend your own money, but make a composition that meets the necessary requirements with your own hands. But here it is necessary to understand that such a mixture will be used more for filling defects in the floor or wooden structures than for completely covering it for the same purpose of leveling. So, there are several options:
- Wood dust is mixed with drying oil or oil varnish until a thick consistency is obtained. As an alternative to drying oil, you can use PVA or wood glue;
- 100 grams of animal glue, 125 grams of turpentine, 25 grams of drier, liquid soap and chalk. Soap is added to the heated glue, during the process of cooking and stirring, drier and turpentine are added to the mixture, and finally chalk is added. The mixture is brought to the proportions of dry sour cream;
- Homogeneous linoleum is diluted with acetone.
All of the above methods allow you to effectively caulk cracks; the preparation process can often be very difficult, and purchasing ingredients is more expensive than ready-made mixtures. For this reason, it is better to make such compositions with your own hands if you have some components on hand.
Cleaning up formwork defects
Despite the fact that the so-called “Eurowoods” are considered high-quality woods, the finished slab has a lot of roughness and sagging.
All protruding irregularities exceeding a height of 2 mm must be cut down using a hammer drill with a wide blade (the wider the faster). It is better to use the lightest (assembly) hammer drill, since chopping a ceiling is not a fun task, and the lighter the tool, the more you will save effort and, accordingly, have more time to do.
Disadvantages of the finished slab
Lightweight assembly hammer and shovel
Stirrer with chuck for hammer drill