Waterproofing the soil base is a job that requires care and responsibility. Such floors can be installed when the soil on the site is dry, there is no groundwater or it lies deep. It is also necessary to take into account the level of precipitation observed in the construction area. The waterproofing of the floor on the ground itself does not take much time, but concrete pouring is carried out along with it. It already takes almost a month to dry.
An example of a common mistake during construction: a leaky joint between the waterproofing of the floor on the ground and the horizontal waterproofing of the foundation wall.
The advantages of such floors are:
- Lack of work on laying large and massive slabs and beams. The floor is simply poured with concrete.
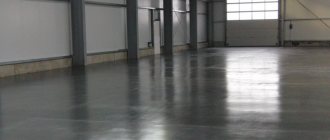
- High quality and durability of the resulting surface.
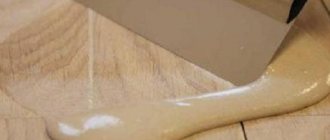
Scheme for applying liquid rubber.
Of the minuses, it should be noted that the soil requires careful preparation. You can’t just start working on land if it’s not brought into compliance with all the requirements. Laying a concrete floor on the ground can be done using various methods, but the most acceptable of them remains the following:
- The soil base is thoroughly compacted, after which a layer of sand is added.
- The second layer is expanded clay or crushed stone of small and medium fractions.
- The floor is directly waterproofed.
- After this, a rough concrete screed is laid.
- There is a layer of vapor barrier material.
- A heat insulator is installed.
- Reinforcement and finishing concrete screed are being carried out.
- The selected floor covering is laid, but only after the concrete has completely dried.
This course of work is considered optimal. Even without much experience, you can make such a floor with your own hands, without resorting to the services of specialists.
The installation of a waterproofing layer is a radical way to combat penetrating moisture
Let's consider the factors dictating the need for reliable waterproofing of the base floor on the ground:
- From a water-saturated layer located at a certain depth, water rises through capillaries. Moreover, the denser the soil, the thinner the capillaries and the more active the capillary rise.
Interesting! Even if the soil consists of dense and oily clay, the water in it can rise above the water-saturated layer by about 12 m.
If there is a concrete floor in the path of rising water, then the concrete or wood floor will be saturated with vapors and drops of water. Salts dissolved in groundwater have a detrimental effect on these building materials.
- Water penetrating into the pores of concrete structures freezes at subzero temperatures. At the same time, it expands by 9% and destroys the material. The cyclical freezing and thawing of water in the pores of concrete and wood causes their gradual complete destruction.
Rules for preparing a multilayer base
During the construction process, a multi-layer “cushion” is created under the house. It prevents the possibility of holes and dips due to natural subsidence of the soil and provides primary protection of the floor from moisture.
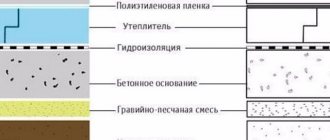
Rules for constructing a “pie”, activities are listed in a “bottom-up” direction:
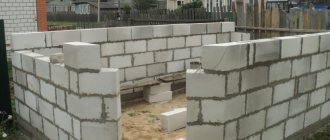
- The first layer is dense soil. Work begins with markings. Using an optical or laser level, set the zero mark. Soil compaction is carried out using tamping devices.
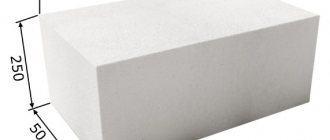
- Crushed stone-sand layer. For its construction, coarse crushed stone and not too fine sand are used. This bedding interrupts the capillary rise of water and provides a foundation for subsequent work. It is recommended to fill the layers one by one in the following order: crushed stone - 300 mm, sand - 300 mm, crushed stone - 150 mm, sand - 150 mm. Pegs that are installed in the corners of the perimeter help control the height of the laid layers. The horizontality of the backfill is adjusted using a building level.
If groundwater is located below 2 m, then it is possible to replace crushed stone with expanded clay. It is prohibited to use broken bricks for these purposes.
The technology for further work depends on the type of floor.
Purpose
Groundwater is found in almost all regions of our country and in all climatic zones. Even in the driest areas, the soil contains moisture. The only difference is at what depth it is located. The depth of its occurrence is called the groundwater level (GWL). Based on the height of their occurrence, the following levels are distinguished:
- high – depth up to two meters from the surface of the earth;
- low - more than two meters.
At any water level, moisture will gradually rise from the soil to the surface through the capillaries present in any soil. According to the laws of physics, the height of water rising in capillaries can reach 12 m. This is enough not only to moisten the walls, but also to completely flood some rooms. It should also be taken into account that the construction of a house will necessarily raise the groundwater level in the construction zone, again, according to the laws of physics. There are often cases when residents of private houses, who have lived in dryness and comfort for many decades, suddenly find their basements flooded immediately after the construction of a multi-story building nearby.
Physics also explains a paradoxical, at first glance, phenomenon - the denser the soil, the better the water rises. This is explained by the fact that the pores in such soil are thin and narrow, and this causes greater liquid pressure in them and, consequently, a higher rate of moisture rise.
The higher the GWL, the greater the likelihood of moisture getting from the ground into the room, the more serious the waterproofing should be. From the capillaries in the soil, water enters the capillaries of the foundation concrete or the pores of other building materials with all the ensuing (literally) consequences. Moisture getting into the pores of the walls is fraught with another problem - when freezing, the water expands, which leads to cracks and destruction of the walls or foundation.
Waterproofing a concrete floor on the ground
Stages of installing a concrete floor on the ground:
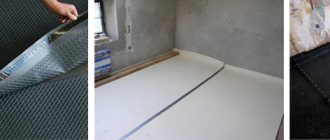
- Laying a hydro-vapor barrier. It is created using a plastic film laid on the top sand layer. The joints are insulated with tape. The film must not have any damage.
- A rough cement-sand screed is laid on top of the film, the thickness of which is in the range of 50-70 mm.
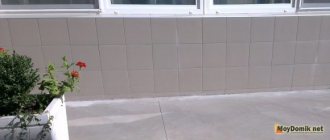
- A waterproofing layer is again installed over the rough screed using lining roll materials or a polymer-based membrane. Strips of one layer are rolled out in the same direction, observing an overlap, sealed with tape. There should be two layers in total. There should be no sprinkles between the layers. Waterproofing material must be applied to the walls by 150-200 mm. After complete installation of the floor structure, excess parts are cut off with a sharp knife.
Gaps at pipe exit points are sealed with non-hardening sealants.
- Insulation is laid on top of the waterproofing. In this case, mineral wool, hydroextruded polystyrene foam or expanded clay are used.
One of the insulation options is hydroextruded polystyrene foam
- Installation of finishing cement-sand screed.
There is another way to install a concrete floor on the ground:
- In this technology, the top layer is crushed stone, which is filled with cement-sand mortar.
The rough screed is coated with bitumen and a roll of adhesive waterproofing is laid on it
- Two layers of rolled waterproofing material are laid on top of it. When using roofing felt, the joints are heated with a gas burner.
- After installing the heat-insulating layer, a finishing screed is performed.
What should load-bearing walls be supported on?
Strip foundation
Since this type of foundation is not load-bearing, resting heavy stoves, brick partitions and massive stairs on it is highly not recommended. In these cases, a strip foundation is used as a foundation for the internal walls.
- Stiffening ribs are installed underneath them - reinforced concrete purlins that rest on the foundation; when the foundation moves, they will act as elastic inserts, dampening such deformations
- a gap is made in the thermal insulation layer and a reinforcement frame is installed into it, which is connected to the main floor frame; if the thickness of the insulation layer is insufficient, to avoid the appearance of cold bridges, you should go down 20-40 cm
In areas with severe frosts, concrete with the addition of cement of at least grade M400, which is frost-resistant, is used for pouring. Cement of similar brands should also be used for pouring screed on wet soil. This material also has higher water-repellent properties.
Features of waterproofing a wooden floor on the ground
The height of the ventilated subfloor should be 150-200 mm
The wooden floor must be arranged in such a way that there is a warm, ventilated subfloor between it and the base. If its height is less than 150 mm, ventilation deteriorates; if it is greater, heat loss increases. The most effective option is to lay logs on brick bedside tables.
Wooden floor installation diagram:
- A substrate is created on the ground. For loose soil, crushed stone impregnated with bitumen is used for this purpose. Crushed stone is poured in a layer of 50 mm and compacted tightly into the ground.
- On the resulting base, the locations of the brick supports are marked and filled with cement-sand screed. After it dries, they begin laying the bedside tables.
To lay supports under a wooden floor, you cannot use artificial stone or sand-lime brick.
- Brick tables serve as supports for the logs. Two layers of roofing material are laid between the brickwork and the wood.
- The beams are usually laid across the room, and along the perimeter they are connected with crossbars.
- The subfloor is wrapped with a hydro-vapor barrier membrane in such a way that equal spaces are formed between the joists, into which insulation is laid - rolled, polystyrene foam, expanded polystyrene, expanded clay. Waterproofing material is spread over the insulation.
- The plank flooring is laid on the joists so that the boards are as close to each other as possible.
Modern technological developments offer many ways to install a floor base on the ground and carry out waterproofing measures. If you want to continue this topic, write to our website.
Waterproofing the floor on the ground - choosing the most effective method, 1.0 out of 5 based on 1 rating
Waterproofing the soil base is a job that requires care and responsibility. Such floors can be installed when the soil on the site is dry, there is no groundwater or it lies deep. It is also necessary to take into account the level of precipitation observed in the construction area. The waterproofing of the floor on the ground itself does not take much time, but concrete pouring is carried out along with it. It already takes almost a month to dry.
An example of a common mistake during construction: a leaky joint between the waterproofing of the floor on the ground and the horizontal waterproofing of the foundation wall.
The advantages of such floors are:
- Lack of work on laying large and massive slabs and beams. The floor is simply poured with concrete.
- High quality and durability of the resulting surface.
Of the minuses, it should be noted that the soil requires careful preparation. You can’t just start working on land if it’s not brought into compliance with all the requirements. Laying a concrete floor on the ground can be done using various methods, but the most acceptable of them remains the following:
- The soil base is thoroughly compacted, after which a layer of sand is added.
- The second layer is expanded clay or crushed stone of small and medium fractions.
- Executed directly.
- After this, a rough concrete screed is laid.
- There is a layer of vapor barrier material.
- A heat insulator is installed.
- Reinforcement and finishing concrete screed are being carried out.
- The selected floor covering is laid, but only after the concrete has completely dried.
This course of work is considered optimal. Even without much experience, you can make such a floor with your own hands, without resorting to the services of specialists.
conclusions
It often seems that reproducing the layered structure of a “pie” is not difficult. However, flooring on the ground includes not only waterproofing work. This also includes determining the height of the floor in relation to the doorway, and modifying the layers according to real conditions and soil characteristics. In addition, you need to understand exactly how to position the floor on the ground relative to the strip foundation and take into account a lot of different little things.
High-quality waterproofing of the floor on the ground is a reliable barrier to water molecules
All this is easy when the approach to the work is professional, that is, the floor is laid on the ground by people who have repeatedly performed similar actions. When specialists work, the probability of errors tends to zero.
Waterproofing the floor on the ground is mandatory to increase the service life of the reinforced concrete screed. Without a hydraulic barrier, soil moisture penetrates into the structure by capillary action, which leads to the opening of microcracks in the concrete and corrosion of the reinforcement inside it.
Unlike foundations and grillages, which can be protected from moisture by all known methods, waterproofing a concrete floor on the ground is carried out with a limited number of materials:
- membranes;
- roll welded or glued insulation;
- polymer films;
- penetrating mixtures.
This is explained by the design of the floor on the ground:
- waterproofing materials are laid on top of the concrete base;
- this screed on one side provides a flat, hard surface that allows high-quality sealing of roofing material or Bikrost at the joints;
- membranes and films do not tear from the sharp edges of crushed stone, do not fall into the sand when workers walk;
- on the other hand, from below the footing protects the waterproofing layer and the floor screed located above it on the ground.
The location of the waterproofing layer inside the floor along the ground.
The weak point of the structure is the junction between the concrete base and the foundation (grillage or plinth). The horizontal layer of waterproofing under the floor along the ground must be continuous and smoothly transition into the vertical level, protecting the screed from the ends along the entire height.
The specified conditions are met only when using the following materials:
- membranes and films - they line the surface of the concrete base, the edges are placed on the side faces of the foundation to the required height;
- roll waterproofing - similar to the previous case, with the only amendment - bituminous materials are fused or glued with mastics to the specified surfaces;
- penetrating mixtures - added to concrete during its manufacture or applied to the floor on the ground after gaining strength, they change the structure of the structural material throughout the thickness of the screed, making it waterproof.
Waterproofing plasters and coating mastics are useless in this case. They can protect the horizontal surface of the footing, but when moving to the side surfaces of the foundation, the continuity of the layer will inevitably be broken, since the floor along the ground is separated from the base by a damper layer and is a floating independent screed.
Membranes
They are created only from high-density polyethylene and have profiling. The protrusions on the outside (2 cm spikes) are intended for glueless interlocking of strips of material when overlapping each other. The opposite side (front) contains the bitumen mass.
Profiled membranes are expensive, but they allow you to do without a layer of concrete. Due to the high density and thickness of the membrane (0.5 - 2 mm), the sharp edges of the crushed stone are not capable of tearing the material.
Films
They are classified as flat film membranes, must be laid in two layers, and are made from several materials:
- PVC – polyvinyl chloride;
- TPO – polyolefin;
- HDPE, LDPE – high and low density polyethylene, respectively.
Films from 0.2 mm in thickness are suitable for floors on the ground; at least 15 cm of overlap is required at the joints; tightness is achieved by welding or gluing the sheets. Mechanical strength is very low, so films are laid only on top of the concrete base.
Important! Only vapor barrier membranes can be used, i.e. those that do not allow water to pass through in liquid and gaseous states; to be more precise, not just waterproofing, but hydro-vapor barrier must be done.
Roll materials
Most often, roll waterproofing is classified according to the base material:
- cardboard - roofing felt, glassine, rubemast;
- polyester – fiber made from polyester resins for Premium class insulation;
- fiberglass is a highly elastic base, but is subject to delamination after 5 – 7 years of operation in aggressive environments;
- Fiberglass is a fragile material, but it is cheaper than other analogues; in a floor pie on the ground it is protected on both sides, so it has a satisfactory service life.
A bitumen layer and a sprinkle of crumbs of high-strength non-metallic materials may be present on one or both sides.
Some manufacturers produce roll insulation without a base. For example, TechnoNIKOL has a “Floor Waterproofing” product with a self-adhesive layer, consisting entirely of bitumen coating.
Penetrating compounds
The leader among manufacturers is Penetron, which produces a range of materials for the manufacture and repair of floor waterproofing on the ground:
- Admix – a dry mixture for adding to concrete when mixing it;
- Penetron is also a dry mixture for preparing a penetrating solution, applied with a brush, increases the moisture resistance of the structural material by 8 units (for example, from W0 to W8).
Regardless of the method of application, Penetron products (and their analogues from less popular brands) react with cement stone, increasing its strength and moisture resistance throughout the life of the supporting structure.
Moreover, a broken piece of concrete treated with Penetron will also retain the specified properties until complete destruction. The only drawback is the price of penetrating insulation materials. For example, when using the Admix additive, the cost of concrete will increase by at least 300%.
Preparing the base and waterproofing the concrete layer
Scheme of a concrete floor on gravel with waterproofing.
Preparing the soil before waterproofing is the most critical stage of work. It is necessary to check that the soil is dry and then compact it. When it is ready, the first preparatory layer is poured using sifted river sand.
After pouring, the sand is slightly moistened and compacted thoroughly.
.
The second layer is crushed stone of small and medium fractions, it is leveled and compacted. At this point, the preparation of the soil surface before waterproofing is considered complete; you just need to additionally check the horizontalness. This is done using a regular building level.
Waterproofing a concrete floor on the ground is carried out as follows:
- Bitumen roll material or a polymer-based membrane is rolled out over the base, observing an overlap. All strips must go in the same direction; the overlaps are taped with construction tape, which provides reliable protection from moisture.
- If materials have been laid, it is necessary to re-check that the surface is completely free of any damage. If there are tears, cuts, etc., then such a film is completely unsuitable for use.
- During installation, you will have to ensure that the film extends about 15-20 cm onto the walls. After installing the entire floor, small parts of the waterproofing material will remain above the surface. They are carefully cut with a sharp knife. In some cases, the use of such materials is not possible. You can replace this stage with pouring a concrete layer, for which a completely different type of waterproofing will be used. For this purpose, coating materials are used to completely cover the concrete. This option cannot be called worse or better, since they both have their own characteristics and advantages.
Return to contents
Laying a concrete subfloor
Rough laying on the ground includes not only screeding, but also insulating the floor and installing a vapor barrier layer. It is the rough screed that serves as the foundation and layer of security for the rest of the floor.
If the technology is violated, the quality of protection will be poor and all work will have to be redone. This subfloor on the ground is made of special lean concrete with a class of B 7.5-10, crushed stone is used for it with a fraction of 5-20 mm.
If a waterproofing layer is not used separately, then concrete class M50-75 can be used. This rough filling under the floor on the ground is simple; its thickness should be only 40-50 mm, the permissible height difference is 4 mm.
The subfloor is laid on the ground following the following steps:
- Installation of vapor barrier material. It is best to use polymer-bitumen membranes for this, which are made on the basis of fiberglass, PVC, and polyester. All of them are of the required quality.
- Next comes a layer of insulation, which makes it possible to save heating costs. This method allows you to eliminate heat loss by about 20%, which is already quite a lot. In this case, you need to use materials such as PSB35 foam. If large loads are planned, then PSB50 is suitable. To prevent the foam from being destroyed when it interacts with concrete, it is necessary to lay a layer of polyethylene film with an overlap on the bottom and top. It is important to ensure that the film does not have breaks or other defects.
- Instead of polystyrene foam, you can use extruded polystyrene foam, which is of great quality. Such materials are excellent for working with floors on the ground, although some experts recommend replacing them with mineral wool. But cotton wool accumulates moisture, so its use is questionable.
Someone's idea of soil waterproofing
may seem crazy and unrealizable - however, work in this direction has been carried out for a long time and is very successful. They help prevent premature destruction of the building’s foundation and are an integral part of many house construction projects.
Technologies
The above floating floor protection materials are applied in different ways. Therefore, depending on the construction budget, you should choose the right technology.
Deposition
Since in 75% of cases roll waterproofing materials are traditionally used, fusing technology is used most often:
- the dried concrete base is dust-free and impregnated with bitumen primer;
- pieces of Bikrost, Technonikol, roofing felt, Steklodroizol or any other rolled material are cut in advance and laid on the floor along the ground;
- the lower bitumen layer is heated by a burner torch, a piece is fused onto the concrete base, the edges are placed on the base or foundation to the height of the screed;
- the following pieces are fused with an overlap of 15 - 20 cm.
Fusing rolled insulation onto the concrete base.
Advice! In wet soils, it is necessary to perform two-layer insulation with the direction of the sheets shifted by 90 degrees.
Pasting
Rolled materials, polymer films and membranes can be glued to hot or cold bitumen, epoxy or polymer mastics. Some materials have their own adhesive layer, which reduces labor costs, but increases the cost of flooring on the ground, since they are more expensive than conventional rolls.
Pasting is carried out in 1 - 2 layers, depending on the level of soil in the area and the material of the underlying floor layer on the ground:
- sand is a technogenic layer in which capillary absorption of soil moisture is possible;
- There is no such effect in crushed stone, but the material is more expensive than sand and is more difficult to compact manually.
Gluing insulation to mastic.
To reduce the cost of building a floor on the ground instead of concrete, the following methods are used:
- the surface of the compacted crushed stone is leveled with moistened and compacted sand, the thickness of the layer should be at least twice the coarse crushed stone fraction (for example, 8 cm for the 20/40 fraction);
- the crushed stone base is spilled with cement laitance, which binds and levels the surface, preventing the absorption of a similar concrete product when pouring the floor itself on the ground.
Important! Films, membranes and rolled materials are not a damper layer of a floating screed, although they are launched vertically over its entire thickness. Therefore, the perimeter of the plinth, grillage or foundation must be additionally covered with a special tape or a vertically installed strip of extruded polystyrene foam must be used.
Penetrating mixtures
Volumetric waterproofing is carried out in several different ways:
- coating - the Penetron mixture is mixed with water, applied with a brush in two layers to the dry floor on the ground, after a month the concrete becomes completely waterproof;
Coating the floor over the ground with penetrating waterproofing.
Adding volumetric waterproofing to concrete.
The first technology is more appropriate when repairing a floor on the ground to improve its waterproofing characteristics. The second method allows you to avoid pouring concrete when making a floor on the ground.
Thus, to isolate a floor over the ground from soil moisture, you can choose any of the above methods, taking into account soil conditions, the design of the floor pie and the available budget.
Advice! If you need repairmen, there is a very convenient service for selecting them. Just send in the form below a detailed description of the work that needs to be performed and you will receive proposals with prices from construction teams and companies by email. You can see reviews about each of them and photographs with examples of work. It's FREE and there's no obligation.
Hi all! There is a house made of timber on a mzlenta. There are plans to connect gas...and I’m thinking of converting the first floor floors into ground floors...to make a water heated floor
I have a couple of questions.
1.Can I anchor/tie the slab to the ground with reinforcement to the tape or will this be considered as a load on the tape?
2. Let’s say I put 100mm eps on the bottom, then in theory I should also cut the slab off from the tape...at least 50mm eps...then I won’t be able to tie the slab to the tape...well, or somehow pass the reinforcement through the eps, but that’s crazy...
3. Will the slab settle on the ground or not? The tile will crack at the joint, it turns out...
4. If I make the first slab, a rough screed and then pour the slab over the ground onto the tape on top of the elbow. Will this be considered a load on the tape? Will I need to reinforce the slab with double mesh reinforcement 10/12 mm with a cell size of approximately 15*15 or will a welded one be enough?
5. you can do this again...
Naturally, you need to do it as cheaply as possible)
What is it for?
Waterproofing the soil under the house
allows you to protect the entire building or its individual parts from moisture in the form of groundwater, precipitation, and melt water.
It is carried out during the construction of premises below ground level, as well as when arranging floors on the ground. The latter is especially true for small country houses. Properly carried out work will eliminate a number of unpleasant phenomena such as the smell of dampness in the house, increased levels of humidity, the appearance of fungus and mold and, of course, flooding. We should not forget that failure to waterproof the soil
will lead to moisture penetration into the load-bearing structures of the building and their destruction.
Where to order?
soil waterproofing services
you can at Stargidrostroy! We have been carrying out work in this area for several years now and have everything that is necessary to implement projects of any size and any complexity. After you leave us a request, our specialist will come to you, who will conduct a thorough inspection of the property and advise you. He will draw up a technical report and offer you to conclude a formal contract. The choice of materials for work is carried out on an individual basis, depending on a number of features of the object: from soil characteristics to the depth of groundwater. It is this approach that allows us to guarantee excellent results, in which we are so confident that we provide a guarantee for our services.
In principle, the purpose of waterproofing is clear: it is performed in order to protect the structure as a whole or its individual parts from moisture: precipitation, groundwater, etc. When might you need waterproofing on the ground? The answer is quite simple: during the construction of basements and cellars, arranging floors not on the foundation, but on the ground (this is true for small wooden country houses or country houses) and other structures.
In this article we will look at the features of arranging such waterproofing and what materials can be used.
Waterproofing on the ground: materials
Note that waterproofing on the ground can be done with different materials: roofing felt, film waterproofing, bitumen, clay and others. The choice of material depends on the type of structure, soil moisture, groundwater level, etc.
Note that for better waterproofing in buildings where it is carried out on the ground and not only, it is often recommended to build a drainage that will drain excess water.
In addition, different parts of the building may have different waterproofing. For example, in bathrooms, in addition to waterproofing performed directly on the ground, additional adhesive waterproofing may be required. The fact is that the first will protect the structure from capillary water, the second - from waste water.
Waterproofing floors on the ground
Waterproofing directly on the ground may be necessary when constructing floors in buildings without a foundation. There are many ways to perform such protection from water: from laying film insulation to creating so-called “clay castles” (which retain moisture).
When laying a floor on the ground, you can use the following waterproofing method:
- Soil preparation.
Before installing the floor and, in fact, waterproofing, the soil is thoroughly compacted. Before compaction, the soil is leveled using a laser or optical level. - Adding sand to the soil.
It is recommended to add a layer of sand onto the natural compacted soil. For these purposes, coarse river sand is usually used. This layer is also compacted. Note that the already compacted layer of sand should be approximately seven to ten centimeters thick. - Backfilling the soil with crushed stone
. This stage is necessary for capillary waterproofing. For backfilling, crushed stone is used twice with bitumen. The crushed stone layer is also carefully compacted. Note that such waterproofing is only effective if groundwater does not come close to the base of the building, that is, the soil is quite dry. The thickness of the backfill with such crushed stone should also be about ten centimeters.
- Pouring rough screed.
It is poured onto a layer of crushed stone (treated with bitumen). This screed is necessary for the next stage of waterproofing (which will protect the rear from groundwater and sewage). For screeding, a cement-sand mortar with crushed stone of fraction 5-20 is used. The thickness of the rough screed is usually about 5 centimeters. As for evenness, it is advisable not to allow differences of more than 3 millimeters per 2 meters of the floor. Note that when using polyethylene film as waterproofing (if the soil is dry), a rough screed may not be used. In this case, the waterproofing is laid on top of compacted crushed stone. - Waterproofing with bitumen roll material
. The rough screed is pre-coated with bitumen, on which roll waterproofing material is laid. It must be laid with an overlap of 10 centimeters.
- Floor arrangement.
Next, the floor is insulated and filled with a finishing screed. After cleaning and priming the screed, leveling mixtures are poured and the floor covering is laid.
The second method of waterproofing a floor on the ground is suitable for floors on joists. Since it is impossible to lay logs on the ground, brick columns are first built (there can also be wooden ones, only treated with bitumen). Note that before this the soil must be thoroughly compacted. After this, waterproofing is laid. In this case, roofing felt, polyethylene, roofing felt can be used. And only then can you lay the logs directly and carry out the remaining stages of work on arranging the floor.
Preparatory work
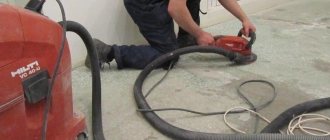
Before starting waterproofing work, it is necessary to properly prepare the base. First, remove the old coating (if necessary), then clean the surface of debris, and remove small particles and dust with a vacuum cleaner. It is imperative to seal cracks, crevices, and various irregularities.
Next, the surface is primed to improve the adhesion of materials to the floor. First you need to prepare all the materials: warm up the roll insulators, measure, cut, mix everything you need.
Waterproofing a cellar on the ground
While talking about the construction of cellars, we also mentioned waterproofing. Let us remind you that in such cases a “clay castle” is created. To do this, the soil in the cellar is first compacted. Next, the clay is laid in a layer of 20 centimeters. This is our castle. The clay will absorb and retain capillary moisture. In addition to such waterproofing, after arranging the floor with concrete or other materials, the cellar floor is also treated with bitumen.
You should not neglect the waterproofing of structures, even if, for example, you are sure that the soil is dry. Take a responsible approach to creating waterproofing, and your building, cellar, and other structures will last much longer.