Concrete helps to obtain a reliable floor covering; usually in apartments or houses the concrete surface is covered with finishing materials on top. But such repairs are not always carried out in workshops or basements, but concrete also needs protection, like other materials. Epoxy paint for concrete floors is suitable for this type of coating. It can become an excellent coating anywhere. More details about the features of working with it on a concrete base will be discussed below.
Why paint concrete
Many will find it strange that a concrete base needs to be protected. However, its porous structure allows various elements to penetrate into the depths, which can lead to deterioration of the material.
So, over time, under the influence of various factors, such as temperature changes, high humidity, mechanical stress, the quality and wear resistance of all floors suffers. Also, concrete does not withstand the effects of chemicals. All these negative factors will lead to too rapid deterioration of the material.
Therefore, painting the floor surface with epoxy concrete paint can significantly improve its wear resistance and increase the service life of the floors.
Painting the surface of the floor with epoxy concrete paint can significantly improve its durability and increase the life of the floor.
Advantages of epoxy paint
Epoxy enamel for concrete has a number of positive characteristics that explain the popularity of using it as a coloring agent on surfaces made of this material. The advantages include:
- Good adhesion to the material;
- The coating is wear-resistant;
- High waterproofing properties, especially important for foundations with reinforcing structures;
- The paint is elastic;
- Good vapor conductivity;
- Resistance to sudden changes in temperature, atmospheric influences, chemicals;
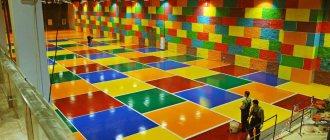
- Gives a pleasant decorative look to the floor base;
- Electrical insulation rates are high;
- Suitable for use on fresh screed;
- Presence of antibacterial components;
- Can be used for outdoor work.
This coating can be washed using various means; the coating retains its aesthetic appearance for a long time.
Epoxy enamel for concrete has a number of positive characteristics.
How to choose paint
To get the desired effect, you need to pay special attention to the choice of product. In this case, the following parameters must be taken into account:
- Where concrete floors will be covered, what conditions will surround the surface. If painting is carried out on the street or in a garage, where mechanical and chemical influences are more common, then you should choose a more sustainable option. The powder type requires the use of heating chambers during preparation, so it is not suitable for household needs. An excellent alternative is two-component concrete paint;
- What loads will be placed on the coating;
- It wouldn’t hurt to know the floor area so that you can calculate the amount of paint composition.
Epoxypol is a two-component epoxy enamel for concrete floors, which is excellent for covering surfaces subject to high mechanical, chemical and atmospheric influences. At the same time, it gives the surface a pleasant appearance. It can be applied in a thick layer up to 500 microns, it is easy and convenient to apply.
To get the desired effect, you need to pay special attention to the choice of product.
What is epoxy flooring?
Consultation with a leading specialist tel.
+7(499) 398-02-36 Get a floor price estimate
Use of epoxy materials in flooring:
Epoxy resin is a two-component polymer with a very wide range of applications in various fields, including the construction industry. Here we will look at the use of epoxy-based materials for self-leveling floors, processing concrete and cement surfaces in premises for various purposes - epoxy concrete floors.
Most examples of such coatings will be taken from work practice. We started our activities in 1989, so we have something to illustrate it with.
Application technology
Before proceeding to the direct application of the dye to the surface of the floors, several preparatory steps need to be carried out. They will be discussed in more detail in the following chapters.
Before proceeding to the direct application of the dye to the surface of the floors, several preparatory steps need to be carried out.
Preparing the concrete surface
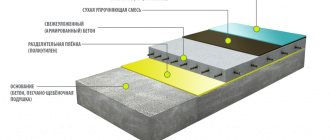
The preparation of the concrete base itself will determine how long and well the paint will last. Moreover, the actions differ on concrete structures that have just been built from those that are already standing for a long period of time.
A fresh screed can be painted five days after creation. At this time, the concrete hardens well enough and has the necessary moisture content for applying paint to it.
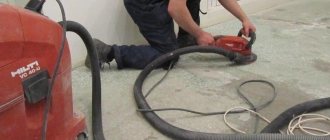
The surface is leveled, all existing defects are removed from it. Concrete pores are cleaned and cement laitance is removed.
This process can be performed using a trowel or a stiff brush. All dust should be vacuumed up after this.
If painting is carried out on an old concrete surface, then, on the contrary, it must be thoroughly dried. Otherwise the epoxy will start to peel off. The moisture content of the base is determined using a special device. If it is absent, you can glue a film to the surface, after 24 hours they look to see if it is covered with moisture and if it is damp to the touch. If the film is dry, then you can proceed to painting; if not, you should wait until the floors are completely dry.
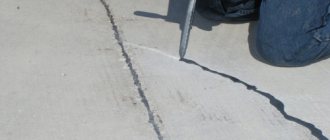
Next, an inspection is carried out for the presence of flaws. Those places where there are large cracks are expanded to 5 millimeters; such defects will be covered with epoxy putty. The surface is also cleaned and vacuumed.
The surface is leveled, all existing defects are removed from it.
Precautionary measures
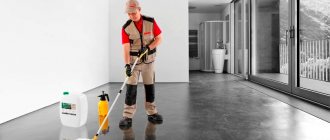
Two-component compositions, which are the most popular, must be mixed for painting. At this time, they can release substances harmful to human health. Therefore, work must be carried out in protective clothing, special glasses and rubber gloves are worn, and a respirator is also required.
The room must be provided with good ventilation. Do not use utensils that are used for food purposes. If the mixture gets on the skin, it is immediately cleaned with denatured alcohol or white vinegar; it is not allowed to harden on the skin.
The room must be provided with good ventilation.
Flow calculation
The paint consumption for self-leveling floors is indicated on the packaging and is calculated per 1 square meter. Accordingly, to find out how much material is needed, you need to calculate the area, and also decide how many layers will be applied to the floor.
When calculating the area, all recesses and recesses are taken into account; if the room is complex in structure, then it is divided into several zones, and then their areas are summed up. The average consumption, which is usually equal to 1 mm per 1.5 kg (the exact figure is indicated by the manufacturer on the packaging), is multiplied by the layer thickness and the area of the room.
When calculating the area, all recesses and recesses are taken into account.
Can I use a spray gun?
A spray gun simplifies many types of painting work and saves paint. But in the case of working with epoxy enamel, its use is impractical. After all, enamel is distinguished by its rapid rate of hardening, so it can simply ruin the device itself.
Therefore, it is better to paint with a roller or brush. After painting, you can immediately throw them away; they will become unusable.
It is better to paint with a roller or brush.
Applying paint to the surface
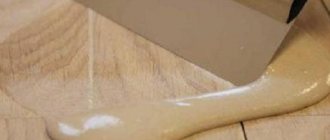
First, a primer mixture is applied to the surface; it serves to improve adhesion to the material. After complete drying, which takes 24 hours. Immediately before painting, the two components of epoxy (hardener and resin) are mixed, the proportions are indicated on the packaging, you must strictly adhere to them. Mix thoroughly, bringing the composition to homogeneity.
The paint should be applied with a roller or brush; the first layer will be rough. Typically, at least two layers are applied, and you can proceed to applying the second after a day.
Before the final layer, chips are scattered, which are standardly included with the epoxy. Polymerization occurs after 24 hours, and final drying takes 7 days.
Typically, at least two layers are applied, and you can proceed to applying the second after a day.
How to fill?
If you decide to pour epoxy self-leveling floors yourself, you need to take into account a lot of nuances when carrying out construction work. Regardless of what type of liquid floor you choose, the application technology will be the same.
Preparing the base
- First you need to prepare the base. If you are planning to pour on a concrete base, keep in mind that the room temperature should not be lower than 5 degrees;
- Also, you cannot start work if the humidity in the room is above 75-80%;
- At this stage, you need to detect and eliminate all defects on the coating (dents, chips). To cope with the task, use regular cement mortar to seal defects;
- If the surface is very large, preliminary grinding and polishing will not hurt;
- Remove construction debris and dust formed after sanding.
Surface priming
- Then you need to prime the floor. This stage is needed in order to improve the adhesion of the base to the liquid emulsion;
- When the primer dries, sprinkle the floor with quartz sand. Only then will the base be ready for pouring.
The video and photo demonstrate the implementation of all preparatory work, taking into account the characteristics of the room and the base of the floor (metal, concrete, wood).
Applying the base layer
- When the primer is completely dry (at least a day), start pouring the base layer;
- The self-leveling polymer product is applied in strips;
- To evenly distribute the composition, use a squeegee. Then the thickness of the layer will be the same over the entire area;
- To distribute the emulsion in the corners of the room, you can use a spatula;
- To prevent air bubbles from forming in the coating, roll the entire surface with a special roller with needles;
- By the way, you should also wear paint shoes that will not leave marks on the surface.
Applying the finishing layer
- This stage of installation is practically no different from the previous version. To consolidate the effect, you can use polyurethane varnish. It will make the floor surface glossy;
- Wait for the varnish to dry. This will take at least 2 days.
As you can see, pouring an epoxy floor yourself is not that difficult. The material is laid using the method of monolithic casting. In this case, there are no joints between sections. If necessary, decorative layers can be applied zonally. Often, professionals refer to these areas as chips. According to the design project, various decorative elements can be placed under the finishing layer, which will visually divide the room into zones.
You can also watch epoxy flooring videos, which describe in detail all the stages of applying emulsions to prepared surfaces.
Two-component formulations have a number of very important advantages, thanks to which they have become popular with consumers. When choosing a suitable emulsion, be sure to take into account the type of room and the types of expected loads (mechanical, temperature, chemical).
Thanks to a wide range of products, you can choose exactly the mixture that suits your operating conditions. But before purchasing materials, an estimate must be drawn up. Since modern epoxy floors are not a budget option, calculate the amount of emulsion needed. So that the funds allocated for repairs are enough to carry out all types of work.
Surface protection and care
Cleaning the self-leveling floor is easy, and it is permissible to use vacuum cleaners, mops, including steam mops. Due to its good wear resistance, this coating can withstand the effects of many detergents. Moreover, the absence of joints allows cleaning quickly and without problems. You can periodically apply wax or polish to prevent scratches.
Due to its good wear resistance, this coating can withstand exposure to many detergents.
Coating a concrete floor with epoxy is easy. Following safety measures and carefully preparing the surface will allow you to obtain a beautiful and stable coating that will last for a long time.
Make a Floor Maximum two-component epoxy resin for filling
| Description | Two-component epoxy coating, colorless, transparent, glossy with high decorative properties, for the installation of decorative polymer coatings, including those with a 3D effect; Component A is a modified epoxy resin containing pigments, fillers and multifunctional additives. Component B is a modified hardener. |
| Coating properties |
|
| Purpose and scope | The epoxy coating Make the FLOOR MAXIMUM transparent is intended for creating a protective varnish layer with a thickness of at least 1 mm in order to obtain high protection of the floor surface and specific decorative effects with the illusion of depth and volume of the lower image under the varnish layer in rooms for various purposes with floor design solutions, in industrial premises with high load, as well as in systems with high filling of colored quartz sand. |
Specifications
| Index | Methodology | Meaning |
| Mass fraction of non-volatile substances, %, not less | GOST 31939 | 99,5 |
| Coating density, g/cm3 | GOST R 53654.1 | 1,1 |
| Viability of the mixture at a temperature of (20±2)°C, min | Internal company methodology, TU 20.30.22-022-66828143-2018 | 40 |
| Curing time up to Art. 3 at temperature (20±2) °С, h, no more | GOST 19007 | 24 |
| Recommended consumption for coating thickness 1 mm, kg/m2 | 1,1 | |
| Ultimate compressive strength, MPa, not less | GOST 4651 | 63 |
| Bending strength, MPa, not less | GOST 4648 | 78 |
| Tensile strength, MPa, not less | GOST 18299 | 50 |
| Elongation at break, %, not less | GOST 18299 | 4 |
| Component ratio A:B, mass.h | — | 100:60 |
| Shine | GOST 31975 | high gloss finish |
| Impact strength, kJ/m2 | GOST 4647 | 45 |
| Abrasion according to Taber, mg | GOST 13087 | 28 |
| Shore D hardness | GOST 24621 | 85 |
| Heat resistance: | Constantly: +50С No more than 7 days: +80С No more than 12 hours: +100С |
| Warranty period of storage | 18 months in original packaging. |
| Storage conditions | Components A and B are stored in hermetically sealed containers in closed warehouses at ambient temperatures from +40°C to -30°C. Avoid direct sunlight! |
| Coating operating conditions | In industrial premises with high humidity at temperatures from minus 300C to plus 600C. Allowed:
Not allowed!
|
INSTRUCTIONS FOR USE
“Make the FLOOR Maximum Transparent” is a two-component protective polymer composition on an epoxy-urethane basis, used for installing a self-leveling screed floor indoors with increased requirements for the abrasive resistance of the floor, including in production conditions with wet processes.
The composition “Make the FLOOR Maximum Transparent” forms a decorative, wear-resistant and durable coating. The finished coating is resistant to mechanical stress, penetration of dirt, oils, and water into the substrate, and prevents the formation of fungus and mold.
The composition “Make FLOOR Maximum Transparent” is recommended for the installation of self-leveling seamless flooring inside residential and public premises: in garages, multi-storey parking lots, car repair shops, hangars, institutions and public service facilities, retail and warehouse premises, premises with increased decorative requirements (trade and exhibition halls ), i.e. areas with heavy pedestrian traffic.
The coating formed by the “Make FLOOR Maximum” composition is resistant to aggressive and slightly aggressive environments and can withstand temperature changes from -45°C to +80°C.
The composition is used on concrete bases, the quality of which corresponds
SNiP 2.0.13-88 Floors, SNiP 3.0403-87
The base must be clean, dry (concrete moisture content no more than 4%), strong (compression strength not less than 20 N/mm2, concrete grade not lower than M 200).
The coating is vapor-tight!
To avoid peeling (the appearance of bubbles on the surface) and incomplete polymerization of the composition (does not dry), the curing of new or repaired concrete floors, including the use of dry cement-based levelers, must be at least 28 days! Do not apply to damp, poorly dried (including after washing) surfaces. Cleaning of contaminants must be done mechanically. Heavily oily areas must be dissolved using traditional means (alkali solution, caustic soda, solvent, etc.), then the treated areas must be cleaned. The surface thus cleaned should be rinsed thoroughly with clean water and dried completely for 48 hours.
Do not apply to polished surfaces.
SURFACE PREPARATION
The surface of the concrete base must be cleaned of any dirt, paint residues, varnishes, coatings, etc. Remove cement laitance, thoroughly sweep and dust the floor.
Surfaces that have severe unevenness, chips, potholes, and deep cracks must be puttied and dried.
CARRYING OUT THE WORK
Work is carried out at air temperatures from +10°C to +25°C. In cases where the composition is stored at subzero temperatures, the components of the composition must be kept at room temperature for at least 24 hours.
Optimal application conditions: relative air humidity no more than 60%, humidity of the concrete base no more than 4%. The applied composition dries “to touch” in 24 hours and is ready for high loads after 48 hours. Before starting work, the base - COMPONENT A, must be thoroughly mixed for at least 3 minutes with a low-speed drill (up to 300 rpm) without allowing foaming and ONLY AFTER THIS, pour the hardener - COMPONENT B into it, without any residue. The resulting composition must be thoroughly mixed for 3 minutes (the hardener must be perfectly mixed with the base) and applied to the surface using the pouring method without scraping the remaining composition from the walls and bottom of the jar, spreading it over the desired area with the special spatula included in the kit.
All mixing and application operations must be carried out within the working life of the material. The lifetime of the material (the period before the start of polymerization, curing of the composition) after mixing the components in a jar is up to 10 minutes, on the surface 30 minutes! For mixing components, an electric low-speed drill (UP TO 300 RPM!) with an attachment is ideal.
VERY IMPORTANT, do not foam the composition! It is impossible to obtain a high-quality coating when using a foam composition!
If you don't have a low-speed drill, use the included stirrer. Upon completion of work, it is necessary to prevent walking on the surface, as well as the ingress of dust, dirt, water, etc. for 24 hours.
PRECAUTIONARY MEASURES
Before starting work, starting from the moment of mixing the base and hardener, it is necessary to use a respirator or cotton-gauze bandage to protect the respiratory system, as well as the supplied gloves. The premises must be sufficiently ventilated. Carry out repair work with windows and doors open. If the composition gets on the skin, it must be removed using a swab with any solvent, then washed thoroughly with soap and water. Do not allow the composition to get into your eyes, and in case of contact, rinse with plenty of water. Do not take orally! Considering that the initial composition of the base and hardener contains flammable substances, smoking, use of electrical appliances that produce sparks, etc. are prohibited at the work site. Possible waste (rags soaked in the composition, empty containers, etc.) must be removed to places designated by the territorial offices of Rospotrebnadzor.
STORAGE CONDITIONS
The composition “Make the FLOOR MAXIMUM transparent” (components A and B) should be stored indoors at a temperature not lower than - 30 ° C and not higher than + 40 ° C. Avoid exposure to direct sunlight and exposure to electrical appliances that produce sparks, etc. Keep away from children.
Proper preparation of the base and application of the composition will make your floor wear-resistant, durable and beautiful!