Coverage options
Today, there are two main factors on which the choice of flooring depends. The first factor is the characteristics of the soil at the construction site, and the second is the climatic conditions.
Naturally, the first and simplest floor in the garage is earthen. The site is leveled and compacted. Naturally, in this case the garage will not be protected from dampness, cold, etc. The only thing that can be added to somehow increase resistance to frost is to apply another layer on top of the ground. Clay mortar is used as the raw material for this layer. It is also carefully compacted and leveled.
Another budget option for garage flooring is a gravel pad. Instead of clay mortar, I pour medium-fraction gravel onto the ground, which is moistened and compacted. The method is inexpensive, not very practical and not durable. However, it can solve the problem of high humidity in the garage, which is not bad.
The third way to install a garage floor is to pour a concrete screed. This option is the most common when constructing a permanent garage. This method will allow you to equip an inspection hole indoors, and if the foundation is deep, then equip a good basement. The option is quite reliable and has a long service life, but, naturally, more expensive than the previous two.
Another method of installing a garage floor is to lay wood over joists. The base is quite simple to make and quite convenient to use. However, the risk of fire increases significantly here. If the wood is additionally treated with protective compounds, the service life of such a coating can exceed ten years.
The last option is laying tiles or stone. This method of floor preparation is the most expensive and difficult to implement.
Coloring stages
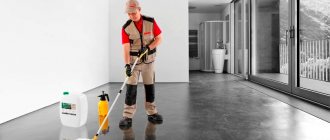
How to paint a concrete garage floor? Step-by-step instruction:
- First we prepare the surface . It is necessary to eliminate unevenness and cracks on the garage floor. We cover deep potholes with cement mortar. Be sure to remove any crumbling concrete.
- grinding machines to grind the concrete base . This way you can increase the adhesion strength of the paint to the floor.
- Now all you have to do is remove the debris and dust. This can be done using a vacuum cleaner or a regular mop.
- Let's start priming the floor . To do this, prepare a brush or roller. If you decide to paint your concrete floor with epoxy paint, you can skip the priming step.
- Mix the paint components . Be sure to read the manufacturer's recommendations. Pour the prepared mixture into the paint bath. Paint the garage floor in one coat. If it is necessary to apply the next layer, you need to wait a day.
Priming Tips
The purpose of priming is to improve the adhesion of the paint to the floor. To facilitate the process of applying the primer, you can use a roller. The floor must be dry and clean. The primer contains quartz sand . It eliminates the effect of slippery floors. Humidity in the garage should not exceed 85%.
Choosing a tool
To paint the concrete floor in the garage we will need: a roller, brushes or a sprayer. The choice of tool depends on the coloring composition. The convenience of the sprayer in the speed of application of enamel. The dyeing process does not require any special skills. The coating thickness will be only 0.2 mm .
However, not all areas can be spray painted. For hard-to-reach areas you will still need to use a paint brush. To apply acrylic enamel, you cannot do without a roller. You can paint the corners with narrow brushes.
Drying floors
paint drying process greatly depends on the conditions of its application. If you painted fresh concrete, the drying time will be longer. Polymerization of the coating should occur approximately on day 7. This is at normal air humidity and temperature in the garage.
Arrangement of the simplest foundation
It is best to start working on the base of the floor in the garage with its simplest options, that is, by arranging an earthen and/or gravel layer.
- The first thing to do in any case is to remove the top fertile soil layer by 15-60 cm, depending on the type of soil on the site.
- After this, the earth is watered and thoroughly compacted.
- If nothing is done, there will be high humidity in the garage, which will arise due to the flow of high groundwater. To reduce this percentage, you can coat the floor with a liquid layer of clay. You need to apply two or three layers of clay. However, before applying the next one, you need to let the previous one dry completely.
- It is important to add here that if the walls in the garage are wet, then the option of laying clay is excluded. In this case, sifted sand, which does not contain clay particles, can be laid on the floor in the garage. After this, a layer of red burnt brick or waste slag is poured on top and also compacted.
- Another option that can help reduce moisture when you have a regular dirt floor is ventilation. To do this, small holes are made in the corners of the building.
- Another budget idea is to lay old linoleum on the ground. The room will become much drier and warmer, but it will slide a lot. In addition, the linoleum itself should be laid with a slight overlap if the material is laid in pieces. To make it more convenient to drive in, you can lay several boards under the linoleum at the entrance to the garage.
It is worth noting that tiles can be laid on a gravel bed, which will be quite good. Such material cannot be laid on an earthen floor, as a good waterproofing layer is needed.
Paint selection
Concrete garage floor paint must be able to withstand the elements, moisture and chemicals. Another factor is the ability to create a dust-free surface that can withstand temperature changes and abrasion.
There are many options for covering a concrete floor in a garage: epoxy, polyurethane, acrylic and alkyd paints, primers. Each composition has its own specifics, advantages and disadvantages.
Latex acrylic paints
This option for covering a concrete floor in a garage is convenient. This is an aqueous solution, based on acrylic resins, polymers, and does not emit a strong odor when painting, since the room is small and enclosed - this is important.
Painting with latex acrylic paints has the following features:
- Protection from mechanical damage, abrasion, chemicals, increases and decreases in temperature, and humidity.
- Compositions for concrete take into account the characteristics of the material.
- Maintaining an attractive appearance to the surface.
- The paint is environmentally safe.
- Can be applied with a brush, roller, or spray.
- Dries in 12 hours.
There is only one drawback - the high price.
The paint on the floor looks impressive
Polyurethane enamel
This coloring composition is capable of protecting concrete both inside and outside the garage. Some properties and features:
- The surface coated with polyurethane enamel is resistant to atmospheric influences and temperature changes.
- High covering power.
- Painting a concrete floor in a garage with this paint will ensure strength, durability, and excellent resistance of the concrete.
- The price is affordable.
Disadvantages: demanding application conditions. The air temperature is above +5⁰, and the humidity is not higher than 75%.
The specificity of two-component compositions is that you need to paint the floor in two passes. Mix the paint components and apply the second layer every other day. Before you paint a concrete floor with this enamel, you need to think about where to leave the car for 2 weeks. It dries so much. Although you can walk on it after 2 days, it is not advisable to bring a car.
Epoxy paints
To remove dust from a concrete floor in a garage, the store will recommend this paint. After application, the coating becomes durable and strong. The appearance remains attractive even with daily use. She has the following positive aspects:
- It has high waterproofing abilities.
- Adhesion to concrete at a high level.
- Resistance to the influence of precipitation.
- Resistant to abrasion and yellowing regardless of color.
- Can be easily applied to concrete that has not completely hardened.
Expensive, but the price justifies the quality. Since the paint is permanent, it will not be possible to change the color of the floor after painting.
Paints may have different colors
These paints are available in two types:
- One-component - require a primer coat before painting.
- Two-component - the components are mixed before application. These are more expensive than the first type and are difficult to apply.
Other paints
You can find such options that theoretically remove dust from the floor in the garage:
Note! They are not the best option, since after contact with flammable substances they quickly crack and change color, leaving the concrete without protection. This happens because they contain soluble resins.
Working with tiles
In order to successfully lay tiles on the garage floor, you will need more effort and time than with the previous option. Here you will have to compact all the layers much more carefully, and therefore the ideal option would be to rent a vibratory rammer, since carrying out all the work manually will be very difficult and much longer. Each five-centimeter area must be carefully processed. The work can be considered successful if, after a person walks on the ground, there are no traces left on it.
The sequence of layers for laying tiles on the garage floor with your own hands is as follows:
- The first layer is sand with a thickness of 5 cm.
- The second layer is medium-fraction gravel. Layer thickness - at least 10 cm.
- Next comes another sand cushion, but with a thickness of 10 cm.
- Next, for the base you will need a cement base or purified sand, 5 cm thick.
- Finish coating of the selected tile.
Here we need to go into a little more detail. After the first layer of sand has been laid, it is recommended to lay one, or preferably two layers of waterproofing material. As such a material, you can use roofing felt or, for example, thick polyethylene film (300 microns). The most reliable option would be to lay geotextiles on the garage floor with your own hands.
If the base has two layers of waterproofing, they are glued together with double-sided tape or soldered. Strips of material are laid with an overlap of 5 cm. Each joint must be additionally treated with bitumen mastic.
When the tiles have already been laid, it is recommended to fill all existing seams with a mixture of cement and sand 1:3. This is done to prevent dirt from getting into them. The excess mixture is swept off the coating. After this, the seams are sprayed with water and left to dry. Any cement that ends up on top of the tiles must be removed immediately. A small nuance - you cannot use watering from a hose, since the water pressure will knock the mixture out of the seams; only working with a spray bottle is allowed.
How much does the material and labor cost?
The price of the material depends on the type of linoleum and wear resistance class. In residential premises, household or semi-commercial linoleum is more often used. The average price of household samples is 300–400 rub./m2, semi-commercial – 400–500 rub./m2.
The cost of laying linoleum depends on the list of preparatory work and the area of the room. In most cases, for Moscow or the Moscow region, a turnkey package of work, which includes preparing the old floor, laying the covering and installing skirting boards, costs around 600 rubles/m2.
Often you have to deal with a situation where the price of installation changes during the execution or after completion of the work. To avoid getting into an unpleasant situation, before ordering services you need to study the price list, clarify unclear points and conclude a detailed agreement.
Arranging a wooden floor
How to cover the floor in the garage? Wood is a budget-friendly and quite acceptable option. The service life of this material in such conditions is up to 20 years, and if it is processed, even more. The sequence of work when arranging such a foundation is approximately as follows:
- it is necessary to remove the entire fertile layer of soil;
- the surface is compacted using a vibratory rammer with moisture;
- Next, you need to lay a layer of waterproofing - a material such as geotextile, roofing felt, film or a special waterproofing membrane will do;
- A layer of sand or crushed stone 10 cm thick is poured on top of this, which is also carefully compacted.
One very important nuance. When installing a heated floor in a garage made of wood, it is necessary to check each layer with a level so that it is perfectly level. If the garage is large enough, then it is better to use a laser level rather than a regular building level.
- The next step is laying the wooden joists. Here, boards with dimensions of 50x50 cm or 40x40 cm are most often used. This material must be treated with an antiseptic or resin and fire-retardant impregnation, which will protect against rotting and fire. An ideal option for lags would be railway sleepers, since they are impregnated at the factory with all the necessary compounds and will last much longer.
- To successfully install a wood floor in a garage, the joists must be installed in recesses. They are fixed against the wall with anchors or you can use a gypsum mixture. This option will be much faster and easier to implement.
- The pitch of laying the logs is 50-100 cm. It would be ideal to lay them so that the car, when entering the garage, passes over them or at least next to them. In addition, it is worth adding that the more boards are laid, the less the coating will “walk”.
- To provide a floor in a warm garage, you need to use extruded polystyrene foam. The thickness of the sheets must be at least 5 cm. In addition, this option is two in one. Expanded polystyrene and waterproofing and insulation.
- If you don’t want to use such material, then it can be replaced with granulated foam glass, which also performs two functions at once.
- There is an option for budget-friendly floor insulation. You need to use broken brick, glass and expanded clay. However, such a base will still allow moisture to pass through.
Budget option for wooden flooring
You can make a garage floor covering without insulation. In this case, you can lay the logs on the posts.
- The soil is leveled and compacted.
- Next, a gravel cushion is made, on which brick columns are installed. The size of the elevation is two bricks wide and the same in height.
- The distance between each support is one meter.
- The brick pillars are laid using cement mortar, which means that you will have to wait until it is completely dry before continuing work.
- The top of the support is covered with two layers of waterproofing or bitumen lubricant.
- The last stage is to install the logs and lay the wooden floor.
Which garage floors are better?
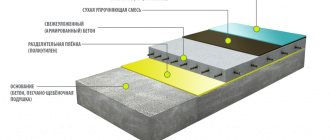
Another base option is a concrete screed. This option is rightfully considered one of the best. However, the work to create it requires much more effort, time and money.
Work begins with preparing the foundation for work. At this stage, you need to decide on the height of the floor. It is necessary to take into account the fact that the screed should be slightly higher than the threshold. Once this step is complete, you can begin removing excess soil from the garage area, if any. The next step is to lay out two pillows. The first is made of crushed stone with a height of 30 to 85 cm. This parameter depends on the type of soil. The second pillow is sifted sand. The thickness of this layer is from 15 to 20 cm.
Pouring the floor in the garage begins with the existing base being carefully leveled, compacted, watered and compacted again. You can use both improvised means and special equipment, if available. The surface should be almost perfectly flat. The slope should not exceed 5 mm per meter.
After this, you can proceed to arranging waterproofing, insulation and reinforcement of the coating. Any suitable waterproofing material, for example, roofing felt, is laid on the compacted surface. Recently, it has become very popular to use expanded polystyrene as insulation, and therefore sheets of this raw material with a thickness of 5 to 10 cm are laid on top of the roofing material. After this, the expanded polystyrene is covered with a film or waterproofing membrane. If the installation took place in separate sections, then you need to work overlapping, and tape all the joints together with tape.
Section reinforcement
How to fill a garage floor? To successfully create a concrete base, it is necessary to have a reinforced layer to strengthen the future floor.
For reinforcement you will need reinforcement rods with a diameter of 8 to 12 mm. This material is selected depending on what load will be placed on the base in the future. Naturally, if the garage is equipped for a large number of cars or for trucks, then the thickness of the reinforcement should be as large as possible.
All elements are connected to each other with wire. Only such a connection is possible. Welding is not suitable, since the structure must be characterized by a certain mobility, and welding the base will eliminate this possibility. 6 mm reinforcement can be used as transverse posts for the frame. The finished version should be a two-layer mesh, in which the distance between the rods is from 5 to 10 cm.
Next, you need to know some conditions by which the thickness of the concrete layer is determined. For example, if the soil is sandy and the area is characterized by the absence of low temperatures, then the thickness of the slab can be from 25 to 35 mm. But in those areas where there is low temperature, and the soil itself is considered heaving, it is necessary that the thickness of the concrete screed exceed 45 mm.
You also need to pay attention to ensuring that the reinforcement frame is separated from the walls by a compensation gap. The concrete base will need this space for free expansion or contraction, depending on climatic conditions.
Impregnations (primers, primers)
If you don’t know how to cover the concrete floor in the garage so that it doesn’t get dusty, doesn’t get too dirty, and spend a little time doing it, pay attention to concrete impregnations (also called concrete primers). These are multicomponent polymer-based compositions. They come on an organic and inorganic basis. Since these are impregnations, they do not form any film on the surface, and therefore cannot peel off or come off. Their components penetrate into concrete and bind molecules with polymer chains. As a result, the strength of the surface becomes 2-3 times stronger, resistance to aggressive environments (acidic and alkaline), temperature changes increases, it tolerates frost better, and the formation of dust is also eliminated.
In general, there are three types of primers for concrete:
- Polyurethane. Their main purpose is waterproofing; they are also used to make repair mortar: the primer is mixed with sand and cracks and chips are repaired with this mixture.
- Water-dispersed. They do a good job of dust removal and slightly strengthen the concrete surface. Their prices are average.
- Epoxy. For the most part, they are two-component, prepared before application, and their main purpose is waterproofing.
After two layers of concrete impregnation, the floor does not generate dust at all
If, after treating with a primer, you will not paint the floor or fill it with any other finishing coating, then water-dispersion primers are best suited for dust removal of garage floors. For paint or other coatings, primers of the same type are used: for polyurethane paint for concrete of the same composition, preparation is used, etc.
Polyurethane (polymer) impregnation for concrete
This garage coating is good for everyone, except for the price - 1 liter costs about $5. You can find packaging of 3 kg and 20 kg. Impregnation consumption when applying the first layer is 0.25-0.5 kg/m2, for the second - 0.15-0.2 kg/m2.
When processing, do not dilute, smear generously, at least twice. Polyurethane impregnation for concrete binds particles without forming a film. Such a concrete floor will stop generating dust and will absorb less liquid. The same compounds are used to strengthen crumbling concrete surfaces. If the process has already gone far, they will not help, but if only traces of abrasion are visible, impregnation will help delay the process.
Application of polyurethane impregnation
Polymer impregnations are applied only to dry surfaces. The moisture content of the concrete should be no more than 5% (at least 28 days must pass from the moment of pouring). The composition is poured onto the floor in portions, spreading with a roller or a special mop over the entire surface. Some companies can add color, so you can get a colored garage floor at the same time. This treatment can be used as a preparation for the subsequent application of paint or polymer floor covering.
Application features: temperature should be from 0°C to 17°C, air humidity not lower than 70%. If the humidity is lower, it must be moistened artificially - with electric humidifiers or by hanging wet rags in the garage, constantly making sure that they do not dry out. Only under such conditions will polymerization be good.
Epoxy primers
This type of impregnation consists of two components that are mixed immediately before use. You can work with them at temperatures above +5°C, there are no other requirements. The cost is higher than polymer ones - $7 per kg, consumption is almost the same.
Epoxy impregnation for dust removal of garage floors
Pouring the base
In order to have a good foundation in the garage, it is recommended to use durable and frost-resistant cement grade M300 or higher. If the area is characterized by rather harsh or difficult climatic conditions, then it is necessary to add special additives and plasticizers to the composition. One of the main requirements for ready-made concrete is a completely homogeneous consistency. Enforcing this requirement manually will be very, very difficult.
To solve this problem, the best option was to order a mixer for mixing concrete mortar. In addition, it is almost mandatory to do this, since the concrete screed must be poured at a time. It is impossible to divide this process into several parts, since in this case the integrity of the coating will soon be compromised.
When the mixture is being poured, a leveling rule is used, and beacons serve as markings. These are the ones you need to navigate. It is also important to expel absolutely all air bubbles that will appear in the concrete. The main goal that should be pursued at this stage is to obtain a continuous, even mass of solution that does not have voids inside.
The next day after the base has been poured, it must be covered with a solid rag, which must be wetted from the outside every day. Until the strength level reaches the desired point, it is necessary to avoid exposure of the solution to sunlight. Complete and final hardening of the concrete slab will occur only 28 days after pouring. Only after this can you begin the floor finishing stage, if necessary.
Self-leveling floors
Self-leveling floors have very good technical characteristics and appearance. They are very resistant to external influences, strong and durable. Their disadvantage is a very high price. Especially for polymer and epoxy ones. The third type - concrete self-leveling floors - has a more affordable price. It is usually used to make a durable and dust-free floor covering for the garage.
They got their name because they have a liquid consistency and spread over the base. These compositions are also called self-leveling, since due to their high fluidity they are distributed over the surface. But don’t think that they don’t need to be leveled at all. Having poured the composition in one place, it must be “dispersed” over the surface with a spatula or some similar tool, more or less evenly distributed. Ultimately, the solution will level itself, but different compositions have different degrees of fluidity, but manual distribution will never hurt (usually expensive brands spread better).
Rubber floors
Recently, rubber flooring for garages has been gaining popularity. It can be made in two versions. Either rubber floor tiles or rolled rubber flooring can be used.
As for tiles, its advantages include high resistance to abrasion, icing, static and dynamic loads. In addition, it successfully resists the effects of chemicals. It is very difficult to damage such material, and therefore using it as a garage flooring is a great idea. This version of the base is laid in separate sections, but for its installation it is best to call a specialist. When compared with rolled rubber floors for garages, two advantages can be distinguished:
- The first is that it is easy to replace. If any area is damaged, then it is enough to simply replace it with another one. If the rolled floor is damaged, you will have to replace the entire strip, and not just a separate section.
- The second thing is styling. To successfully lay such a base, you will not need to use special adhesives, since the segments have special fastenings.
As for the thickness of the sections, the maximum is 4 cm.
If we talk about rubber rolls, it is worth noting that they are produced from used car tires. For this purpose, there are special devices - drum-type vulcanizers. This flooring has a long service life and high durability.
Installation of rubber floor
You should start by laying modular tiles. If large loads are not planned on them, then you can not glue them to the floor, but only fix the edges of the segment. In addition, for ease of connection with each other, each section has docking protrusions. Because of this, installing the floor resembles assembling a puzzle. After several sections have been joined together, all remaining seams are sealed with sealant. The service life of a properly assembled coating is at least 10 years. In addition, to install this type of rubber floor there is no need to treat the base, which saves a lot of time and effort. In addition, the slabs can be installed on the subfloor even without first leveling it.
As for the installation of roll rubber coating, here you will have to work with the base. The rough layer of the base is carefully primed, after which it is covered with a special mixture of polyurethane glue and turpentine. Approximate primer consumption is 300 g per m2. The rubber rolls themselves are spread on a concrete base, after which they need to be allowed to rest for several days. In addition, unlike laying segments, the use of glue for installation is necessary in any case, regardless of further loads.
The latest technology for installing rubber flooring is self-leveling coating. The composition used in this case includes rubber chips, dye and polyurethane glue. The finished mixture is liquid. It is evenly applied to the prepared base according to the instructions. This substance can be applied by spraying, which allows you to easily apply it not only to horizontal, but also to vertical and inclined surfaces. It is worth noting that the cost of any of these three types of rubber flooring is quite high, but this is justified by the reliability and service life of the base.
From all of the above, we can conclude that the question of how to make a floor in a garage is no longer such a problem as it was before.
Laying linoleum on a concrete floor
As in the situation with wooden floors, installation is carried out after all repair work has been completed, the room is completely ready and the material has been pre-matured in a rolled out state. Linoleum is laid on a leveled and clean subfloor.
Floor preparation
Leveling a concrete floor for laying linoleum is much easier than leveling a wooden one. Uncorrected surface defects are visually noticeable on the coating and lead to abrasion of the top layer. Before laying linoleum, check the strength of the screed. If the screed is loose, it should be replaced. If the quality of the screed is good, it is enough to level the base with leveling mixtures, plywood, chipboard or by arranging a dry screed.
Preparatory steps for leveling the screed with mixtures:
- The old floor covering is dismantled.
- All bumps or sagging are removed from the concrete base by grinding.
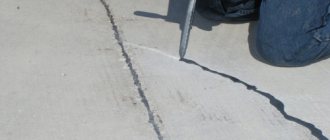
- Cracks or potholes are repaired using leveling mixtures.
- The surface is sanded, dust-free, and treated with a primer.
Important: you should not make the surface too smooth, this reduces the quality of adhesion to the coating.
The thickness of the leveling layer in the presence of freshly repaired damage must be at least 5 mm. After leveling, the maximum permissible deviation of the floor surface from the horizontal in length or width is 0.2% of the corresponding linear dimension. The clearance between the floor surface and a 2 m long batten is no more than 2 mm. Work begins when the screed humidity is no more than 5%.
Laying linoleum
The processes for laying linoleum on wood and concrete floors are similar, but on a concrete base, linoleum without a base will definitely require a backing. The main functions of the substrate are noise and heat insulation of the floor. Additionally, the substrate will help eliminate minor surface defects, but you should not count on leveling out large flaws.
As a substrate, roll materials made of foamed polyethylene, cork, jute, flax, wool are used, and there are combined options. Substrates made from natural materials are more environmentally friendly and do not shrink.