Features of working with glass bottles
Before starting work, it is recommended to place glass containers in a basin of water for 15 minutes. This is necessary for easy removal of soaked labels, glue residues and dirt. To make crafts, you can use the entire bottle, but very often it is necessary to cut the container into 2 or more parts.
This can be done in several ways, but be sure to take precautions.
| Method of cutting glass containers | Materials and tools | Process description |
| Glass cutter | Bottle, glass cutter, marker, hot and cold water | You can use a factory glass cutter or a one made by yourself. When cutting, make 1 pass. This will help achieve smooth cut edges. To make it easier to separate the parts of the container, you need to pour hot water over the cutting line. Immediately dip the heated glass into cold water. As a result of temperature contraction, the glass will crack along the cut line. |
| Candle flame | Bottle, felt-tip pen, candle, piece of ice | Use a felt-tip pen to mark the line of the future cut on the glass. Warm up the line over a candle flame, turning the bottle evenly. Then cool the heated glass with ice and lightly tap the container. |
| Burning rope | Bottle, natural twine, acetone, container with ice water | Cut a piece of twine long enough to wrap around the container a few times. Soak the rope in acetone. After abundant impregnation, wrap the bottle along the intended line of the future chip, tie the ends tightly and cut off the excess. Holding the container horizontally, light the twine. The bottle should be rotated to ensure uniform heating. When burning ends, you should immediately lower the bottle into a bowl of cold water. Due to a sharp temperature change, a crack forms on the line of the tied thread. After this, you should separate the pieces of glass with your hands. |
After cutting the glass container, it is necessary to sand the cut edges. Be careful when working as fine glass dust flies around and can damage your eyes. It is safest to sand with an emery wheel or file under water. You can also pour water on the sandpaper and quickly move the cut edge along it.
In the master classes below, a glass cutter is used for the work, but you can cut the bottle in any way suitable for everyone.
Beauty in the garden
Unfortunately, most owners of a garden plot prefer to use it only as a way to provide their family with fresh fruits, vegetables and berries.
And only a small part of gardeners combine business with pleasure. It is this part of nature and land lovers who use the site for comfortable privacy, as well as for a pleasant pastime. In this case, the “amenities” are various crafts that are easy to implement with the help of plastic bottles.
Flowerbeds
In almost every garden plot you can find a small flower bed. Even if it is a very small garden bed, during the flowering period it illuminates the entire area with joyful and bright colors. A small bed often becomes invisible during the maturation of the plant and the bud in particular. To protect the flower bed, you can use plastic bottles.
Here, during the winter, it is recommended to collect bottles of the same size and shade. In the spring, bottles are simply placed with their necks in the ground - preferably 2/3 of the entire container size.
Especially enterprising and creative gardeners prefer to paint new “fences” with acrylic paint. But you can spend money and put decorative sand or stones into transparent plastic bottles.
Animals
Various animals and cartoon characters are perfectly formed from plastic bottles. Some of them are easy to implement, others require some fiddling, but the results are worth it. Finally, the plastic is painted with acrylic paint in a suitable color and pleases gardeners for several years - yes, such products cannot stand forever under natural disasters.
To extend the life of crafts, it is recommended to bring them under a canopy or in a country house for the winter.
Paths
Walking paths made from plastic bottles are a great way to relax your feet. After working in the beds, it is recommended to walk along these paths barefoot, which, in principle, can be done constantly. The presented designs are simple to make - the bottom is cut out of the bottle with a rise of 7-10 cm.
On the site, it is better to dig a shallow trench, also 10 cm deep. Pour sand into it, and “drive” the cut plastic blanks into it - it is important to ensure that the container is completely filled with sand to avoid deformation.
How to Make Amanitas from Plastic Bottles. Crafts Homemade
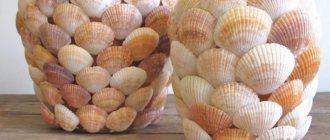
Crafts from glass bottles for home interior
Crafts made from glass bottles can perfectly complement the style of the interior and create a positive mood in it. You just need to decide where exactly you want to apply them and choose the range of possibilities.
Flower pots
From glass containers you can make not only a beautiful, but also a “smart” flower pot.
For needlework you will need the following materials and tools:
- wine bottle;
- glass cutter;
- marker;
- emery wheel;
- Earth;
- net;
- flowerpot;
- water.
Master Class:
- Use a glass cutter to cut the glass container in half.
- Sand the edges of the product with an emery wheel.
- Pour water into the bottom of the container.
- The upper part of the product needs to be turned upside down, a mesh should be placed there and filled with earth. A long string of mesh should be lowered down through the neck.
- Plant the plant in the ground and place this container at the bottom of the bottle. The neck and rope will be in the water, so the flower will always have access to moisture. You just need to periodically add water to the lower vessel.
Candlesticks
A candle holder made from a bottle is very convenient to use, since the glass reliably holds melted wax or paraffin. The easiest way to make a craft is from the bottom half of a bottle.
To work you will need:
- bottle;
- glass cutter;
- paraffin;
- wick;
- marker;
- file;
- pin.
Master Class:
- Mark a line on the glass with a marker where you want to make the cut.
- Cut the container using a glass cutter or any other method.
- Separate the 2 parts of the bottle with your hands and file the edges until they are perfectly smooth. The lower part is exactly what is needed for making a candlestick, and the upper part can be used as a lamp, which will be discussed in the next master class.
- Melt the paraffin in a water bath, leaving a small dry piece for the next step.
- Place a piece of wick on the bottom of the candlestick and secure it with dry paraffin. Clamp the upper part of the wick with a clothespin lying on the top of the candlestick.
- Carefully, without moving the wick, pour melted paraffin into half the bottle. Leave it to dry for 1-2 hours.
If you don’t want to deal with heating and pouring paraffin, you can insert a suitable thick candle into the candlestick.
Lamps
Artificial light cannot be compared to a candle smoldering under a bottle. A hand-made lamp fills the atmosphere of the room with the effect of comfort, mystery and romanticism.
To make it you need:
- bottle with a long neck;
- candle;
- wooden board;
- marker;
- glass cutter;
- file.
Master Class:
- Prepare a beautiful bottle. It can be completely transparent or slightly colored. Translucent blue, red, green lamps look beautiful.
- Mark the cut line with a marker. The tops of bottles are used for lamps, but their sizes may vary. You can use half a bottle or a container for its entire height for the product, cutting off only the bottom itself.
- Cut the bottle along the marked line using a glass cutter.
- File the edges.
- Place a thick candle on a wooden board, light it and cover with a bottle cap.
Compositions of 3-5 lamps of different sizes look original.
Coat hooks
The idea of hooks made from glass containers was first introduced by Lucirmas. After that, stylish eco-hangers began to decorate many hallways and bathrooms.
To make such a product yourself, you will need:
- wine bottles;
- mirror base;
- glass cutter;
- file;
- liquid Nails.
Unusual crafts from glass bottles - coat hooks
Master class:
- Using a glass cutter, cut the bottles at an angle so that they are mounted on the wall at the desired angle.
- Hang the base on the wall.
- Using liquid nails, glue the cut of the glass neck to the mirror. You can decorate traces of glue on the hook, if any, with a cord.
Hanging planter
If you are tired of the same type of plastic flower pots, and ceramic containers are expensive, use glass wine bottles to decorate your garden plot. I planted vines and tradescantia in them. They are hardy and unpretentious, suitable for garden decoration.
You can decorate them with beautiful patterns or leave them as is. It all depends on your imagination and creative skills.
For kitchen
Crafts made from glass bottles are used not only as decoration, but also as useful items often used in the kitchen. From these containers you can make unique elements of dishes, vases, shelves, which will add individuality to the kitchen and emphasize a sense of style.
Dishes
At home, you can make a glass and a glass from one bottle. For needlework you will need:
- bottle;
- felt-tip pen;
- glass cutter;
- file;
- glue.
Master Class:
- Using a felt-tip pen, mark the bottle into 2 even parts.
- Cut the container along the drawn line with a glass cutter.
- Carefully sand the cuts of both halves. The polished bottom part of the bottle is already a glass.
- The neck of the upper part needs to be screwed with a cork and the base from a broken glass or a cut and polished glass circle, for example, the bottom of another bottle, should be glued to it. Turn the product upside down and the glass is ready.
Bottles cut lengthwise are used as original plates. You can also make flat plates from glass containers, but to do this you need to seek the services of a glass blowing workshop. There, at high temperatures, craftsmen will shape glass containers into various shapes.
If you put a small tray or plastic plate on top, first drilling a round hole in them, you will get a wonderful multifunctional product - a vase with a plate for desserts. It can be painted and decorated with beads, stones, or applied with an image using the decoupage technique.
Vases
A glass bottle is a ready-made vase. You just need to decorate it to your liking and place it in a visible place. One of the simple but effective ways to decorate is to paint the bottle and add some elements to it.
For needlework you will need:
- beautifully shaped bottle;
- beige acrylic paint;
- acrylic lacquer;
- dark lace;
- sponge;
- wide brush;
- fine grit sandpaper.
Master Class:
- Wash and dry the bottle thoroughly before further painting.
- Paint the container using a sponge. It should be dipped into the paint and applied to the surface of the bottle with pointed slapping movements. This painting method is easy to achieve a perfectly smooth surface.
- Lightly sand the dry paint with sandpaper and apply another coat. Leave until completely dry.
- Using a wide brush, coat the bottle with a thin layer of acrylic varnish.
- Immediately after applying the varnish, attach a piece of dark lace to the bottom of the bottle and gently press it to the surface so that the material sticks. In this way you can attach a narrow strip to the top of the neck. Leave the product to dry.
Shelf
To create a kitchen shelf you will need:
- 4 boards of the same size;
- 8 bottles;
- stud M10-2m and nuts with washers.
Master Class:
- Mark 4 holes along the edges of 2 boards (2 on each edge).
- Make holes using wood crowns. The diameter of the hole should exceed the diameter of the bottle neck, but be less than the maximum width of the container.
- In all boards, drill one hole in the center of each side with a 12-gauge drill bit.
- Assemble the shelf. You should start from the first row, before inserting the tie into the first board. Place 4 bottles on the board, and on them - a board with cut out holes. Then tighten the stud on both sides with nuts and continue assembling the product in the same way.
Animal drinking bowl
We made a special automatic drinking bowl for rabbits from a wine bottle. You can do this too. In the cork, just make a hole with a drill and insert a tube made of soft food-grade plastic with a nipple at the end. Build a mount from the wire so that you can hang it on the cage. A very convenient device. Pets can always get drunk, especially on a hot day.
No longer in fashion: models of white shirts that you need to get rid of before spring
St. Petersburg volunteers distributed flowers near the metro in honor of Valentine's Day
A married couple rode a python on the hood of their car: photo
For a country home
Crafts made from glass bottles go perfectly with the natural elements of the country landscape. The combination of glass and vegetation is a successful type of penetration of artificial material into the natural environment. The glass beautifully refracts and reflects light between green grass and vibrant flowers.
Table for the garden
In order to make a table for your dacha, you need to prepare:
- 3-4 thick wine bottles;
- shield made of natural wood;
- jigsaw;
- wood drill;
- drill.
Master Class:
- Using a jigsaw, cut rounded tabletops from wood.
- Mark 3-4 support points with a pencil and drill holes in them. Sand everything carefully.
- Insert bottle necks into holes. You may need to taper the hole so that the table top fits tightly on the glass legs.
Flower beds
Before you start making a flower bed from bottles, you should decide on its shape and size. Next for work you will need:
- bottles - from 50 pieces (depending on the size of the flower garden);
- shovel or hoe.
Master Class:
- Draw a sketch of the flower garden on paper, and then use a hoe to draw its boundaries on the ground.
- Using a shovel or hoe, dig a trench 15-20 cm deep along the drawn lines.
- Insert bottles into the trench with their necks down.
- Fill the remaining voids with soil, compacting it tightly. Containers should be recessed to half their height.
Decorative fence using bottles
Dig a pole of the required length into the ground or use a wooden base with special holes for this.
Make a connector in the bottles that is 1 centimeter larger than the diameter of the pole
We simply thread the bottles through and secure them with a strap at the top.
On a note! This fence option looks more attractive when the glass material used has a different shape and color.
For the garden plot
Crafts made from glass bottles very often decorate garden areas. Many people want to decorate their plot beautifully, but at the same time it is also practical, inexpensive and uncomplicated. Glass container is just the right material for this.
Multi-level flower beds
Creating flower beds in several levels requires a lot of time and material, but the end result is worth it. After preparing a large amount of glass containers, you can begin work.
Master Class:
- Using a hoe, dig a trench 15 cm deep around the flower bed.
- Insert bottles turned upside down into the trench.
- Pour sand or earth into the voids and compact. Half the height of each bottle should be above the ground.
- Pour another layer of soil onto the flower bed and thus protect it with bottles. The diameter of each subsequent level should be smaller than the previous one. You can make an unlimited number of levels, and the lowest level should be quite large.
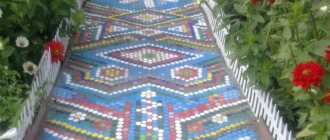
Path in the garden
Crafts made from bottles can be quite large in size. For example, you can create entire garden paths from glass containers. They do not harm garden flora and are safe for health. Paths made from glass containers of different colors look especially funny. You need to come up with and draw the desired ornament on paper in advance and collect containers of the desired colors.
It is important to note that, for example, the diameter of a champagne bottle is 8.5 cm. Considering the 1-2 centimeter gaps per 1 sq. m of path you will need approximately 100 units of glass containers. A half-liter beer bottle has a diameter of about 7 cm. Therefore, 150 pieces are needed for the same area.
Master Class:
- Mark the perimeter of the path using pegs and stretched twine. If you plan to have a winding path, you can lay out the rubber hose. Suitable track width is 50-70 cm.
- Dig a ditch along the marked perimeter. Its depth should be approximately the same as the height of the bottle.
- Pour some fine gravel onto the bottom of the trench, carefully compacting and leveling it.
- Fill up to 2/3 of the trench with a layer of sand or soil.
- Fill glass containers with sand or fine gravel. This will give them more strength.
- Insert the bottles, neck down, into the soil, tapping them lightly with a rubber mallet. The containers can be placed close to each other or leave centimeter gaps between them. Using a flat board, you need to trim the bottles on top so that they are in the same plane.
- Water the soil in the gaps. Then fill it with dry sand. Water again and add sand to the top. The upper gaps between the containers can also be filled with decorative pebbles or gravel, or they can even be covered with cement mortar. The bottles should protrude several centimeters above the horizon.
In addition to the fact that creating interesting crafts from bottles brings great benefits to the interior and exterior of your home, it also helps solve a serious environmental issue. Many glass containers end up in recycling rather than landfill. There is a great opportunity to combine caring for your home and the environment.
Methods for cutting glass at home
It is difficult to teach something to a person who does everything his own way.
This is especially true when working with glass. Although many crafts use whole bottles, in some cases they need to be cut. How to learn to do this work masterfully in order to create original masterpieces? Experts advise trying several methods of cutting glass bottles:
- using a special machine;
- using a glass cutter for wine or beer bottles;
- preheating the container using a flame or boiling water;
- use of burning thread;
- nichrome wire under electrical voltage.
Of course, each option should be learned. Experienced craftsmen are always ready to give practical advice to anyone who wants to create masterpieces with their own hands.
Persistence and patience will help you achieve the desired result. In addition, you will have to ruin a lot of bottles. But it's worth it.
Sock organizer
If your socks are still in a pile, it's time to make an organizer. It will help you organize your drawer. In addition, you will save time searching for the right pair.
- Take a small bottle (1–1.5 l). It is desirable that it be made of colored plastic.
- Cut off the bottom. You won't need this part.
- Turning the bottle in a circle, cut it into a spiral into a 0.5 cm strip.
- Wind the spiral onto the hanger. Glue the ends.
- Fold pairs of socks, catching them by the coils.
We recommend: What is better to buy for a comfortable sleep: a blanket made of sheep or camel wool
You can fold your underwear using the same principle.
Home decor
Plastic bottles also look great in home decoration - the main thing in this matter is to take a responsible approach to craftsmanship and be careful.
Lamps and night lights
To make a lamp (lampshade) or night light from a plastic bottle, you will have to use high-quality acrylic paints and other decoration elements.
Another important issue here is safety - the lampshade should not be positioned so that the plastic touches the lamp, otherwise the material may melt. In this case, it is better to choose energy-saving lamps that heat up to no more than 60 degrees Celsius.
Palm trees
Oh, the sea, the sun, the beach and palm trees! You always want the feeling of the tropics, so you should immediately make at least a palm tree from plastic bottles. Surprisingly, such a complex design is completed in just a couple of hours. The main thing is to show imagination, not to be discouraged by the lack of heat, and also to be careful when working with tools.
Flower pots
You don’t have to buy flower pots, but make them yourself from plastic bottles of various sizes, depending on the needs of the plant’s root system. In this case, you can show your imagination and cut out a flowerpot of the most unexpected size.
For example, kittens for which only 2 ears are cut out turn out to be interesting. The main task in such work is to attractively color the finished carved product.
Candlesticks
Candlesticks are not always required at home, but if there is a need to install a couple of candles, then why not use the bottles left over after the celebration. It should also be noted that for the manufacture of these parts, remnants from previous crafts are mainly used - bottle necks that have not found use previously. It is advisable to paint the necks with acrylic paints so that the craft matches the existing interior.
Curtains
For your home or garden, you can make curtains from the bottoms of plastic bottles. This interpretation is suitable for low-budget decor and looks great in any style.
Moreover, from afar it is impossible to determine what exactly these bottoms are supported on - they can be hung on a ribbon, fishing line or thread, like a garland, or they can even be glued to strips of tape.
If you use several shades, you can even imitate some kind of pattern on the created canvas.