Variations of wigwams
When making a children's wigwam with your own hands, first of all you need to decide which hut design will be most optimal for the child. There are several types of huts, differing in the shape of the base, which can be either quadrangular or hexagonal.
To understand how to sew a wigwam for children with your own hands, you need to take into account several circumstances, taking into account the parameters and age of the child. In a large family, it is naturally better to make the base larger in area.
In addition to the classic “hut” design, you can also make a hanging wigwam, but despite the fact that it looks interesting and beautiful, it deviates somewhat from the “canon”.
Wigwam ideas and designs for children
There are many teepee ideas for kids. It all depends on the preferences of the child and the skills of the master who will make it. There are 5 options for original houses.
wigwam with pompom mattress
Pom pom mattresses have become very popular. It will also be very comfortable for your baby to lie on it. Such a wigwam will become a real decoration for a child's room. You can make pom-poms yourself, and then sew them together.
wigwam with lighting
For older children, it is rational to make a wigwam with lighting. Then they can read in their nook, look at pictures or draw.
hanging wigwam
This type of wigwam differs from the above. Its design is based on the fact that the frame must be suspended. So the wigwam can also become a swing. This is especially convenient when you need to rock your baby to sleep.
wigwam - princess house
This option is only suitable for girls. More design costs will be required, but this will be justified by the end result.
wigwam - tent
If you hide the ends of wooden sticks in a fabric cover, and make the wigwam itself into several sections, it will take the shape of a tent.
Frame
It is quite difficult to understand how to make a wigwam for children with your own hands the first time, the main thing is to avoid mistakes at the preparatory stage.
Wooden beams and bamboo sticks are best suited for the frame. They should be smooth without jagged edges to avoid splinters, thick enough (approximately 2 cm) and durable so as not to sag under the weight of the fabric.
But at the same time, their weight should not be very large: there is always a risk that the child will knock over the home. PVC pipes can be a good alternative; they have all the advantages: they are durable, lightweight and can be easily connected to each other.
The length of the sticks should vary from 1 m to 1.8 m, depending on the height and area of the wigwam. To secure the structure, fasteners are needed, including strong rope (string) or twine.
Gable fabric hut
The easiest way to build a hut, suitable for small children, is very easy to install. It can be built this way - stretch a rope and throw any fabric material over it. For slightly older children, you can build a folding hut using wooden blocks for the frame.
Required materials for the frame:
- four blocks of pine wood 25x50 mm, 1.2 m long;
- round wooden rod with a diameter of 20 mm, a length of 1.2 m;
- drill with a feather drill with a diameter of 20 mm;
- pencil;
- ROULETTE.
Materials and tools for the awning:
- fabric 1.2x2.2 m;
- sewing machine;
- elastic for clothes;
- threads
- Measure 15 cm from the top of each block and mark these places with a marker.
- Then drill a small hole with a diameter of 20 mm in this place using a drill.
- Place the bars against each other to make sure the holes line up.
- Now you need to insert a round rod through the drilled holes of the two bars at the same time. The connection must be tight enough to secure it firmly.
- Pass the other end of the rod into the holes of the other two bars. Thus, we get a finished frame.
- Fold the fabric material for the awning 1 centimeter around the perimeter and sew using a straight stitch. The required tent size is 1.1 x 2.1 m.
- Take an elastic band and cut 4 pieces 10-12 centimeters long.
- Make loops from the resulting pieces and sew them to the corners of the awning.
- The last step is to throw the canvas over the crossbar of the frame and fix it on the legs thanks to rubber loops.
READ ALSO: How to Make a Compound Bow From PVC Pipes
The height and width of such a house can be adjusted, and the structure can be easily assembled even by one person. It also requires very little space when disassembled.
Awning
Almost any fabric can be used as a covering. However, it is better to give preference to natural fabrics. This is due to the fact that the space of this playhouse is quite closed, therefore, the material should allow air to pass through well (it would not be a bad idea to leave a window).
Cotton, linen or canvas fabric, silk are perfect. You can also combine them: make the base from stronger materials, and the walls from lighter ones. The floor of the wigwam can be covered with a blanket filled with synthetic padding.
Children's wigwam: exploring design options in the photo
The design of a nook for your baby can have different shapes and dimensions. Often there is a simple tent design with a quadrangular base and a crossbar at the top (pictured below) or with a pyramid-shaped frame.
The base of this model can be square or elongated
Less commonly used are models with a three-, five- and hexagonal base. For cozy homey houses, the best option is a pyramid-shaped structure with a square or rectangular base.
Required Tools
In order to install an Indian dwelling, in addition to fabric and a frame, you need scissors, a pencil, pattern paper, glue, a tape measure and a sewing machine (in extreme cases, thread and a needle). These tools will also be useful in determining the correct patterns and sizes for a given wigwam with your own hands.
Beautiful photos of finished children's wigwams
It's always difficult to choose fabric options that will match each other. Therefore, I decided to make a selection of beautiful ready-made options to make your task easier.
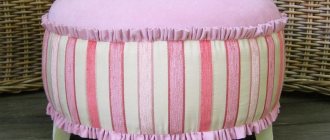
The photo shows a wigwam for a boy. Stylish colors and soft pillows of different shapes will delight all friends and the baby himself.
A bright version of the cover, the fabric at the entrance is held in place with ribbons.
In the photo below, decor in the form of pompoms is used.
A calm combination of colors attracts attention, but acts calmly. In the photo we see an open window.
Decorating the composition with flags.
An interesting option for a princess.
The dream catcher adds color to the design.
The black and white version of the cover is suitable for a nursery for two children.
A fabulous option with garlands.
A house for every princess. This is a non-standard round window.
A cozy place for privacy and relaxation.
The wigwam fits organically into the interior.
The marine style of the interior is reflected in textiles.
Interesting bright design option.
Interestingly, this idea can also be implemented in the garden. For kids to escape the heat on a sunny hot day!
I was very inspired by this invention, it’s a pity that my child is no longer interested in this - they discouraged the hunt with an ordinary tent. In your opinion, is it worth building such a fortress in a nursery?
Source
How to make a wigwam for children. A few tips
When making a wigwam for children with your own hands, a step-by-step photo should greatly simplify the manufacturing process; you should check your actions with the sample.
First you need to install the frame of the future wigwam. Secure the beams tightly to the top. To be sure, you can drill holes through which you can string the rope. If desired, an additional frame is installed below, connecting the beams to each other.
It is important to understand that based on the area and height of the future wigwam with your own hands, patterns are selected individually; there is no single standard. At this stage, the sides of the base and the height of the hut are measured. These parameters are then transferred to the pattern paper. The future awning is cut out from them; it is important to remember the indentations required for the seams.
At the same stage, you can cut a window in one of the walls. In total, for a wigwam with a square base, you should get several parts for the walls: a wall without a window, one with one, and a side that is the entrance.
For the window you need to cut out four 6 parts of the same length and width. Four of them are sewn together and then overlapped on the wrong side and sewn on with small “pockets” stitched for threading through the ends of the frame. Then, from the outside, the partitions are inserted into these gaps, and the product is again stitched from the inside out.
You can put a blanket of suitable size on the floor. You can sew it yourself.
The part going to the door is cut. If desired, the edges can be additionally stitched. You can go a more complicated route and sew the entrance from three different parts: a whole top and two “curtains”.
When connecting the sides, you must remember that the slats must pass between them; to do this, you can retreat a few centimeters along the edges and sew them from the inside out to form a kind of cover for the poles.
Or additionally sew the sides with stripes, inside which the sticks should be threaded. If this method seems complicated, you can sew loops to the fabric, which are sewn to the finished awning along the edges.
Now you can start adding additional decor. Additional elements include ties on the doors, bows, pom-poms, tassels, fringe, etc. They are added as desired.
How to sew a wigwam for a child yourself, job description
Now let's move on to describing the work process, because the vast majority of our readers have fairly vague knowledge in this area.
We make patterns
To make the base of the future wigwam, you need to draw an equilateral triangle on the film with a marker.
The optimal side size is 130 centimeters. In order to make the walls of a future building, the same triangle is drawn on the fabric with a marker, but its side length is 145 centimeters and its width is 130 centimeters. Such a wigwam will be most convenient for playing not only for the child himself, but also with friends. After everything has been drawn on the film, we cut out the details of the house.
We cut out the parts necessary to build the base
Now we move on to the next stage of our work - we cut out those parts that are necessary to create the base of a children's tent.
The operating algorithm is as follows:
This stage of building a children's wigwam for play can be considered complete.
Sew the base
Since we already have everything to create the base of the wigwam, we need to sew it together. To do this, we carry out the following actions:
- it is necessary to stitch the ties, but one end must remain open;
- the base of the wigwam must be carefully lined up, the squares (as we remember, they must be folded
diagonally) and you also need to grab 2 ribbon ties, which are used to enter the wigwam. Now we move on to the stage of sewing an Indian house for children (its walls).
Sew the walls
Now you need to sew the walls of the wigwam. Moreover, this should be done as efficiently as possible. No one wants a child to be upset because the wigwam, which is so much fun to play in, collapses at exactly the wrong time.
So, how can you sew the walls of a wigwam:
· we cut out three side walls from the purchased fabric (sides of the tent). In order to make the construction more colorful, we sew pockets onto two sides with an applique applied (you can not only sew them on the pockets, but also stick them on them). An applique with some kind of animal print is best;
· the next stage is to make a cut on the front side of the house at an angle so that you can then roll it up (entrance). An incision at an angle of 45% is considered optimal;
· sew pre-prepared ties on both sides of the entrance to our wigwam.
We have completed the work related to preparing the walls of the wigwam.
Sew the walls and edge the entrance
The wigwam should look colorful and unusual. Therefore, you need to make an edging around the entrance to the children's play area. Moreover, the edging needs to be done beautifully. But first you need to sew a house. When grinding down the walls, you should remember that you need to leave space at the top for installing sticks. We put the parts face to face. To stitch the walls of the wigwam you need to use a French seam - this is the best option. The cuts (both top and bottom) need to be finished cleanly with bias tape.