DIY shell panel for beginners
Surely everyone has shells brought from the sea. They evoke pleasant memories of relaxation, sun and sound of the sea. Seashells themselves are a beautiful work of nature. Making a panel of shells with your own hands is quite simple. You need to use your imagination.
Materials for creating panels can mostly be found at home:
- Glue;
- Framework;
- Board;
- Beads;
- Pebbles;
Anyone can make a panel from shells, showing a little of their imagination and desire
- Cereals;
- Beads, etc.
If you don’t have any, you can buy everything for needlework in the store.
Making shell panels can be a great hobby. This is a fun activity for adults and children. When working on crafts, a child incredibly develops fine motor skills, fantasy, imagination, perseverance and attentiveness.
You should remember about safety, since shells are quite fragile material, and they can hurt you.
How to make a panel from shells with your own hands: master class
Creating panels develops incredible creative abilities in everyone. Such a panel can be hung at home; for example, a marine-style panel looks great in the bathroom. And panels with flowers or trees, as well as in the form of toys, are perfect for the design of a children's room. In addition, a hand-made panel of shells is a good gift.
To create a panel of shells you will need:
- Seashells of different sizes and shapes;
- Board or plywood;
- Glue;
- Acrylic paints;
- Wooden frame, suitable for photos;
- You can also use various beads, feathers, pearls, rhinestones, pebbles, buttons, cereals, seeds.
Thanks to the variety of shapes and colors of shells, the panel can turn out original and colorful
In general, you can use any available materials that you have. There are no restrictions.
First you need to collect all the material for work. Prepare everything.
Shells can be brought from the sea, or they can be purchased at a craft store.
Actions:
- It is necessary to sort the shells by size and type. All shells should be thoroughly washed and dried.
- Shells can be painted with marigold to give them a darker and richer shade.
- If there is no stain, you can use a strong solution of potassium permanganate, then the color will range from dark red to brown, depending on the strength of the solution. It’s easier and faster to cover shells with acrylic paints.
- The shade of paint is selected at will, in accordance with the concept and design of the picture. For example, to create a sun from shells, use yellow color, and for flowers you need to paint shells pink and red.
- Before gluing the shells onto the panel, the paint must dry, or it will smudge. You can, of course, paint the shells after attaching them to the panel. But it may not turn out very neatly.
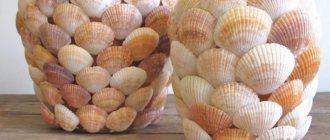
You can make a lot of different panels from shells: paintings, decorations, figurines, patterns, etc. The main thing in this matter is imagination and ingenuity.
If you don’t have any of the above on hand, you can use nail polish to give the shells a tint. Pearlescent varnishes look especially impressive.
You need to take a wooden frame, you can use a photo frame. It can also be coated with acrylic paint.
The board or plywood must be level, to achieve this you should walk over the surface with sandpaper. The board should be adjusted to the size of the frame.
Decoupage
If you manage to find a large stone, smooth and flat, on the seashore, you can decorate it using the napkin technique. It is called "decoupage".
Materials required:
- white water-based paint;
- napkins in 3 layers with a bright large pattern;
- PVA glue.
- acrylic paints.
Step-by-step instruction:
- The stone must be painted with water-based paint.
- Separate all layers of the napkin and cut out the design from the first.
- Soak the picture with glue (it is recommended to start from the middle) and carefully glue it to the stone so that wrinkles do not form.
- Wait until completely dry.
- Draw with acrylic paints, paint, if necessary, add sparkles, rhinestones, and other additional decorations.
- Varnish the surface.
- Dry for 2 days.
- Varnish the other side.
In total, up to 3 layers of varnish will be required. The finished product can be decorated with a flower pot or simply left on the coffee table.
How to make an unusual panel
You can make the panel abstract, that is, simply stick on shells of various shapes in a chaotic order, or you can arrange the shells into a pattern.
For example:
- Flowers;
- Tree;
- Ship;
- Doll;
- Car;
- Seascape, etc.
The next stage is a sketch of the panel, made in any way. You can not only draw a picture by hand with a pencil or paints, but also find a photo you like on the Internet or scan a beautiful picture, photo or even a postcard. Using Adobe Photoshop, you need to outline the image.
Most people bring a lot of shells from their seaside vacation, which eventually gather dust on a shelf and are forgotten about. Not everyone realizes that they can be used to make an excellent and original panel
It should be understood that the sketch should not have many small details, since the shells themselves are a very original and interesting material that looks impressive in various compositions. But if you really want to, you can use shell crumbs for small details.
Beginners to create in this direction should take simple drawings, with a small amount of detail.
Print the image in accordance with the dimensions of the panel being performed, the next step.
Then you need to apply the drawing to the board using carbon paper.
However, this is not a mandatory step; beginners usually do this. Or when the drawing is incredibly complex. You can simply create a composition directly on the panel.
Step-by-step instructions: DIY shell paintings and panels
After preparing all the necessary materials, you can start working on the panel.
Step by step guide:
- We paint the frame with stain, potassium permanganate or acrylic paints. The frame needs to dry completely. A white and blue frame works well for a marine-themed panel.
- We insert the board or plywood into the prepared frame.
- Mesh, fabric, sand, burlap are used as a background.
- We cut out the mesh, fabric or burlap prepared for the panel to the size of the frame. We attach it with glue. It is convenient to use a special glue gun. If creating panels is a hobby, then you should spend money and buy a glue gun; it is not expensive, but is very convenient, since the glue is applied carefully, in small portions. This will prevent the glue from spreading.
- The next stage is the main, most exciting and interesting. We make panels from shells and other materials directly on the panel. We carefully attach each part with glue.
A panel of shells is a rather painstaking task that will require a little of your patience and diligence.
We treat the assembled panel with acrylic varnish. This will allow the panel to look more finished; in addition, the varnished parts shimmer beautifully in the sun.
Painting
Surprisingly, stones on cardboard can be used to make natural paintings that are not embarrassing to hang on the wall in a frame.
To do this you will need a little:
- A large piece of cardboard, preferably colored.
- A scattering of pebbles of different shapes and sizes. Pictures of stones are made like a puzzle, so there should be a lot of them.
- Glue.
On cardboard you need to draw an approximate drawing of the future picture. The pebbles are simply selected according to their shape and put together into a single picture. They need to be glued with glue. Thick polymer “Titan” or “Dragon” will do.
You can get ideas for stone applique in this video.
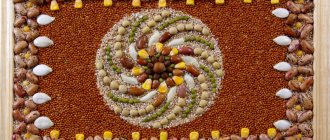
Shell panel with sand background
A panel of shells on sand is a panel that has sand as its background. Instead of sand, you can use any grain.
The first stages of frame and board are carried out in the usual way. Then we apply PVA glue to the board. The next stage is applying sand or grain in an even layer, pressing it as tightly as possible to the board so that it sticks well. Then you should wait a couple of hours until it dries completely.
A panel of shells with a background of sand will remind you more than once of a wonderful holiday at sea
For shine, it is good to coat the sand with varnish and let it dry.
After this, we compose a composition in a marine style, using shells directly, as well as materials combined in theme and style (beads, beaded stones, dried sea stars). We glue everything to the base using glue.
You can lay out the details randomly, or you can lay them out in the form of a pattern, for example in the form of a ship.
Basic instructions for preparing shells
Cleansing
Before you start making crafts from shells, you need to prepare them well.
- If the shells are “dead” and there are no shellfish remains left in them, then you just need to soak them in a solution of water and any chlorine-containing product (for example, bleach, “Duckling”, etc.) in a 1:1 ratio for 30 minutes. If the shells are very dirty or you want to remove the dark outer layer (periostracum), soak them longer. After soaking, brush the shells and rinse in clean water.
- If the shells are “live”, that is, they have the remains of mollusks (even if they died long ago) and have an unpleasant odor, then they need to be thoroughly cleaned. To do this, put the shells in boiling water for 5 minutes, and then remove the remains of the shellfish using tongs, nail scissors, etc. There is a second way: heat the shells in the microwave for 30 seconds, then try to remove the remains with tongs. If unsuccessful, continue heating the shells in the microwave, checking the result every 10 seconds. When all remains have been removed, treat the sinks with a bleach solution according to the first instructions.
After processing, inspect the sinks for chips and, if any, sand them with a sanding block, disc or sandpaper. If desired, you can add shine to them using clear nail polish or furniture polish, as well as using oil or rich cream. True, in this case, before treating the shells with glue, the gluing areas will have to be additionally degreased with alcohol.
Drilling holes
To make some types of crafts from shells (for example, wind chimes, garlands, beads, bracelets and other jewelry), you need to drill a hole in them. This task is quite simple, the only difficulty is that the shells can crack or delaminate at the drilling site.
- Therefore, remember the main rule: the thinner the shell, the smaller the hole should be in it and, accordingly, the thread/accessories of the decoration.
To make these beads, you need to drill holes in the shells and string them on a silk cord, securing the location with knots. Next, all that remains is to clamp the ends of the laces in the crimp ends and attach the fasteners to them
There are two ways to make holes in shells - manual and automated.
Method 1. Select a drill bit for a drill, screwdriver or straight grinder with a diameter of 0.8 - 2 mm. Place the shell on a wooden or plastic board and secure it with masking tape. Drill a hole directly through the tape - it will prevent the shell from splitting or delaminating.
Method 2. If you do not have a screwdriver or drill, then you can make a hole in the sink using a nail and a hammer. To do this, first cover the shell with masking tape, put a mark on the inside of the shell, then place a nail and gently tap it with a hammer several times to make the initial hole. Next, widen the hole by moving the same nail back and forth inside it until you reach the desired diameter.
If you don’t have a nail or a hammer at hand, then use an ordinary needle, nail scissors or a knife and “drill” the hole by hand. The result will appear in about 10 minutes.