Advantages of the selected material
The main advantages of using plastic lids include the following:
- Low financial costs, both for material and labor.
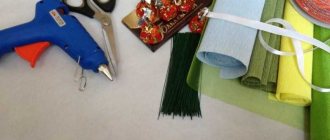
- The minimum set of necessary tools: an awl, fishing line or metal wire, glue, paint (if necessary).
- Safety for humans.
- Plastic bottle caps do not need to be treated with moisture-resistant compounds, since PVC is not susceptible to moisture.
- A large number of available ideas for independent creative work.
- Several types of lids of different sizes, which is also a plus. For example, it is convenient to assemble panels from large lids (from five-liter containers) to decorate garage doors.
- In the photo of crafts made from lids, you can appreciate the variety of colors and intricate designs that can be created for a future product.
Working with colorful pieces will certainly arouse children's interest. Creative activities can be carried out by parents together with their children.
For the dacha
A dacha is a great place to make your fantasies come true. Here you can build a variety of figures and even buildings from plastic bottle caps.
A dacha is a great place to make your fantasies come true.
Fence decoration
It’s easy to decorate any fence with such a simple product by making a panel from it. The size of the decoration depends on the amount of material available. First, you should draw a sketch on the fence, which will later help you create the desired pattern of corks and plan its area. The sketch can be flowers, birds, landscapes and much more.
There are two options for securing covers to a vertical surface: glue or attach with a screw. In the first case, waterproof glue must be applied to the inside of the part. In the second case, fastening is done through the upper side. When screwing, it is advisable to give preference to corrosion-resistant screws. This will preserve the canvas in bad weather.
It’s easy to decorate any fence with such a simple product by making a panel from it.
Garden paths
Alleys made from PET lids will be an excellent decoration for the site. Plastic is resistant to moisture, does not rot, is durable and has a low cost.
Materials you will need:
- Many colored caps;
- A little cement or fishing line (for a removable composition);
- Sand;
- Several boards for formwork;
- Any construction adhesive.
First you need to create a trench and install formwork along its entire perimeter. After this, pour a layer of sand 5 cm thick into it. Prepare a cement solution with sand in a ratio of 1: 4. Next, pour it into the prepared niche and let it harden a little. Press the lids into the slightly frozen mass according to the composition. After a couple of days, the formwork can be removed.
With a removable version of the track, you should make a hole in each of the elements and connect them using fishing line or rope.
Plastic is resistant to moisture, does not rot, is durable and has a low cost.
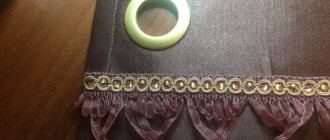
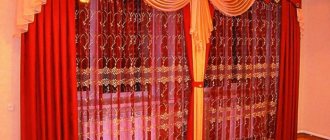
Summer curtains
To create a cozy atmosphere, bright curtains made from cork are suitable. The finished work is suitable both as an element for dividing space and as an entrance to the gazebo.
To create a PET curtain you will need:
- About 2000 pcs. plastic units;
- Fishing line or thick cord;
- A small block of wood or plastic pipe;
- Several screws;
- Needle;
- Awl;
- Drill.
Stages of creating a curtain:
- Make 2 holes in each lid for the fishing line to pass through it.
- Attach the fishing line to a piece of wood or plastic tube. To do this, you need to form a loop and insert a block through it. The fixation strength can be increased by using a glue gun.
- The number of threads of fishing line should correspond to the number of rows of plugs put on.
- The free edge of the thread should be passed through an awl to quickly thread multi-colored parts.
- Secure the required number of caps to the fishing line using a knot.
- Repeat the procedure for all plastic elements.
- Hang the curtains using self-tapping screws.
This design is also suitable for forming a gazebo. Attach several ready-made curtains to the frame of the gazebo, creating its walls. The result is an interesting design idea that will undoubtedly attract attention and provide shelter from the sun in the summer heat.
To create a cozy atmosphere, bright curtains made from cork are suitable.
Preparing consumables
Covers should be prepared before starting independent work:
- All parts must be washed thoroughly in hot water and soap. As an alternative, any disinfectant solution can be used. Pathogenic microorganisms may remain in small cells or channels and should therefore be removed.
- To assemble appliques or a beautiful rug, it is better to use clean lids. For this purpose, it is necessary to use a solvent, with which all inscriptions and pictures are removed from the surface of the plastic.
To make the master’s work easier, you can sort all available lids in advance. Sorting is done by size or color.
Let's go to the lesson
The process of making a proud cockerel can be traced using the example of a master class. The step-by-step creation of a cockerel is described in detail and shown in the photo.
In order to make a cockerel, take a canister (volume 5 liters), a plastic bottle (volume five liters), a couple of plastic bottles for the legs (volume one and a half liters), a metal-plastic pipe, scissors, a screwdriver, a stationery knife, self-tapping screws.
The photo shows a model of the body of a cockerel.
In order to fasten the product, you need to use self-tapping screws. They can be purchased at specialized construction stores. The length of the small screws is about one and a half cm, and the large ones are five to six cm. We will use the small ones to fasten the feathers, and the large ones to attach the head.
The first step we will make is the frame of the cockerel. To do this, we move the upper part of the canister by three cm. Then we shape the legs of the metal-plastic pipe. In our case, the cockerel will walk, so one leg moves forward. You need to secure it with self-tapping screws to the canister. In order to make the cockerel's neck, we fold the envelope and attach the screws. Then we cut out the hams from small bottles and attach them to the canister with self-tapping screws. This is how the body turns out:
In order to make the feathers of the cockerel, we will use beer bottles (the shape is shown in the photo). It is necessary to cut off the long neck and cut the bottle into five parts. It is best to navigate along the bottom. We will only use the top part.
Now we move on to the process of pasting the body. You need to start working from the feet. To make it more convenient, you can detach them from the body. Attach crepe paper to the neck of the bottle, and then use wire to attach the feathers.
Related article: DIY rompers for newborns: diagrams with photos
After we have made the cockerel's legs, we attach them to the body again.
Well, now we’ll just cover the body with feathers, starting from the back. It is necessary to cover all parts except the back with feathers. It is also necessary to leave the back of the cockerel's neck open. As mentioned above, the feathers must be attached to small self-tapping screws.
Then we need to make the paws. Take copper wire (two and a half mm thick). You can take any other wire that bends, but not steel. We bend the shape of the legs from this wire. Then we take corrugated paper and create a leather effect. The tail that remains must be inserted between the corrugated paper and the metal-plastic pipe. To prevent anything from slipping out, seal the bottom with glue for strength.
Then take the bottom of the bottle and cut claws out of it. The claws should be as narrow and long as possible, as shown in the photo. Using instant glue we attach them to the legs.
Use regular spray paint to paint the body and legs of the cockerel.
Cut out the head of a cockerel from construction foam. We use a utility knife to ensure that the cuts are as sharp as possible.
If things aren't going smoothly for you, then you can cut out all the pieces separately and then glue them together with glue.
This is what happens at this stage:
The second photo also shows the cockerel's head:
And third, but from a new angle:
This shape was made using medium-hard sandpaper.
We cover the surface of the head with acrylic putty or any other. Then we need to wait until it dries completely and only then process the head again until it is perfectly smooth. The next step is to treat the surface using regular PVA glue. This is necessary so that the paint adheres well in the future.
Related article: Crochet butterfly patterns
Use acrylic paints (or any other) to decorate the cockerel's head. Then we glue the eyes. You can make them yourself, or you can buy them in a specialized store. The next step is to prepare the shape of the wings and then cut them out using side cutters.
We fasten the long feathers of the wing using ordinary wire, the back should still remain open.
You can close the top using corrugated bottles. The last row should go inside the wing, on the bend.
We cover the surface with paint and wait until the product dries. Then we attach the wings to the body and prepare the mesh for the tail. The longer the mesh, the more magnificent the ponytail.
The tail feathers must be cut from 2.5 or two liter bottles. Now we need to paint each feather in two parts.
Attach the feathers to the tail. They can be cut in half.
From transparent bottles we cut feathers of different lengths for the back. Their width is about two and a half cm. We attach them to the body with self-tapping screws, several at a time. Don't forget to paint it yellow.
Here's what happens:
The last row of feathers must be glued so that the screws are not visible.
Apply yellow paint to this part of the work and let it dry.
Add a couple of bright stripes.
We cover the product with transparent varnish (possibly glossy). So the cockerel is ready, which will bring a joyful mood to everyone.
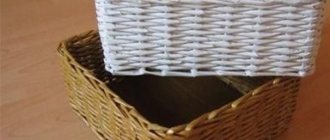
Wicker storage baskets
Using multi-colored or plain lids, you can make original baskets for storing personal items, hygiene items, and large tools in the garage or shed. The advantage of such crafts is the ability to wash the surface of the plastic, and constant ventilation prevents the development of pathogenic fungus. How to make crafts from plastic caps with your own hands:
- For independent work you will need metal wire (large cross-section) and an awl.
- It is better for the master to think through the design of the future basket in advance.
- Two holes should be made in each plastic cover.
- The basket begins to be woven from the bottom. Perforated lids are strung on wire. To secure adjacent parts, it is better to make an additional loop after each threaded cork.
After finishing weaving the bottom, they begin making the walls. The surface of the basket can be decorated with original painting, or you can leave the original design.
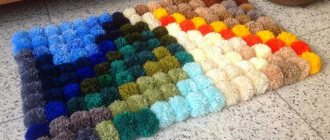
Massage Mat
It is needed for foot massage. It’s quite simple to make such a craft yourself, but it looks original and interesting, especially if you use corks of different colors during production. Walking on a carpet like this every day for 15 minutes is extremely beneficial for your health.
Even doctors agree with this statement. Since walking on it activates the nerve endings located on the feet and responsible for certain organs, this massage serves as a kind of exercise for the whole body.
A detailed master class on similar crafts made from plastic corks can be found on the Internet on specialized websites.
Coasters for hot dishes
Any wooden table is afraid of hot dishes. Original mats made from plastic covers will help prevent damage to the tabletop.
To work, you can use weaving from corks on a metal wire or glue PVZ blanks onto a sheet of plywood.
The method is chosen directly by the master, depending on the availability of the necessary materials.
Instructions on how to make simple crafts from caps for beginners:
- A layer of glue is applied to the prepared base (as a rule, this role is played by a small sheet of plywood, which is given the required shape).
- The lids, previously cleaned of dirt, are laid in rows on the adhesive solution.
- If metal wire is used, weaving is carried out by analogy with the previous method.
You can create any design you like on the surface of such a stand. This craft is perfect for protecting a garden table or tabletop on a summer terrace.
Mini pots for cacti and other plants
If you have a love for wine and plants, at least something as prickly as a cactus, then you should make crafts from wine corks in the form of tiny pots, and by planting plants there, you can decorate a small or medium-sized corner in the apartment, as well as a refrigerator.
Required:
- Wine corks and the corresponding number of cacti or succulents, as well as magnets (if intended to be placed on the refrigerator) in a 1:1 combination
- A small bag of soil (not fertile soil is suitable for cacti)
- A small knife, a tube of appropriate glue, a glue gun and a screwdriver.
Read here: How to make a book with your own hands: step-by-step instructions and useful tips
- First, prepare an appropriate workplace, taking into account the presence of a large number of crumbs from plugs and soil.
- Second, use a screwdriver to “screw” the non-through hole in each plug.
- Third, use a knife blade to increase the volume of the planting site to the desired size (usually half the diameter and length of the plug is enough).
- Fourth, use a glue gun, or if you don’t have one, carefully squeeze the glue out of the tube and attach the magnets to the plugs.
- Fifth - Fill the holes with prepared soil almost to the top.
- Sixth - Plant plants in the depressions in the soil and level it.
- Seventh – Place your work on the refrigerator, trying to create an artistic composition.
Important! Do not forget to water the plants occasionally, being careful not to spill water and stain the refrigerator with splashes of soil.
Photos of crafts made from corks in the form of small pots with cacti on the refrigerator can be seen here.
Palette for a young artist
Drawing lovers will love this homemade palette made from plastic lids. To work you will need a sheet of plywood, a jigsaw, and several self-tapping screws.
Instructions on how to make an original craft at home:
- First of all, you will need to find and print a template for the future palette.
- The next step is to transfer the sketch to the surface of the plywood.
- The workpiece is cut using an electric jigsaw. Small holes are cut around the perimeter for paint cells. It is important to take measurements in advance so that the lids fit perfectly in diameter. The second method is often used, in which the cell covers are attached using self-tapping screws to the plywood.
- The lids are cleaned of debris and accumulated dirt.
The covers are attached to the underlying base in either of two ways. The palette itself should be polished and then decorated with original painting using acrylic paints or gouache.
Additional opening of the surface with acrylic varnish will protect the homemade palette from moisture (liquid paints) and rapid deterioration.
Bottle Cap Craft Ideas
Since there are a wide variety of caps available in terms of color and sometimes shape, different uses can be considered. Here are a few of them.
- Decorate boxes, barrels or other similar items to give them an interesting and creative look. This process will require a little of your time and perseverance, but the result can be quite interesting and impressive.
- Canopy . An unusual use case, but very worthy of attention. Such a canopy can be created using a wire frame and bottle caps.
- Decorate furniture for the cottage or garden . You can decorate anything with the help of lids, including a bench, table, ottoman, sofa, bed, etc. By the way, it is important to note that by replacing the fabric base with lids, you can avoid global problems with cleaning and cleaning the upholstery.
- Pots for plants . Another one of the most popular design options using our material. This decor will help create an unusual and attractive look for your flowers and pots. It will be enough to carefully glue the covers to the surface and let them dry.
- Fences and gates . This option will help save a significant amount of money, while making the fence attractive and worthy of attention. The lids are glued onto a pre-made frame, you can lay them out as a mosaic, drawing whatever you want on it.
- Decoration of flower beds . Here you can imagine a lot, because from the caps you can assemble a figurine of an airplane or some kind of animal. The main thing here is the flight of thoughts and creativity.
Article on the topic: Wooden plinth: characteristics, advantages and installation features
There are all kinds of other ideas, and in fact there are a lot of them. The lids can be used in any decor of almost all items. And if you’ve already collected a bunch of caps, you probably still have the bottles themselves.
Board game made from caps
The best crafts made from lids are products that are not only beautiful, but also perform useful functions.
Using a minimal set of materials, you can create backgammon or checkers for family leisure. You will first need to create a playing board with the appropriate markings.
As a rule, such a part is made from a sheet of plywood or wood. The role of playing pieces is played by plastic covers, which are painted white and black.