Sooner or later, you have to replace any lighting fixtures, and in order to carry out this procedure correctly and without unpleasant consequences, it is important to know certain rules. If you decide to replace lighting fixtures in a suspended ceiling, first carefully read the instructions and safety rules. There is a certain scheme for removing lighting fixtures, and it is not always possible to determine by eye how this is done. Therefore, you should not try to do something without studying the instructions. Everyone knows that amateur activities in working with the electrical network are far from harmless.
How to change a light bulb in a suspended ceiling
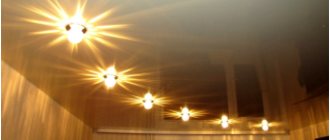
Ceiling panels are often emphasized with the help of lighting placed in a certain way, and it is enough for one lamp to burn out for the appearance of the room to change, so it is better not to delay replacing them. But if in a regular chandelier it’s quite easy to change the lamp, then with a stretch ceiling it’s more complicated. Quite often, in order to pull it out, you need to remove the entire lamp from the socket. The algorithm of actions in this case depends on the type of lamps, namely:
- If there are ordinary incandescent lamps, then replacement will be simple - turn off the power supply in the room, unscrew the damaged element and screw in the working one.
- Replacing halogen or LED lamps is a more complicated matter. Start by turning off the power to the room, then remove the housing cover and retaining ring. If you need to replace a halogen lamp, do not handle it with bare hands; use a cloth or gloves. Often, in order to remove it, you need to shake it a little, only with gentle movements. If there is no effect, then try to carefully rotate it around its axis.
Important! There are lamps with LEDs, which are a single mechanism. In this case, the entire device changes!
How to change a light bulb in a spotlight on a suspended ceiling
Depending on the type of socket, light bulbs are removed differently. Let us consider in detail the replacement process for each type of base. Before starting work, it is better to turn off the power supply at the panel, otherwise there may be an electric shock.
G5.3
It is not very convenient to remove light bulbs of this type from spots, since the outer part is recessed into the lamp body and is located above the plane of the stretch ceiling. In the lampshades they are held in place using a special retaining ring or a wire clamp with antennae at the ends. Such lamps are compatible with LED and pin-type halogen elements.
To change a light bulb with a G5.3 socket, you need to squeeze the two antennae and pull out the fixing bracket. If a retaining ring is used as a retaining part, it is simply unscrewed. The lamp falls out. Then you need to disconnect it from the contacts by pulling it towards you. After this, a new lamp is connected, inserted into the lamp body and the fixing ring is installed in place.
Sometimes the retaining ring does not fit back in after replacing the light bulb. This happens for several reasons:
- the body is deformed - it will have to be replaced;
- the ceiling is fixed too high and the base rests on the concrete base - you need to purchase a lamp of exactly the same size, a difference of 1 mm can cause a problem;
- The fasteners are the wrong size - this happens if you had to unscrew several light bulbs and the rings were mixed up.
GX53
In luminaires with a GX53 base, the lamps protrude beyond the ceiling by 3-4 mm. On their back side there are two contact pins that are inserted into the corresponding grooves on the body of the lighting fixture. Dismantling is carried out by turning the lamp counterclockwise until it clicks, then it is simply pulled out.
Replacement is very easy; there is no need to install fixing parts or disconnect wires. Simply insert the new lamp and turn it clockwise.
G4, G9
The design feature of such lamps is that the body protrudes beyond the plane of the ceiling. LED and halogen pin-type models are available with G4 and G9 sockets. To dismantle the lamp, just pull it down. Then simply insert the new one into the groove. There is no need to rotate the lamp. In some models, you first need to disassemble the spotlight, namely, unscrew the decorative diffuser.
E14, E27
Such lamps are changed in the same way as in a regular chandelier or sconce.
Holding the flask, carefully unscrew it counterclockwise. Then screw the new one in until it stops, but without effort.
Sometimes the light bulb is difficult to grasp with your fingers, in this case you can use masking tape.
Features of replacing an LED lamp in a suspended ceiling
LED lighting is very popular these days, because it is economical and convenient, it shines brightly and consumes little electricity. However, this type of lighting also expires and needs to be replaced.
This process occurs as follows:
- Make sure the lamp is working properly using a tester.
- Turn off the electricity in the apartment.
- Take care of autonomous lighting in advance or carry out such work during the day.
- Remove the mount from the damaged lamp.
- Strip the insulation from the wiring and disconnect the wires.
- Carefully read the instructions for the new lamp and install it based on this information.
- Connect all wires and insulate.
- Replace the LED light cover.
Even though LED lights need to be replaced periodically, they are still beneficial due to their cost-effectiveness.
Features of removing a chandelier
Removing a chandelier is usually not difficult. If you are afraid of electric shock, you can turn off the power to the entire apartment, not just one room. In this case, this event does not pose any danger, you will not be nervous, and everything will go smoothly.
This process includes the following steps:
- When the chandelier is hung on a hook, you first need to remove the protective cap, then stick your hand into the gap that appears and feel for this hook. Bring the wiring into view and disconnect the wires. Hold the chandelier firmly where it is attached and remove it. Ready!
- When a chandelier is hung on cross-shaped slats, you first need to remove shades, lamps, and fragile decorative elements from it. Then unscrew the cap, under which there is a fastening system. Now, by unscrewing the screws, you can disconnect the pendants and remove the chandelier along with the mounting system. All that remains is to unwind the insulation and disconnect the wires.
- If your chandelier is bulky and heavy, then it is better not to risk it and remove it with an assistant.
Replacing the lamp step by step
The procedure for replacing a light bulb directly depends on the type of base. If we are talking about replacing devices with GU5.3, it happens as follows:
- The first stage is a power outage. This will protect the technician from electric shock, since the switch does not always disconnect the phase wire.
- If there is a decorative lampshade, it must be removed.
- Press the locking bracket with your fingers using the special “antennae”. At this stage you need to be careful, as the removed stopper sometimes slips out of your fingers.
- The lamp will now hang on the wire. Holding onto it, the light bulb must be removed from the base. It is important not to pull the wire too hard to avoid tearing it off.
- The last stage is to assemble the structure in reverse order.
Fig. 3 – cartridge GU5.3.
Sometimes the stopper does not go back into place. This can happen for two reasons. The first is that the lamp is not fully inserted. The second reason is that the ring does not fit the lamp. This happens if the master mixed them up by changing several lamps at the same time.
Removing the spotlight
Every owner of suspended ceilings sooner or later wonders how to change the lamps in such a ceiling. This process also has its own nuances, which we will talk about. In order to avoid problematic situations during the work, before starting work, you should carefully read the diagram, then everything will go without a hitch.
Removing a spotlight has some difficulties, namely:
- When you remove the lighting element, the springs securing it above the ceiling can hit your fingers
- If you do not turn off the power, there is a high risk of electric shock.
- When the springs are too tight, the strobe can be damaged when removing the lamp.
However, with some precautions, these problems can be avoided.
- First, always turn off the power to the room before removing lighting fixtures;
- Secondly, hold the springs of the lamp tightly, then both the fingers and the ceiling will remain intact.
Considering all the above rules, you can easily change the built-in lamp in your suspended ceiling.
Lighting
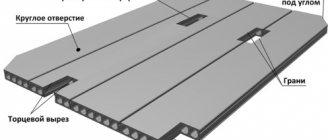
In any case, a suspended ceiling consists of a frame and a facing board - plasterboard, cellulose, plastic, Armstrong mineral board, for example, metal and others. The lighting device is mounted only in a cell formed by a frame; mounting to a lathing or facing material is impossible, with rare exceptions. The device is fixed to the base ceiling, and not to the suspended ceiling; only the lighting part remains visible.
The exception is ceiling suspended structures - chandeliers, for example.
Based on the method of placement in the cell, there are 2 types of lamps.
- Modular - is a block with light bulbs and a transparent top part, which in size matches the dimensions of the suspended ceiling cell. The module creates uniform diffused lighting, which is ideal for service premises - office, retail, and so on.
- Spotlights are compact, powerful lighting fixtures with one bulb. With their help, both diffuse and directional lighting is created. Most point models also allow free mounting, which means the ability to direct the light flux as desired. In this case, a hole is made in the Armstrong ceiling slab for the device.
Types of light bulbs
- Incandescent light bulb - has the highest luminous power, is not very durable and heats up noticeably. However, its size, shape and power vary over a very wide range, so changing it is not difficult. In addition, it tolerates voltage fluctuations well and is not too sensitive to moisture: it can be used in the bathroom either in a regular chandelier or in an Armstrong suspended ceiling module.
- Metal halide - has excellent light output and much better color rendering, can generate excellent daylight, and does not affect the shades at all. The durability of the device is higher, but the sensitivity to voltage drops, especially in the acoustic range, is high.
Before changing such a light bulb, you need to accurately determine its type. Devices are produced for a variety of purposes, including operation in a specific position.
- Luminescent - today they are considered the best in terms of light output, that is, with a strong luminous flux, they consume a minimum of electricity and, moreover, practically do not heat up.
Can be installed without restrictions in any type of lamp, including on a suspended ceiling. This is the most economical type of lighting, but is also sensitive to voltage changes and moisture: they are not used in the bathroom. In the photo there is a spotlight.
- LED lamps have all the above advantages and are free from all the disadvantages: they are slightly inferior in light output to fluorescent lamps, withstand weather conditions well, are extremely durable, do not heat up and are completely safe. Can be used both in the bathroom and outdoors. There is only one thing - the cost.
Replacing an LED fixture is as easy as replacing a regular one.
Types of light bulbs for ceiling lamps
Several types of light bulbs can be installed in spotlights. They differ in type of construction and voltage. During the replacement process, you need to consider the following:
- type of base;
- voltage – 24, 12 or 200 V.
With a voltage of 12 V, you can use light bulbs that are not afraid of high humidity. They are installed in the kitchen, bathroom and other rooms where humidity is high. The type of base will depend on the types of lamps, for example:
- GX53;
- E14;
- GU10;
- E27;
- GU5.3;
- GU4.
Fig. 1 – types of socles.
Based on the types of bases, they can be divided into 2 groups – pin and threaded. In the first case, the lamps are installed without rotation. LED devices, incandescent lamps, as well as halogen and fluorescent lamps are mounted in the threaded base. LED and fluorescent lamps are called energy-saving. They are often installed in homes in order to save on energy consumption.
How to change a light bulb
There are 3 ways to attach the light source. Depending on this, as well as on the type of light bulb, replacement is carried out using different methods.
Before work, the lighting must be turned off on the panel and a stable base must be prepared. You can change the lamp only after the housing of the lighting fixture has completely cooled: there is a very high risk of damage to the glass part, which could result in injury to the worker.
- The standard mount involves installation in a cartridge. The easiest way to change it is to carefully unscrew the bulb and replace it with a new one - the same or a different power. Screwing is done until it stops.
- Two-pin fastening - in this case, as a rule, we are talking about a metal halide model, which is held in place by 2 metal guides. To change the light bulb, first unlock the locking ring: holding the lamp with your hand, bend the wire ring with the other. Then take out the light bulb and fix the new one - a characteristic click should be heard. After installation, the retaining ring is secured back.
There is no need to disassemble the suspended ceiling for this; the device is not even removed from the cell.
- A special cartridge is typical for fluorescent and LED devices. First of all, remove the fixing ring, remove the glass from the transparent part of the device, and then unscrew the light bulb. The special chuck requires an additional 90 degree rotation.
To change an LED or fluorescent model, you should wear cotton gloves or protect your hands in some other way: greasy stains on the quartz glass of the bulb sharply reduce the service life.
In the lighting panel, replacement of any device is carried out only after its complete dismantling. The module is detached from the wires and removed from the ceiling frame.
The video discusses in detail all replacement methods.
Types of lighting
There are several types of suspended ceiling lighting:
- Hidden lamps . These lamps are completely hidden behind the ceiling in special niches. They are installed before the ceiling is tensioned. If the canvas is made of PVC film, the lamps are installed on LEDs, which emit less heat. LED lamps use different types of bases, so it is important to know how to change an LED light bulb in a suspended ceiling . First of all, the owner of the room must know what type of base the lamp has. It comes in three types:
- E – a screw base familiar to many people. To replace, the lamp is unscrewed from the socket, and after replacement it is screwed back in.
- G – pin type socket. To replace, the lamp is removed from the socket, and after replacing with a new one, it is inserted into the socket.
- GU – mixed type. When changing, the lamp is rotated and removed from the socket. The lamp is inserted in the reverse order.
When replacing a lamp, first of all, you need to de-energize the room and have the necessary tools: a set of screwdrivers, pliers, a ladder. First, the decorative panel on the niche is removed. If the lamp has a lampshade, remove it by unscrewing the lampshade holder. Then remove the electrical appliance from the socket, depending on the type of base. Only trained people can check an old LED lamp, so you need to replace it with a known good one. If after changing the light bulb the light still does not light up, you need to contact an electrician.
- Surface-mounted lamps . For such lamps, the mounts and sockets are located inside the tension structure. The lampshade and its fastenings are displayed on the surface of the canvas. The problem of how to change a light bulb in a suspended ceiling lamp can be solved simply: you just need to unscrew the mount on the lampshade, remove or unscrew the lamp and insert a working one in the reverse order, and install the lampshade in place.
- In the most familiar hanging lamps , there is nothing complicated about changing the lamp; you just need to unscrew or remove the electrical device from the socket and replace it with a known good one.