You can arrange your home based only on your own considerations. They may relate to design, personal preferences and financial capabilities of the owner. Supermarkets offer a huge amount of materials, furniture and plumbing fixtures, but some owners prefer extraordinary solutions that open up broad prospects. For example, a do-it-yourself concrete bathtub can be made in completely imaginative forms. Its size and configuration will be limited only by the size of the room and the funds allocated for work. In this case, you will not have to look through numerous company catalogs, find out the capabilities of manufacturers and overpay for exclusive order fulfillment.
Unique design
A concrete font can be built in any bathroom, but only if the space allows. It doesn't have to be huge. Even a corner can be designated for a sitz bath. The attractiveness of a concrete structure consists of several factors, the main ones being:
- strength and durability;
- variety of shapes and sizes;
- possibility of independent construction;
- a huge selection of exterior and interior finishes that transform gray artificial stone into a truly royal font.
Concrete baths can last not for decades, but for centuries. And there are many examples of this. The original shapes will decorate the interior, and the individual bowl sizes will create the most comfortable conditions for bathing. As for the price factor, not everything is as clear as it seems at first glance. The final costs actually depend on the cost of finishing materials.
Among the disadvantages, one can highlight the significant weight of the structure, which will put pressure on the ceiling. There is only one piece of advice - you should not install a concrete structure in multi-storey buildings. And in the private sector, it is recommended to build a bathtub from artificial stone only on the first floor.
Do not forget that the weight of concrete and ceramic tiles (if the finishing is made from them) is also added to the weight of water poured into the bowl. And such a local load is not initially provided for by standard projects!
Bathroom design 2021: Wood in the interior
Do you want to create the latest bathroom design for 2021?
Then choose Ecostyle, for the creation of which in the next season it is recommended to use such uncharacteristic material as wood.
The times when wood finishing in a bathroom was considered an impractical solution are long gone. Today, various wood impregnations have been invented.
They help ensure the durability of wooden furniture and cladding even in conditions of high humidity.
An excellent option is to use artificially aged boards. However, do not try to decorate all the walls with wood. Otherwise, the bathroom will look like a Finnish sauna.
It is better to combine wood with snow-white tiles. It can be either glossy or matte. If you are still not ready to use such an unusual material for the bathroom, then choose wood-look tiles.
Many well-known manufacturers of ceramic finishing materials offer many options that imitate wood of various types quite well.
Stages of constructing a concrete bath
The main list of works includes:
- mandatory development of a drawing - a concrete bathtub cannot be made with your own hands without at least an approximate design;
- calculation of materials is carried out according to a previously completed drawing;
- preparation of the base - this includes the installation of a light base (foundation or cushion), as well as the mandatory(!) implementation of waterproofing;
- installation of formwork according to the shape defined in the drawings;
- installation of a metal frame;
- pouring the concrete mass - forming the bottom and walls of the bathtub;
- hardening of artificial stone;
- final formation of the shape of the structure by plastering;
- cladding of internal and external surfaces;
- laying (if necessary) and connecting sewerage and water supply networks.
When drawing up a project, you need to take into account that the water pressure in a filled bath can destroy its walls. In this regard, it is necessary to provide either for their support in supporting structures, or for the installation of a reinforced metal frame. In the latter case, a calculation will be required.
The decorative design of the external surface of the bathtub is done with tiles, mosaics, plastic and other available methods. These can be mirror elements, multi-colored smalt and even pieces of broken glass or ceramics. The internal bed is decorated with liquid acrylic, ready-made liners (not the best option due to their limitations in size and shape), as well as small-sized ceramic tiles. An economical option may involve painting the surface with water- and heat-resistant enamels.
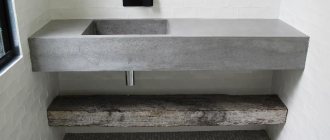
Given the abundance of building materials that has become familiar to us in recent years, it is difficult to imagine that choosing a container for washing could cause any difficulties. The most common models are made of cast iron, acrylic and stainless steel; at a low price, they provide high comfort in performing hygienic procedures and functionality.
More expensive, exclusive bathtubs are made from artificial or natural stone, glass and wood. However, quite often in construction practice there are situations when the only option to place a comfortable bowl of the required size is a do-it-yourself concrete bathtub, during the creation of which the master, like a sculptor, gives the product the desired shape.
Bathroom design 2021: Gray is in fashion
Those who are chasing trends are recommended to choose a gray bathroom design. Such a design can be either high-status or as simple and democratic as possible. Finishing with chic gray marble with a mirror polish and concrete will look equally relevant.
You can also use ceramic tiles.
A gradient or mosaic design using various shades, from graphite to pale gray, will look especially original.
Creation principle
Technically, the washing container belongs to the group of stone products and has all the advantages of this material. It is famous for its unsurpassed strength, ability to dampen the sound of falling water and low thermal conductivity, allowing you to soak in warm water longer.
In addition, the undoubted advantage of concrete ones is that they are created individually in accordance with customer requirements, therefore they look impressive and original. To make such a bathtub, a cement-sand mixture of super-moisture-resistant grades is used, which is given the required shape using formwork. The process of creating a concrete font is carried out in 4 stages:
- Preparing the bathroom floor for work, clearing debris and assembling formwork.
- Filling the bottom and walls of the bathroom with concrete.
- Shaping the bowl and finishing the product.
- facing material.
Note! A washing container made of moisture-resistant concrete becomes an integral part of the bathroom, a kind of built-in pool. In small rooms, a concrete font is often mounted between two walls so that only 1 side remains to be poured, or in the corner of the room if a corner model is being created.
How to choose finishes and furniture for the bathroom?
Today, manufacturers offer a huge variety of plumbing fixtures and furniture of different styles.
Choosing the one that fits into your design project will not be difficult. Decide what you need more - a bath or a shower. Some bathrooms can accommodate both. If you have a small bathroom, pay attention to shower cabins with a deep tray into which you can collect water; a corner bath can also be a great solution. It is important to choose high-quality, reliable and beautiful equipment. Faucets require special attention - brass taps are suitable for a classic style, and stainless steel for a modern style. The bathroom sink can be anything: regular, built into a cabinet or a designer wall-hung one.
Bathroom tiles can be of different types. Classic white is a good, but boring solution for the interior, which can be transformed if you put patterned tiles on one of the walls. Make the most of your walls, and don’t hesitate to use live plants in your room decoration.
Find inspiration in photo galleries on Houzz. Our bathroom design photos can inspire you to find your own style for decorating your bathroom. And if you have a separate bathroom, look at our section on toilet design.
If you are just looking for ideas for renovation and arrangement or already know for sure that a bathroom is your option, we have collected for you 1,809,307 photos from real projects of interior designers, decorators and architects from Russia and around the world, including such proven professionals as Credit Ceramica and Artyom Popov. The beautiful bathrooms in our photographs are the best examples of competent design and layout in different styles and colors. If you like any design option, for example the bathroom from the second photo, you can contact the author and order the ideal design project for yourself. See our photo gallery, look for inspiration and professionals, and you will see why Houzz is the best resource for apartment and home interior design, renovation, home construction, architecture and landscape design.
Cladding type
An important stage in creating a bathtub from moisture-resistant concrete is finishing the product with facing material. Moreover, the future shape of the font and the composition of the cement-sand mixture used for pouring depend on the choice of type of cladding. Experienced craftsmen recommend deciding on the decorative material before starting work in order to create an accurate bathtub design. You can line a concrete washing container using the following materials:
Note! Before choosing a material for lining the font, think about the shape of the future product. If you like anatomically shaped rounded bathtubs, but don’t want to bother with mosaics, cover the bowl with liquid acrylic, which will last at least 20-25 years.
Before starting work on creating a concrete washing container with your own hands, you need to build a hydraulic trough from rolled, painted or coated waterproofing materials in order to avoid leaks during operation. After drying, the screed is primed several times with a special deep penetration compound. Installation of formwork is carried out according to the following scheme:
Experienced craftsmen recommend using smooth particle boards or planed boards for the formwork walls, since it is much easier to separate the concrete from them after hardening. In addition, when installing the formwork, the presence of cracks is not allowed, since the solution will leak out through them.
Pouring concrete
After creating a reliable formwork that defines the shape of the font and connecting the siphon, they begin pouring concrete. For the manufacture of washing containers that are in constant contact with water, use a cement-sand mixture of grade M-400 or higher. The consistency of the solution should be thick, viscous, but fluid, in order to achieve this effect, plasticizers and reinforcing additives are added to the mixture. The concrete pouring process consists of 4 stages:
Important! Filling the font frame with concrete must be done in one step, preventing the layers from hardening. Therefore, before making a concrete bath with your own hands, enlist the help of an experienced assistant, and use a concrete mixer to mix the solution.
Concrete bath
Concrete construction is considered better than brick, but the manufacturing process is also more complicated. The absence of joining seams makes the font strong and durable.
The advantages of a monolithic bath are as follows:
- the bathtub can withstand a lot of weight;
- Over time, only decorative cladding can deform;
- long service life;
- the ability to implement any idea and design idea.
Design disadvantages include:
- Lack of access to communication systems. All plumbing fixtures are covered with concrete, so in case of emergency it is quite difficult to get to them.
- Difficulties in making formwork. When a bowl is created according to an individual project, the design often contains curves and transitions. This causes additional difficulties when pouring concrete.
- The structure turns out to be quite heavy, so placing concrete baths on the upper floors is not recommended.
Selection of cement and preparation of mortar
The choice of materials depends on the further lining of the container. If you plan to leave the surface concrete, then you need to choose a cement mixture with additional plasticizers. This composition will help make the bottom and walls smooth and durable.
In the case where acrylic or tiles will be applied to a concrete base, you can use a cement-sand mixture without additives.
The main rule is that the solution must be water-repellent. Builders recommend the following proportions: 1 part M350 cement or higher to 3 parts sand. Before mixing, the sand must be sifted to remove debris and foreign bodies.
Planning and wiring of communications
To make a concrete bathtub, a plastic mold is used, which helps to choose the size of the future bathtub and correctly carry out the wiring of communications.
It is recommended to approach the location of plumbing fixtures with extreme care. In the future, they will be covered with a layer of concrete, and it will be problematic to redo anything.
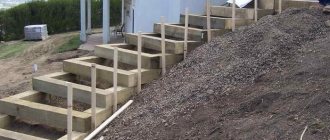
Formwork and frame
The construction of the base of the tank consists of 2 stages. At the first stage, a frame is created from reinforcement, the diameter of which should be no thicker than 8 mm. First, vertical rods are installed in the corresponding holes in the ceiling, and then horizontal rods are attached with wire. It is impossible to use the floor as the bottom of a bathtub, so it is necessary to design fittings for these purposes.
At the second stage, the formwork is erected. Most often, smooth wooden slabs are used as a basis, which are easily detached from the concrete and do not leave marks.
Pouring concrete
Before pouring, you need to make sure that there are no cracks, the frame is installed firmly, and all drain holes are closed with plugs. For the first stage, a more liquid version of the solution is used, which corresponds to the consistency of sour cream. It will spread better over the formwork and fill all the cavities of the future container.
When the bottom is completely filled, you can begin to create the sides. To do this, take a mixture of standard thickness. It is important to complete the entire fill in one go. Otherwise, layers and leaky areas may form.
Now, using vibration, the structure must be rid of air accumulations. If there is no vibrating machine, you can use a simple hammer. Lightly tapping the walls of the bowl will prevent the formation of voids.
Once finished, the bath should be left to harden for 4-5 days. During this time, the structure will become sufficiently strong and you can move on to the next step.
Removal of support structures and sanding
At the current stage, the wooden structures are removed and grouting of the container begins. The tool used is sandpaper or a grinder. If further decorative design is not required, after sanding and polishing, the bowl is coated with a special impregnating solution for stone, which acts as a waterproofing agent.
Decorative cladding
Ceramic tiles, acrylic or mosaic are used as a decorative covering for a homemade bathtub.
The first option is considered the fastest and simplest. The tiles are laid with waterproof adhesive, and the seams are grouted with a special grout for bathtubs and swimming pools. This design can only be used for square and rectangular structures. If the font has roundness, it is better to resort to another cladding option. The tile has good resistance to moisture, cosmetics and can withstand heavy loads. Moreover, it does not require special care.
Self-leveling acrylic protects the concrete structure from moisture and gives the surface an elegant glossy shine. When using this type of filling, the bowl is additionally sanded with plastic and moisture-resistant putty.
The layer is applied using a reinforcing mesh, which will increase the strength of the layer. Acrylic is combined with a hardener according to the instructions and applied to the sides and bottom of the bath. Similar cladding can be used for swimming pools and Jacuzzis. The material can last 20-25 years.
The most popular method of cladding non-standard plumbing structures is tiled mosaic. It is highly moisture resistant and, due to its small size, easily fits into rounded, curved products. Mosaics, like simple tiles, are glued to a waterproof mortar, and the seams are treated with epoxy grout. The only drawback is the laboriousness of the process.
Video instruction
Concrete is not only used in the construction of foundations and monolithic walls or for pouring garden paths. Concrete is used as an inexpensive material for less labor-intensive and large-scale projects. We invite you to familiarize yourself with the manufacturing technology of a concrete monolithic bathtub
.
Who among us does not dream of an original and unique design of our own home. And there is no limit to your own ideas. One day, a construction company had to deal with an unusual order. The owner of a country house expressed a desire to have a bathtub made of monolithic concrete
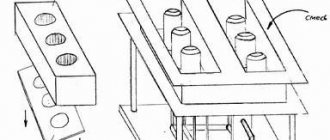
. The work began by determining the required dimensions. Since the hostess expressed very specific requirements, measurements had to be taken from the hostess herself. For example, she wanted to be able to sit cross-legged, and the water should reach her chin. The outer formwork panels and the internal form were made of 20 mm thick plywood and bars with a section of 50x100 mm.
Fig.1. External formwork
.
To the inner shape of the bathtub
We attached a square steel pipe, which is necessary for stripping.
Fig.2. Internal formwork
.
Having prepared concrete from 1 part of Portland cement, 2 parts of sand and 4 parts of fine gravel, we laid a pre-prepared reinforcement mesh in the assembled outer form with a step of 20 cm (without it the walls can “sag”), filled the bathtub floor with concrete, and then installed it on another wet surface of the inner formwork. After that, we secured it with spacer bars and poured the walls of the bathtub, not forgetting to carefully compact the concrete.
Fig.3. Section of the bathtub in the central part
.
Stripping
.
If you press firmly with your palm on the pouring surface and an imprint 10 mm deep remains on it, the internal formwork can be removed. This is perhaps the most crucial and difficult moment of all work.
. In order not to spoil the surface of the bathtub walls, the mold was removed without disassembling it. To do this, hand screw jacks were placed under the ends of the steel pipes and the formwork was carefully pulled out with their help.
Fig.4. Stripping using screw jacks
.
Then, having eliminated possible unevenness on the surface of the walls and without dismantling the outer panels, we covered the bathtub with film for several days so that the concrete remained wet for as long as possible and acquired the necessary strength. Once the tub was transported and in place, the interior walls were sanded with a hand sander and coated with epoxy primer and paint used for swimming pools. The finished bath weighs approximately 1100 kg
. She was carried around the workshop on a forklift. Before putting it in place, we had to work hard to strengthen the floor so that it could withstand a bath with water (200 liters) and the hostess.
Concrete monolithic bath
.
Often during the renovation process it becomes necessary to install a bathtub of non-standard sizes. Sometimes this is due to the layout of the room and the placement of equipment, in other cases the individual bath is designed to complement the overall style or interior of the bathroom. Of course, you can order the production of a plastic or acrylic product according to your own dimensions, but this pleasure will cost a tidy sum. An excellent way out of the situation is a bathtub made with your own hands from brick. Follow our recommendations, and your brick structure will not only be comfortable and beautiful, but also reliable and durable.
To build a bath you will need regular red brick
To build a brick bath you will need:
- brick (red, silicate) or blocks (concrete, aerated concrete);
- cement grade 400;
- sand;
- roll of roofing material;
- slag backfill;
- ceramic tile;
- tile adhesive;
- grout for joints (preferably intended for swimming pools);
Additionally, you may need a shower drain, sewer pipes, couplings and fittings. For work, prepare the following tools: a trowel or trowel, a mason's hammer, a construction level, a set of spatulas.
Concrete bath
This design is more complicated than a brick one, but has a number of advantages in comparison with it.
- High strength. In terms of strength, concrete baths are on the same level as cast iron ones. The design mirror itself can withstand great forces; only the finishing decorative coating of the bathtub can be damaged.
Concrete bath: stylish design
Concrete bath
This bathtub will last a very long time
There are also disadvantages to concrete baths.
- The first is the complexity of manufacturing formwork . If you want to create a beautiful bathtub with various smooth curves and transitions, then the most difficult stage is considered to be the process of manufacturing and installing the formwork.
- The second is quite a lot of weight . The mass of the bath should take into account the load-bearing characteristics of the floors.
- Third, access to water drainage systems is excluded . All pipes and siphons are completely filled with concrete; in case of emergency situations, enormous difficulties arise in eliminating them. During the installation of pipelines and engineering systems, this feature should be kept in mind and all measures should be taken to guarantee operational reliability. Only the most durable materials for the manufacture of siphons and pipelines are selected, and installation is carried out in strict accordance with existing regulations and manufacturers' recommendations.
Piping in an apartment for installing a bathtub
How is a concrete bath made?
Step 1. Decide on the size and configuration of the bathtub.
Keep in mind that a cubic meter of concrete weighs more than a ton; make sure the floor is strong. One more nuance - be sure to inspect the existing water drainage. Clean old sewer pipes or replace them with new ones, check the condition of the rubber seals. After installing the concrete bath, these communications will become inaccessible for repair. If everything is done correctly, the sewer system can function properly for several decades.
Practical advice. Concrete baths are allowed to be made only on factory floor slabs. Never try to build such a project on wooden beams.
Step 2. Mark the outline of the bathtub on the slab, draw the position of the external and internal walls. It is desirable that the two surfaces rest against the side interior partitions; this can only be done if the partitions are made of brick or foam concrete.
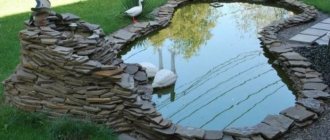
Diagram of the bathtub that will be located in the pavilion on the street
If your bathtub will be located outside, prepare the base. Level the ground, fill and compact sand
It is recommended to use insulation to reduce heat loss in the future
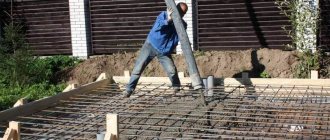
Step 3. Drill holes in the slab for vertical reinforcement. The diameter of the reinforcement is approximately 6–8 mm, the distance between the rods is 20–30 cm. The reinforcement must be tied together with wire Ø 1–2 mm and thus create a reinforcing belt.
The rods are connected using knitting wire
A pipe for the technological hole is installed
Reinforcement connection in the corner
Important. Drill holes into concrete floor slabs carefully. If the drill gets into a metal rod, then make a hole in another place; it is strictly forbidden to damage the reinforcing belt of reinforced concrete slabs.
Step 4. Start making the formwork. This is the most difficult stage; the formwork has a curved profile. For vertical posts, use bars approximately 30x30 mm; the flat part can be made from edged boards approximately 20 mm thick or waterproof plywood.
Curvilinear shields be made in the following sequence.
- Prepare two edged boards approximately 25 mm thick and 25–30 cm wide. The specific width of the boards depends on the actual bending radii of the bathtub contour. The minimum width of the board after cutting should be at least three centimeters.
- Carefully draw the outline of the complex profile of the bathtub on one board. It is recommended to first make the drawing on thick paper, check its correctness, correct it if necessary, and only then use it as a template for transferring to the board.
- Using an electric jigsaw, cut the board along the drawn line.
- Lay it on the second board, outline the outline and cut off the excess.
- Use two slats to fasten the boards at the ends; the height should be equal to the height of the bathtub. If the structure is unstable, then install diagonal struts on the back side of the shield.
- Nail 20x30 mm slats to the profile side of the boards at a distance of approximately 30 cm.
- Fix sheets of thin plywood to the jumpers using small nails or wood screws. To prevent it from getting wet, it is recommended to soak the surface of the sheets several times with vegetable oil, drying oil or machine oil. The thickness of the plywood is no more than 2 mm, it should bend easily.
Practical advice. The smaller the radius of curvature, the more often the vertical jumpers should be located.
Don’t rush into making formwork panels, check the dimensions several times, and consider the possible consequences of your actions.
Step 5: Reinstall the formwork. The minimum thickness of the walls of a concrete bath should be 7 cm; along the radii of curvature, the thickness can increase to 15 cm.
Practical advice. There is no need to make the concrete bathtub very thick. Firstly, the weight of the structure increases significantly. Secondly, you will need a lot of hot water to warm up the bath. Although, on the other hand, the heavier the bath, the longer it keeps the water warm.
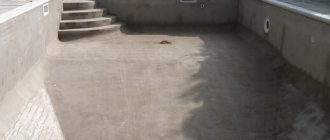
Preparatory work
At the first stage, it is necessary to empty the bathroom of unnecessary things and equipment, dismantle and remove the old bathtub.
Next, you need to prepare the site for construction. To do this, remove all the old screed to the base (to the floor slab). The work is difficult, but only if all requirements are fully met can one count on the tightness of the structure. If the old sewage system was made of metal pipes, it must also be dismantled and a new drain made of plastic pipes installed. Remember that it will be impossible to eliminate the leak that appears without destroying the structure or part of it. That is why it is better to install not an ordinary bath siphon, but a shower drain, the inside of which is accessible from the outside. We talked about how to install such a drainage system in.
A shower drain in a brick bathtub drainage system significantly increases the reliability of the structure
It is also necessary to consider how hot and cold water will be supplied. You can install the bathtub faucet either on the wall or on a pre-installed frame covered with plasterboard. The same frame can be mounted after the construction of the bath, thus fitting it into a stylish design. The next step is to mark the space for the bathtub walls and calculate the required amount of materials.
When taking measurements and drawing up a project, take into account the thickness of the “floor brick” masonry. This is a necessary condition for the strength of the structure. Remember that the force on the walls will be exerted not only by you, but also by a decent amount of water, so with the “quarter brick” method of laying, the wall will have to be additionally reinforced and reinforced with concrete. As a result, this will not greatly affect the reduction in its thickness, but will significantly increase the complexity of manufacturing.
Stone in decoration
Status bathroom design 2021 can be created using marble. In this case, we are not talking about finishing the walls and floors. A bathtub and countertop made of natural stone will look absolutely gorgeous. You can make such an interior even more attractive by using marble of various shades.
Please note that classic designs using marble are also trending.
If this is your choice, then you can give the room the charm of antiquity by using columns or pilasters.
Masonry
Rectangular bath
Before you start laying, prepare the solution. To do this, thoroughly mix one part of M-400 cement with three parts of sand. After the mixture becomes homogeneous, add water little by little, constantly stirring the solution. The finished composition should resemble thickened sour cream in consistency. To check its readiness, you can use the method used by professional masons. To do this, put a little mixture on the trowel and try to throw it off the tool with a sharp movement. The solution, ready for use, will come off the surface in a monolithic lump, without any residue.
Laying the bricks begins by spreading the mixture up to 15mm thick on a concrete base. The walls are laid in ordinary single-row masonry, with each row bandaged. To do this, starting each subsequent row, the first brick is shifted to the floor of the building relative to the element in the previous row. In this case, the seam between the bricks should be about 10mm.
This will make it possible to easily eliminate unevenness of individual bricks, which will not be possible with too thin a layer of mortar.
When laying, immerse each brick in water for a few minutes. This will greatly increase the strength of the masonry, since in this case dehydration of the solution will not occur and the adhesion value will significantly increase.
After going through two or three rows, fill the sewer pipes with slag and make a concrete screed. To do this, use the rule and a wide tamper. Do not forget to make the slope of the bottom of the bath towards the drain grate at least 10 mm per 1 m of the length of the structure. In addition, when calculating the height of the screed, take into account the thickness of the waterproofing and facing layer. Of course, the bottom can be concreted after the walls of the bathtub are ready, however, you will agree that it is easier to do this if their height is 25 - 30 cm. When carrying out masonry, try to immediately pick up excess mortar protruding from the seams and constantly monitor the work with a building level. After finishing the work, the structure is left alone until the solution has completely set. As a rule, 10 – 15 hours will be enough for this.
Freeform bathtub
You can create any brick bath design
To make a bathtub with a curved inner surface, a brick frame is constructed using exactly the same technology as for rectangular structures. Typically, to make a bathtub with smooth, flowing surfaces and a frame, a free-form is required. You can create the inner surface of such a bath using a metal mesh, from which the required contour is bent. Next, the space between the frame and the mesh is filled with concrete mixture. To prepare it, you will need to mix 1 part cement and 3 parts granite screenings with water. Then the walls and bottom of the bath are smoothed using spatulas and a trowel. After this, they begin to seal the surface. It will be difficult to use roofing felt in this case, so use waterproofing for swimming pools.
Waterproofing
Waterproofing a bathtub can be done using roofing felt
To protect yourself from bathtub leakage, you must seal it. To do this, you can use either special waterproofing materials for swimming pools or regular roofing felt. As practice shows, it copes with leakage protection no worse than expensive materials. The use of roofing felt is possible only in one case - it is necessary to remove the powder from its surface.
To do this, you can use a wire brush. Then the sheets cut to size are glued to the bottom and walls of the bath using bitumen mastic. At the same time, do not forget to lay the material overlapping with a wide overlap on the walls. The edges and joints of the strips are additionally treated with a layer of bitumen. Finally, the internal and external surfaces of the bath are plastered with the same mortar that was used for the brickwork, and for better adhesion of the plaster to the waterproofing layer, the surface is treated with a primer. If you decide to use a dry mix, be aware that only cement-based compounds can be used. Considering the need for facing work, grouting of the plastered surface is not carried out. They proceed to the final stage only after the plaster has completely dried.
Using polystyrene foam as a base
Another material that allows you to make a bath with your own hands is polystyrene foam. It is used to create a frame. Due to the lightness and comparative softness of polystyrene foam, you can create a container of any shape.
The manufacturing instructions are similar to those used for brickwork.
However, there are some nuances of the process:
- The expanded polystyrene sheet is cut into pieces of the desired shape and size.
- Using mounting adhesive, the pieces are connected to each other and form a bowl shape.
- A reinforced mesh and several layers of waterproof glue are applied to the finished frame. This will help strengthen the product and protect it from leaks.
- The next step is to prime the surface and treat it with a waterproofing solution.
- Ceramic mosaic tiles are attached with adhesive, and the seams are rubbed with pool cleaner.
In the finished room, you can make a plasterboard ceiling. It will give the bathroom a finished look. But such an idea is not required to be implemented.
Finishing
Ceramic tile cladding is most often used to finish brick bathtubs. To reduce the amount of tile waste, it is better to use small tiles.
If it is necessary to finish the curved inner surface of the bathtub, pasting is done with mosaic tiles, which are small ceramic elements glued to a flexible base.
During the work, you can use a special waterproof tile adhesive or use a composition of PVA glue, M400-1 cement and river sand. Before starting facing work, the plaster must be treated with deep penetration soil or the same PVA glue mixed with river sand, sifted on a fine sieve.
The use of mosaic tiles allows you to tile any curved surface of the bathtub
Before work, the tiles are soaked in cold water for several hours and only after that they begin to lay them. In this case, they begin work from the bottom of the bathroom, and then move on to its walls. Grouting of joints is done with epoxy compounds. Only in this case can you be sure of the strength and reliable sealing of the finishing layer. The product is started to be used after the adhesive layer has completely set.
The drying time of the factory mixture can be found on the packaging, and when using cement-sand glue, it is kept for at least two days. At the final stage, install the drain grate and connect the mixer. Before use, the bathtub must be washed with warm water and any detergent. A bathtub built of brick will become a real decoration of the most important room in the apartment only in one case - if the work is done carefully and in compliance with technology. In addition, every time you take a hot bath, you can completely relax and get real pleasure, being confident in the reliability of the structure you created with your own hands.
A bathtub is no longer a luxury item. In a modern home it is simply impossible to do without it. The bathroom is used for hygiene procedures, washing, and bathing pets. In addition to convenience, the room must correspond to the overall interior of the house and the latest technologies. However, despite the wide range of plumbing fixtures, it is sometimes difficult to choose a suitable bathroom model: it is either too large or too compact. A do-it-yourself concrete bath will help solve the problem. To do it means to deprive yourself of the agony of choosing among unsuitable store products.
Arranging a concrete bath with your own hands allows you to save a lot of money
A concrete bath is a relatively inexpensive and simple option for self-construction. All that is required of you: construction of the form, as well as cladding using mosaics made of ceramic or plastic. Before starting any repair work, take the time to draw up an action plan, count consumables, and find the necessary tools. Calculate the location for the future structure and imagine how it will be decorated. Working with concrete mixture is easy even for a beginner.
DIY bath
Modern manufacturers of sanitary equipment offer consumers a huge selection of bathtubs, both in design and functionality, and in manufacturing materials. But all these products cannot be considered exclusive; only bathtubs created with one’s own hands exist in a single copy. It is impossible to make a bathtub from metal yourself, but there are options for producing structures from polymer materials. Making a polymer bath is very difficult; it will require a lot of time and knowledge of special technological processes. Due to the difficulties described above, such baths are extremely rarely made independently. It is much easier to make baths from concrete or brick and then line them with ceramic tiles. We will consider these two options in detail in the article.
DIY bath
Preparing for work
Before you start creating your own bathtub, make sure to equip yourself with the necessary materials and the help of friends, acquaintances or specialized workers. It is better not to carry out repair work on the construction of the bowl alone. Work should begin by cleaning the area for the future invention and leveling it with a primer.
The process of making a concrete bath can be roughly divided into several stages:
- Prepare and install formwork.
- Start installing fittings.
- Apply plaster.
- Make cladding.
To complete the first step, you should purchase formwork and reinforcement from your nearest hardware store.
Sometimes wooden panels and thick plywood are used instead of formwork. Since you will not need these parts after installing the bath, you can use them for restoration work on old furniture. Instead of fittings, metal rods with a diameter of about 1 cm are mainly used.
Installation of formwork depends on the design of the concrete bowl and the selected thickness of its walls. Pay special attention to the fasteners, which should be fixed as firmly as possible. Don’t forget about leveling: uneven installation of formwork will not be corrected after the concrete mixture has dried. Having fixed all the parts, you need to create a frame from reinforcement.
It is enough to cut the rods into equal sections and give them the shape of the letter L. Fasten the rods in the panels so that a piece of the frame protrudes inside the bowl by a couple of cm. It is important to install the frame in the corners, place the rods on each side of the bowl every 40 cm. This point is often missed from mind, what should not be done, since, thanks to the reinforcement, the structure will be strong and uniform.
Separately, it is necessary to stipulate the mandatory connection of the bathroom to the sewerage system and general water supply. Do not lose sight of the arrangement of a canal that drains water. It is not difficult to build: you will need small holes in the formwork in those places where future drainage is expected.
The diameter should be equal to the diameter of the sewer pipe. The pipe is inserted into the hole. Connecting the pipe to the sewer is the final preparatory stage. Before moving on to the next step, carefully check the quality of the fixed structure.
How to make a bowl from a concrete mixture?
Before pouring concrete into the bowl, it is important to think in advance about how and where the holes for drainage and overflow will be located, and also find a place for the siphon. Sometimes they use a plastic siphon, connect it to the sewer system and concrete it for centuries. Such an operation will complicate cleaning the device in cases of blockages. This stage differs from the first in that the future bowl begins to take the shape of a bathtub. To create the necessary solution you need:
To create the necessary solution, you need to purchase M-400 cement
- purchase M-400 cement;
- mix it in a ratio of 1 to 3;
- bring to maximum thickness.
Next, pour the resulting mixture into the bottom of the bowl so as to completely cover the metal frame. Mix the solution and fill the wall to the required level. To fill the entire space with mortar without voids, you need to occasionally tap the formwork with a hammer.
Remember that it is prohibited to allow previous layers to dry out when pouring. Don't take unnecessary breaks while working. After pouring, leave the bowl for several days. This time is not enough for complete drying, but enough to acquire the required strength. Next, remove the formwork, avoiding sudden movements, and begin plastering. It is necessary for the final formation of the bowl.
How to treat a bowl with plaster?
After waiting for the concrete bowl to dry completely, you will see a strict rectangular shape. It is easy to guess that this type is not suitable for taking a bath or enjoying water treatments, so it is entirely up to you how to smooth out the corners for subsequent laying of tiles. At this stage, you also need to start arranging a layer of thermal insulation, since concrete tends to poorly retain the heat of water.
This is not difficult to do, since the ready-made recipe is open to access. Using high-tack tile adhesive and crushed foam is great for bonding to concrete. The mixture is characterized by heat-insulating properties, plasticity, lightness, and does not flow. Applying the leveling mixture is usually done without any tricks.
The internal relief of the bathroom can create a problem for a beginner - here it is better to take a previously prepared plywood template. You can make it like this:
- take a plywood sheet;
- mark the desired radius on it;
- cut out the template using a jigsaw.
Apply the mixture to the surface, moving it in such a way as to achieve a perfectly even radius. Pay attention to the location of the siphon - the plaster should be applied so that the surface is level with the neck of the siphon. It is enough to estimate the thickness of the slab and focus on the data. By moving the template up and down, you will get a smooth finish.
How to lay tiles?
For DIY tiling, it is better to use small-sized tiles, which can be found in any specialized store. Using large tiles does not look as impressive. In addition, laying sets of small tiles is easier and will not be difficult for one person.
Tiling is an effective option
Laying involves attaching slabs using glue. The grid of tiles needs to be “drowned” in the glue in order to strengthen it. Before you begin laying work, determine by eye the beginning of the bottom and the end of the walls. This needs to be done to optimize the process and create an even cutting line.
The procedure for self-cladding must be strictly followed so as not to encounter a lot of unpleasant moments in the future.
- You need to start with the walls. You will need a special high-adhesion adhesive that guarantees maximum adhesion when gluing the tiles.
- Treat the selected area with glue and attach the set of tiles to the coating. Press the tiles as firmly as possible and do not allow the adhesive to protrude beyond the seams. Pressing the tiles with maximum force, take a sanding block and run it over the glued materials to ensure evenness. Bends require special care, where the entire set of small tiles cannot be pressed at once. Work carefully and a little finer, using a wooden strip instead of a sanding block.
- According to the principle described in the previous paragraph, start lining the bottom.
- After the glue has dried and the tiles are fixed, you should start grouting the seams. To do this, take a waterproof grout that is not prone to mold development when in contact with liquid. At the beginning of work, it is important to carefully wipe the entire bathroom coating, remove dirt, dust, and any unnecessary elements. Grouting must be done as carefully as possible due to the fact that the bath is in constant contact with water. Complete tightness will ensure the integrity of the bonding layer, prevent liquid from entering under the tiles, and strengthen the strength of the cladding. It is better to rub the seams with a good rubber spatula, without allowing a single omission. At the end of this stage, dry the coating and remove excess grout.
- Prime the concrete surface when completely dry. Prime in three layers and let dry.
- Proceed with cladding with selected materials that should provide high-quality adhesion and allow you to lay out a flat surface. Apply the tile adhesive with a notched trowel, then press in the applied strips of material.
Brick bath
A structure made of brick or foam concrete blocks can replace a standard bathing bowl. The masonry technology is based in such a way that you can create a bowl of any shape and size. The use of a shrink mold is not required.
The individual masonry process consists of 4 stages:
- supply of plumbing communications;
- masonry of the structure itself;
- waterproofing;
- external cladding.
Advantages of materials
The advantages of brick baths are as follows:
- high strength and wear resistance;
- soundproofing properties;
- low level of moisture absorption;
- naturalness and environmental friendliness;
- material density;
- comparative ease.
Which brick is suitable
Bathtubs are made of ceramic, sand-lime brick or foam concrete blocks. If you follow all technical standards, you can make a strong and reliable font from any brick. The design can last for many decades. Construction industry experts recommend giving preference to standard ceramics. It is a little more expensive than its opponents, but its consumer properties cover the difference in price.
Preparatory work
Before starting construction work, it is necessary to prepare all tools and materials.
The list includes:
- level;
- putty knife;
- square;
- jointing;
- trowel;
- mopping;
- brick;
- cement;
- plaster;
- waterproofing mixture;
- tile;
- grouting of joints for swimming pools.
You also need to dismantle the old bathtub and floor down to the floor slabs in advance. Communications are double-checked and installed before construction work begins, since it will be almost impossible to correct this in the future.
Step-by-step construction instructions
In order for the design to comply with technical standards and regulations, you must follow the step-by-step instructions:
- Install a drain for shower cabins. This will increase the convenience of subsequent plumbing maintenance.
- Lay out the bottom and walls of the container using standard masonry mortar. When building walls, they use the “half-brick” technique, or use blocks with a minimum thickness.
- Apply plaster, which will help smooth out all the unevenness, and round the corners if necessary.
- The next layer is waterproofing. For these purposes, polymer and combined ready-made compositions are chosen. They are laid in a thin layer, but at the same time have a high degree of water resistance. Also, the walls and bottom can be plastered with cement mortar, which includes liquid glass.
It is not recommended to apply roll or bitumen waterproofing, as it prevents the durable installation of the facing material.
Final finishing and cladding
The final stage of construction is the external and internal finishing of the structure. Whole tiles, mosaics made of ceramics or porcelain stoneware are used as cladding. The material is attached with waterproof glue. After the installation has dried, begin grouting the joints with epoxy.
Judging by the photos of the finished products, the mosaic cladding looks much more impressive. In addition, due to its small size, the material can be easily placed under any inclination or bend of the container.