A well-designed brick fence will not only look aesthetically pleasing, but, above all, it will last a long time, providing protection from natural conditions and prying eyes. It is better to entrust the construction of the fence to professionals, but you can do it yourself. To do this, study the action plan and start working.
Technical equipment
The first thing you need to think about before building a brick fence with your own hands is what tools are needed for this? Sample list:
- container for mixing mortar or concrete mixer
- shovels and buckets
- Master OK
- cement, sand, water
- bricks
- roulette, level, rope
- hammer, fittings, grinder
To lay bricks we need cement mortar. It's not difficult to prepare it yourself. Mix cement and sand in a ratio of 1:3. Add water to such a consistency until we create a thick viscous substance. At the discretion of the builders, a plasticizer can be added to the solution. It extends the shelf life and strength of the masonry.
If you don’t have the desire or time to tinker with the solution, you can buy a ready-made one. This way you will save time, but not money.
About finials (caps) and fence parapets
Caps for protecting the masonry of brick fence supports
Here it is, your first DIY brick pillar. It is perfectly smooth, with seams of the same width, made according to all the rules - a sight for sore eyes! In order for the pole to remain that way for many years, the final touch is needed - a top (cap). The intake hood performs several functions at once:
- Protects the brick from excess moisture, which will destroy it when frozen.
- Protects concrete and metal base pipes located in the middle of the column. If they are not protected, then during rains the concrete will gradually crumble, and water, accumulating in the resulting depressions, will sooner or later reach the metal base.
- And finally, the pommel gives the post a more attractive, finished look, serving as its decoration.
For brick pillars, metal caps are usually used, the size of which is selected so that they protrude several centimeters beyond the boundaries of the pillar. When choosing them, give preference to products without rivets, with well-processed tight joints that can provide reliable protection. In addition, the following requirements apply to intake hoods:
- resistance to precipitation;
- sufficient angle of inclination to prevent moisture accumulation;
- Possibility of reliable and accurate fastening to the pole;
- the presence of ventilation to prevent the formation of condensation.
If the spans between the pillars are also made of brick or concrete, then the top of the wall must be protected with special parapet covers.
How many bricks do you need for a fence?
At the stage of designing a fence in Vologda, we recommend calculating the amount of material that will be needed for the work. This parameter depends on the type of masonry:
| Masonry | Brick size | Quantity including mortar joints, pcs. |
| In 2 bricks | single one-and-a-half double | 204 156 104 |
| 2.5 bricks | single one-and-a-half double | 255 195 130 |
Each type has its own nuances:
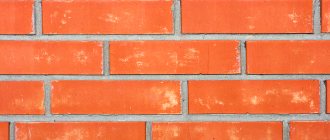
- Red brick requires processing after completion of work - plastering. Although recently this operation has not been performed, based on the design ideas of customers.
- Facing does not require finishing and allows you to create various finishing options.
- Frost-resistant brick allows you to build a high-class fence and increases the longevity of the fence several times.
The choice of brick is primarily based on the financial component and weather conditions of the area.
Brickwork calculation tables
1/2 brick
| Single (250x120x65) | One and a half (250x120x88) | Double (250x120x140) | |
| Thickness, cm | 12 | ||
| Quantity (excluding mortar joints) | 61 | 45 | 30 |
| Quantity (including mortar joints) | 51 | 39 | 26 |
1 brick
| Single (250x120x65) | One and a half (250x120x88) | Double (250x120x140) | |
| Thickness, cm | 25 | ||
| Quantity (excluding mortar joints) | 128 | 95 | 60 |
| Quantity (including mortar joints) | 102 | 78 | 52 |
One and a half bricks
| Single (250x120x65) | One and a half (250x120x88) | Double (250x120x140) | |
| Thickness, cm | 38 | ||
| Quantity (excluding mortar joints) | 189 | 140 | 90 |
| Quantity (including mortar joints) | 153 | 117 | 78 |
In 2 bricks
| Single (250x120x65) | One and a half (250x120x88) | Double (250x120x140) | |
| Thickness, cm | 51 | ||
| Quantity (excluding mortar joints) | 256 | 190 | 120 |
| Quantity (including mortar joints) | 204 | 156 | 104 |
2.5 bricks
| Single (250x120x65) | One and a half (250x120x88) | Double (250x120x140) | |
| Thickness, cm | 64 | ||
| Quantity (excluding mortar joints) | 317 | 235 | 150 |
| Quantity (including mortar joints) | 255 | 195 | 130 |
The approximate amount of brick needed to build a fence in Vologda and the region is not difficult to calculate. You only need to know the total area of the planned building. Next you need to make some simple mathematical calculations:
- when laying 1 brick per 1 square meter, about 100 pieces are spent
- when laying 2, the same unit will cost 200 pieces
After we have found out how many bricks will be used for the fence, we need to calculate the consumption of the mortar.
We do this according to the table: Table of mortar consumption for brickwork
| Binder grades | Consumption of cement and cement dust, kg/m3 of sand with a humidity of 3-7% with active dust, kgm/cm2 | ||||||
| 25 | 50 | 75 | |||||
| cement | dust | cement | dust | cement | dust | ||
| 200 | 500 | 355 | 90 | 350 | 90 | 345 | 90 |
| 400 | 445 | 50 | 440 | 50 | 435 | 50 | |
| 150 | 500 | 275 | 90 | 270 | 90 | 265 | 90 |
| 400 | 345 | 90 | 340 | 90 | 330 | 90 | |
| 300 | 465 | 50 | 460 | 50 | 455 | 50 | |
| 100 | 500 | 200 | 105 | 195 | 105 | 185 | 105 |
| 400 | 250 | 105 | 240 | 105 | 230 | 105 | |
| 300 | 335 | 85 | 325 | 85 | 320 | 85 | |
| 75 | 500 | 155 | 125 | 145 | 125 | 140 | 125 |
| 400 | 195 | 100 | 190 | 100 | 180 | 100 | |
| 300 | 260 | 85 | 250 | 85 | 245 | 85 | |
| 200 | 395 | 45 | 385 | 45 | 380 | 85 | |
| 50 | 400 | 130 | 135 | 120 | 135 | 105 | 135 |
| 300 | 175 | 110 | 170 | 110 | 160 | 110 | |
| 200 | 270 | 85 | 260 | 85 | 250 | 85 | |
| 50 | 300 | 95 | 140 | 85 | 140 | 75 | 140 |
| 200 | 140 | 125 | 130 | 125 | 120 | 125 | |
Selecting bricks for pillars and material for fence sections
When choosing a brick for pillars, each developer proceeds from his personal ideas about beauty. However, here too the practical side of the issue plays a big role. Ordinary smooth facing bricks have not proven themselves to be the best in such structures.
After a few seasons, it begins to crumble and loses particles of the outer layer. This fact is partly explained by the negligence of the owners who do not cover the poles with reliable caps. Part of the blame lies with manufacturers who are unable to make high-quality material.
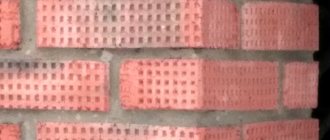
Textured brick for pillars, called “rock,” is more resistant to precipitation and frost. A compromise option, both aesthetic and reliable, is a combination of the two mentioned types of bricks (photo No. 4).
Photo No. 4 Combined masonry is an excellent option
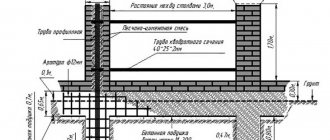
In the photograph, we see the rational combination of the fence grillage with its finishing. Brick here plays a dual role: formwork for concrete and a decorative layer.
The design of the posts for gates and wickets is not fundamentally different from ordinary sections. To install heavy swing gates made of metal, the cross-section of the reinforcement frame or post pipe is increased. In this case, the embedded plates need to be thicker and wider so that the rotary hinges do not tear them off the racks (photo No. 5).
Photo No. 5 Pillar embedded part with a plate for hanging the gate and a plate for the automation motor
The front gates of the estate are often crowned with decorative lamps, and are also complemented with automation and intercom. If you intend to do this, do not forget to place a corrugated cable with wire in the masonry.
Photo No. 6
Having decided to make brick pillars with your own hands from start to finish, decide in advance on the material for filling the sections. Among the most common options are steel profiled sheets, forging, picket fences and unedged boards.
The most expensive, but at the same time the most elegant option is forged grilles (photo No. 7).
Photo No. 7 Forged gratings on brick pillars
The combination of brick with natural stone and forging is no less aesthetic and durable (photo No. 8).
Photo No. 8 Combined option (brick pillars + natural stone + forging)
What is good about the combination of three materials? In it, each element contributes to the overall appearance. The grille can be ordered in a minimum area. It will perfectly serve as a decorative accent.
Photo No. 9 shows a not very successful example of a combination of brick with forging and corrugated sheeting.
Photo No. 9 The corrugated sheet looks out of place in such an environment
Having opened part of the fence using a forged lattice, the owner for some reason decided to close it again by placing a sheet of flooring in the opening. The result was an absurd and strange combination.
Brick and wood are perfectly combined in any design, helping to create an inexpensive and beautiful fence (photo No. 10).
Photo No. 10 Classic version of the fence with brick pillars and a solid picket fence
A picket fence or board in a section can be mounted not only vertically, but also horizontally (using the overlapping method).
Photo No. 11 Horizontal installation of boards between brick fence posts
Metal picket fences are becoming increasingly popular. It is several times more durable than wood, and looks no worse (photo No. 12).
Photo No. 12 Metal picket fence - a close relative of profiled sheeting
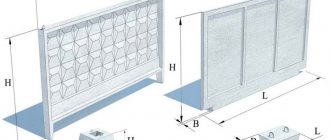
A mandatory design element is caps for brick pillars. Without them, the material will not last long. Moisture freezing in a brick will destroy it. There are two types of caps on the market – metal and concrete.
Photo No. 13
The choice of material for protective caps is purely individual. It should be taken into account that the metal on the pole will last longer than concrete, which is less resistant to frost and moisture.
Design
At the beginning of work, you need to decide on the dimensions of the building: height and width. If the fence is created only for decorative purposes, then you can choose a thickness equal to the floor of the element. In this case, the bricks are laid with the long side lengthwise. There is no need to inject anything. We build it as a whole - we place the product with the long side across. If the fence also has its direct function - protecting the territory, then we make it 1.5 - 2 units.
Brick and corrugated fence project
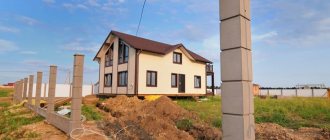
We determine the height of the fence ourselves. Usually they are built from 0.5 to 3.5 m and above.
To give additional stability and rigidity, brick fences are built in the form of columns with walls. The pillars are erected at a distance of 2.5 to 6 meters. The step depends on the soil and the choice of masonry. Be sure to build additional posts in the places where the wicket and gate are installed.
When you have decided on the above questions, we recommend making a drawing or diagram showing the area of the fence and the dimensions of each section. Even a hand-drawn drawing will allow you to better navigate the work when doing masonry.
Brick pillar laying
In most cases, fence posts are made of 1.5 or 2 bricks, cross-section 380*380 mm and 510*510 mm, respectively, up to 3 meters high.
It is best to do the masonry around a metal pipe, the base of which is concreted into the base of the foundation.
The presence of long metal pipes (the entire height of the post) is mandatory for the posts on which the gates are attached; for the rest, you can lay shorter pipes so that the elevation above the top of the foundation is 300-500 mm, and then you can weld several rods with a diameter of 10 mm , but for pillars that support the gate, this option is unacceptable.
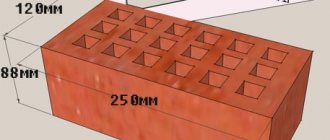
At least for the bottom 3 rows you need to use solid brick. For the remaining rows, hollow facing is also suitable, but in this case the solution should not be too liquid, otherwise it will fall into the cracks of the brick.
The masonry is carried out with bandaging (offset) - the seam of the bottom row is overlapped by the “body” of the brick lying on top. The standard seam is 8-10 mm. Scheme for laying columns in the photo:
Ceramic brick absorbs moisture very quickly, so if you hesitate a little, it will be difficult for you to “put” it in place. To ensure that the solution retains its plasticity longer, the brick is dipped in water for a few seconds before laying. The same maneuver makes it easier to remove excess mortar from the surface of the masonry (it is removed immediately with a dry cloth). This method of laying pillars has long been proven, but for beginners, if they do it themselves, it will be difficult for them to maintain an even seam. The work will be much more convenient and faster if you use masonry under the rod: a metal rod with a side of 8-10 mm, cut into pieces (10-15 cm longer than the size of the post).
Having laid the first row, a rod is laid on it along the edge of the brick. Fill the area with a small amount of solution, with a larger layer being made closer to the pipe. Next, moving the trowel along the rod, remove the excess, clearing the rod of the solution. But at the same time, the slope of the solution is maintained. They place a brick and level it. At the same time, the rod prevents it from settling too much, and we control the position of the other end with a level.
Then take a short piece of rod about 10 cm (for a vertical seam), place it along the end surface, apply the mortar with a trowel to the side of the laid brick, also removing the excess along the rod. Place and level the next brick. After the brick is set to the required position, the seam is pressed from above with a trowel, and the vertical rod is removed.
Other problems that may arise when laying pillars with your own hands are changes in size or “twisting”. Both defects arise from insufficient control of the vertical position of the bricks being laid.
When laying pillars yourself, very often the upper rows become much wider than the lower ones. This happens gradually, a millimeter or even less is added, but in almost every row. As a result, at a height of 2 m, the width of the column can be 400 mm or more, instead of the planned 380 mm. Avoiding this mistake is to control the size of each row. Controlling the building level alone is not enough. Basically, a household tool (yellow) is used, and it has a fairly large error. And if the level is 60-80 cm long, you simply will not see minor vertical deviations. Therefore, they additionally use a tape measure - checking each row by size, or you can make a template according to size (for example, from even planks) with which to check for possible deviations.
Laying pillars yourself without experience in such work can lead to another mistake: the edges of the pillar can shift, while the pillar “twists” around its axis - try attaching spans to such pillars. Therefore, when laying each row, you must strictly ensure that the corners are located strictly one above the other. You can make the task easier by using two corners screwed to opposite corners. They are temporarily attached to the lower rows (with bolts or self-tapping screws in the seam) and then used as a guide, placing the bricks strictly in the corner.
And finally, another fairly common mistake made by inexperienced craftsmen is the lack of mortgages for attaching gates, gates and fence sections.
The result of forgetfulness is a very even and beautiful, but completely smooth pillar to which it is not possible to attach anything. Find out how to avoid such trouble below.
The type of mortgages depends on what the fence sections will be made from in the future. If it is brickwork, then the role of the mortgages is reduced to connecting the pillars and sections into one whole. Since there will not be any special weight load on them, it is enough to use wire loops 8 mm thick, laid in every fourth row on the side of the post to which the sections will be attached.
If the sections are made of corrugated sheets or wooden beams, that is, they will be attached only to poles, stronger mortgages are needed that can withstand their weight and additional loads that arise. In this case, metal plates are used that are welded at a certain height (or mounted in any other way) to a base post or reinforced frame, and a cut is made in the brick using a grinder in the right place.
In the future, purlins will be welded to the mortgages, and corrugated sheets, metal rods or other elements will be mounted on them.
Columns made of facing bricks must be treated with a special impregnation, which will cover it with a film and will serve as protection against the appearance of efflorescence (whitish stains) and subsequent destruction.
All is ready? Don’t rush to fasten the fence sections right away - the posts should stand for about three weeks, otherwise you can easily ruin all the previously done work.
Marking the area
To mark the area we will need: tape measure, pegs or other marks, rope.
Site marking
From the previously prepared drawing we take the dimensions of the structure and drive in pegs with a distance of 1 meter. We stretch the rope between them. Afterwards we mark the places for the posts and gates.
We recommend that you pay special attention to the marking of the corners - they must be made perfectly straight. It is better to remove all shortcomings now, because it will be difficult to eliminate inconsistencies later.
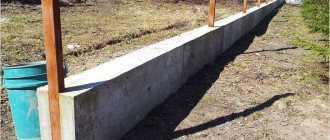
Laying the foundation
We begin the construction of a brick fence in Vologda by laying out the foundation.
We dig a trench. It is necessary to dig a hole according to the dimensions:
- width is 6-7 cm more than masonry
- depth from 0.8 to 1 m.
Foundation for a brick fence
We level the trench and clean it well. The entire fence weighs quite a lot, so digging a trench should be taken seriously. It's better to be safe than to have to do it all over again.
At the bottom of the hole you need to pour a layer of sand 10 cm thick and compact the pillow. Such a cushion will protect the fence from seasonal movement of soil layers.
Next we build the formwork. We insert fences so that after pouring the concrete solution, the visible part of the foundation remains level.
Reinforcement. We tie the rods with wire and place them on a sand bed. This design will add rigidity and strength to the foundation.
Filling. We buy a ready-made solution or make it ourselves. At the end of pouring, the surface must be leveled and pierced to allow excess air to escape. We forget about the foundation for 20 - 21 days. After 10 days you can remove the formwork. During hot weather, we recommend watering the foundation once a day to prevent cracks from appearing.
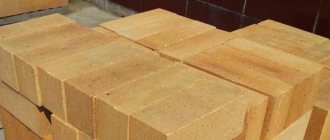
Fence made of ceramic and silicate bricks
The technical characteristics of building materials depend on the technology of their manufacture, the presence of voids in them, impurities and the compositions from which they are made.
The process of making sand-lime bricks is as follows: lime-sand mortar must be poured into a mold and “baked” under high pressure in an autoclave. As a result, you can get a monolithic strong block.
The advantages of using silicate block are as follows:
- it has excellent frost resistance and sound insulation;
- it is also environmentally friendly and safe for health;
- has a high level of wear resistance;
- has a long service life;
- silicate block has an affordable price;
- a wide variety of colors: from sand to gray.
Advantages of ceramic block:
- durability;
- high moisture resistance;
- soundproofing;
- resistance to high temperatures, etc.
A different production technology is used to produce a ceramic block. The basis for the manufacture of this building material is clay, which is subsequently fired at high temperatures. To make a silicate block you need to spend 18–19 hours, a ceramic one – 48–72 hours.
Masonry
To prevent the brick from absorbing moisture from the mortar, we recommend immersing it in water. We lay waterproofing material on the surface of the already solidified foundation. Usually they choose roofing material; dense polyethylene is also suitable.
Now we will look at the technology of constructing a solid structure. There are others, in which brick columns are first created, then piers.
Sequence of laying a brick fence
Checking the layout. We lay out the brick and make sure that each element fits on the foundation. You should try to avoid exposing chipped elements, as the strength of the structure is impaired.
Apply the first layer of solution. It needs to be made thicker than subsequent ones. This way we can compensate for uneven surfaces of the foundation.
Lay out the first row. You need to understand that the first row is the most important part of the fence. Therefore, we take wooden slats pre-twisted at right angles and, using them as a constraint, apply the solution to the creeper. Next we place the element. After the row is formed, we unstitch the seam and check the horizon.
Laying brick pillars for a fence
In a combined brick fence, an important role is played by the correct and durable laying of brick pillars. To build strong and reliable cabinets, it is important to strictly adhere to the installation technology. You can build brick pillars with your own hands or invite a team of builders. Before this, it is necessary to draw up a work plan and coordinate the drawings.
Construction of brick pillars
To form the pillars, we lay out a perimeter of 4 bricks on the surface of the foundation. We leave empty space inside to fill with reinforcement and concrete. Do this for 3 rows. Then we make walls to the same height. We lay a reinforced mesh every 3 rows. This way we give additional strength to our fence. We continue working in this order until the selected height is reached.
Schwof design
To add aesthetic beauty to the structure, we recommend decorating the seams and making them identical. You can buy a metal rod and lay it along each long row during laying, or use a special tool - a jointer.
After finishing the joints, all that remains is to protect the fence from precipitation. We put caps on the brick fence posts and attach ebbs to the wall. We make protective equipment from sheet metal or buy ready-made ones.
Building a brick fence with your own hands is quite difficult, especially if you have never encountered brickwork before. Therefore, we recommend that you entrust the construction of a brick fence for a dacha or country house to professionals.
Step-by-step fence installation
Let's take a step-by-step look at how to build a brick fence on your site. The technology for constructing a brick fence involves construction in several stages. First, the support pillars are raised, then the spans are laid, and later the walls are plastered and protected from precipitation by ebbs and canopies.
Construction of pillars
As a rule, support pillars are laid out in 1.5 or 2 bricks.
Types of masonry
The pillars are laid along the perimeter of concreted pipes or pieces of reinforcement. The height of the pillars can be any, but usually they are erected up to 2.5-3 m. The construction procedure is as follows:
- A layer of waterproofing is spread on the foundation.
- The solution is applied to the waterproofing in a layer of about 1 cm, on which the first row of bricks is installed. The masonry is leveled in all planes.
- The second row is laid out taking into account the dressing. At the same time, the solution fills the void between the masonry and the pipe.
- To ensure perfectly even seams, it is recommended to use square metal rods. They are laid out along the edges of the bricks, the resulting area is filled with mortar, and then the next row of bricks is laid. Exactly the same rods can be installed vertically to obtain beautiful vertical seams.
- All posts are laid out this way, including those intended for wickets and gates. If necessary, embedded elements are formed on the pillars for fastening spans, gate hinges, etc.
Bricklaying
The laying of the brick fence continues by laying out the spans. We lay out the first row on waterproofing. When laying the next rows, it is necessary to take into account the dressing of the seams. This will protect the wall from cracks. Before starting work, you need to stretch a cord along the future wall, along which you can monitor the horizontality of the rows. Verticality is checked using a building level.
General recommendations for masonry:
- The solution must have the appropriate consistency and not be too thick or too thin.
- Before laying the next brick, it is soaked in water. Moisture fills its pores, so the material does not pull it out of the solution. This significantly improves the quality of the masonry.
- To obtain high-quality seams, metal rods are used, as when erecting pillars.
- The spans are laid out at a given height.
- After completion of the masonry, the joints are opened. This operation can be omitted if the brickwork is being plastered.
Tip: to strengthen the structure, it is recommended to lay reinforcing mesh or wire every 4 rows.
Plastering the fence
We have figured out how to build a brick fence, but it still needs to be given a finished look. This can be done using cladding or plastering. Different types of brick fences have their own characteristics, so the finish may be different. If the fence is to be finished with clinker bricks or stone, then plastering work cannot be avoided in any case. This stage is performed in the following sequence:
- A thin wire mesh is attached to the brick wall, which serves to securely fix the plaster mortar.
- The wall is primed and wetted with water.
- A layer of plaster 1.5-2 cm thick is applied to the surface. It is leveled using a trowel and a rule.
- Within an hour the solution dries.
- The final leveling of the plastered surface is carried out.
- During the drying process, the plaster layer is periodically moistened with water to prevent the formation of cracks.
- In the future, the surface can be painted or covered with some material.
Installation of ebb tides
To protect the masonry from the effects of precipitation, flashings for the brick fence are installed. They are made from sheet metal or composite material. Caps are put on the pillars, and flashings are put on the sections. The metal is fastened to the fence using dowels. In some cases, concrete caps are used, which are held on poles due to their weight.