The emergence of decoupage technique
The art of decorating surfaces with ready-made designs originated in Europe at the end of the 15th century. It became popular and was widely used to decorate homes.
The word “decoupage” is of French origin and means “to cut out.” The technique involves gluing a pattern printed on a napkin onto any surface, glass, wood, ceramic or metal.
Many creative individuals are passionate about this art. Pictures of decoupage and samples of napkins can be purchased in specialized stores.
Decoupage courses in Moscow for beginners - school addresses
We offer you a list of decoupage courses in Moscow for beginners that will teach you this technique:
| Name | Metro | Address | Contacts | Price |
| Creative development courses in Cultural | Kursk | st. Staraya Basmannaya, 12, building 2 | +7 | 5800 rub. |
| Decoupage on wood | Belarusian | st. 2nd Brestskaya, 39, building 3 | +7 | 1500 rub (3 hours) |
| Creative workshop “Golden Hands” | by appointment | by appointment | 8(495)703-71-01 | 2500 rub (6 hours) |
| Handicraft gallery “Forget-me-not” | Nagornaya | Khlebozavodsky proezd, 7С9 | 8 | RUB 11,250 (for the entire course) |
| Art studio “OSA” | Elektrozavodskaya | Perevedenovsky lane 18, building 2 | 8 8 | 6000 rub. (4 lessons of 3-4 hours) |
What is the secret of the popularity of “application for adults”
What are the features of the technology and why it is so attractive and has remained popular for several centuries:
Firstly, the simplicity of design and the ability to decorate large areas, from small boxes to garden benches. Absolutely any surface can be decorated.
Secondly, the availability of technology. Anyone can learn decoupage from napkins for beginners. There is no need to purchase expensive materials and equipment; all tools can be found at home. This is a great free time activity for adults and children.
Little artists get acquainted and acquire skills in working with various tools, develop artistic taste and spatial imagination.
Thirdly, the ability to create an individual design in any style: Provence, modern, classicism, baroque. Moreover, one or two details are enough and the room is transformed. How easy and simple it is to do this. The answer is simple - decoupage.
Note!
DIY gifts for February 23rd - a large selection of ideas for creating unusual gifts for Defender of the Fatherland Day
What to give a 2-year-old boy - a list of the best options for an interesting and useful gift (120 photo ideas)
Papier-mâché - TOP 120 photo reviews of original products. Detailed instructions for beginners on creating beautiful crafts
Restoring an old stool
This option is especially suitable for those who live in a private house. In the utility room there is always an old stool or chair that needs restoration. How to properly decoupage furniture:
- To begin with, the product is disassembled (if it is in good condition, this need not be done). Each part gets rid of paint, fastenings are changed.
- After processing, a layer of wood primer is applied.
- After which, you can cover the surface with white, and most importantly, matte paint.
- After the product is completely dry, using the direct decoupage technique, the pictures are transferred from the napkin.
- The work is completed by applying varnish.
Note!
- Kinusaiga technique - TOP-140 photos of the best ways to create crafts using the Kinusaiga technique with your own hands + instructions for beginners
Do-it-yourself passe-partout - a master class with step-by-step do-it-yourself schemes. Making tips + photos of the best examples
Decoupage with napkins: TOP-150 photos of ways to decorate with napkins. Simple instructions for beginners at home
The design is selected based on the overall design of the room where the stool will be located.
Basics of using decoupage
How to decorate a surface in three steps.
Step 1. Find a beautiful, suitable design and cut it out.
Step 2. Place in place on a pre-treated surface, cleaned and degreased, assemble a composition from different parts and glue them.
Step 3. Cover the surface with glue in several layers. Finishing the composition with varnish.
The concept of decoupage technique
Decoupage is a technique for decorating objects by inserting a picture or drawing, followed by covering the glued composition with varnish or paint, ensuring the preservation of the created appearance of the object.
The beginning of decoupage dates back to the fifteenth century. This art originated in Germany - there are the first mentions of the technique. Cut out pictures were used to decorate furniture and create unique interior items. In Venice, elaborately carved images were used, covered with many layers of varnish.
The second flowering of the decoupage technique began in the Victorian era in England, from where decoupage as a hobby spread in the first half of the twentieth century. In Russia, there was a similar technique of icon painting, and decoupage itself was developed in the seventeenth and eighteenth centuries.
Necessary tool
To accurately apply and fix the design you will need:
- Small scissors, suitable for manicure, for cutting out small details;
- Stationery knife;
- A set of brushes for priming, painting, varnishing, smoothing. You will need round, flat brushes to adjust the motifs of the composition, smooth it, cover the protective layer of glue and varnish, thin brushes will be needed to draw fuzzy lines on the surface;
- putty. Necessary for eliminating minor defects, irregularities, dents, cracks on wooden surfaces;
- sandpaper to give the surface a smooth, even appearance and for better adhesion to the varnish;
- priming;
- White spirit, acetone, alcohol-containing liquids for surface degreasing;
- Paints, acrylic, gouache, watercolor to give a background to the decorated surface and complete the details;
- The basis. An item made of any material that is decorated;
- Glue, PVA, special for decoupage, construction glue;
- Acrylic varnish, matte, glossy, with various visual effects, “antique”, with patina, sparkles, gilding;
- A design printed on multi-layer napkins, thin rice or newsprint paper, ready-made templates, or printed on a printer.
Rules, features of work, necessary materials for decoupage
Decoupage - applique for adults. In order to get an excellent result, you need desire, a little free time and material for creativity:
- Special napkins;
- Scissors for cutting;
- PVA glue or special adhesive composition;
- Varnish;
- Sandpaper;
- Alcohol;
- Tassels.
And, of course, an object for decoration.
Using decoupage napkins
Napkins for decoupage are in greatest demand among needlewomen. They are regular paper napkins with multiple layers, usually 2, 4 or 8 layers. For appliqués, only the top layer on which the ornament is applied is used.
Napkins can be found in stores. They come in square, round, rectangular shapes, sizes 21x21 cm, 40x40 cm. Pictures differ in the intensity of the colors, the abundance of elements, and location on the paper.
Typically, decoupage napkins have four, two or one center sketch. Round ones have more decorative elements, from which you can choose different motifs and form interesting compositions.
Rice paper or napkins?
Experts who work using the decoupage technique recommend using rice paper for commerce. It has those properties that will successfully help in the future to realize the finished product.
Unlike napkins, the master does not waste time removing residues after transferring the picture. Moreover, those who work using this technique know that drawing is not always successful.
The use of special rice paper, onto which any motif is transferred, guarantees the high quality of the finished work. Main directions when it is needed most:
- Working with enamel - plates, pots.
- Working with glass - bottles, mirrors, etc.
The rice card is available at any online craft store. Therefore, if the master has already gotten his hands on napkins, he can safely use professional raw materials to make gift items. Decoupage on wood is more convenient to perform using napkins and newspapers.
How to choose the right drawing
When choosing pictures, pay attention to:
Note!
- Kinusaiga technique - TOP-140 photos of the best ways to create crafts using the Kinusaiga technique with your own hands + instructions for beginners
- Do-it-yourself passe-partout - a master class with step-by-step do-it-yourself schemes. Making tips + photos of the best examples
- Amigurumi: features of do-it-yourself knitting technique. Step-by-step master class on making toys for beginners + 180 photos
- Stretching paper. Too thin will be easy to tear and inconvenient to work with;
- The top layer of napkins should be easy to separate, have a translucent structure, due to which an organic appliqué is obtained that imitates artistic painting;
- The degree of wetting, the formation of folds, irregularities;
- One of the advantages is the availability of the material and low price.
Advantages and disadvantages
Decoupage is an excellent method of decorating interior items. Like any decor, it has its own pros and cons that determine its use for decoration.
Advantages:
- the ability to use any material;
- ease of execution;
- availability of materials for work;
- high durability of most types of decor.
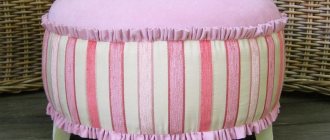
Decorative teapot
Decoupage is undemanding when it comes to the source material. Napkins, magazine clippings, and individual printouts are used as drawings. If you wish, you can cut out flowers from the wallpaper and place them on the cabinets - decoupage does not limit the author’s imagination.
Decoupage does not require any special skills or tools - all you need is scissors, an old magazine, varnish and a brush. In some cases, there is no need to carefully cut out the design, since some carelessness can add additional charm to the interior.
Varnish and paint are sold in any store. Decorating a wooden door will take no more than one 200 ml can of varnish.
On a paraffin candle
Almost all types of decoupage are durable due to varnish protection. Fragile works include those protected by other means or without protection at all. For varnished designs, the only threat is cracking over time.
Flaws:
- impossibility of application to all interior items;
- requirement for accuracy when working;
- difficulties when working indoors.
Not every piece of furniture is decorated using the decoupage technique for beginners. Step by step, with photos, we will analyze how bottles, fabric, plastic, cutting boards and other objects are decorated. Upholstered furniture or glass is not so easy to decorate. The varnish will not adhere to the fabric, and the glass will be damaged. In some cases this is not critical, but do not apply decoupage to glass in windows, since removing the varnish is extremely problematic.
Decoupage boxes
The surface for decoupage must be prepared - the old peeling layers of coating are removed from it. This applies to enamel on old furniture, which must be completely sanded.
To work, you need to be patient - delicate drawings require great care from the master when creating, since careless movement will easily tear the paper. This is critical when using thin paper.
Paint and varnish products have a specific smell that takes a long time to evaporate from the room. Considering that decoupage requires applying several layers of varnish, we recommend carrying out this operation outdoors.
Using paper
The situation is aggravated when it is necessary to sand the surface to begin work. With large sizes of the latter, a lot of dust and debris often form. This will put an end to the possibility of working indoors.
Decorating wooden surfaces
Decoupage with napkins on wood requires a certain skill and proper surface treatment. Beautiful decor will be created on a flat surface, so wooden surfaces are pre-treated.
- The surface is cleaned of branches, dirt, dust, the bumps from knots are removed with sandpaper until smooth;
- The sanded base is degreased for better adhesion of the paper to the wood, so that the design does not roll or run off;
- If necessary, seal cracks, irregularities and cover with a primer;
- Apply the picture in the usual way. The cut out element is glued onto the glued base, smoothed out and a second layer of glue is applied. After complete drying, coat with varnish.
In this way you can decorate a wooden box and make an excellent souvenir, a kitchen tray. The products can withstand wet wiping, do not fade over time, and are not deformed.
Getting ready for Easter
On the eve of the Easter holidays, a special theme arises in decorating objects, including Easter eggs. Decoupage of Easter eggs involves applying a beautiful ornament to a pre-boiled egg.
We will not use regular glue, as it penetrates through the porous shell. And for gluing, fresh, raw egg white is perfect. It is tapped a little to break up the fibers and applied with a brush to the base.
Attach the cut out picture, let it dry a little and cover the surface with protein again, but with a picture. The protein reliably fixes the decor, does not fade, does not give off odor and lasts for several days.
Glue
The quality of the adhesive material is important when working with decoupage technique. It is the glue that will allow you to preserve a thing you created with your own hands for a long time.
Glue for decoupage must have certain qualities:
- Homogeneous creamy consistency;
- Average drying speed;
- Transparent finish;
- Neutral odor;
- Reliable packaging;
- Availability of a special device for application.
Depending on various factors: quality, durability, method of decoration, you can choose different glue for creativity:
- Special glue for decoupage expands the possibilities; it can be used:
- Not only for finishing wood, ceramics, stone, cardboard, glass, but also fabric, candles;
- For decorative purposes, and dishes decorated with such glue, for example, can be used for their intended purpose;
- Not only for fixing, but also for adding gloss and shine;
- For working with gold leaf or potal;
- For outdoor work, creating decorative elements on concrete, metal and wood.
- PVA glue. In order for this adhesive to be suitable for use in decoupage techniques, several conditions must be met:
- Use PVA glue intended for construction work;
- Before use, dilute the glue with water in a ratio of 2:1.
- Glue prepared at home from the following products:
- Starch, water and sugar;
- Egg whites and granulated sugar.
There are many options for glue for creativity; at the initial stage, you can get by with a simpler product; with experience, you can afford to purchase a high-quality, expensive product.
Children's decoupage
Decoupage with napkins on cardboard is suitable for children. A figure is cut out using the template and decorated with an applique of napkins. This creative activity will help develop a child’s imagination, and handmade crafts will be useful to mother and grandmother.
You will need shoe boxes, which make wonderful boxes, large cardboard boxes, from which you can build a house for dolls with beautiful patterns and ornaments.
What you need to know before you start making decoupage
Before you start working with drawings, study the features of the fabrics and materials with which you will work.
A thick pattern for decoration looks less natural. This imposes restrictions on the use of thick cardboard and introduces its own requirements for the accuracy of work during the creation of the drawing.
Harmonious color combination
Not every drawing is located under varnish. The image must have solvent-resistant paints that will not begin to dissolve under the influence of the latter. Glossy designs are excellent, less so are images printed with inkjet ink.
Consider the combination of colors during decoupage for beginners (step by step instructions with photos below). Carefully select images for decoration, since an already fixed illustration is almost impossible to remove from the surface.
On a cutting board
Features of the design of round surfaces
Surfaces with curves and slippery glass or glazed ceramic surfaces require a special approach to the technique. New Year's bottles decorated with appliqués look very elegant.
A gift option for expensive alcohol in a retro style will pleasantly surprise friends and employees. Decoupage of bottles with napkins, just like decoupage of plates with napkins, requires a different approach to application.
Using an iron
This method can be used when decorating a flat surface. Steps for iron/glue technique:
- Apply a primer to the surface;
- On top of the primer, use a brush to coat the entire area with PVA glue or glue stick;
- Using a hairdryer, thoroughly dry the item;
- Lay out and level the napkin on a dry, flat surface;
- We use parchment paper for baking: iron the napkin through it with a heated iron;
- We move the iron from the edge to the center;
- Coat the fixed composition with PVA glue.
This is the easiest way to allow a beginner to do his first simple work using the decoupage technique.
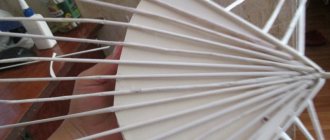
File method
We will decorate a smooth surface with curves using a file. The method has proven itself when working with thin materials, the top layer of napkins does not tear, it is convenient and easy to use, and the ability to decorate uneven surfaces. For this we need:
- Container with water;
- Stationery plastic file;
- Glue;
- Varnish.
I had an old two-tier dish dryer made in China. Over time, they stopped using it, but it was a pity to throw away plastic pallets. They are light, small, easy to use, but too unsightly. I decided to decoupage the trays so that I could use them even with guests without embarrassment. By the way, the time has come for a cosmetic renovation in the kitchen, and the idea came to decorate it in country style, using popular roses as the main theme. I hope this simple master class will be useful to home craftswomen.
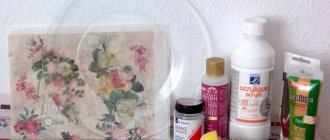
To decoupage the tray you will need:
from materials:
- acrylic white paint for primer (you can use artist paint, but we had a can of interior matte acrylic paint that we bought for renovation);
- PVA glue;
- colorless varnish, preferably water-based (they come in glossy and matte, you can use either one. I had a glossy varnish, also bought for repairs in a large package, by the way, it costs about the same as artistic acrylic in a small bottle);
- three-layer napkins with a pattern;
- a piece of fine-grained sandpaper.
from tools:
- sponge for priming (some people use sponges for washing dishes, I prefer more compact homemade devices from pieces of foam rubber on a knitting needle or thick wire);
- brushes with soft bristles (synthetic or kolinsky);
- scissors for cutting out fragments (I use regular small ones, although you can also buy special decoupage ones).
Sequence of decoupage of a plastic tray
Step 1. Preparing the tray for decoration
The tray should be thoroughly washed with dish soap to remove dirt and grease. I also had to use stronger bath cleaners first to remove limescale marks from the local hard water. The tray is then thoroughly dried. I also always wipe the surface with alcohol to remove any greasy micro-traces.
Step 2: Prime the back side
Some people decorate only the front part for decoupage of plastic trays, leaving the back side untouched, but I wanted to completely hide the cheap plastic texture, so I also painted over the back side. Acrylic primer is applied twice with foam sponges. But if the surface of the tray is very smooth, then it is better to even lightly sand it with fine-grained sandpaper first so that the paint adheres better. The first time the layer will look unattractive, don’t be scared. Rinse the sponge with water immediately after use so that the paint does not have time to dry, then the tool will serve you for a long time.
After the layer has dried for 3-8 hours (see instructions on the paint packaging), the second layer is also applied with a sponge. Now the surface looks incomparably better. The tray is left until the paint has completely dried.
Step 3. Removing excess paint
No matter how carefully the primer is applied, some of it will end up on the front side of the rim. I remove the acrylic paint with a piece of sandpaper and wipe the resulting dust off the tray.
Step 4: Varnishing the reverse side
The varnish is applied in a thin layer in two steps. Apply polish moving in one direction. Acrylic varnish has a milky color before drying, but after drying it becomes colorless. Before applying the next layer, the tray is left to dry for the time specified in the instructions. After applying the second coat, the tray is left to dry completely. You can use a small roller on a large surface. Instruments are washed with water immediately after use. After polishing, I wash my brushes not only with water, but also with soap.
Step 5: Apply primer to the front of the tray
Turn the tray over and wipe it again with alcohol to remove fingerprints. Do not neglect this, since the paint will not adhere well to a greasy base. Then we apply the acrylic paint primer exactly as on the back side, drying for several hours between coats and leaving after the second coat until completely dry.
Step 6. Surface treatment for PVA decoupage
Many people glue fragments of napkins directly onto the ground, but I prefer to first treat all parts of the decorating tray with glue diluted with water. To do this, I mix PVA in equal parts with water in any container, for example, a cream jar. I then use the same solution for decoupage fragments of napkins. Preliminary application of glue will then greatly simplify the process of securing the napkins, and much less wrinkles will form. Before the next step, you need to dry the tray thoroughly.
Step 7. Preparing decoupage fragments
In fact, we can cut out the fragments we need earlier, when we are waiting for the primer or varnish to dry. I used regular three-ply patterned napkins that you can buy at a regular store.
Many people prefer to cut out the fragments first, then separate the two white layers, since to decoupage the tray you only need a thin top layer with a pattern. It’s easier for me to first separate the layers, then carefully cut out the necessary parts. By the way, do not throw away the white parts, they can be used for decoupage work with imitation rice paper.
Please note: to decorate the tray, I do not cut out the fragments strictly along the contour. Then on white ground it will be absolutely unnoticeable, but with such preparation of fragments we get two pluses:
- firstly, they are much easier to cut;
- secondly, you can save even the thinnest fragments of the drawing.
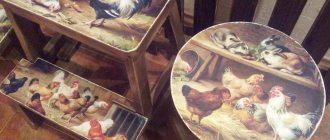
Step 8. Decorating the tray with decoupage fragments
This is the creative and most exciting stage of tray decoupage. We sequentially paste the prepared fragments, creating the composition we need. For novice craftswomen, I can advise you to first attach a fragment of a napkin to the tray and carefully iron it with a low-heated iron. In this case, the napkin is slightly fixed to the previously applied layer of glue, and practically no folds are formed. Experienced craftswomen can glue the fragments right away.
The glue is applied to the middle part of the fragment from above, and then sequentially from the center to the edges with smoothing movements so that there is no air left under the napkin. DO NOT apply a lot of glue at once, but try to stick the fragment quickly enough, otherwise the napkin will get wet and you won’t be able to smooth it out nicely. Remember that at this stage any unsuccessful fragment can be removed before the glue sets.
Gradually stick all the necessary fragments onto the tray. It is better to carefully blot excess glue with a soft cloth or white layers of napkins. Do not glue the adjacent fragment if the desired area of the pallet is wet, otherwise unpleasant folds will form. You can still decorate the opposite edge of the tray. I usually stick on large fragments first, then fill the gaps with smaller ones; this is clearly visible in the photographs.
Step 9. Varnishing the surface
The varnish is applied in two layers in the same way as was done on the back of the tray. Wait until the glue is completely dry before applying. The first layer is applied with light, careful movements, with light brush pressure, otherwise you may cause wrinkles to form on the layer of napkins. If the varnish is very thick, dilute it slightly with water in the indicated dosage. Do not use the tray for several days to allow the initially slightly sticky layer of varnish to dry completely and adhere to the tray.
The great advantage of the decoupage technique is the fact that using the same napkins, you can achieve completely different options. For example, on the second plastic tray, I created a decor of a different style during decoupage.
Later, fragments of the same napkins were used to decorate the three remaining drinking glasses and a glass juice bottle from the set. As a result, additional items with a similar decorative pattern appeared in the kitchen. My glasses serve as vases for low wildflowers and as stands for cocktail straws or napkins. The bottle has become a very convenient vase for small bouquets or flowers on thin stems that rise above it in the shape of a ball.
As a result of decoupage of trays, glasses and bottles from scattered inexpensive items, the result was quite a decent set of kitchen accessories in the same decorative style. Now there is no shame in storing transformed things even on open shelves. Perhaps it makes sense to think about what else you can decorate with the same napkins for an updated romantic kitchen in a country style.
©ultradizz.ru Author of the master class and photographs - Triny
Step-by-step instructions for applying an image to a rounded surface
Step 1. Select a design and carefully cut it out. Place face down on file.
Step 2. Pour a little water so that the napkin is completely wet and floats freely. If necessary, use a brush to straighten the edges. The picture should be smooth, without folds or curled edges.
Step 3. Carefully drain the water, holding the picture and applying it to the surface to be decorated. Press well, drain the water completely and smoothly tear off the file. Using a dry flat brush, smooth the image, smoothing it onto the glass surface.
The surface of the bottle and plate should be degreased beforehand. If the design drags behind the file, press the file with the design again and try to slowly remove the plastic sheet.
Step 4. Coat a tightly fitting image without air bubbles with glue from the middle to the edges. There is no need to wait for the napkin to dry; glue it immediately.
Step 5. After the glue has completely dried, the product is varnished. Apply at least 6-8 layers of transparent acrylic varnish with a glossy effect. Experienced craftswomen advise covering smooth surfaces with varnish in 100 layers, then the decorated product will certainly preserve the design for a long time.
We eliminate flaws
Even experienced craftswomen have misfires, but don’t worry, they can be easily corrected or prevented. If you are decorating a product with small fragments of torn napkins, then smooth the still damp paper with your fingers or a wet brush, this will help prevent creases when drying. Noticed uneven color in the background? No problem! Feel free to dilute the paint with water to the desired shade and correct this error. Do any bumps or unevenness appear on the dried work? Gently sand the work with a fine abrasive and cover with several layers of varnish.
If there are not enough details at work, then acrylic paints and thin brushes will come to the rescue.
The next step is to decorate the edges of the finished product. Some people prefer to paint them with paint to match the background color, others with dark contrasting paint, and brave needlewomen wrap the edges of the napkin onto the sides.
After this, you should thoroughly dry the product; the process can be speeded up a little with a hairdryer, but keep the unit at a great distance from the work, constantly change the direction of the air flow so that the product dries on all sides.
After this, it is worth leaving the work overnight so that all layers firmly and surely adhere to each other.
Important! Remember that half of the mistakes can be prevented with proper technique and preparation of the work surface.