Handy materials for work
In fact, if you look around and examine the contents of your pantry, you will find a huge collection of useful things:
- Old clothes made from natural, synthetic and combined fabrics.
- Leather belts.
- Metal, glass and earthenware.
- Broken toys.
- Wooden pallets.
Schemes for creating crafts from scrap materials may be useful in your work.
Hallway hangers
It is impossible to place a full-fledged wardrobe for outerwear in a small hallway. You have to be content with a wall hanger with hooks. And here you can get creative so that from the very threshold the guests understand that they are lucky to meet extraordinary people.
Fork hooks
Twig hooks
Hanger made from old skis
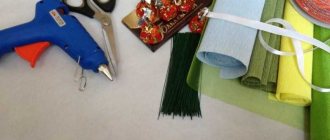
Auxiliary materials
For high-quality and successful work you will need the following set of tools:
- Paints (acrylic) and clear varnish.
- Sandpaper.
- Special compositions for impregnation (antiseptic, antipyretic and antifungal solutions).
- Durable glue.
- Fittings and fasteners.
Skills in working with an electric jigsaw and screwdriver will be a big plus.
Crafts for the interior
Original and practical products made from scrap materials can become a real interior decoration or a useful accessory. Cutting and sewing skills, knitting, design taste and sense of style will be useful for work.
The best solution would also be to pre-prepare schemes for making crafts with your own hands.
Ideas for the home: various little things with your own hands
The atmosphere and comfort in the house is created not only by global things. Many small things that can be made from scrap materials bring no less and, sometimes, more pleasure and benefit. You use them often. And after a month you don’t look at the same paintings or mirrors anymore. A number of ideas for turning your home into a cozy and comfortable place have been collected in this section.
Opportunities are a sea
Shoe tray with pebbles
Owners of private houses have to go out into the yard regardless of the weather. That’s why shoes don’t always shine clean. Many people get out of this situation by placing a rubber mat near the door or by placing a rubber tray. Yes, the dirt does not spread, but the view is not the most attractive. You can significantly improve the situation by simply pouring pebbles into the tray. The water will flow over the stones, the drips on them will not be visible, and neither will the dirt. Periodically, you will need to soak the pebbles in water and rinse them to remove accumulated dirt, but pebbles are a reusable material and they simply cannot be “erased off.”
Currently reading: Panels made from natural materials: amazing ideas for DIY masterpieces, photos for inspiration
Ideas for storing shoes at home
If there is no rubber tray, you can knock down a wooden box with a side height of about 10 cm. Pebbles can be found on the banks of a river, sea, etc. As a last resort, you can find it in designer stores or where aquarium products are sold. But buying this “charm” is expensive.
Scarf storage
Every family usually has a lot of scarves, neckerchiefs and other similar items. How to store them so that they don’t take up a lot of space, are always at hand, and don’t get wrinkled? There are several life hacks that you can easily do yourself.
First. We attach metal rings to a regular hanger. Rings can be plastic or metal. Both can be found in departments selling cornices. There are all sorts of them, in shape, size and material. Rings can be nailed to wooden hangers/hangers/trempels, attached with staples, or glued or tied with thread to plastic hangers. And that’s it, you have a device for storing scarves.
Ideas for the home: how to store scarves
The situation is a little more complicated with the second device. You will need a treated board and a dozen or two clothespins. We attach clothespins to the bar with one side. They can be nailed, screwed, or glued. You will also need hinges to secure the structure itself to the wall.
Another homemade scarf hanger
Both ideas for the home are practical, require a minimum of money and a little time. And evaluate the benefits yourself. Especially in the spring-autumn period, when there are a lot of scarves, scarves, and flower pots on the shelf.
Instead of a bookshelf
Bookshelves are a good thing, but they are not appropriate everywhere, and good copies cost a lot of money. But books need to be stored somewhere. The solution is metal staples. When installing them, the lower book serves as a support for 4-5 pieces, which are simply stacked on it.
Book holder - everything ingenious is simple
The disadvantage is obvious - the lower book is inaccessible. The solution is to put the most unpopular or unnecessary one down.
Holders for keys and other small items
One of the biggest problems is where to hang the keys so that they can be quickly found, and also instantly hung or removed. One of the good options is a magnetic board, but where to look for it is a question. But you can make funny holders from tennis balls. They are cut to about a third of the diameter. That's all. The holder is ready. It just needs to be secured somewhere. You can - on the wall using nails, you can attach several pieces on a separate board, and then attach the board itself to the wall, cabinet, etc.
Instead of a key holder - cute faces
You can make such a holder for small items in a matter of seconds. Look longer for tennis balls. And to make it even more interesting, eyes are glued to the ball. It turns out to be such a cheerful smiley.
Basket made of plastic bins and clothespins
Every household is full of plastic food containers, but ideas for the home using them are rare. We found one such option in which the hero is a liter mayonnaise container. In principle, any can of large diameter and small height can be used. Otherwise, the “basket” will be inconvenient to use.
Waste into income - a basket made from a plastic can
Using universal glue, we glue the containers with clothespins. When the glue has dried, coat the surface with varnish or wood oil. We cover the inside with a cover made of cotton or linen. We make it a little longer than necessary so that we can hide the unsightly edge behind the lapel.
We make the handle from steel wire with a diameter of 3-4 mm. We bend an arc from it. We make a loop at one end, and in the side, using a nail heated over a fire, we make two diagonally located holes (one opposite the other). We thread the formed loop on the handle into one hole. We bend the wire on the second side, thread it through the second hole, and then form a loop. We decorate the handle with hemp rope. You can also make decorations for a basket from it. If you know how to weave macrame - great, no - a regular braid woven from several threads will do.
Stand for a sofa or chair for cups/glasses/newspapers
Sipping tea in your favorite chair is a great idea. But there’s nowhere to put the cup, the phone always falls between the seat and the “bytsy”. The armrests of modern models are soft, you can’t put anything on them. So smart people came up with the idea of making a stand for cups/glasses (pictured). An extremely simple and very convenient thing. Few ideas for your home will bring you more pleasant moments.
A very convenient thing. Stand for a chair or sofa for a cup or glass
You will need three boards with a width of at least 25 cm. They are knocked down in the shape of the letter “P” (the connection can be strengthened using carpentry corners). The height of the jumper is slightly greater than the height of the armrest; the table should protrude no more than 1/3 of the width of the seat, otherwise you simply will not sit in the chair. The structure is placed on its side, the lower part is pushed under the chair. It serves as a stop and prevents the structure from turning over. To be sure, make the lower part much longer than the “table”. Also, for mobility, you can install wheels, but do not forget that the legs of modern furniture are low and the wheels need small ones, and they will have to be attached from the side. Otherwise, the stand simply won’t fit under the chair.
Where to hide dog bowls
Dog owners know how difficult it is to find space for their dog bowls. Dogs living in an apartment or house are usually fed in the kitchen. There they are given bowls. But they are needed for half an hour a day, and then they get underfoot on the floor all day. The problem can be solved, and elegantly. We place the bowls in one of the drawers. If they were needed, they opened the box and poured in food. Feeding is over - the bowls have been washed, put back in place, and the drawer has been pushed back. Everything is perfect and does not bother anyone.
Where to put dog bowls
This idea will require a little modification to the drawer. A small section bar or corner is placed around the perimeter. A rectangle of the required size is cut out of plywood, chipboard or other sheet material. We cut holes in it for the bowls, then paint (if necessary). That's all, the idea has been implemented. All that remains is to train the pets.
Idea for storing slippers
In any house or apartment with two or more inhabitants, slippers always get lost, confused and disappear somewhere. One of the interesting ideas for solving the problem is such pipes/holders for slippers. Each pair has its own pipe. Order is guaranteed.
The pipes can be made of stainless steel, or they can be cut from large diameter plastic pipes. You just need to process the cut well - so that it is comfortable and beautiful.
Cushion cover made from shirts
From old shirts that cannot be repaired, you can sew interesting pillowcases for sofa cushions. An extremely positive point is that the textiles already have patterns and color compositions (large or small checks, variegated patterns, solid colors). Operating instructions:
- The master needs to take measurements of the pillow.
- The next step is to prepare patterns or a template according to the obtained measurement results. Be sure to leave 2-4 cm for the seams. The cover should fit freely on the pillow.
- The parts are cut out using the templates and sewn together with the wrong side out.
- Turn the product right side up.
The edges of the pillowcase can be decorated with decorative hand stitches (for example, using rough stitches and thick yarn).
Crafts for phones
Mobile phones, tablets, laptops and other electronics have long become an integral part of our lives. But progress has not yet reached such heights that it works smoothly without recharging or connecting to the mains. As a result, our houses are tangled with wires, which not only create interference, but also do not look aesthetically pleasing.
This problem can also be solved with the help of simple DIY devices.
Charging point
Several devices can be charged simultaneously in the house. In order not to look for a free outlet or trip over wires, you can make a compact charging point for all devices from an ordinary shoe box.
It needs to make several holes in the front wall to output the “tails” of the charges, and one in the back for an extension cord with several sockets. Decorate the box as you wish.
Charging point
Hanging case
If the sockets in the house are located high, you can get rid of the appearance of hanging wires using a hanging case made from a container for shampoo or household chemicals of a size suitable for the phone.
Step 1. Cut off the neck of the bottle, leaving a pocket for a phone with a high back wall. We cut a hole in it in the shape of the charger.
Marking and cutting along the line
Step 2. Wash the resulting cover to remove chemical residues and wipe it dry or let it dry.
Step 3. Use fine sandpaper to sand the cut edges and erase the text and drawing from the surface.
Sanding
Step 4. Decorate the case in any desired way: paint, cover with fabric, use decoupage techniques, etc.
Decoration
The result of the work is in the next photo.
Photos before and after
Fast, easy and practical.
Applications from broken toys
Empty walls in the living room can be decorated in an original way with applications from old children's toys. Any figurines will be useful for work: giraffes, horses, elephants (home safari collection).
Note!
- DIY military crafts step by step: 150 photos of the best craft ideas for children for school or kindergarten
- DIY crafts for May 9 step by step: 150 photos of the best crafts for Victory Day
DIY crafts for February 23rd step by step: master class with photos and descriptions of how to make crafts for Defender of the Fatherland Day
Before starting creative activity, you should prepare a wooden board as a base, glue, a sharp knife, and acrylic paints. Instructions for creating crafts from scrap materials:
- Trim the backs of the toys along the pre-drawn line.
- Paint the wooden base.
- Glue the prepared figures on top of the wooden plate.
To create an interesting visual effect, animal appliques can also be coated with paint and acrylic varnish. Crafts made from improvised materials can become a creative assignment for school.
Crafts for the kitchen
The kitchen is a place where the family gathers to enjoy communication and delicious food. Therefore, I want to make this room homey and cozy. A variety of textiles will help with this. They can be:
- napkins;
- towels;
- potholders;
- apron;
- funny amulets or dolls for a teapot;
- pillows or chair covers.
All of them are made quite easily from old T-shirts, jeans and scraps of fabric left over from previous sewing.
Manufacturing techniques can be very diverse: cross stitch or satin stitch, patchwork.
You can knit a cute thing from leftover wool.
A thrifty owner can make a table or stools. The material can be boards or construction pallets. A variety of shelves or cutting boards will be good and useful crafts.
And an old wooden board can serve as an excellent holder for a tablet or book. To do this, it is enough to sand the previous product well, attach a small block or piece of molding to the bottom as a stand. Cut a triangle out of the board and glue it to the back as a support.
Now the board can be painted or varnished.
The stand is ready; you can install a recipe book or tablet on it to watch your favorite TV series.
You can make an excellent organizer out of several old boards by putting fabric pockets on them and securing them with superglue or small nails.
The same organizer can be made from old tin cans, painted them in a bright color and secured to the supply or among themselves. This craft will be useful for both home and garden. Old baby food jars make great spice jars. To do this, you can paint them with paints and fix the resulting image with colorless varnish, and decorate the lids with old door handles.
An interesting idea would be cute flower pots that can be placed on the windowsill and used to grow unassuming plants or herbs. To do this, just take mayonnaise buckets, glue them with glue and wrap them tightly with twine. To decorate the resulting pots, knitted flowers, coins, beads, and ribbons are used.
A good knife stand can be made from an ordinary glass jar or an unnecessary vase. To do this, you need to fill it with wooden kebabs skewers or multi-colored cereals. This kitchen decoration will be an excellent replacement for expensive store-bought stands.
Currently reading: Children's room for two opposite sexes
Jeans shoulder bag
Torn jeans should not be thrown away recklessly - they can last for more than one season, but in a different format. Using ready-made drawings or an individual project plan, the master has the opportunity to sew an original bag.
To operate, you will need to purchase accessories (zipper, button or flap), strap and handles for ease of use of the accessory.
Organizer for a child
A classic organizer for a child is absolutely uninteresting. A completely different matter is a homemade panel made from old shirts, skirts, T-shirts, on which there are pockets for keys, pens, key rings, and a notepad. No special skills are required from the master - dexterity of hands when handling a sewing needle is enough.
Note!
- DIY airplane craft: the best options for creating an airplane from paper, cardboard and plastic. 120 photo ideas
- DIY crafts for March 8 step by step - a review of the most beautiful crafts for International Women's Day (120 photo ideas)
Diaper cake for a girl - 180 photos of ideas for original diaper cakes + DIY instructions with examples of finished products
It is better to use bright rags, but do not get carried away with too toxic shades. The optimal combination of colors promotes the development of abstract thinking, memory and develops the attention of a child, especially a schoolchild.
Crafts from old leather belts
Belts made of leather or high-quality leatherette can last a long time even after they are no longer worn. The buckle is cut off from them, folded into a loop and screwed to the wall. It turns out to be an unusual, but very convenient holder for newspapers, magazines, skeins of yarn and other small items.
New life for old belts
If you fasten two such loops at the same level and insert a rectangular plank into them, you will get a hanging shelf.
Hanging shelf
Note. When attaching leather to a wall or other hard surface, you need to place a washer under the head of a screw or nail.
Pieces of leather belts will also come in handy when making a tray if it is customary in the family to serve breakfast in bed. In addition to them, you need to prepare a large cutting board or furniture board, a small piece of plastic pipe and glue. As well as a hacksaw or jigsaw, sandpaper and finishing materials.
Tools and materials for making a tray
Step 1. When using a board or furniture panel, the material must be sawn to size and sanded until smooth. You can paint it, varnish it, paint it, burn out patterns or inscriptions with a special device. In a word, the decor is at the discretion of the manufacturer.
Step 2. When the board has dried after finishing, legs made from pieces of plastic pipe about 5 cm long are attached to it in the corners. Before gluing, they are sanded and, if desired, painted in the color of the wood.
Making legs
Attaching the legs
Step 3. Cut two strips from the belt along the length of the narrow side of the tray or a little longer for ease of grip, and fasten them along the edges with screws.
Currently reading: Design of a one-room apartment: renovation project for a 1-room apartment with an area of 33 sq. m, Interiors in a modern style: a selection of photos of interior design options, tips on choosing modern finishing materials.
Tray with strap handles
Domino clock in the living room
A beautiful watch with a unique design can easily be made by the lucky owner of a domino set. To work you will need an old watch, domino parts, glue.
The elements are arranged either by the number of points on the part, or in a free order. Such crafts for the home allow you to highlight interior details.
Crafts for the garden
A summer cottage is another place where crafts from scrap materials can find their application. There are a number of requirements that must be observed when working on crafts:
- Treat all wooden surfaces with moisture-resistant solutions, and protect metal from corrosion.
- Take into account the possibility of paint fading quickly when exposed to sunlight.
- Evaluate the practical side of future products.
With the help of old unnecessary accessories you can organize an excellent recreation area, a playground for children, and a summer terrace.
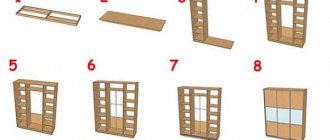
Wooden pallet sofa
For a summer terrace, a homemade sofa made from wooden pallets will come in handy. For work you need to prepare the following kit:
- Moisture-resistant solutions, antipyretic and antiseptic.
- Fasteners, metal corners.
- Upholstery (polyester or padding polyester).
- Textile fabric (it is better to use a coarse fabric that is tear-resistant).
Instructions on how to make a craft from improvised materials:
- Attach the pallets to each other according to the scheme prepared in advance: four pallets are the base, two are for the back, two are for the armrests.
- Nails and screws are used as internal fastenings. The outer contours are fastened with metal corners.
- The body of the future sofa is subjected to special impregnation with moisture-resistant solutions, antipyretic and antiseptic. This approach makes it possible to ensure the safety of new furniture, especially in a summer cottage.
Polyester is laid on top of the rigid frame, and a decorative cover is sewn on top.
Organizers for spools
Those who sew a lot accumulate an incredible number of spools of thread of different colors and thicknesses. Keeping them in a heap in a box means wasting time searching for the right reel. And in bulk at the bottom of the box it’s too wasteful.
The most convenient organizer for spools is individual pins. And it’s as easy as shelling pears to make from a board or piece of plywood and nails, hammering them in at small intervals. If such an organizer will be stored in a desk drawer, you can stop there. If it will always be in a visible place, you should think about the decor.
The most convenient spool organizer
We offer two solutions for this problem. The first is extremely simple: you need to cut out a piece of polystyrene foam the size of any beautiful box, put it on the bottom and insert toothpicks.
The second will require a more detailed description.
Step 1. On a rectangular sheet of plywood, make markings so that the distance between the points in all directions is slightly greater than the diameter of the coils. In order not to lose the markings when painting, we fill small holes with a couple of hammer blows on the nail.
Holes made
Step 2. We measure out the decor from foam or polyurethane moldings, cut the ends at 45 degrees and glue them around the perimeter. Then we paint the structure. If the decor is very embossed, it will be more convenient to use aerosol paint in a can.
Painted decor
Step 3. Drive long nails into the marked holes.
Driven nails
Beautiful and convenient thread organizer
Advice. If you are hanging this organizer on the wall, drive the nails in at a slight angle to prevent the spools from slipping off.
This is just one of the options. It can be modified or the shape of the structure can be changed by cutting out any shape from plywood.
Figured thread organizer
Swings for children's playground
Crafts from improvised materials can also be made for children. With wooden pallets and a set of strong ropes on hand, you can give your children a real swing.
In your work, it is better to use a ready-made drawing to make a durable frame and fastening mechanisms. The swing will be complemented by a soft seat made of fabric or a leather cover with filling.
DIY garden crafts
Designing a garden plot is not an easy task, but an exciting one for novice landscape designers. A variety of available materials are used: dishes, boxes, bottles, plastic CDs or DVDs.
Garden crafts from improvised materials can easily be made with your own hands, without any special skills.
Flower pots from old dishes
To create an original garden, cups, bowls, and a metal kettle will do. The surface of all items is thoroughly cleaned from rust and soot and treated for corrosion.
Acrylic paint or stencil painting are suitable for decoration. Several holes should be made in the bottom for water outflow and high-quality drainage.
Animal crafts
You can make a cozy house for your cat with your own hands. An ordinary cardboard box and a small pillow made from scraps of fabric and padding polyester will help you create it. For those who want to create a more comfortable home for their pet, foam rubber, plywood, and baskets are suitable materials.
Photos of houses and beds for pets will help you quickly decide on the choice of construction option.
All kinds of useful crafts can be easily made from almost any material, you just need to use your imagination or use existing ideas.
Birdcage planter
An original flowerpot will be made from a metal cage for animals and birds. It is necessary to install any small container at the bottom, in which holes should be made to drain the water. For such accessories, it is better to use climbing plants, which will quickly weave metal rods into a green hedge.
Crafts made with your own hands, at home using available materials, are a real godsend for the thrifty owner. Such products can become not only a stylish decoration, but also a very useful accessory.
We make accessories for home decoration
Many ideas for the home concern the creation of unique designer crafts that make our home memorable and cozy. These are the things that create the atmosphere of a home. Moreover, it is not at all necessary to spend an incredible amount of time and money on their creation. There are very simple ideas using the most ordinary, and sometimes even junk, things.
Ideas for your home are a whole sea of possibilities for improving your interior or making your life more comfortable...and sometimes both
Mini garden in the house
There are two types of miniature gardens that can be made to decorate the interior of a house or apartment: open and semi-closed. An open mini-garden is made in large flat pots and pallets. You can use miniature bonsai plants, succulents and small cacti.
Outdoor mini garden in an apartment or house
When selecting plants, pay attention not only to size, but also to the soil in which the plants grow. If the mini-garden area is large enough, it can be divided into zones with different soil acidity, but this will require physical separation, as well as delimitation using physical plastic partitions so that the soils do not mix.
Semi-enclosed tabletop gardens look amazing
This interior decoration recreates a real garden. With paths, benches, rockeries, etc. You can put up a toy house or make a pond. Whatever your imagination tells you.
Semi-closed mini-gardens are made in glass containers. Round ones look very interesting: aquariums, vases. Soil or stones are poured into them and plants are planted. But in such a limited volume, it is necessary to select plants not only by soil type, but also by the degree of illumination, watering regime, etc. It will not be possible to care for plants differently in a jar. Different varieties of moss can be grown in such containers. In fact, they are very beautiful and only in such miniature gardens can you examine them down to the smallest detail. Some of them resemble trees or shrubs, others are more like herbaceous plants. A wide variety of compositions are created from pebbles and moss, reproducing real landscapes or transporting us to a fairyland.
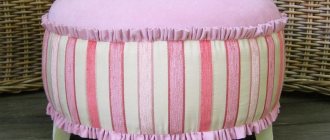
DIY sofa pillows
If you look at the photos of interiors, you will notice that in most of them, pillows add zest to the interior. With their help, a boring interior turns into a lively and memorable one. In addition, a large number of pillows allows you to rest comfortably. Such home decor ideas allow you to quickly change the “mood of the interior,” adding home comfort.
In the case of using fabrics, everything is clear - we select the color and texture to match the interior. But there are homemade pillows that exude coziness. A striking example of this is knitted pillows. A variety of patterns, colors, shapes. But the result is the same - you really want to hug them and cuddle them. They look very unconventionally.
What to do if you don't know how to knit? It's no problem. There are old sweaters. Yours or children's. They make very interesting and neat pillows. Cut the old knitted items along the sleeves, put the pillow in the half-finished pillowcase, and sew it up on both sides. That's it, the designer pillow is ready.
You can also use lace, fleecy fabrics, old jeans, even pajamas. Everything is going well. And the stranger the coloring, the more interesting the result.