6034 0 0
MesterulManole August 14, 2016Specialization: many years of experience in finishing works of residential and office premises, dachas, country cottages, etc. Hobby: cycling in all its forms
Built-in appliances look great, but how to connect them to the water supply and sewerage system?
Greetings dear readers. In one of the following articles I will definitely tell you how to choose the design of a washing machine in the bathroom, but now I propose to consider in detail the installation features of this unit.
The topic is of considerable interest, since many compatriots, due to the small size of their kitchens, prefer to install washing machines in the bathroom. At the moment, several methods are being practiced for connecting the unit to the water supply and drainage, and this is exactly what I will talk about now.
Is it fashionable to install a washing machine in the bathroom?
Displaying household appliances outside the kitchen is rarely practiced. A washing machine is a necessary piece of equipment that, unfortunately, takes up a lot of space and is unlikely to look decorative. In detached houses, you can organize a special separate room. And in which the washing machine or dryer will be located. Laundry facilities are rare in apartments. Therefore, these devices are most often placed in the bathroom. People who value aesthetics and functionality try to make them as inconspicuous as possible. Therefore, an increasingly common solution that adds beauty to the interior and has a positive effect on practicality and comfort is a washing machine built into the bathroom.
To get the most satisfying effect, it is better to consider installing the washing machine in the bathroom during the design stage. There are many great ideas that will allow you to integrate the equipment into other rooms. Installation options for a washing machine depend on the surface of the bathroom and its layout. In the case of those who have a small area or no space, discreet interior space for a washing machine is a common problem. Some even have to place the equipment in the hallway or kitchen.
Recommendations!
Plumber
Ask a Question
Regardless of the building where it will be located, be sure to leave space above and on the sides of the equipment (about 5 cm). To prevent the transmission of vibrations produced during its operation to surrounding surfaces. Also, leave a few inches of space in the back for the water hoses.
Washing machine in the bathroom - what are the dimensions of built-in models?
Washing machines in bathrooms are most often built using special models. Stores now offer a large selection of different brands, including Whirlpool, Samsung, Candy, Electrolux, Hoover, Bosch and Indesit. The equipment is available in the following sizes:
- depth - choice of models up to 55 cm or 55.5 - 59 cm;
- width - measured on the top of the washing machine, it can be from 60 cm, or up to 59.9 cm.
- the height, measured along the outer edge of the device, is from 81 cm. This allows free installation under the countertop - most of them are mounted at a height of 85 - 90 cm, so as not to create problems when using the sink.
Methods for connecting to the water supply system
The washing machine requires constant access to water and electricity. The user himself chooses how he will connect the unit. It all depends rather on skill and experience, as well as the location of the pipes in the bathroom.
Connection to a metal pipe
Insertion into the wall of a water pipe. A special mortise clamp is installed on the pipe (you can use a crimp coupling instead). The device has a small hole on top where the machine hose is then attached. Through it, water will flow into the washing unit.
Connection process:
- first you need to close the faucets, turning off the valve so that water does not run out;
- thoroughly clean the section of pipe selected for laying, removing any remaining paint, and sand it;
- The tip of the bushing is carefully inserted into the clamp and securely fixed in the area of the gasket cutout;
- attach the assembled clamp to the desired section of the pipe, secure it with 4 bolts and tighten them, turning with a wrench, until the gasket is finally attached tightly to the pipe itself;
- Through the hole inside the clamp, carefully drill a part of the pipe wall with a drill (a drill of 6-8 mm in diameter will fit there).
When finished, place a small container or rag under the clamp, now smoothly turn the valve at the shut-off mixer. Water will immediately flow out of the hole. When it has all drained, clean the hole and then fix a new tap there, at the same time checking for leaks.
When the pipes are metal-plastic, it is better to replace the usual clamp with a tee fitting. The installation mechanism is simple - just turn off the water, attach the fitting, mark the places for cuts, and cut out the desired piece of pipe. The resulting opening is closed with a fitting, supplemented with seals. Then connect a simple ball valve.
Connection to mixer
The faucet is equipped with a separate hose extension for hot water. The connection method is now quite popular due to its accessibility and speed of application. If the mixer is European, then the connection will be quick - you need to disconnect the hose (cold water), screw the tee tap onto the eccentric on top. Hole 1 – mixer hose, hole 2 – machine hose.
We recommend reading: How to choose an orthopedic mattress?
If the mixer is domestic, then, having disconnected it, you need to unscrew the eccentrics and insert a pass-through valve with its extension.
Connection to taps to a tank or mixer
It is considered the most practical and affordable installation method. The taps are mounted, turning into “pipe-hose” type connections; they are needed to supply used water either to the tank, or to the water heater, or to the mixer. It is more convenient to install the faucet in the space between the water supply pipe and the faucet from the tank. If the connection point is the water heater area, then it is better to install the pass-through valve in the space between the pipe and the main valve.
Connection procedure:
- turn off the water;
- turn off the tap (cold water);
- take a tee tap, FUM - tape, wrap it around the external thread, screw the tee in place of the previously removed tap;
- Occupy 1 hole of the tee with a mixer hose, the second with a machine hose.
The machine can be connected to an existing outlet from the riser.
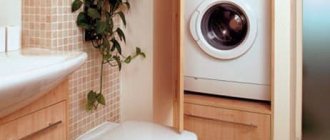
How to install a washing machine in the bathroom - under the countertop
A bathroom with a built-in washing machine under the countertop is one of the most common solutions. The choice of model depends on the size of the countertop. With a width of at least 60 cm, it is better to choose a special built-in washing machine. On the other hand, a good solution would be a free-standing super-thin model with a depth of up to 39.9 cm, or a thin model with a depth of 40-49.9 cm.
Washing machine - in the “wardrobe”
The washing machine in a modern bathroom is sometimes placed in a wooden or furniture panel that looks like a wardrobe. The offer is dedicated to owners of large bathrooms. The space above the washing machine can be used in different ways. For example, install a dryer, shelves for cleaning products, toilet paper or a laundry basket.
Methods for connecting to the drain pipe
Connecting a new machine to the sewer system is not difficult, the main thing here is to follow the instructions. The user selects one of the three options presented.
Plumbing drain
It may be inconvenient, but it is the most practical of the options. A horseshoe-shaped plastic holder will be included with the purchased machine. After installing the machine itself, the element is attached to the side and the end of the hose is threaded there. Through it, dirty water is directed into the bathtub/toilet, depending on where the holder is attached.
Pros - there is no need to waste time installing a drain.
Minuses:
- when the hose is weakly fixed, the water pressure can drop it;
- the toilet will be busy until the machine drains all the dirty water;
- the choice of location for installing the unit is limited by the actual length of the hose plus the distance to the drainage point;
- plumbing gets dirty faster.
Draining through a siphon
After installing the washing machine under the bathroom sink, you can at the same time connect its drain to the siphon located there. You need to purchase a special siphon with a pipe on the side and replace the old one with it. Then connect the end of the hose to that pipe. The input is prudently located higher, at a special angle.
We recommend reading: Engineering geological surveys and their stages
Minuses:
- Sometimes the “aroma” of sewerage leaks through the hose; it is advisable to use a water seal system;
- The siphon may not be able to withstand strong pressure, then the water, on the contrary, will pour up into the sink.
Drain into the sewer
It is considered the most reliable, but difficult option. You will need a tee with a special oblique outlet, as well as a check valve (in other words, an anti-siphon). One side of such a valve is attached tightly to the end of the drain hose, and the second is attached to the tee and further to the main sewer pipe.
It is better to place the inlet at the drain hose at an angle, directing from top to bottom.
How to make a box for a washing machine
It is best to make the box from moisture-resistant plasterboard (GVL). The machine is measured, leaving a margin of 10 cm (5 cm on the sides and on the back of the machine). We transfer these dimensions to the chosen place in the bathroom. We assemble a frame from a metal profile and cover it with plasterboard. The height of the box depends on your desire and the free space of the bathroom.
This storage box can accommodate a top loading washing machine which requires about 60cm to open the lid. If the decision is made to close all body work on the front door, ventilation must be provided to ensure air exchange in the detergent compartment. Otherwise, you must leave the body door open during and for several minutes after washing.
Recommendations from installation experts
It often happens that equipment installed independently or by a master begins to vibrate during the spin cycle. This indicates that the installation was performed incorrectly. Therefore, even before purchasing, you need to decide on a place for the machine and read the recommendations of installation specialists.
Professional advice on installing a washing machine, as well as step-by-step instructions will help you complete the installation and connection according to all the rules.
Tip #1 - prepare the conditions for installation
When choosing the overall dimensions, type of construction and technical characteristics of the model, they are guided not by their own wishes, but by the capabilities of the room in which it will stand.
Necessary conditions for the operation of the washing machine include close proximity to an outlet and water. This will help avoid lengthening of electrical cables and hoses.
They also pay attention to ease of use, as well as the aesthetic component. Problems with placement most often arise in small apartments.
Tip #2 - choose the optimal room
Most users, when choosing a location, choose the bathroom as the most suitable from a logical point of view. After all, this is where the water pipes and sewer drains are located. In addition, the washing process will be hidden from view.
When choosing a location for the machine, pay attention to the following points:
- the ability of the floor to withstand vibrations;
- possibility of laying communications over remote distances;
- during measurements it is necessary to take into account unevenness on the walls;
- the space for installing the machine must be at least 1 cm larger than its nominal dimensions.
If space is limited and the dimensions of the machine are large, you should think about placing the unit in the kitchen or hallway.
Tip #3 - The Importance of Proper Connection
The issue of correctly connecting the washing machine to communications should be treated extremely carefully. Next we will consider this process in more detail.
Connecting water to the machine
Machine washing, like any other, is impossible without water. The water supply must meet two basic requirements: sufficient pressure in the pipes and clean water.
If they are not met, a pump is installed to increase the pressure, and the water is filtered. A tap is built into the pipe supplying water to the machine to shut it off. Thus, the likelihood of leakage becomes minimal.
Electricity supply issue
A washing machine is a powerful unit. Residents of old apartments in which the wiring has not been changed are recommended to install a separate cable, since the wires and sockets installed many years ago are not suitable for connecting modern equipment. The cable cross-section must correspond to the expected load.
We discussed in detail the installation and connection of a grounded outlet in this material.
Tip #4 - take into account external factors
The ambient temperature and type of flooring should also be taken into account when installing the washing machine.
High quality flooring and flooring
There are high demands on the quality of the floor. It must be strictly horizontal, hard and even.
The floor covering will have to withstand the vibrations created by the rotating drum. If there are doubts about the quality, it is necessary to strengthen it at the installation site of the machine.
Ambient temperature
In a heated apartment or house, equipment is kept warm. During prolonged heating outages, which are often observed in country houses and technical rooms, the equipment cannot be left in place.
Washing machine in a niche
The washing machine in a small bathroom can be hidden in a recess. If it does not exist initially, it is separated using drywall. When making a recess, you must carefully consider the dimensions so that the selected model of washing machine can be placed in it. For small bathrooms, you should make the most of every space. Therefore, shelves above the washing machine are simply necessary. A washing machine installed in a niche looks natural and does not affect the overall style of the room. Enhancing the niche with an interesting tile, color or other texture will make it the focal point of the bathroom.
How to connect a washing machine to the water supply: installation nuances
There are two ways to connect a washing machine to the water supply: in one case, a full cut into the pipe is made, and in the other, a tee installed at the end of the pipeline is used. For example, on the water supply to the toilet or to the washbasin faucet. The second case is much simpler and more accessible to do it yourself - here you won’t need anything except adjustable wrenches.
This is done as follows. We turn off the water supply, find a tap that allows you to turn off cold water from the toilet or faucet, and twist it using a key. In its place we install a tee with the appropriate threads (as a rule, this is one external and two internal) and, tightly winding tow on the external thread, we install it instead of the tap. Now we connect the toilet to one branch of the tee, and the washing machine to the other.
Don’t forget to install shut-off taps on both branches - for a washing machine you will need a tap with a 3/4-inch outlet thread.
Well, that's all. We can say that the connection of the washing machine to the water supply has been completed; all that remains is to connect the prepared connection to the machine itself using a special hose that comes with the equipment. If necessary, the hose can be replaced with a longer one - you can always purchase it at a hardware store. It should be understood that the flexible water supply hose is connected to the washing machine exclusively through sealing gaskets - no tow or FUM tape needs to be used.
How to connect a washing machine to the water supply with your own hands photo
To back up the theory with practice, we bring to your attention a video on how to connect a washing machine with your own hands.
Preparatory stage of installation
Before installing the washing machine, you need to make sure that you have the following conditions and tools:
- Adjustable wrench;
- ring key;
- building level;
- fum – tape for sealing;
- Screwdriver Set;
- rags.
Preparing the room comes down to cleaning the area and leveling the floor surface. The building level will help with this. Floor slopes that exceed regulatory requirements are leveled by fixing adjustable factory feet to the bottom of the washing machine. A separate option is to pour a cement pedestal at the installation site.