Benefits of homemade rugs
Firstly, it saves money, which can be spent later on more useful or pleasant purchases.
Secondly, this is the release of rag debris from apartments and attics, from things that the owners definitely won’t need, and the Russian tradition of “what if it comes in handy” doesn’t allow throwing it all away.
Thirdly, this calm activity will help calm the nerves of yourself and those around you.
Fourthly, this is the creation of a charming view of the room, the pleasure of the completed task and the praise of relatives.
Woven carpets
Such carpets look more solid, reminiscent of durable mats. Making them will be a little more difficult, but only at first. They are made from thick threads or the same strips of fabric.
First you will have to make a small loom to create a masterpiece. And it’s not at all necessary to order it in stores. The machine for creating a woven carpet will be a wooden frame, along the top and bottom of which nails are nailed. The size of the frame will determine the dimensions of the future creation. If desired, several parts can be combined into one large carpet.
The technology for creating floor decorations is quite simple and does not require much time. Strips of fabric are attached to nails at the top and bottom, creating a rag fabric. The closer the nails are placed, the stronger the final creation will be.
All that remains is to thread horizontal stripes in the form of a braid between the vertical ribbons, as they did in labor lessons in elementary school, and secure them to the outer strips.
When the carpet is ready, carefully remove the nails and place the rug in the chosen place.
What to make a rug from
So what can you make a rug with your own hands from? It is beneficial to rely on pompoms - this is a spherical bundle of cotton, wool and even paper. But more often fabrics purchased from a store or from damaged items are used.
You can also use old leather belts, wine corks and other exotic materials. This option will definitely attract the attention of guests and increase the uniqueness of the interior.
Important: There is no need to immediately start working with the most complex examples. Therefore, we will not consider sophisticated versions with unique patterns or ornaments.
Woven round carpets
Unusual round mats can be made using a regular gymnastics hoop. To begin with, the opposite parts of the hoop are connected with strips of fabric, trying to place them as close to each other as possible. Then, from the center of the circle, they begin to weave a braid, passing ribbons first along the top of the strips, then under them. If necessary, add vertical stripes.
The resulting round carpets can be combined into one whole or used individually.
LiveInternetLiveInternet
Quote from Ryazanochka's message -
Read in full In your quotation book or community!
Do-it-yourself woven fabric without a loom.
Do-it-yourself woven fabric without a loom.
Source
What you need: A durable frame (can be from a painting). Nails (optional). The threads are thick and strong for the warp. Multi-colored threads for weaving. You can replace the threads with ribbons and strips of fabric. Thick fabric to fit the size of the rug + 3 cm on each side for the hem.
How to do it: Prepare the frame. Apply notches on both sides at a distance of 5 mm across the width of the rug. Drive in the cloves. Take the threads and pull the base for the rug quite tightly, catching the threads on the nails. If there are no nails, just wrap the frame tightly around, keeping the distance. Then you can make two rugs on both sides.
Now make two braids from air loops, hooking each loop onto a warp thread. This makes it easier to maintain the distance between the threads when weaving. One braid is at the bottom. The second one walks freely along the base fabric. It needs to be raised up as we weave. In principle, it is quite possible to do without them.
All! The preparatory stage is over! We begin to weave the side with thin threads. We simply tie a knot on the first thread of the warp and then, like in a basket, we throw the thread up and down.
Having made one row, we go back, alternating the warp threads in reverse. Those. the warp thread that we braided from below is now braided from above. The side should not be very wide - 5-6 rows. If you weave without braids, you can lubricate the edge with Moment glue. This is of course not according to the rules, but for beginners it is forgivable. To ensure that the rows fit tightly together, you can press (nail) them on top with a fork.
Next I used an old, very shabby sheet. She tore it into thin ribbons. The first “stitch” of the tape was laid along with the end of the bead thread. I wove it in the same way as the side.
I decided to make the rug striped. So, at the end of the sheet, I wove a ribbon, drawing one stitch together.
You need to make sure that the fabric of the rug does not pull together during the weaving process (I pulled it a little), to do this, you can place a piece of cardboard of the required size at the back to keep track of the edges. Or measure the width of the canvas with a ruler.
After the desired length has been achieved, you need to make a thin side on the other side. Lubricate both sides with Moment glue for strength (optional).
Cut the rug from the base. You can leave it like that. But I think it looks unfinished.
Place the mat in the center of the prepared fabric. Secure with pins in the center. Along the edges, fold the edges 2 times, going onto the mat. Sew the fabric (sides) on a machine. You can finish the edges of the rug by sewing on ribbons. It will be beautiful too. The rug is ready.
Braided carpets
Even a novice needlewoman can weave a braid from three strips of fabric. Terry fabrics are best suited for creating such a rug. They will be able to maintain their comfort and softness even when folded.
To create a pleasant creation to decorate the floor, you will need ribbons from bathrobes, towels, and sheets. The individual pieces are connected into long ribbons, which are then used to weave a regular braid.
You can lay the resulting long braid in a circle, oval, rectangle or square. To add density, individual turns are joined together by hand or using a sewing machine.
Jeans rug
We present to you a master class on making rugs from jeans.
- For one rug, you need to take several pairs of old jeans, depending on its size.
- Rip apart the jeans prepared for work along all the seams, flog the zippers, belts and pockets. Wash and iron the panels of the trousers.
- Draw them lengthwise into strips twice as wide as the planned width of the strips for weaving.
- For example, for stripes two centimeters wide, you need to draw parallel lines every four centimeters. Cut the strips along the marked lines.
- Iron both edges of each strip towards the middle. Sew each strip on both sides, retreating 3 mm from the edge.
- Cut a rectangle from the base fabric with the dimensions of the future rug.
- Sew the ends of the denim strips to one of its sides, applying their reverse side to the wrong side of the base.
- Start weaving. To do this, lay other strips across the stitched denim strips, passing them first from above, then from below, and moving them as close as possible to the stitched edge of the strips.
- Each subsequent strip must be laid in a checkerboard pattern relative to the previous one: if in the previous row it passed over a specific strip, now it must be passed under it, and vice versa.
- After completing the weaving, sew denim strips along the three remaining sides of the rug. Trim the strips to fit the dimensions of the rug.
- Prepare 4 more strips of denim. The length of two of them should be equal to the length of the rug plus the hem, and two should be equal to the width of the rug plus the hem.
- The width of the stripes should be equal to the width of the strips from which we wove the rug, plus a hem on both sides. For example, in our case it will be 4+0.5*2=5 cm.
- Hem the rug with the prepared strips. To do this, attach the front side of one strip to the back side of the rug and sew a line 0.5 cm from the edge.
- Unscrew the stitched strip, fold its other side 0.5 cm from the edge, attach the fold line to the stitched line on the front side and stitch 3 mm from the edge.
Do the same on the remaining three sides of the rug. Tuck the ends of the facing inward and hem them on the arms. The rug is ready.
Pompom carpet
If you have a lot of yarn lying around the house, you can make a soft and fluffy rug from pompoms. To do this, you will need a construction mesh or a piece of fabric as a base and many pom-poms of one or more colors.
You can make whole pictures out of pompoms that kids will love. Plain rugs are more suitable for the bedroom.
How to make a rug from wine corks
If wine is often consumed in the house, then the wine corks should not be thrown away, but folded, and when there are enough of them, you can make a rug for the bathroom from them.
You will need about 150 corks, so you are unlikely to be able to cope with your own supplies - you will need to involve neighbors and acquaintances.
Cut each cork lengthwise into two pieces with a sharp knife, arrange them cut side down in the order you would like to see the finished product (rows, checkerboard, zigzag, etc.).
Cut a piece of rubber to the size of the mat and glue the plugs with rubber cement. First, do this around the perimeter and gradually move towards the center, removing excess glue with a rag. Let your product dry thoroughly.
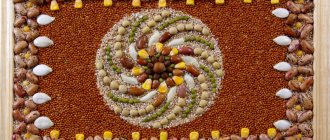
Patchwork carpets
The technique of using scraps has also found its application in home carpet weaving. Only you will have to select more patchwork scraps.
Cute rugs can consist of one piece or have several parts separated by a decorative cord. Large patches can be sewn in the most unusual way, imitating even tiles, and rugs in the shape of flowers will beautifully fill a child’s room, reminiscent of summer.
Experienced craftswomen even manage to sew entire puzzles that children will definitely enjoy putting together. To add volume, you can put a layer of padding polyester or cotton wool inside.
Rug made of tights
- Get as many old nylon tights as you can, in different colors and thicknesses. Cut off the socks and the upper dense part.
- Cut them crosswise into rings 4-7 cm wide. The denser the tights, the narrower the stripes should be, and tights of the same density should be cut into identical rings.
- Take one of the nylon rings, fold it in half and put it in the form of a figure eight on two fingers of your left hand.
- Take the second ring, also double it and put it on the same fingers, no longer twisting it in a figure eight.
- Remove each half of the first ring from both fingers. They should remain on the second ring.
- Now we put on the third double ring, also without twisting it. Remove both halves of the second ring from it.
- A chain began to emerge. It needs to be woven to the desired length. Stretch it, aligning the individual links.
- Set aside a distance from the end of this chain equal to the width of the future rug and fold it in half in this place.
- Take a thread and a needle and sew these two strips together from the wrong side.
- In the place where the first piece of the chain ends, bend it again and you will get the third row. Sew it to the second one.
- Then sew all the remaining rows together in the form of a snake. In this case, you need to ensure that the width of all rows is the same. If the chain is not long enough, it can be braided at any time.
If you lay out a chain of tights not like a snake, but in a spiral, then you can make a round rug in the same way.
Patchwork corners
Charming patchwork corners will help create the most unusual flower on the floor. To do this, the fabric is folded into corners, which are attached to each other in an expanding circle. It is better to sew such a rug on a machine; manually such an undertaking will take too much time, and you can easily skew the whole work.
In addition to right angles, the fabric can be folded into a soft semicircle or light folds, as for kanzashi flowers. True, you won’t even want to get up on the last mat. He's very handsome.
Rug made of leather belts
Thanks to a simple idea and instructions on how to make a rug, without much effort, you can economically and quickly create a unique product to decorate your flooring.
In addition, we use clothing accessories that have not been used for a long time and would be a shame to throw away. We will lean on leather straps.
What you will need:
- Let's take 10-15 natural or artificial leather belts;
- An awl or puncher for working with leather;
- A little twine or rope.
"Stone" rug
Despite its name, this flooring is striking in its softness. To create a custom carpet, you will need to make many knots with soft filling inside. The knots are sewn to the base, creating a unique carpet, most reminiscent of sea pebbles or a garden path.
This was only part of the ideas for making a home carpet. Photos of handmade rugs will show a variety of options for making this essential item in any home.
Where to begin
It is worth studying the shape, texture, and methods of making handmade rugs from photos. Then it is beneficial to familiarize yourself with the video based on the step-by-step manufacturing stages.
But the most important thing is to understand for what purpose this product is being created:
- When used near the front door, it helps keep moisture and dust out of shoes;
- For stability and moisture retention on bathroom flooring. Models with massage coating are popular;
- To improve sound insulation and insulate the floor of the living room and other rooms of the apartment or house;
- As a soft flooring for children's games;
- For wiping soles near the entrance to a living space.
But you should not miss an important component - decorative decoration, since this option is suitable for any style direction.