What types of shelves are there?
Shelves are not only almost the main place for storing various household items, collections or highlighting design. They themselves complement the design and are a reliable and spacious storage for essential items.
Fantasy has no political boundaries
One of the outdated definitions says that a shelf is a horizontal board attached to a wall, mounted in it or in a cabinet, used for storing household items (books, souvenirs or dishes). Not everything is as simple now as it once was. Shelves are not always horizontal, not necessarily attached or built-in, and not even wooden boards at all.
Based on their location, shelves are divided into three main categories:
- wall shelf
- corner shelf
- hanging shelf
Based on the main materials, shelves are divided into:
- MDF, chipboard shelves
- gypsum fiber shelves
- wooden
- metal
- glass
- plastic
- combined (at least two materials)
It is important to understand that this list is not dogma. If you have a developed imagination, you can make a shelf from an egg patch or a cardboard box. In this case, neither functionality nor an appropriate design solution will be lost.
Based on their design, shelves are divided into:
- console
- with back wall
- with side walls, one wall, without them
- horizontal
- vertical
- multi-tiered
- with sliding door
- straight, inclined, radius
Homemade shelves for household appliances
Taking into account the fact that some things in my office did not have a permanent place of registration, I decided to use waste to make homemade shelves.
To begin with, I made a sketch. For what?
- Firstly, everyday experience has taught me: it is better to think through everything in advance before making a shelf with your own hands.
- Secondly, you need to clarify the dimensions of the future shelf for these specific items (kettle and microwave oven).
- Thirdly, since I made everything from leftovers, I had to try to find the right scraps, both in size and quantity.
The result of creative efforts is shown in the figure below. Since I made the sketch for myself, I apologize to the reader for the readability of my creation. The content of the sketch: the dimensions of the stove are indicated, the dimensions of the stand for the kettle are indicated, the general dimensions of the shelf are indicated, approximately the necessary materials and parts and their quantity are indicated.
The finished shelf for the kettle and microwave oven is shown in the photo below. Compare how the actual design differs from the sketch.
Kinds
For a more detailed understanding of fastening methods, follow this material in more detail. This will make it easier to decide which type of installation to choose for your decisions.
Let's look at these three categories.
Wall shelves
Wall shelves A wall shelf is a shelf that is hung on the wall. There are two main ways to attach it. This is a traditional method using racks and brackets, which can also have a decorative appearance. The second (secret) method is used to hide all the fastening elements that serve as the bracket, axle and suspension.
Corner shelves
Corner shelves Such shelves are attached in the corner of the room to two adjacent walls, and are in turn divided into shelves for internal and shelves for external corners over 180 degrees. The fastening of such shelves is carried out in the same way as conventional wall ones, with the exception of rare cases of using the ceiling as a support. A distinctive feature is the increased labor intensity compared to the first method.
Hanging shelves
Hanging shelves This type of shelf significantly expands the possibilities of design solutions. As a rule, fastening is carried out directly to the ceiling using cables, chains and ropes. A dowel is mounted into the ceiling, into which a threaded steel hook is screwed. When drilling a hole for a dowel, a slight deviation from a right angle is allowed. This increases friction on the fastener and increases operational reliability.
Feasibility
To make an “intricate” shelf you need to purchase additional tools
If everything is clear regarding the material of the shelves and other classifications, then some difficulties may arise with the tools. Therefore, to make something extravagant, you will need to visit the construction market to purchase a tool.
The modern construction market is not only about building materials and tools. This is still an extensive service sector. Therefore, if the cost of the service is significantly less than the price of the tool, it is worth thinking about this factor and making the right, appropriate decision.
Another aspect of difficulty lies in personal skills. Of course, you can cut a wooden or plastic shelf with a regular hacksaw without buying a jigsaw. But not every craftsman can make a high-quality radius glass shelf on his own; Even gluing edges to a sheet of chipboard can be difficult.
Based on the feasibility and personal experience in the manufacture of products from selected materials, you should know that the construction market is ready to perform a number of works for little money. These are: cutting sheets of MDF, chipboard, wood, plastic, radius and straight cutting of glass, drilling holes according to customer drawings, cutting metal along the contour and others.
Understanding well what needs to be done, what to make it from, taking into account the interior of the room, you just need to approach this issue expediently and not clutter up the space with unnecessary tools. But further production and additions to the interior can be done independently by purchasing the necessary material.
Decorative and original
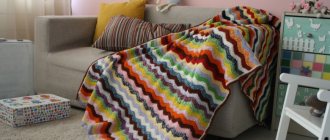
Often, shelves on the wall play a purely decorative role. They are designed to attract attention and this goal is achieved by an unusual shape, contrasting with the walls and color. You can’t bet much on it: one or two things, but how interesting they are.
Another interesting topic is glass shelves. Just one glass is not very interesting. Its combination with wood and steel is more attractive. The effects are sometimes unexpected. Glass is assembled on guides: the material is fragile and heavy, and it needs to be held. Steel can do this.
An interesting glass option. You can arbitrarily change the height between tiers
In fact, these systems are intended for creating store interiors, but they also look stylish in an apartment in a modern or loft style.
Also suitable for vintage style
What are shelves made of? Even from pipes. Metal and plastic. Do you have any samples left from the renovation? Put it to work and get a designer item, interestingly, assembled from trash.
There are examples that simply amaze you. Well, how could you come up with this?
Collecting the necessary tools
Regardless of what material you need to make the shelf, you should collect the tools that will be needed in the manufacture and installation of the finished structure. For installation you will need either a hammer drill, a drill or even a screwdriver, depending on the material of the walls of the room.
Everything you need for a good owner
You also need to prepare:
- screwdriver or drill
- jigsaw
- hacksaw for metal (wood)
- brackets (regular or decorated)
- screws (nails) or anchors
- paint (varnish) for wood (metal)
- sandpaper
- level (water or laser)
- roulette
Depending on the material of the shelves, the tool can be supplemented with the listed range depending on the requirements for the final result. If the issue becomes controversial, we return to the point of expediency.
When choosing paints, you should take into account their composition and drying time. Oil paints may be a cheaper material, but take a long time to dry, which can lead to some inconvenience while waiting for the final result. Also, wooden, chipboard and MDF boards should be kept in a warm, dry room for some time after purchase in order to evaporate moisture.
If the manufacture of a wall shelf takes place in an apartment, you need to think about the working hours and days of the week so as not to inconvenience your neighbors. This is especially true for the final stage of work - installation, during which you have to use a hammer drill and drill the walls or ceiling of the room.
Safe work measures are the key to success in any business
Unfortunately, not everyone sharpens their attention at this point in the preparatory operations, which sometimes leads to dire consequences. If such significant efforts are being made to realize creative plans, then why not slow down so that these creative dreams do not turn into a tragic reality? In addition, it is elementary and practically inexpensive.
PPE is an indispensable assistant in work
When it comes to power tools, it is worth accepting the fact that 220 Volts is not just an unpleasant shaking, but possible death. Therefore, work should be carried out in dielectric shoes, after first inspecting cords and extension cords for the presence of bare areas. It will not be difficult for anyone to use electrical tape and eliminate the danger.
When working with an angle grinder, it is wise to stock up on construction glasses with yellow filters. The cost of purchasing them will be small, but it will serve as a guarantee of clean eyes from chips. Don't ignore hand protection - gloves will not only protect your skin from cuts, but will also help avoid unwanted stains when painting.
When installing the structure, if necessary, you should use the services of an assistant. This is especially true if you need to fasten the product at a height; there is no need to buy a construction helmet.
Safety is a process, not a result Bruce Schneier
The most difficult question is what to make a shelf from.
“Classics of the genre” as the main material
If everything is more or less clear with safety precautions, then often when choosing such a variety of materials a difficult situation arises. For greater understanding and practicality, you should consider some of the features of each of them.
- Wood (chipboard, MDF) is the leading material on the market in the manufacture of furniture. Its low cost is a plus. It can be easily processed with any tool and has a long service life at low humidity.
- Metal - manufacturing often requires a welding machine. The material has a lot of weight, but it benefits greatly when combined with other materials.
- Plastic , like wood, is a fairly cheap material and easy to work with. Compared to wood, it has a significant advantage - mold does not form on it in high humidity (loggia, balcony, bathtub, toilet).
- Glass is a very stylish and fashionable material. You can very advantageously play with space in small areas of the room using mirrors. A glass cutter and a diamond drill bit are required to drill holes if necessary.
- GCR is the cheapest of the above materials. Not resistant to high humidity. Often used in the manufacture of niches in the wall, which subsequently serve as shelves.
It is natural that the choice of material for manufacturing should not be determined only by the cost of the material. Both the opportunity and the skills of the master play an important factor. This is the case when unnecessary risk will cost certain unforeseen costs in case of damage to the workpiece.
Raw materials for making shelves
When making a shelf, there will be no problem with the choice of material. Shelves can be made from:
Lumber
Traditional material, since most of the male population prefer to work with this raw material. Working with wood is very convenient due to the light weight and pliability of the material.
A wooden shelf will last quite a long time if basic conditions are met: normal humidity in the room.
Glass
Glass shelves look original and will always be in demand. To make such shelves, you will need some skill in cutting glass and a glass cutter.
Plastic
Inexpensive material, easy to handle, not subject to the formation of fungus and mold, and easy to clean. Plastic shelves are indispensable for use on balconies and loggias.
Metal
If you are planning a shelf consisting entirely of metal, then you will need a welding machine to make it. To assemble the combined product, it will be enough to use conventional fasteners.
Chipboard or laminate
It is mainly used when the shelf forms part of the room design: an alcove is installed in the room using plasterboard.
Design and purpose of manufacture
Earlier it was said that shelves are wall-mounted, hanging and corner. Each of them differs from the other in the installation method, which also affects the design. Moreover, when combining materials, the functionality of the finished product also increases. You can make a closed structure with opening doors where you can store food; with the open type, the shelf benefits from its openness for placing souvenirs or vases with beautiful flowers.
Before starting work, you need to decide on the design of the shelf
In any case, at the first stage it is necessary to understand for what purpose the structure will serve, what material to choose and what tool to choose. This sequence will help resolve the issue with the design solution and reduce the time for preparatory work.
For those who do not think about distant difficulties, near troubles await Confucius
Bookshelves
There are strength requirements for bookshelves: they can hold significant weight. Therefore, the fastening, materials and design must be reliable. Traditionally, bookshelves are made of wood, laminated or veneered fiberboard. And then fiberboard with a long span (more than 90 cm) sag over the years.
When planning shelves for books on the walls according to your own dimensions, keep in mind that the distance between the supports should not be more than 90 cm. Then even when fully loaded it will not bend. There are two types and varieties of shelves: wall-mounted and floor-mounted. Both of them can be angular.
In the simplest case, it is a board secured in one of the following ways. Some options, especially when presented correctly, look very good.
The simplest design of a shelf at the bottom of a wall for books (a secret fastening is used)
And with imagination, several planks turn into a very interesting thing, which can even be the main element of decor. Ideas for DIY are collected in the photo gallery.
Floor bookshelves can be loaded more seriously. Here the forms are different: there are racks to which shelves are attached. The highlight can be a broken or unusual line of shelves, as well as interesting racks.
Read about the manufacture of fountains (both small indoor ones and more substantial ones for a country house, personal garden or garden plot) here.
Getting started with the selected material
Tree
The working material is ordinary pine or spruce (spruce has a lighter shade). An electric grinder will be a good help in your work.
When purchasing, you should carefully examine the material. The tree should not be rotten, cracked or have many knots. At room temperature, resin can sometimes come out of such knots, which will lead to additional difficulties; The moisture content of the wood should also be taken into account.
The material must be given a smooth surface
After sawing the material to the required dimensions according to the drawing, it should be given a smooth and even surface . For these purposes, we use pre-prepared sandpaper or a grinding machine. First, rough paper No. 40 is used, then No. 80 and the final finishing is No. 120.
The chamfers on the edges also need to be slightly rounded . If after sanding the material small cracks appear, use wood putty. After the putty has dried, the restored area must also be treated with sandpaper.
Next, for installation to the installation site, you should drill holes of the required depth in the marked places. They are necessary to prevent cracking of the workpiece during the process of screwing fastening screws or self-tapping screws into the material. The diameter of the drill is chosen slightly smaller than the diameter of the self-tapping screw or Euroscrew.
After drilling, the wood is given the required shade or color. To preserve the texture of the wood, it is coated with stain or similar materials and then painted with a clear varnish (or without it).
1 Making a bookshelf structure
Labyrinth shelf
As an example, a bookshelf in the form of a labyrinth is being manufactured. After the operations described in detail, it is necessary to begin assembling the structure, having first given the sections different shades.
For reliable contact, use construction wood adhesive, additionally compressing the surfaces with at least two euroscrews.
It is important to know that conventional self-tapping screws do not guarantee sufficient strength and reliable operation of the structure.
To preserve the aesthetic appearance, the exposed glue must be wiped off. After the glue has dried, both sections of the composition are applied level at the desired location. Next, mark the attachment points with a pencil and drill holes for the dowels, then attach the shelves to the wall.
For an even cut at a right angle, it is recommended to use a miter box.
This labyrinth is an extraordinary example of creativity. If desired, you can complicate the design with additional sections and mount a real puzzle labyrinth on the wall, which also serves as an entertaining role for guests.
2 Making a decorative pattern to add coziness to the room
A shelf that also serves a decorative role
The shelf itself is made using the method described above to the required dimensions, but mounting it to the wall will be completely different. You can use chains, twine or leather straps.
If you take belts, then their cuts should be even. To attach the belt to the wall, fold it in half and drill a hole 1.5 - 2 centimeters from the edge. The same actions are performed with the second belt, the length of which is calculated individually at your discretion.
Using a building level, make two marks on the wall at a distance 10 to 15 centimeters less than the length of the shelf. Then holes are drilled at the marked points for nylon dowels. A screw is threaded into each of the belts, folded in half, which is screwed into the dowel (or driven in, if it is a dowel - a quick installation nail).
The already fully prepared shelf is inserted into the loops of the belts and set as level as possible. To prevent the shelf from moving in the loops of the belt from the reverse end adjacent to the wall, self-tapping screws are screwed through the belts.
Chipboard or MDF
Combining colors of chipboard and edges
The examples described above can be made not only from wood, but also from plywood, chipboard or MDF . The surface should be treated with sandpaper only in the cut areas. At home, chips form on the sections of the slab, which are easily painted over with special wax crayons of a suitable color after gluing with an edge.
Melamine edge is commercially available in a wide range of colors and is glued to the end of the slab using an ordinary iron. The color of the edge does not have to be the same as the color of the slab - you can combine it advantageously using the color scheme of the room.
Making a glass masterpiece
Rigid fixation of the glass workpiece in the fasteners
To make a glass blank, you will need certain skills in this specialization, a glass cutter and sandpaper or a diamond file for grinding a sharp edge. The process is quite complicated without proper qualifications, so the easiest way is to order the blank from professionals and do the rest of the work yourself. The glass shelf can be ordered in any shape.
To install a regular rectangular shape, you need to use a level to mark 2 points on the wall for drilling. Next, everything depends on the selected fastener element. You can use rigid glass fastening to the wall or simply place the shelf on chrome brackets.
Dowels are inserted into the drilled holes in the wall and special holders or an aluminum profile are attached. With rigid fixation, the shelf is inserted into the rubberized grooves of the fasteners, aligned evenly and fixed.
Creating a practical plastic shelf
1 Classic version
Plastic shelf
To make a regular rectangle or square, you will need a plastic sheet of the required thickness, depending on the expected load. Please note that plastic material is quite flexible. However, it has a great advantage over wood and materials derived from it - it is not at all afraid of moisture.
To cut the workpiece, we use a hacksaw with a fine tooth or a jigsaw. When cutting by hand, the saw must be held at an acute angle. Plastic is quite easy to machine.
After cutting, it is necessary to sand the edges and remove the chamfers. Depending on the chosen installation method, you may need to drill holes for the brackets, but to avoid this you can use the fasteners from the previous example.
Since plastic is not afraid of moisture, it is rational to use it in rooms with high humidity: balcony, loggia, bathrooms. In rooms it is practical to use for flower stands where water may spill from the pot. When installing a plastic ceiling or window sill, do not rush to throw away the scraps - they will help save on material.
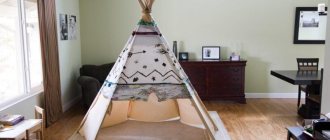
2 Fantasy goes beyond boundaries
“Advanced” technologies in everyday life
It is worth dwelling in more detail on one of these solutions and using exclusively available materials.
It’s very easy and quick to build an excellent container for towels and washcloths in your bathroom, without spending practically any money on it. It is enough to collect several five-liter bottles of drinking water and look for a nylon cord about 8 meters long. You will also need fasteners and a glue gun.
Depending on the needs, take 6-8 eraser bottles (in this case, square in diameter). The tapering section of each bottle along the marked line with a marker is cut off with a handy tool. For reliable adhesion to each other, a glue gun is used.
In the resulting block, at the outer corners, holes are made with a regular knife or scissors, into which a nylon rope is threaded. You can calculate the length of the cord visually. Using a level, two points are marked and after drilling, dowels with hooks are inserted, where the edges of the ropes are tied.
This block is universal and can be used not only in the bathroom. If desired, you can increase or decrease the number of compartments, change their shape and location, as well as the required volume of each cell.
Metal interior style
1 Antique
Forged bar bracket
When the interior requires it, you can resort to the help of a metal frame and base. For manufacturing you will need a welding machine, which greatly complicates the work. Outsourcing welding work is also expensive, however if the price is worth the purpose then it is worth it.
The shelf itself can be of absolutely any shape: flat, with sides, oval, curved, angular. At this stage, a welding machine will not be needed; You will need metal shears for thin sheet steel or a grinder for thicker material. For subsequent removal of burrs, sandpaper or abrasive attachments on a drill are used. Do not forget, as in previous examples, to chamfer, which is especially important for metal products.
To make brackets you will need a steel bar with a diameter of 3-5 mm. This section is relatively easy to bend and twist without heating. To simplify the work, the required pattern is pre-made as a template from aluminum wire or drawn on paper, followed by a blank for verification.
To attach directly to the wall using anchor bolts or dowels, you need to prepare two steel plates about 2 centimeters wide. On both sides, at a distance of 1-2 centimeters from the edge of the plate, holes are drilled for a mounting bolt or self-tapping screw.
The welded areas must be removed from slag and cleaned with a grinding machine. The finished brackets are applied to the shelf and welded to it using a corner for setting a right angle. The finished product is painted in the desired color using patina for an antique effect.
Fastening and installation is carried out in a typical way using a building level, pencil and dowels.
2 Plumbing design
A masterpiece of design thought
To apply brutal ideas, you won’t need a welding machine or effort to bend metal. In this case, only a standard plumber's kit is applicable - a gas wrench. Non-standard solutions often outperform classics due to their extravagant techniques.
For such a masterpiece you will need 10-15 pieces of pipe with a diameter of 15 mm (with threads at the ends ½ “). For fastening: a pair of screw water taps, tees, a pressure gauge, several corners and plugs with ½” thread. Then you can draw a rough diagram of the water supply unit.
The pipe sections are connected using a gas wrench and tow, then painting occurs. Tees or corners are attached to the wall with ordinary dowels. To do this, the already twisted plumbing system is applied to the wall and leveled, and the drilling points are marked with a pencil.
This type of idea will not only look good in almost any room setting. It is still not without practical use as a wall shelf for storing books or magazines. To “revitalize” the corner, it is possible to install a pot with a climbing trunk entwined around the water supply units.
To make it even more practical, you can lay an electrical cable inside the pipes and supply the structure with electricity. With such local lighting, you can enjoy reading books taken from the tube. Such a unique reading corner with a unique design.
We combine materials for creative solutions
A good solution for realizing creative ideas would be to use two or more materials. It can be wood and iron, glass and metal. For more complex tasks, it is possible to use three materials at once, for example, steel, wood and glass.
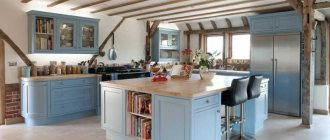
Designer touch in the kitchen
Before starting any physical work, you need to carefully calculate the parameters and only then start purchasing material and working. As in most matters, the saying applies : measure seven times and cut once.
For combined shelves, the base itself can consist of two or more tiers, chrome-plated tubes, and the back wall is made of a thin OSB sheet.
In addition to everything, you can also use lighting equipment to illuminate objects. It is possible to use spotlights or LED strips. Installation will not be burdensome with its complexity - the already familiar dowels and screws will come in handy, however, if the load of dishes is high, you should think about using anchor fasteners.
Rationality and safety
As it turns out after reading this article, you can do anything with your own hands. The main thing is to have an idea and a desire to create. Skills play a role, but are not at the forefront. Because, having a bright idea and an irresistible desire, your creation will show off in this corner.
Children don't learn Sopromat - they overcome it
All that remains is to apply the material you have read and draw a conclusion : which material is functionally applicable in this type of room. After all, if objects of different masses often fly around at an irresistible speed in a children’s room, is it worth risking the health of children who have kilograms of glass hanging on the walls in their room? And why put a rectangle of chipboard or plasterboard under a constantly flowing flower pot?
It should be understood even without physical calculations, based on life experience, that wood is afraid of moisture (except for some species of which the shelf will give off the smell of big money). Drywall is not afraid of this moisture - it simply does not have time to do it, the glass is fragile, the plastic bends. But at the same time, wood can withstand enormous loads, drywall is cheap, glass adds sophistication, and plastic tolerates dampness painlessly.
Shelves on the wall
In any room there are places on the wall where you just need to hang something. After all, most modern furniture occupies only the lower part - sofas, tables, couches. The upper part remains empty and dissonance arises: the lower part of the room is overloaded and the upper part is half empty or completely empty. These voids on the walls are organically filled with shelves.
The whole system, and the most “dead” space is used - the corner
Structurally, most shelves consist of the actual shelves and lintels. But these components are combined into so many options that it is impossible to count. A simple design is good: you can make any shelves with your own hands. Moreover, these products may be the first self-made things. It's really simple.
How and what to attach it to
It’s not for nothing that we start with fasteners. The design of a wall shelf largely depends on the type of mounting. Or maybe it’s the other way around. It depends on what to dance from...
Traditional hinges
Traditional hinges for hanging shelves
There is a traditional way - on loops. It is suitable for wood and fiberboard, any other material that is thick enough to attach. Screwed onto the sides with self-tapping screws. Then the distance between the centers of the loop holes is measured and marked on the wall (make sure it is horizontal). At the marked points, holes are drilled for the dowel, the dowel is inserted and a dowel-nail with a small head is screwed into it, which fits into a loop or bracket (a pin slightly bent upward). Then a shelf is hung on them.
Not all materials can be drilled. For example, glass shelves. You definitely can't screw anything into them. Fastenings for glass shelves are special: they consist of two parts, between which glass is inserted. Often elastic pads are installed between the holders. The bottom mount usually has a small clamping screw to secure it in place.
Fasteners for glass shelves
The most popular mount for glass shelves is called “pelican” - for its unique shape. It looks good on its own and is available in different colors. The thickness of glass that it can hold is from 8 to 34 mm. You can insert not only glass into it, but also any other material of such thickness. It just looks stylish with glass.
Notes for the home designer
- A shelf located high should not be filled with heavy objects. The higher, the easier.
- Sophistication has no place in cramped spaces. Remember that the paintings in the gallery do not fit together.
- It is better to place the most used things at eye level.
- Use contrast and the three-color rule.
- An installation of an elephant will hardly look good next to a pug. Manage the placement of dimensions correctly.
Original do-it-yourself shelves without nails or screws
[Instructions] How to make beautiful and unusual shelves on the wall with your own hands: for flowers, books, TV, for the kitchen or garage (100+ Photo Ideas & Video) + Reviews
Decor is everything
You have assembled and hung the shelves on the wall. But they look unpresentable - too empty or, on the contrary, littered with books and other small items. To make wall shelves in the interior of your room look aesthetically pleasing and eye-catching, follow these simple rules.
- The law of three colors - one dominant color for the shelf and two additional ones for the items on it. It is advisable that the color of the shelf contrasts with the objects standing on it - this way they will look more expressive.
- Control chaos with triads. Arrange items with similar colors on different shelves so that they are on the tops of imaginary triangles.
- Give more air - some things, especially large ones, require more free space on the shelf.
- Small things need a favorable background. For example, a figurine standing on a shelf next to a luxurious vase must be moved away from its spectacular neighbor and placed against the background of a small watercolor painting.
- Try to place objects that are similar in size and color relative to the imaginary vertical or horizontal axes of symmetry.
- The higher the shelf, the lighter the items should be. It is advisable to place all massive objects on the lower shelves, and light ones on the upper shelves.
- Don't forget about functionality - on a shelf located at your eye level, place the things you use most often.
A simple design is good: you can make any shelves with your own hands.
Don't be afraid to experiment. A wall shelf can be made from any material, but lumber works best. For installation, use hanging corners or brackets. And don’t be lazy to beautifully arrange books and vases on them.
Structurally, most shelves consist of the actual shelves and lintels.